Applet Settings - Server Side Permission
1.1 Permission Wizard [In Progress]
Permission Wizard displays a list of permissions templates whose lines contain one of the targets (company, branch, location). The main functionality of Permission Wizard is to generate permission sets for all selected companies/ branches/ locations. There is also a checkbox for users to check if they want to auto generate roles.
1.2 Permission Set
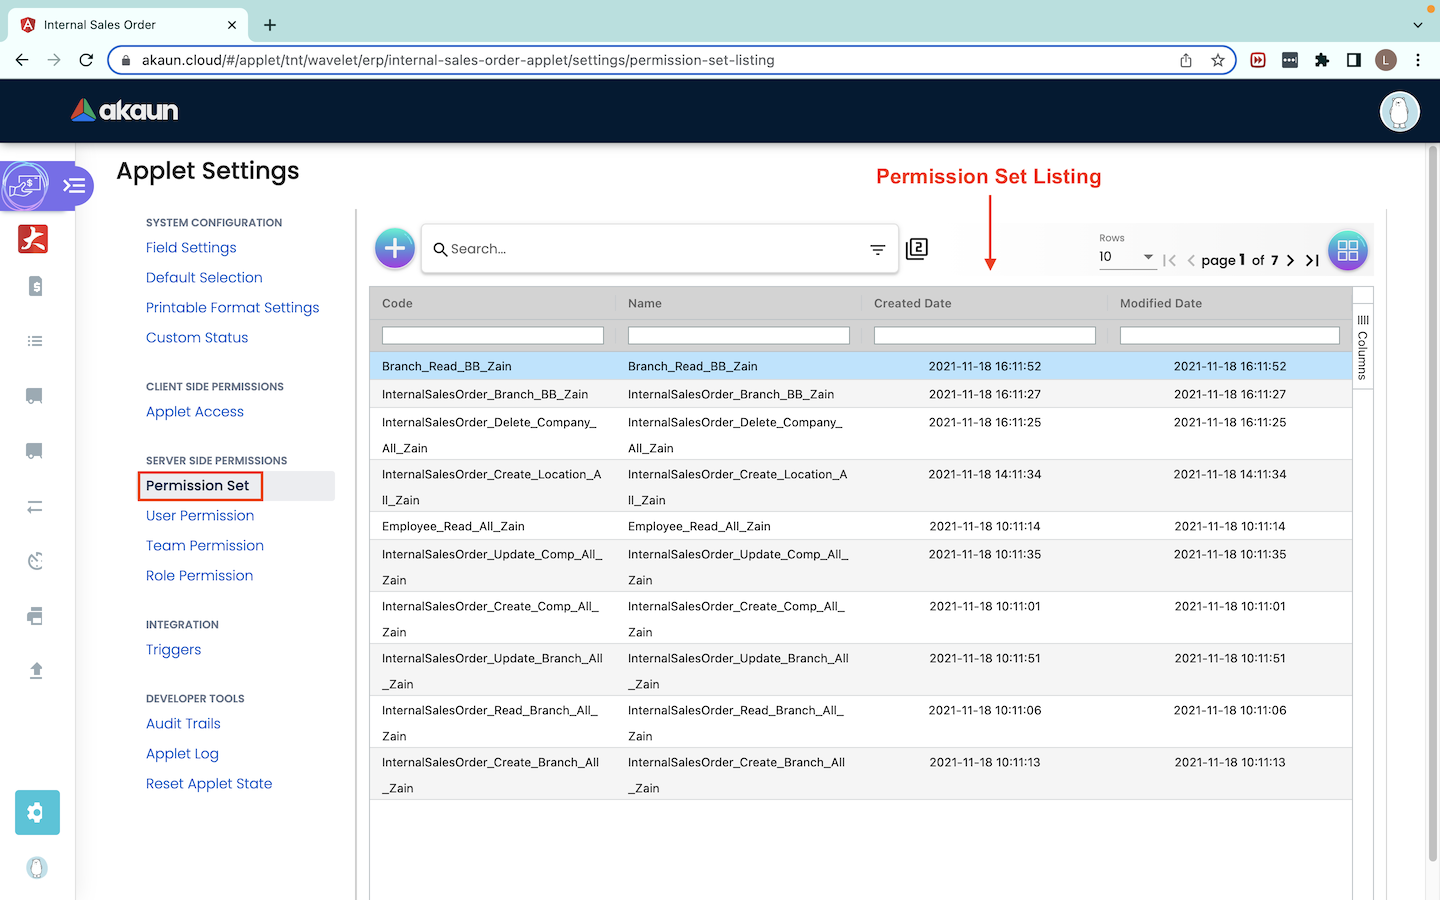
1.2.0 Permission Set Listing
Upon clicking into the Permission Set, there will be a list of Permission Set being displayed. Each Permission Set belongs to a Permission Template and can consist of one or more Permission Set Lines. Each Permission Set serves a different purpose but mostly based on CRUD operations. For example, there are different Permission Sets for branches to create, read, update and delete.
For each of these Permission Sets, there will be at least one or more permission set lines which consists of the permission lines configured to the targets. Targets can be a company, branch or location. By doing so, the targets are given permissions to perform certain operations.
ONLY users with ADMIN or OWNER rank in the applet can have Read and Update access to assign permissions to users in other ranks such as MEMBER. Users who have MEMBER ranks only have READ permissions.
1.2.1 Create Permission Set
Click on the “+” button to create a permission set.
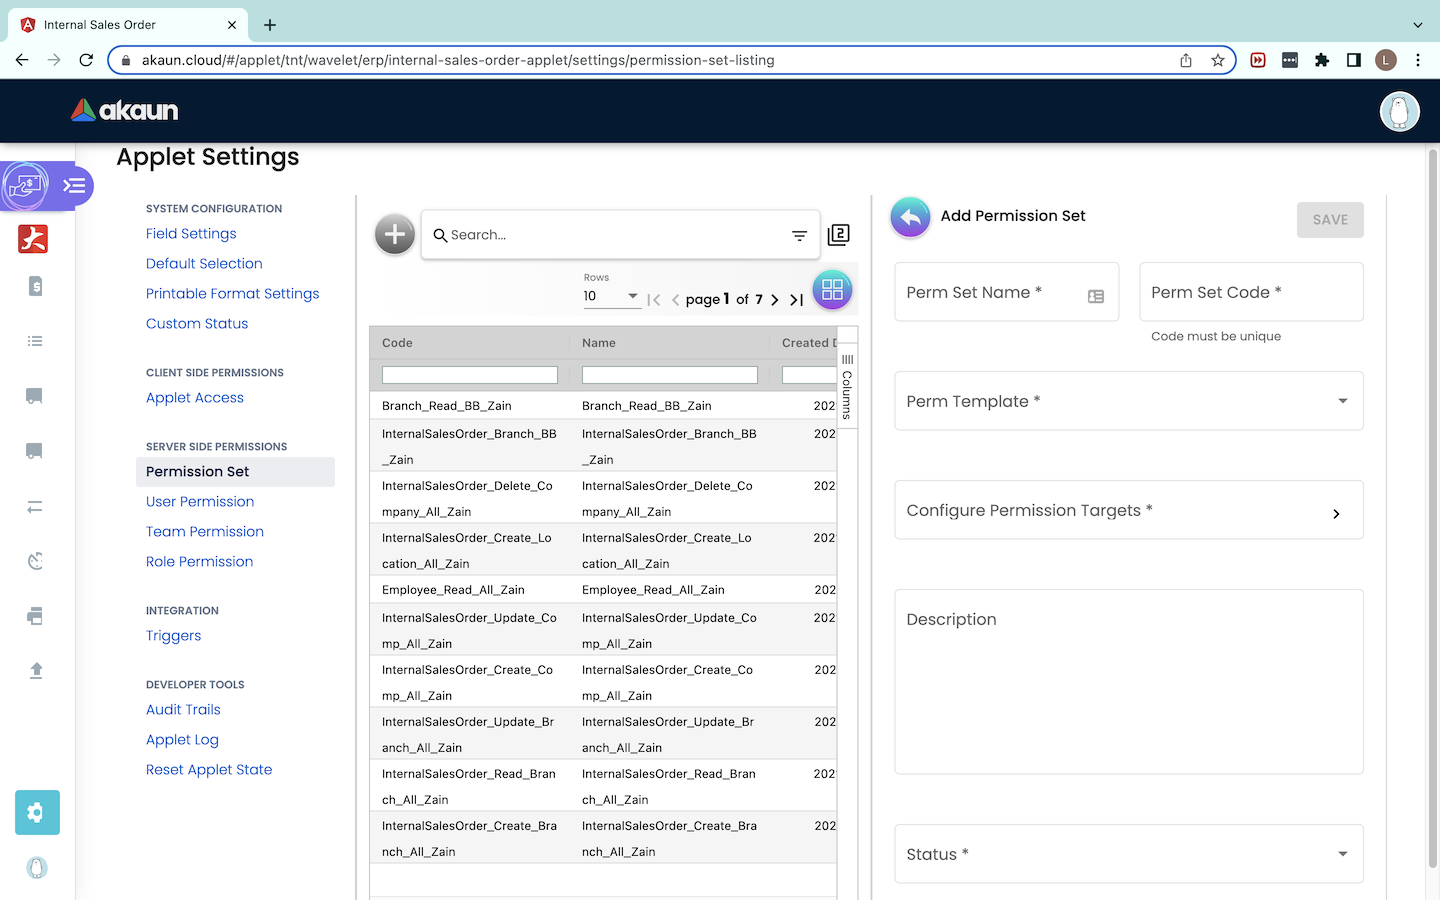
Upon clicking on the ‘+’ button, a “Add Permission Set” tab will pop out from the right.
In this tab, the details to be filled are as follow: Perm Set Name* : The name for the Permission Set. Perm Set Code*: The code for the Permission Set. Perm Template*: The permission template which contains the permission line required. Configure Permission Targets*: A new listing of permission set lines will appear for users to select. Description [OPTIONAL]: Description of the Permission Set. Status*: ACTIVE / INACTIVE
All fields with the * symbol indicates information that is compulsory to be filled up by users in order to create the Permission Set.
Permission Templates can be created in the Developer SysAdmin Applet. For more information, please refer Role Permission Listing.
Configure Permission Set Lines
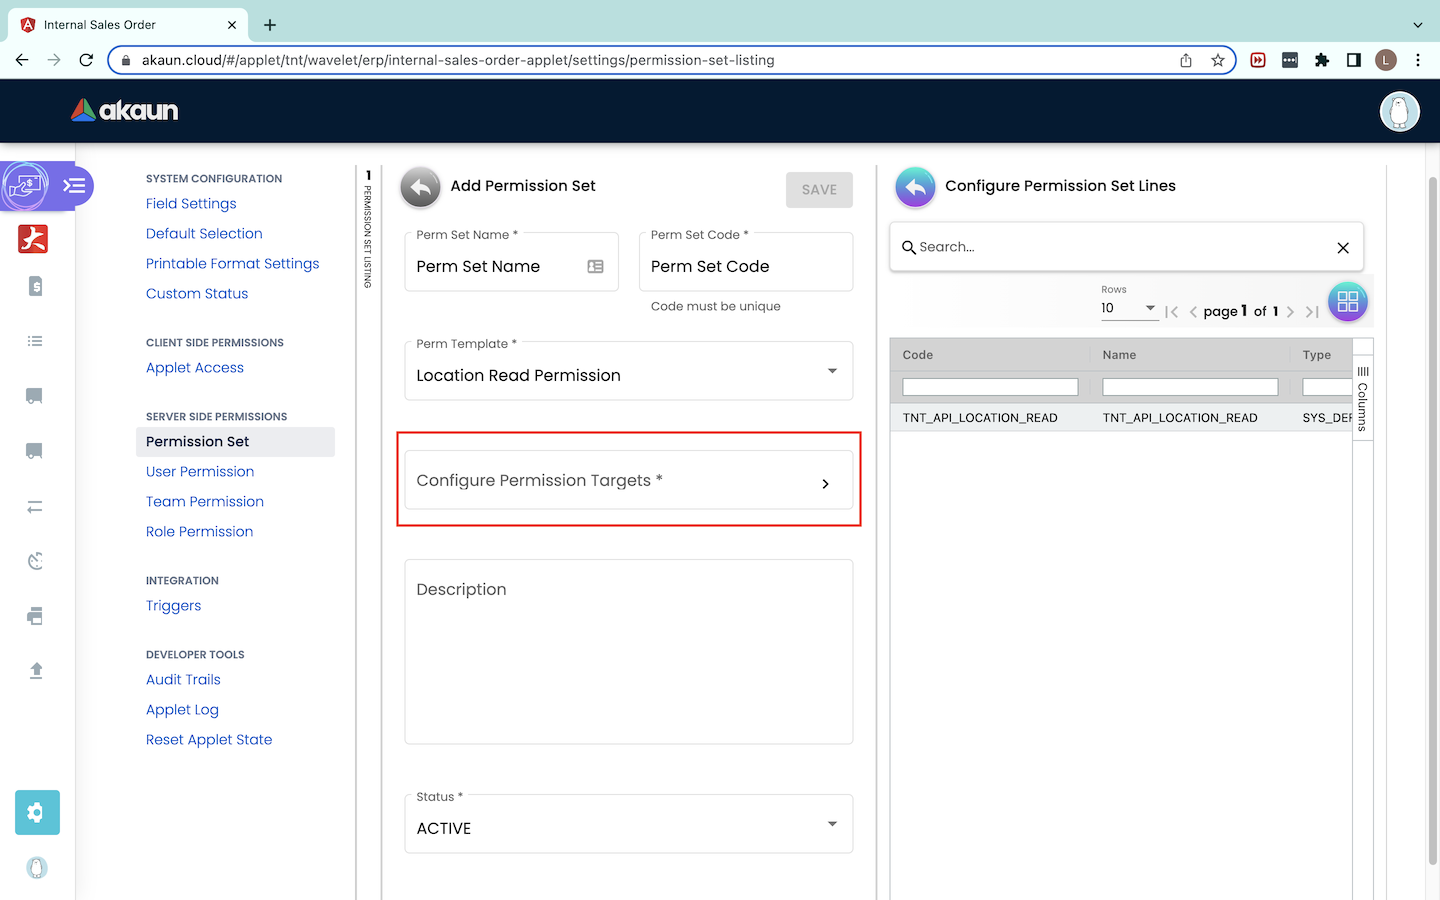
Upon clicking on the Configure Permission Targets field, a “Configure Permission Set Lines” tab will pop out and it consists of a Permission Set Lines listing.
Users can click on the Permission Set Line needed.
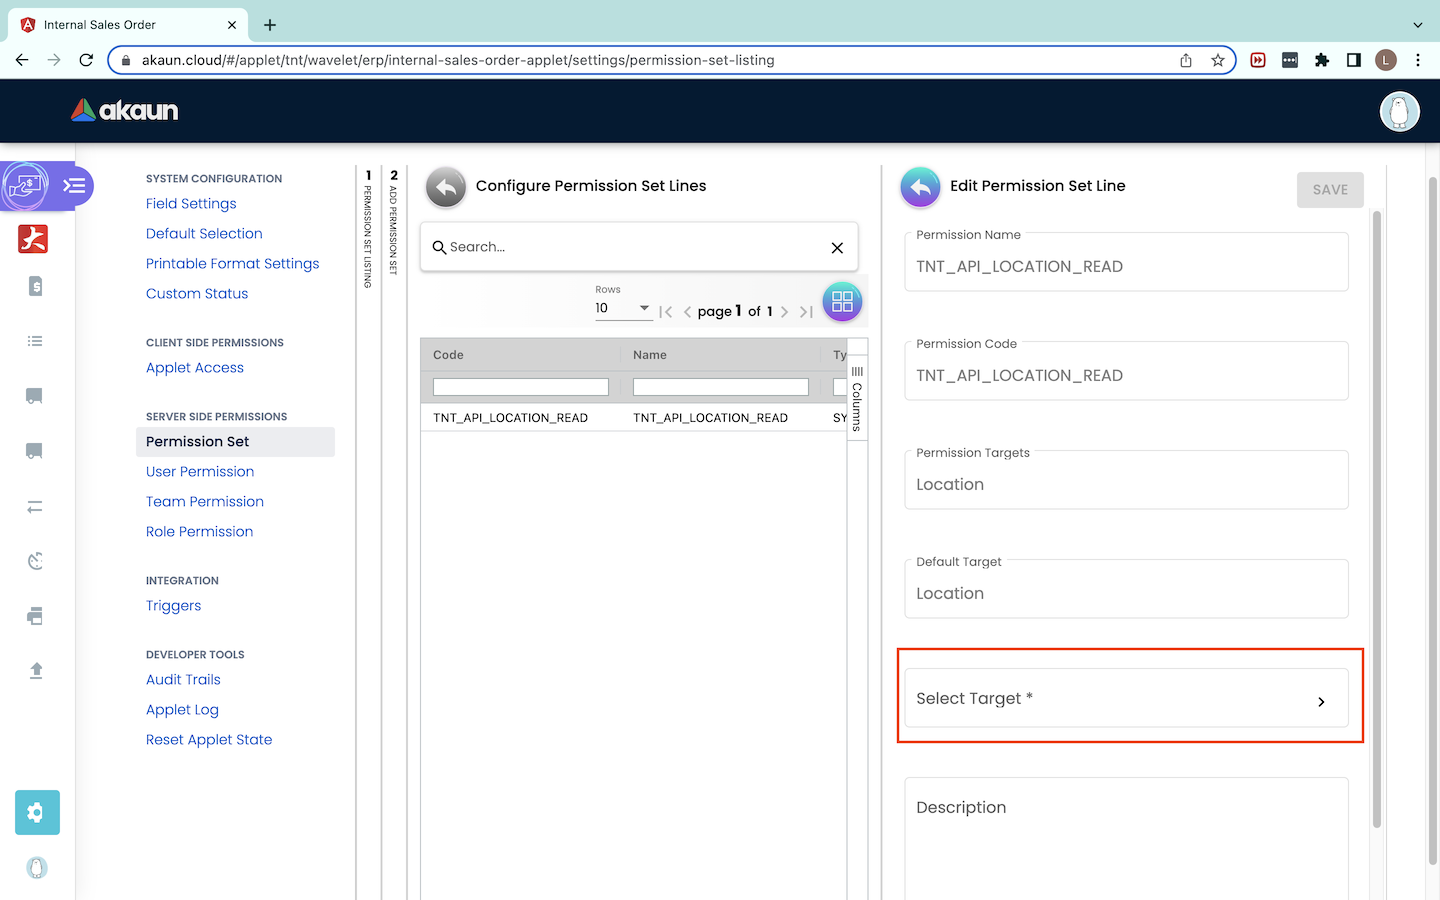
Upon clicking on the permission set line, a “Edit Permission Set Line” will pop out and users will need to click on the “Target” field to select a target.
Adding a Target
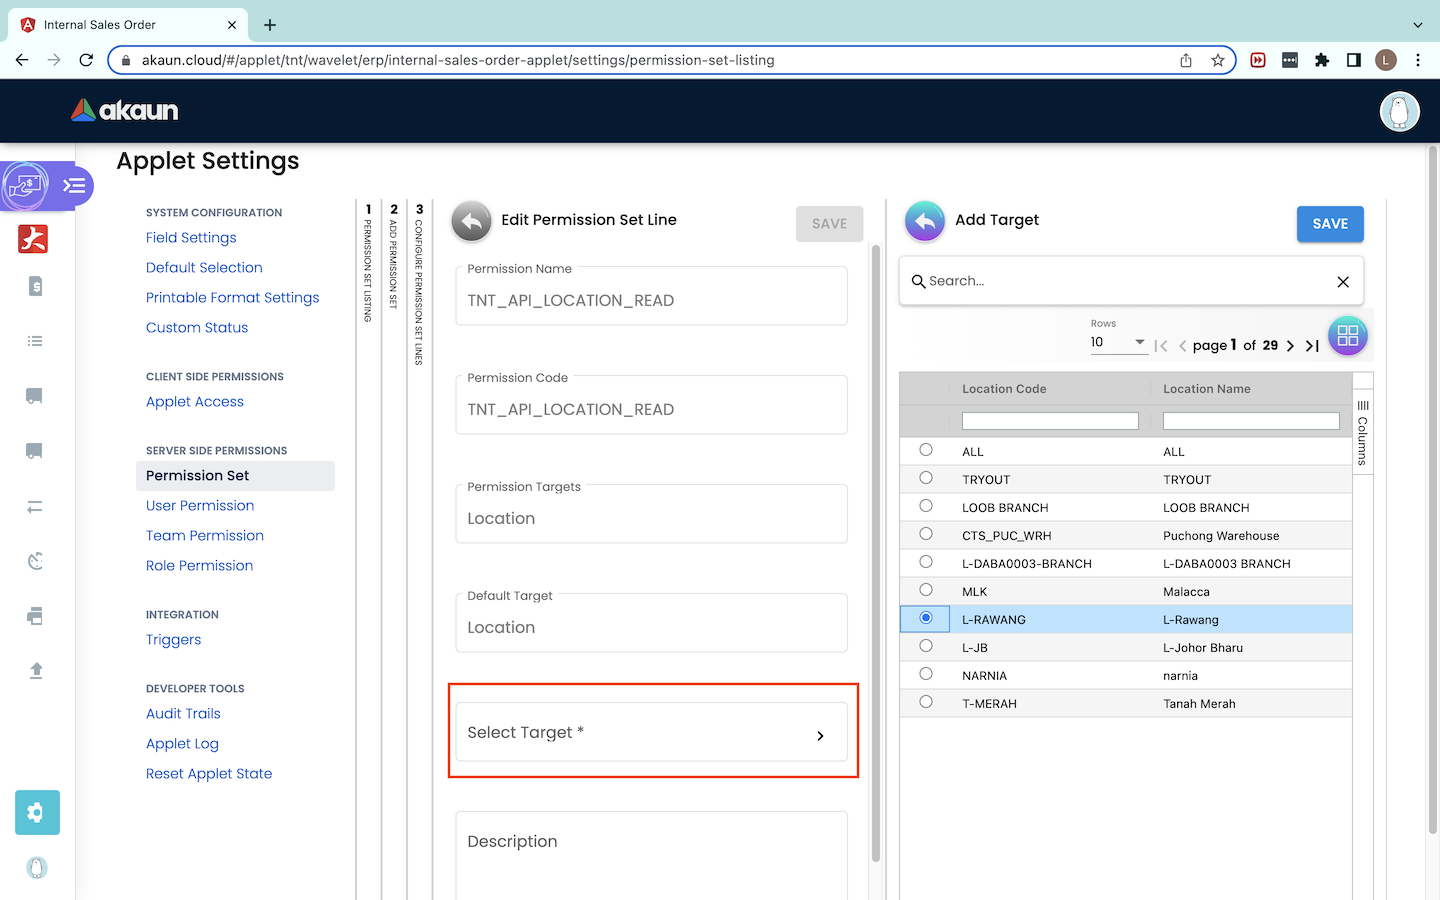
A list of targets either companies, branches or locations depending on the Permission Template, will be shown. Users can select only one target. After selecting the target, users can click on the “Save” button to save the target selected.
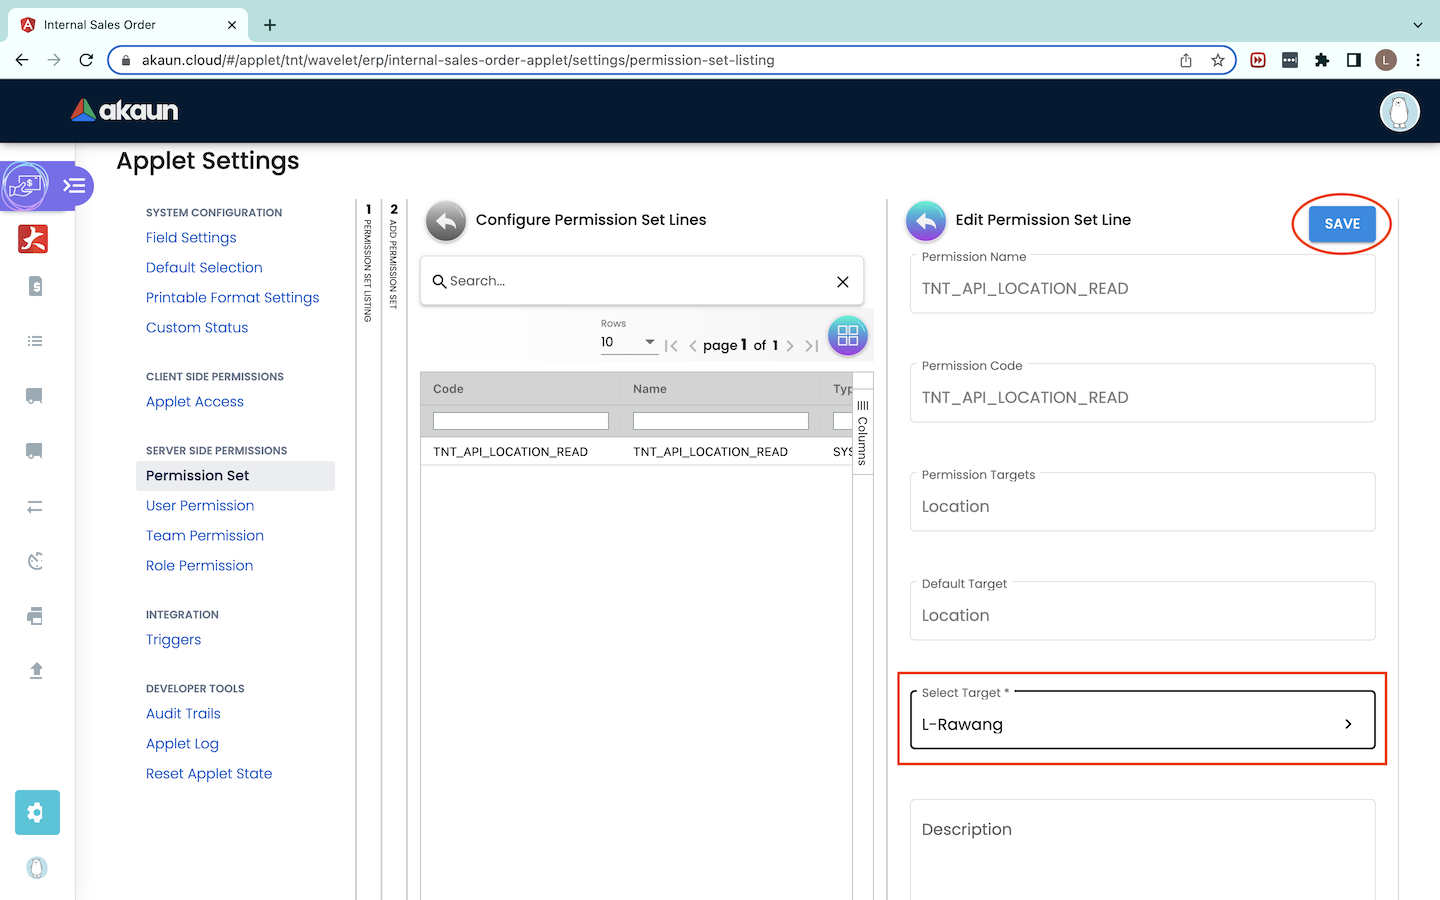
Upon clicking the “Save” button, users will be redirected to the previous page. The target selected will be displayed. Users have to click on the “Save” button again to save this Permission Set Line.
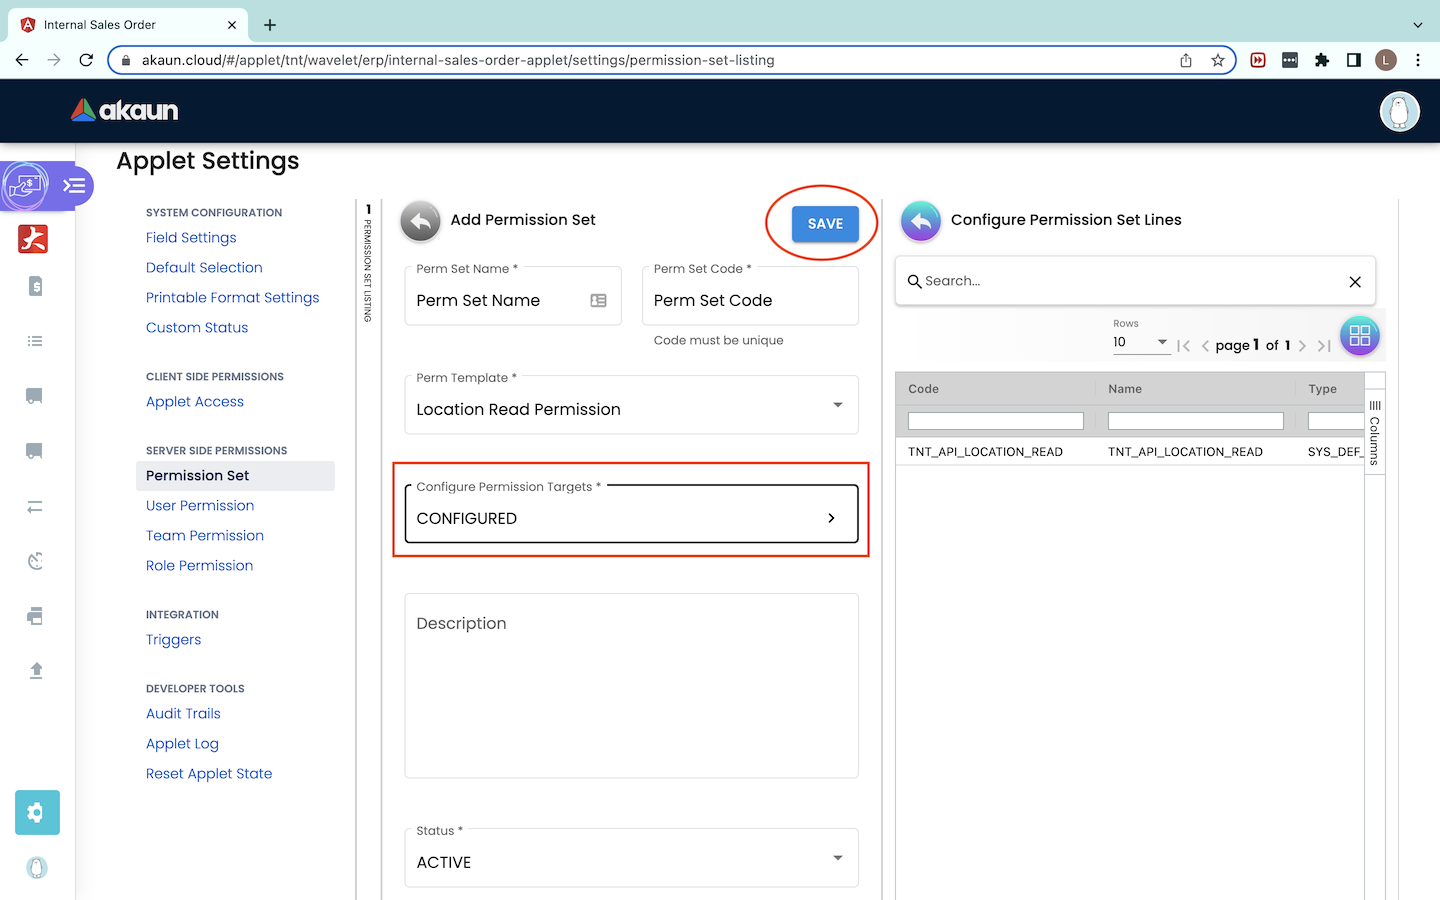
Users will then be directed back to the “Add Permission Set” tab. The Configure Permission Targets field will have ‘CONFIGURED’ shown meaning that the target has successfully been configured. Users can repeat the steps for each Permission Set Line and assign a target to it respectively.
When all Permission Targets have been configured, users can click on the “Save” button to save the respective Permission Set.
Important Note: To assign the same permission set to multiple targets, users will need to create multiple different permission sets. Each permission set will consist of the same permission lines but can have a different naming convention. Users will have to assign each permission set to one respective target. The faster and easier way is to use the Permission Wizard to generate permission sets.
1.2.2 – Edit Permission Set
To edit a Permission Set, users can click on the respective Permission Set in the Permission Set listing.
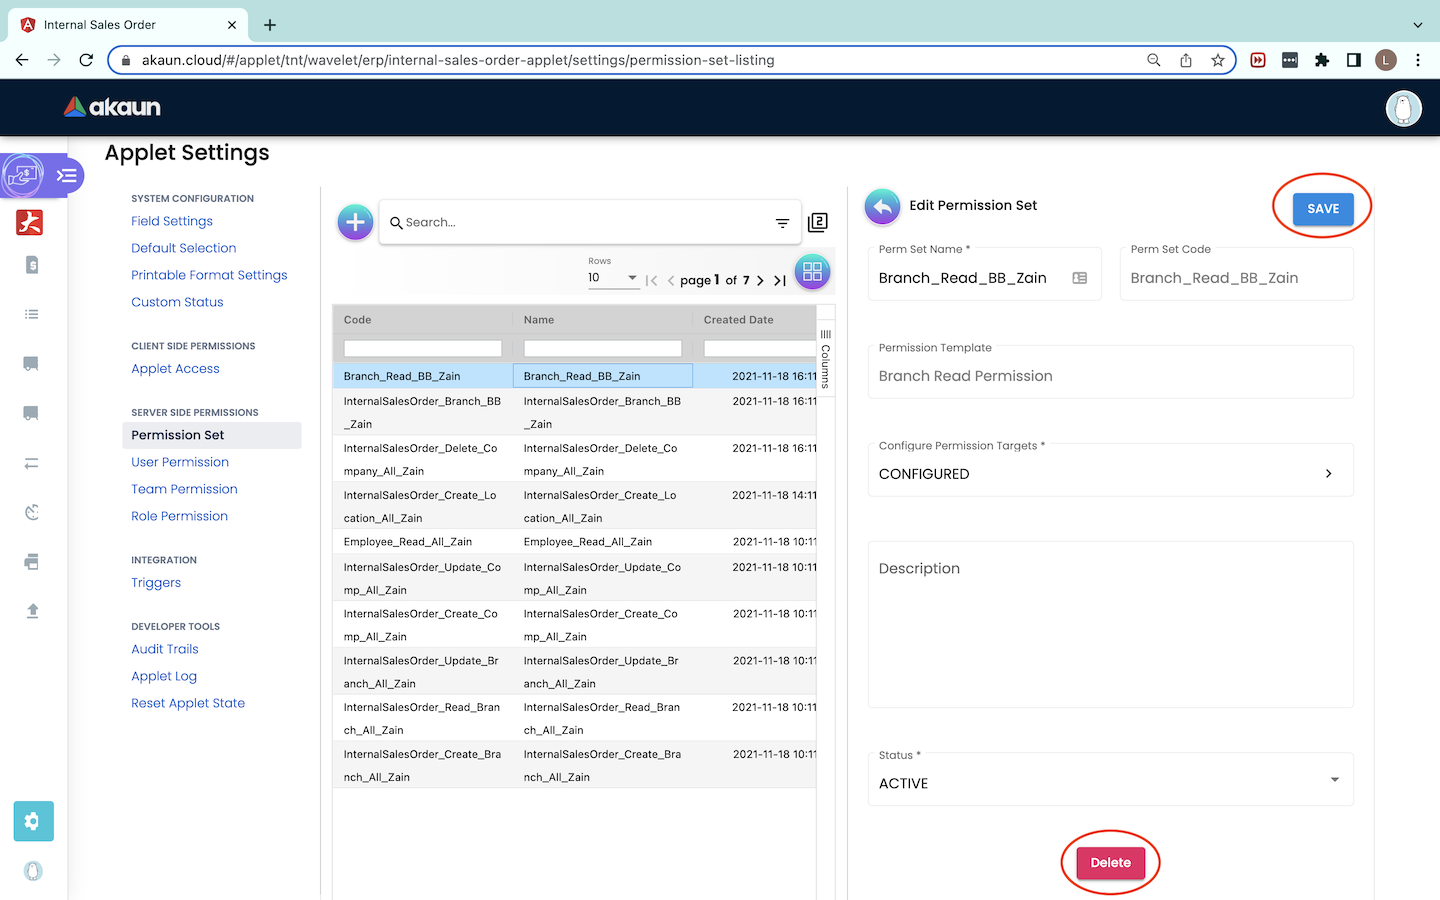
The process flow of editing a permission set is similar to the process flow of creating a permission set. Users have to click on the “Save” button to ensure that the changes made have been saved. To delete the permission set, users will have to click on the “Delete” button at the very bottom.
1.3 User Permission
1.3.0 – User Permission Listing
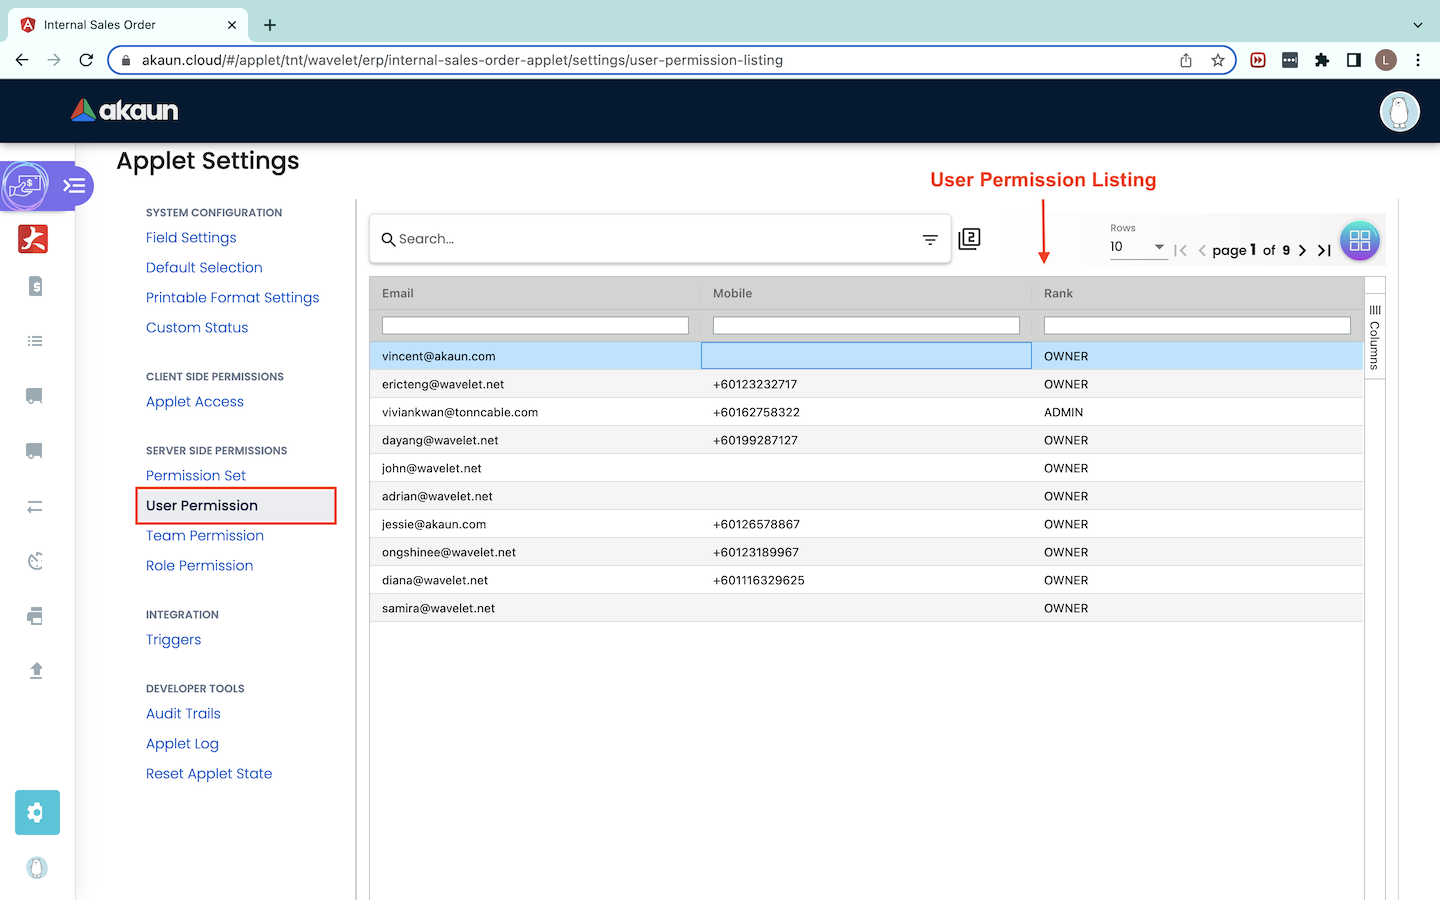
Under User Permission, there is a User Permission Listing which consists of all users who have permission to access this particular applet. The user information which are listed includes Email, Mobile and Rank. Once a user has successfully installed the applet, their information will be shown in the User Permission listing.
1.4 Team Permission
1.4.0 - Team Permission Listing
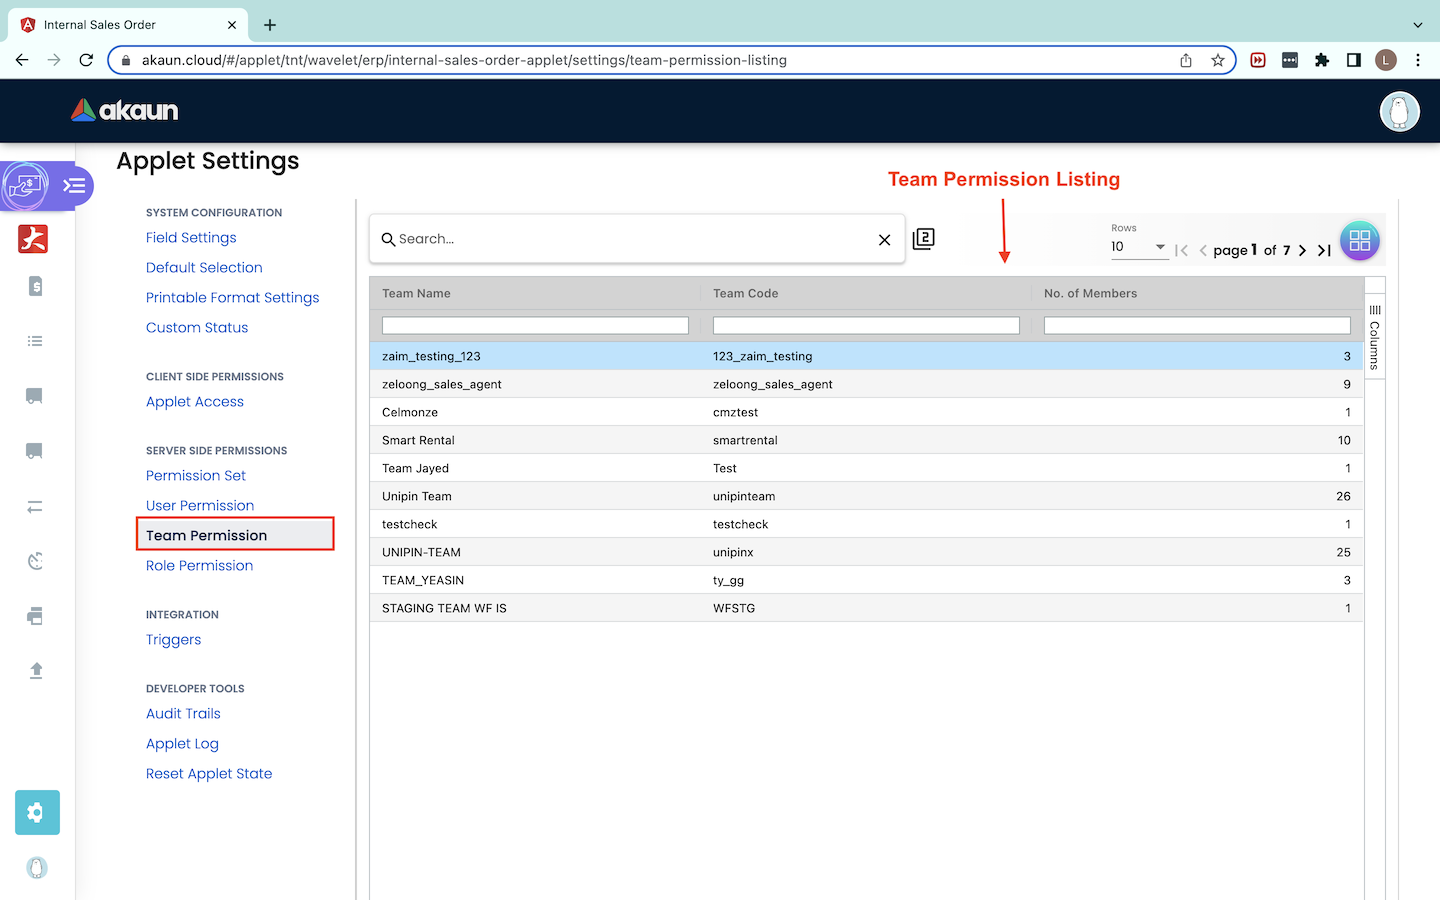
Team Permission is used to categorize the members who require the same roles. The Team Permission Listing shows the Team Name, Team Code and No. of Members in the respective team.
1.4.1 - Edit Team
Team Details
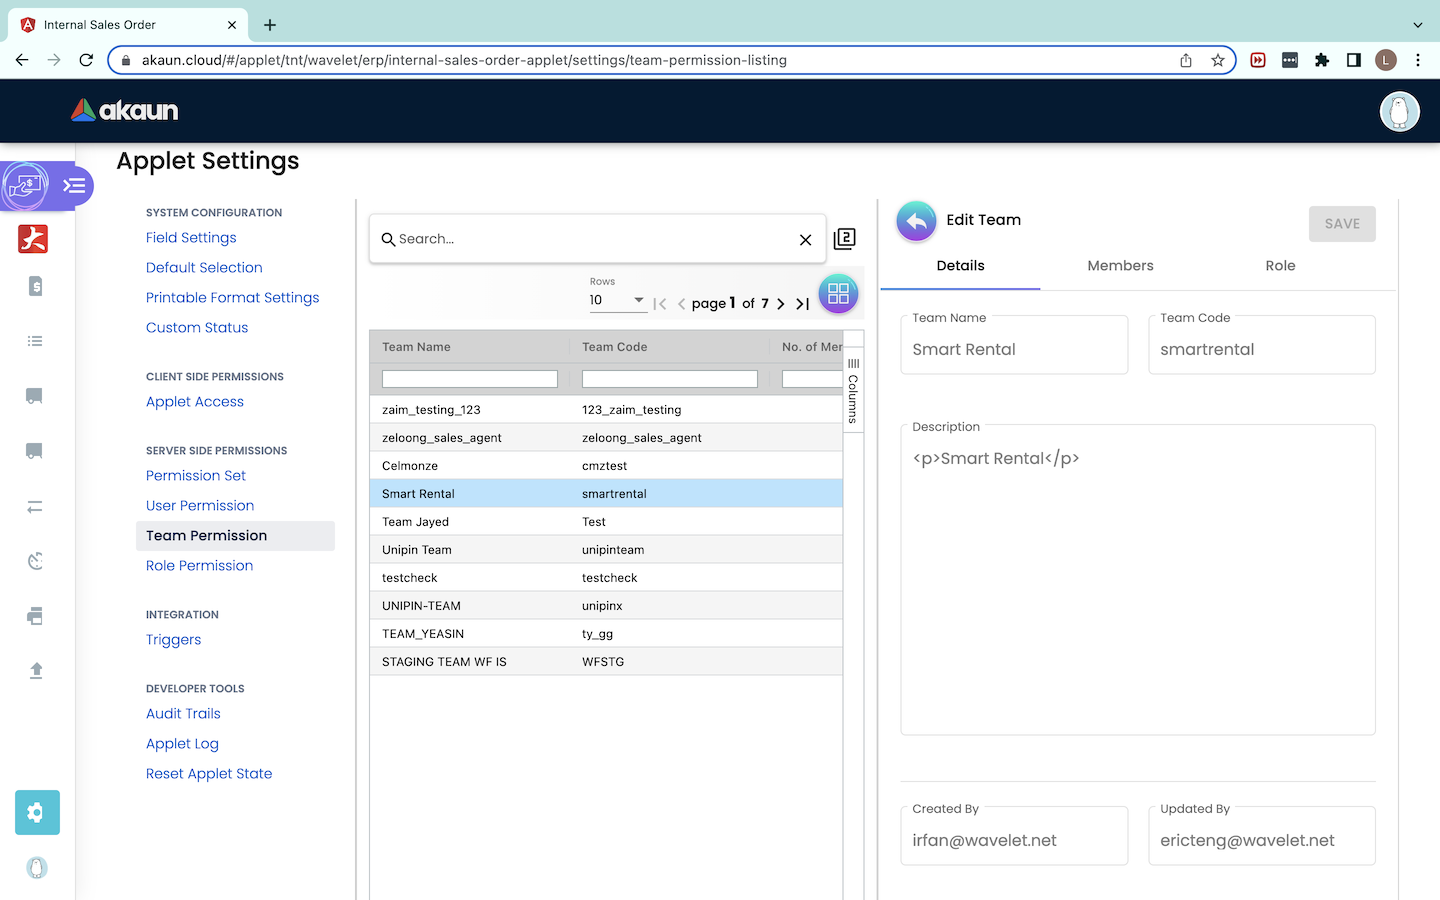
Under the “Edit Team” tab, there are 3 tabs - Details, Members and Role. Under the “Details” tab, users can ONLY READ the Team Name, Team Code and Description.
Members
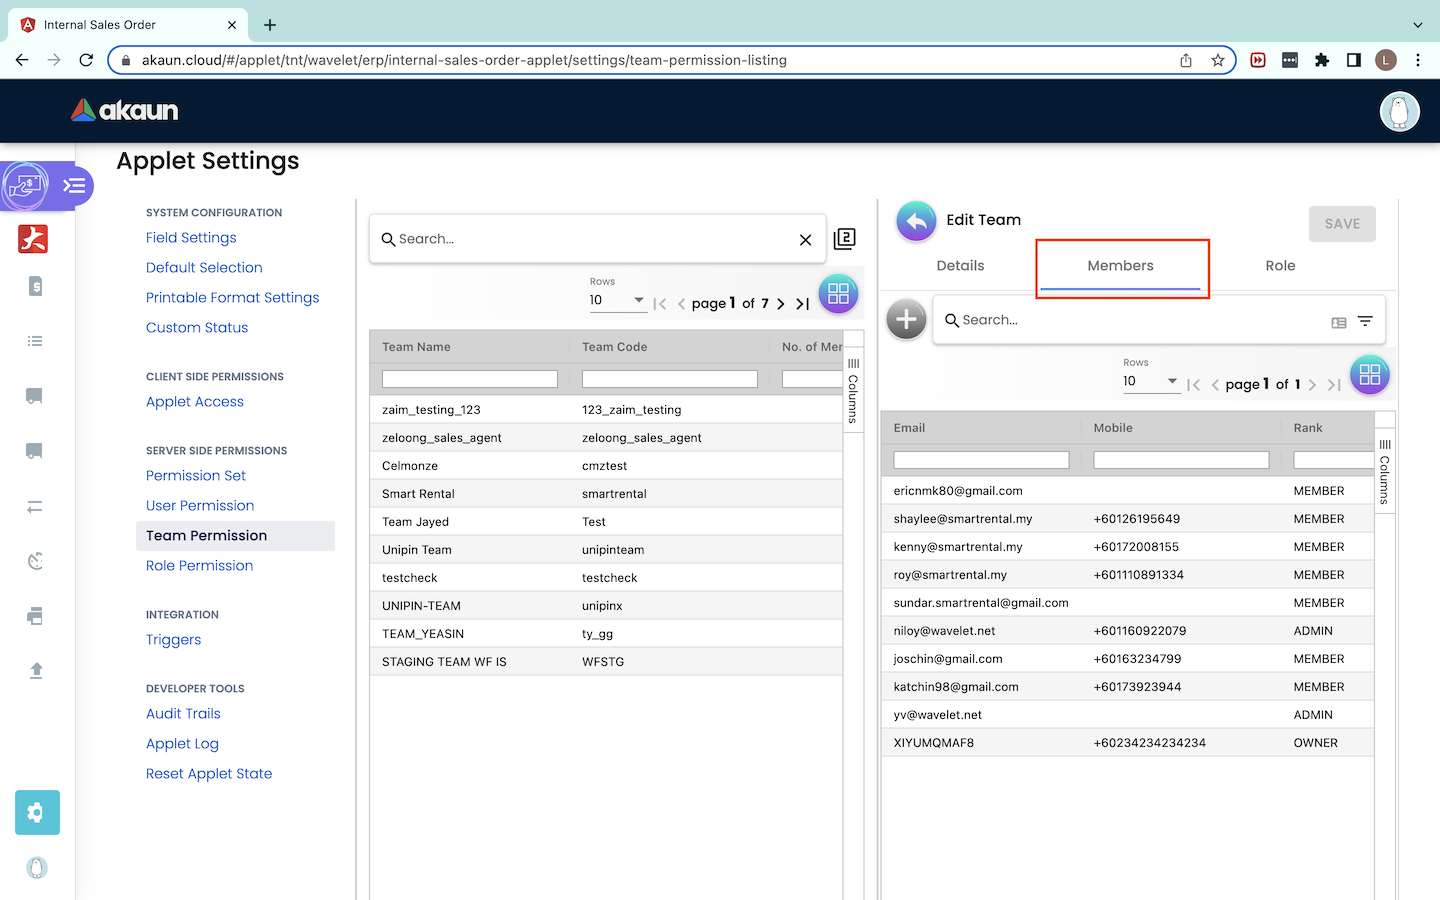
Under the “Members'' tab, there is a Member listing showing the Email, Mobile and Rank of the member. Users are unable to create or edit the members.
Role
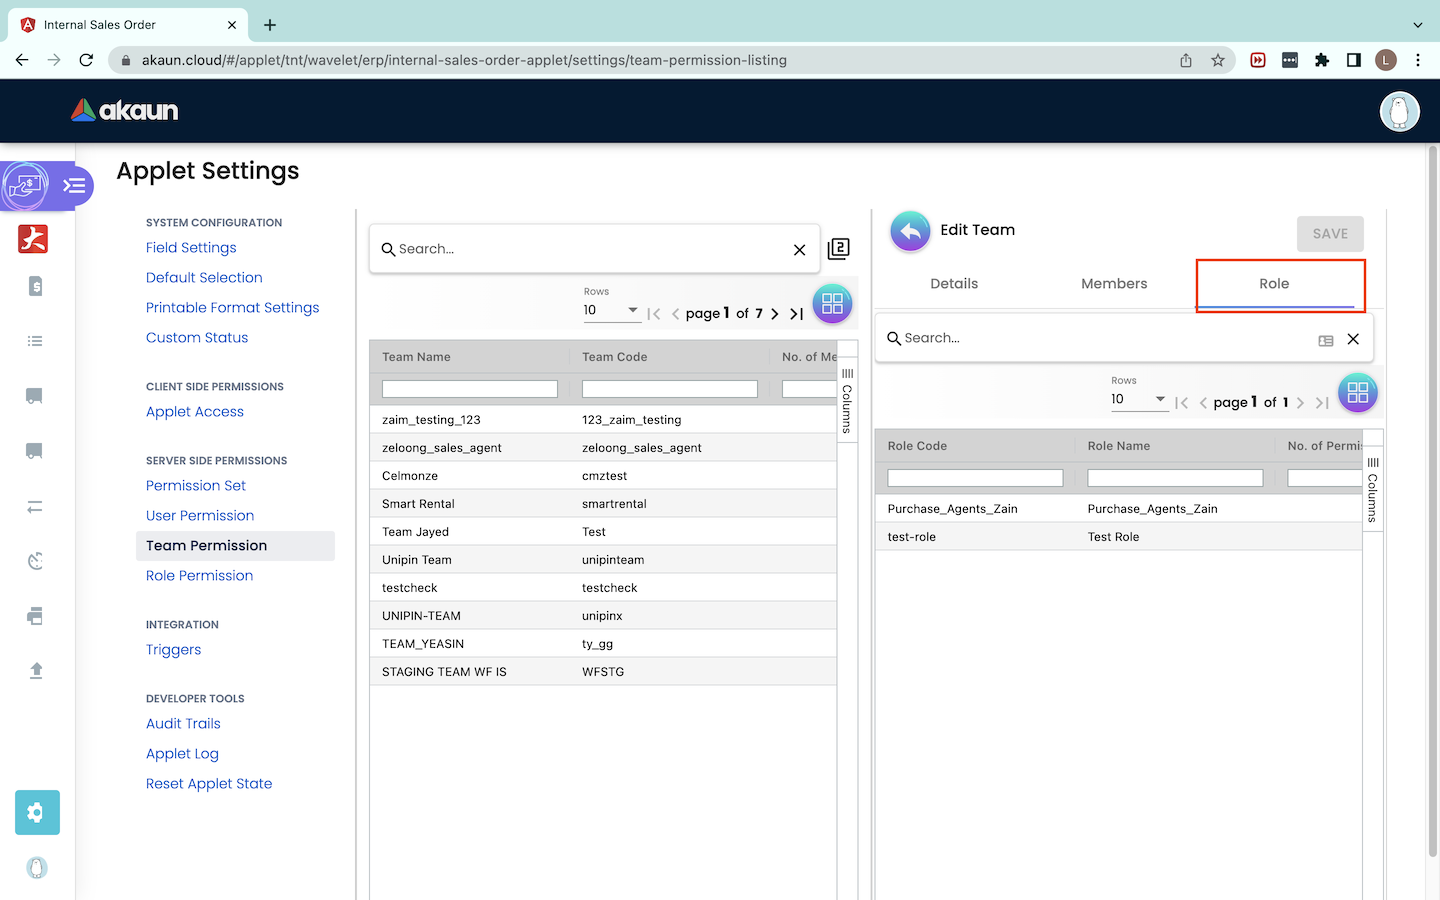
Under the “Role” tab, users can see the roles which are in the Team. There is a list of roles showing the information of Role Code, Role Name and No. of Permissions the role has.
.png)
Users can also edit the role’s Name and Status by clicking into the role. Users are NOT ALLOWED to change the Role Code because it is fixed upon creation. After editing the role, users need to click on the “Save” button to save the changes.
1.5 Role Permission
1.5.0 - Role Permission Listing
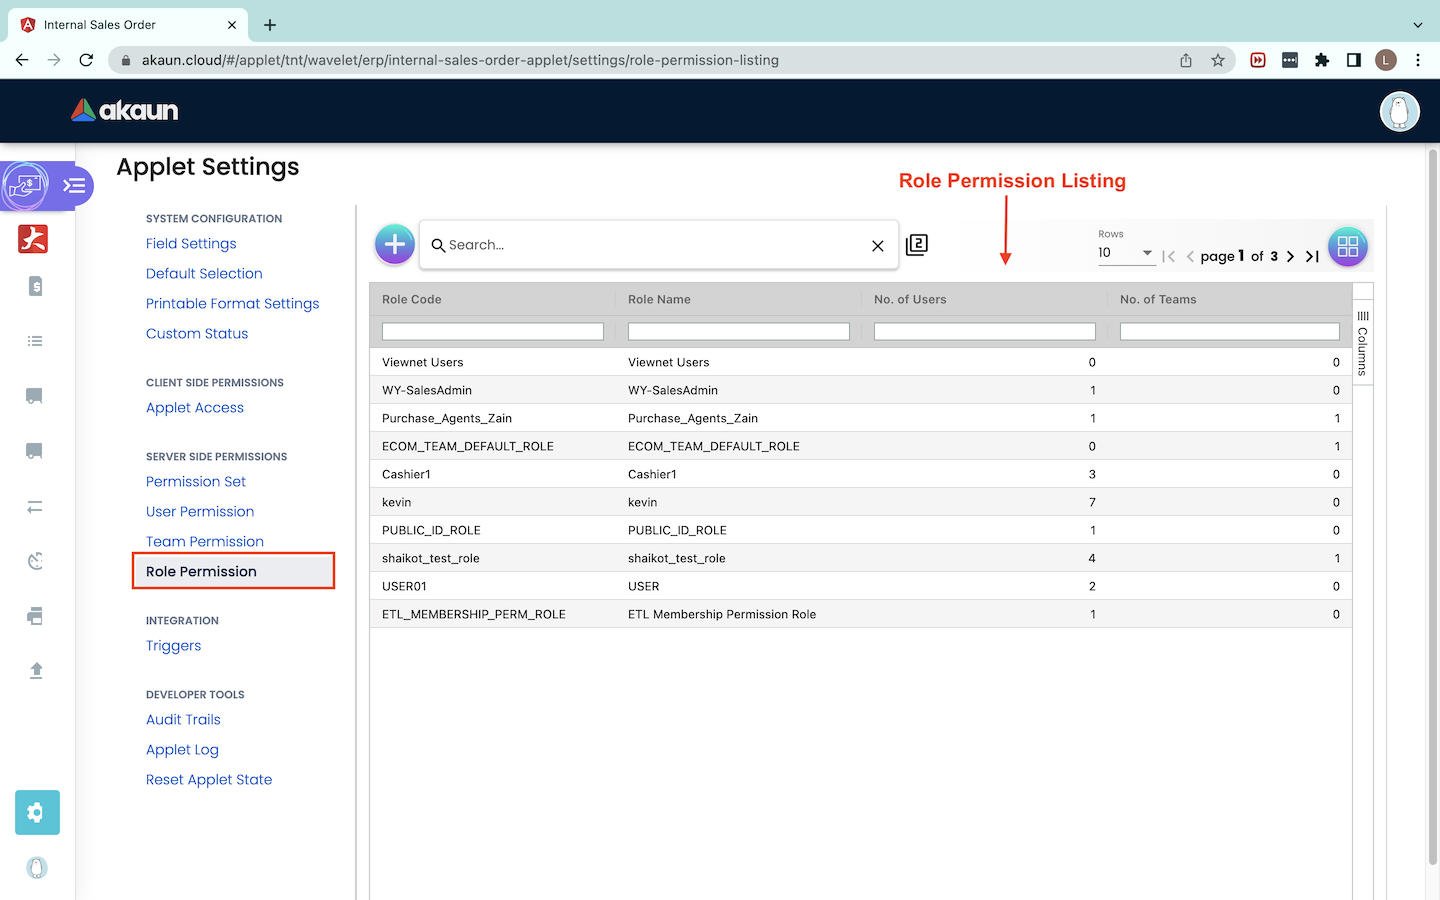
An organization will have many different roles such as CEO, managers, salesman, cashiers and more. Each role will require different permissions. Under role permission, users can assign specific permissions to each role. Then, users can assign roles to users or teams. At the Role Permission listing, users can see the Role Code, Role Name, No. of Users and No. of Teams.
1.5.1 - Create Role Permission
Click on the “+” button to create a Role Permission.
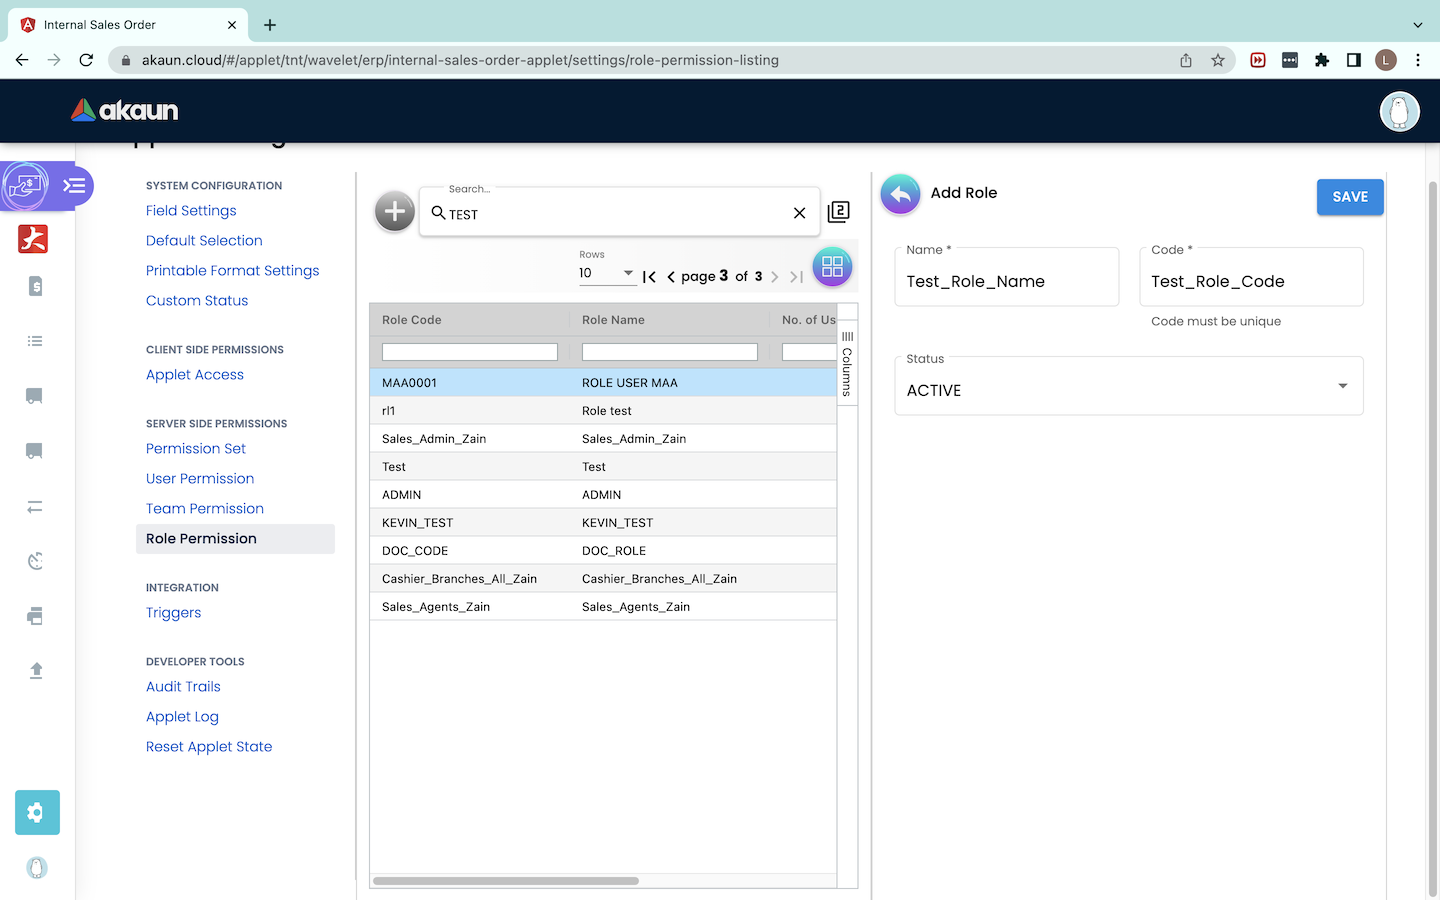
To create a new role, users need to set a Role Name, Role Code and Status. The Role Code must be UNIQUE and it cannot be changed upon creation. The Status of the role needs to be set to ACTIVE. After completing all the fields, users need to click on the “Save” button to save the role.
1.5.2 - Edit Role Permission
Details Tab
.png)
Users can edit the role by clicking on its row. An “Edit Role Permissions” tab will pop out from the right. Users can edit the role’s Name and add in Description for the role here. After making changes, users have to click “Save”.
-Delete.png)
Users can also delete the role under the “Details” tab. To do so, users can scroll all the way down and there will be a “DELETE” button.
User
.png)
On the “User” tab, users can see all users which have this role. Since this is a new role, there are no users yet. Users can click on the ‘+’ button to start adding users.
.png)
Upon clicking on the ‘+’ button, an “Add User” tab will pop out and there will be a list of users to be selected. Users can multi-select users to be added to the role. Users can also use the Search bar to search for specific users. After selecting all the users, users can click on the “ADD” button to add the users to this role.
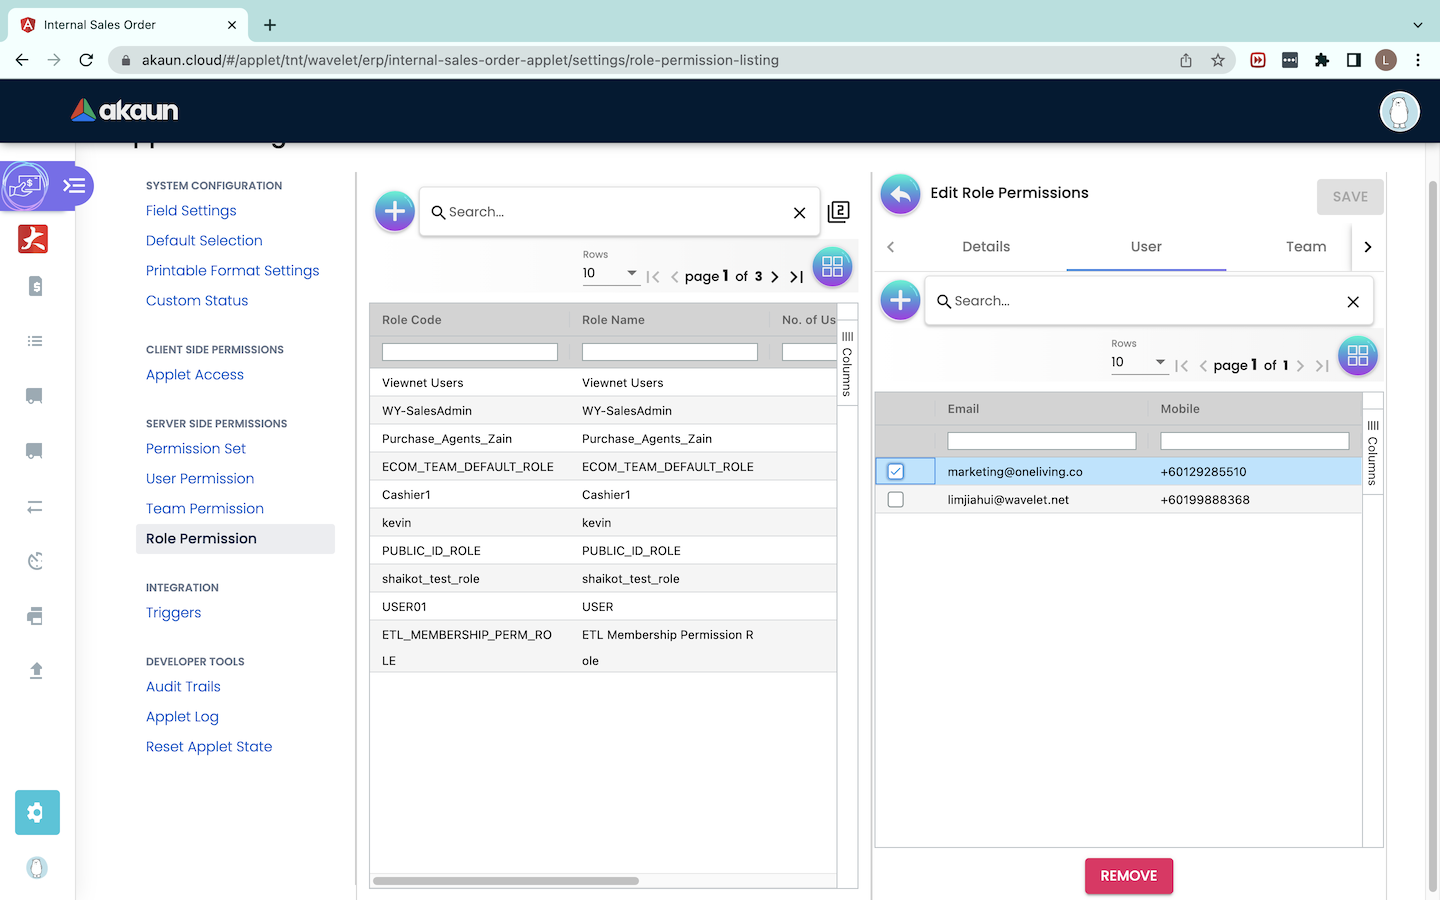
To remove a user from this role, users can select the user and click on the “REMOVE” button.
Team
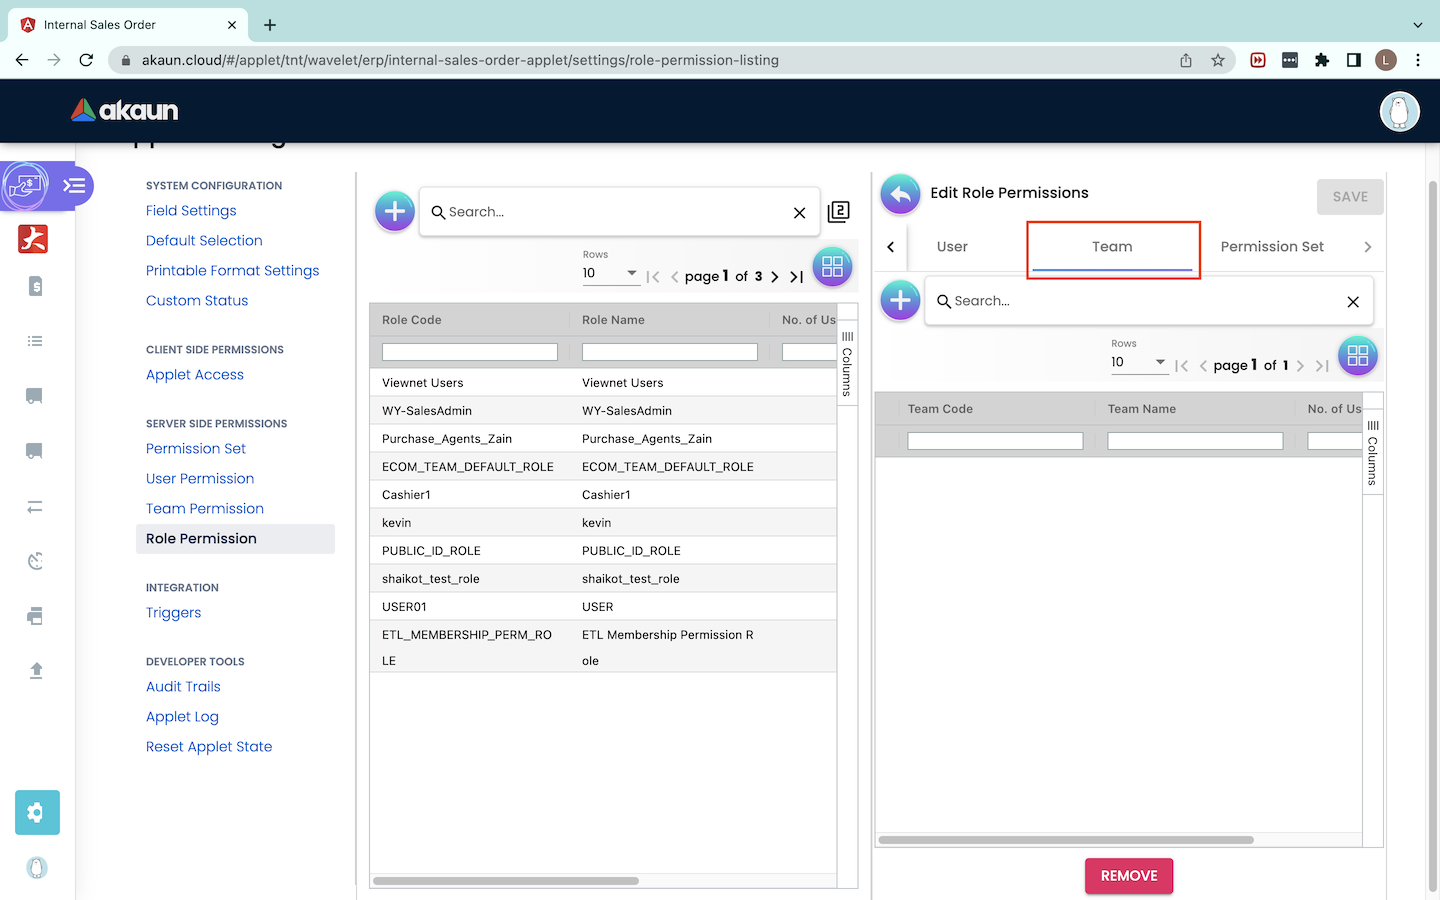
On the “Team” tab, users can see all teams which have this role. Users can click on the ‘+’ button to start adding teams.
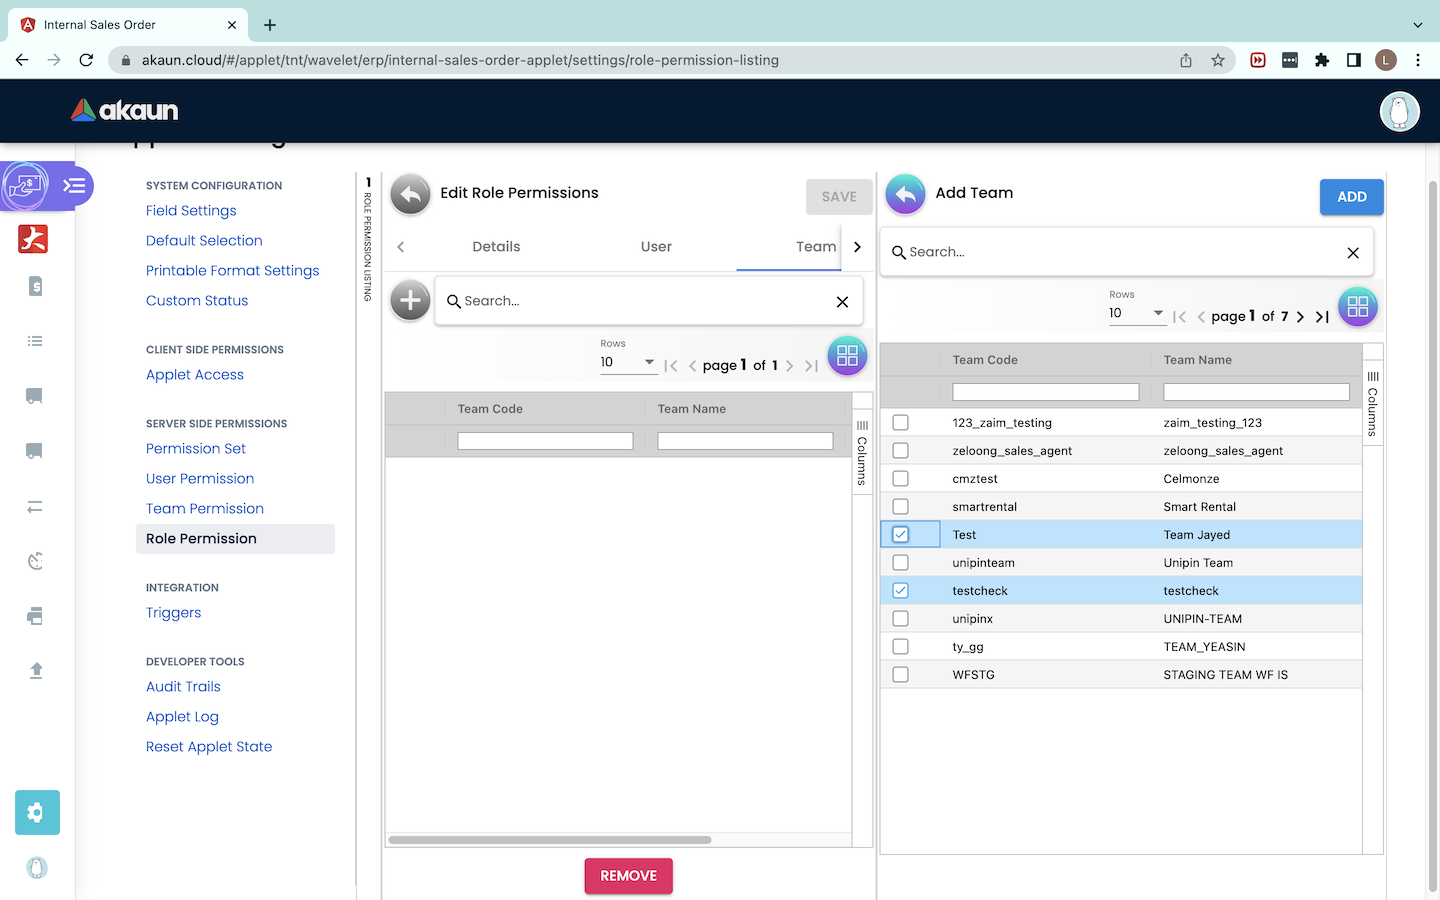
On the “Add Team” tab, there will be a list of teams shown. Users can multi-select the teams to be added to the role. After selecting all teams, users need to click on the “ADD” button.

To remove a team from this role, users can select the team and click on the “REMOVE” button.
Permission Set
.png)
Last but not least, there is a “Permission Set” tab. This is the most important tab because the functionality of the role depends on the Permission Set it consists of. To create a Permission Set for this role, users can click on the ‘+’ button, whereas to remove a permission set from the role, users can click on the “REMOVE” button.
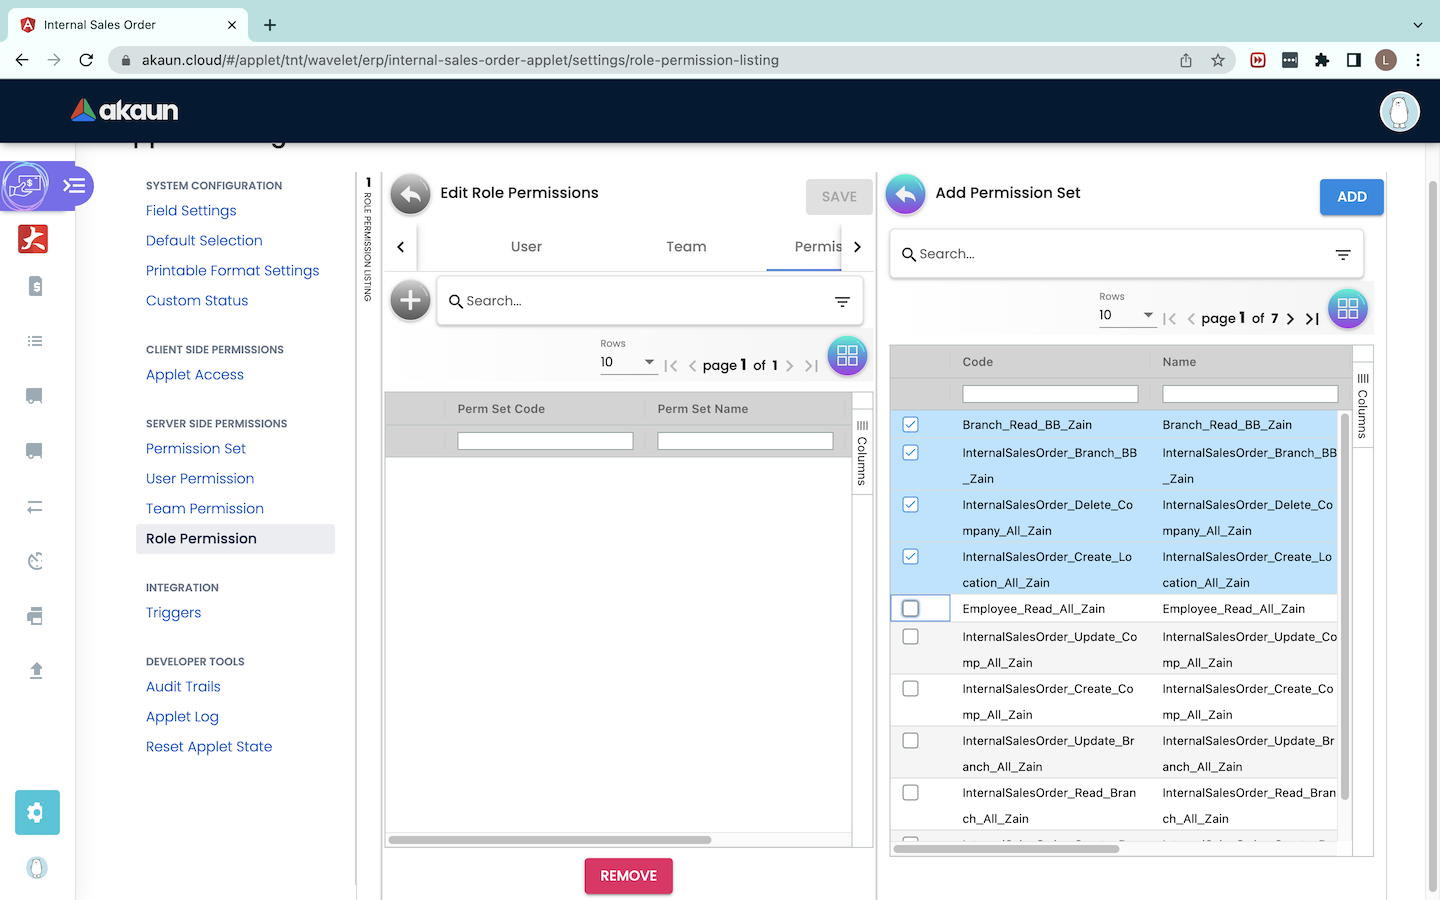
On the “Add Permission Set” tab, users can select multiple permission sets needed for this role. After selecting all the permission sets, users can click on the “ADD” button.