Security
Security is essential in software to protect user data, intellectual property, system availability, and regulatory compliance. By implementing strong security measures, software companies can protect themselves and their users from security threats and ensure the integrity and availability of their systems.
Server side permissions vs Client side permission Server-side permissions are managed and enforced by the server, while client-side permissions delegate some control to the frontend application.
1. What is Permission Templates?
From a security perspective, permission templates are used to control access to sensitive data or system functionality within an application. By configuring permission templates correctly, developers can ensure that only authorized users have access to the appropriate features and data within the application. This helps to prevent data breaches and other security incidents, protecting both the application and the users.
Please watch the video for a better understanding.
2. Permission Wizard:
2.1. Introduction:
The Permission Wizard in Applet settings menu under SERVER SIDE PERMISSIONS is a powerful tool designed to simplify and streamline the process of managing permission templates for different companies, branches and locations within your organization. This documentation provides an overview of the features and functionality offered by the Permission Wizard, guiding users on how to efficiently copy and generate permission sets and roles across multiple branches, locations and companies.
Note: Before using the permissions wizard to generate permission sets for multiple branch locations or companies, it is essential to configure the permission templates and sets first.
2.2. Key Features:
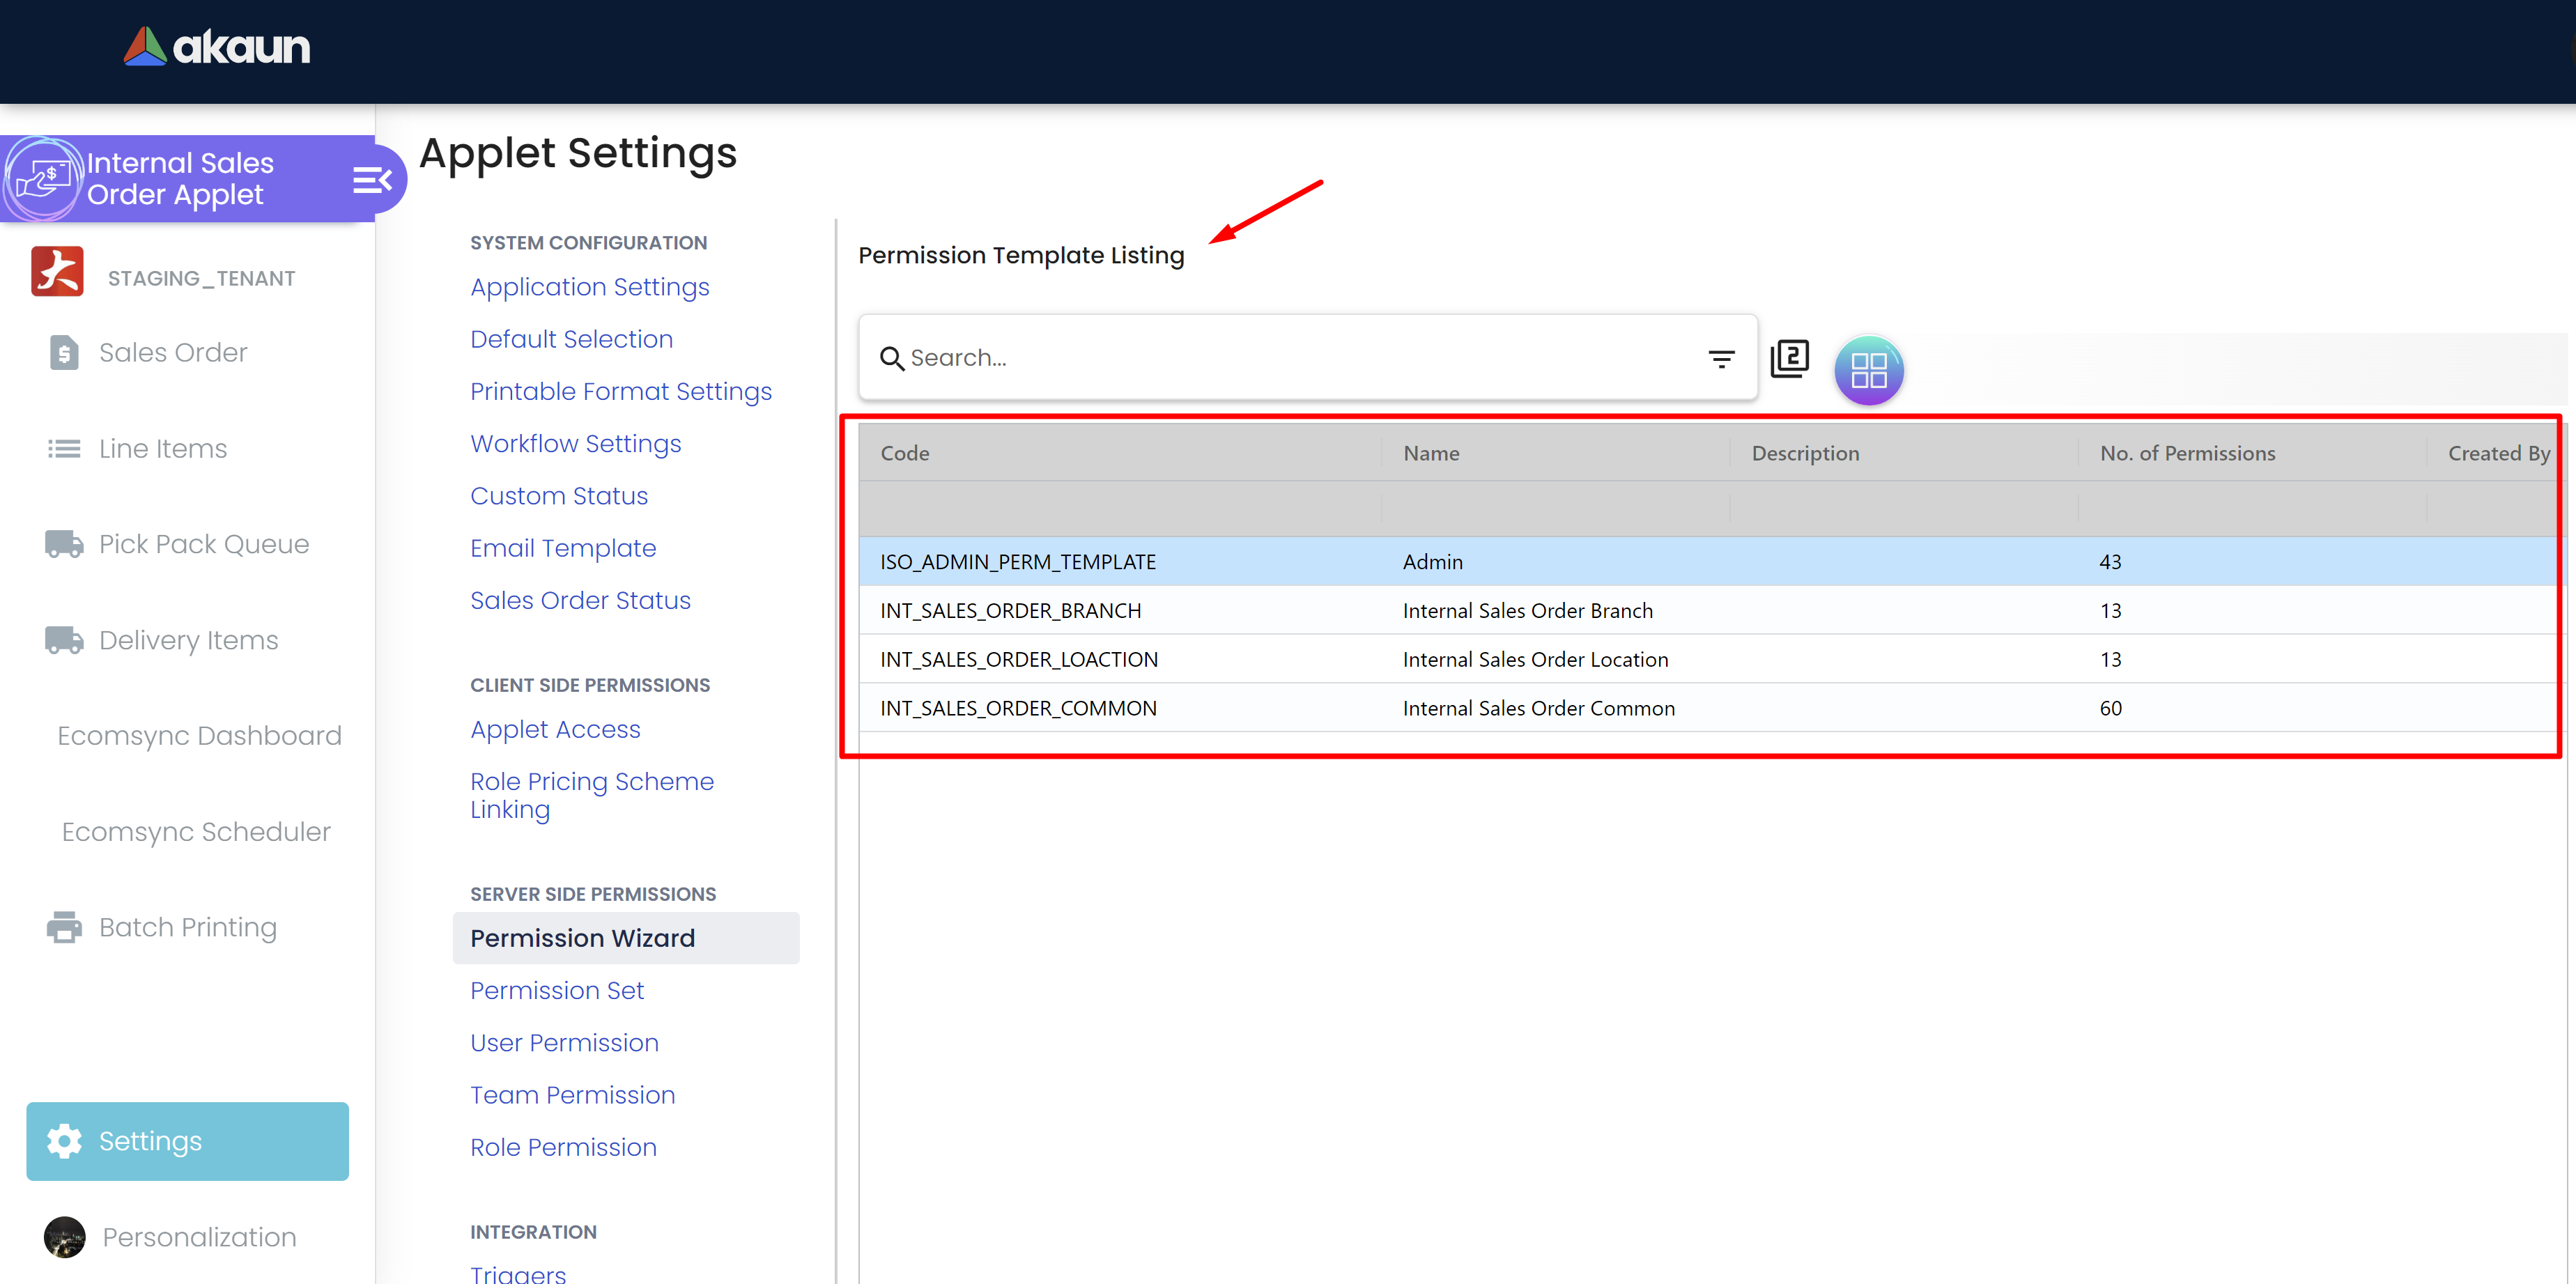
Listing Permission Templates:
The Permission Wizard presents users with a comprehensive list of all the company, branch and location permission templates available in the "Tenant" system. Each template contains its own set of permission definitions, tailored to specific roles and access levels.
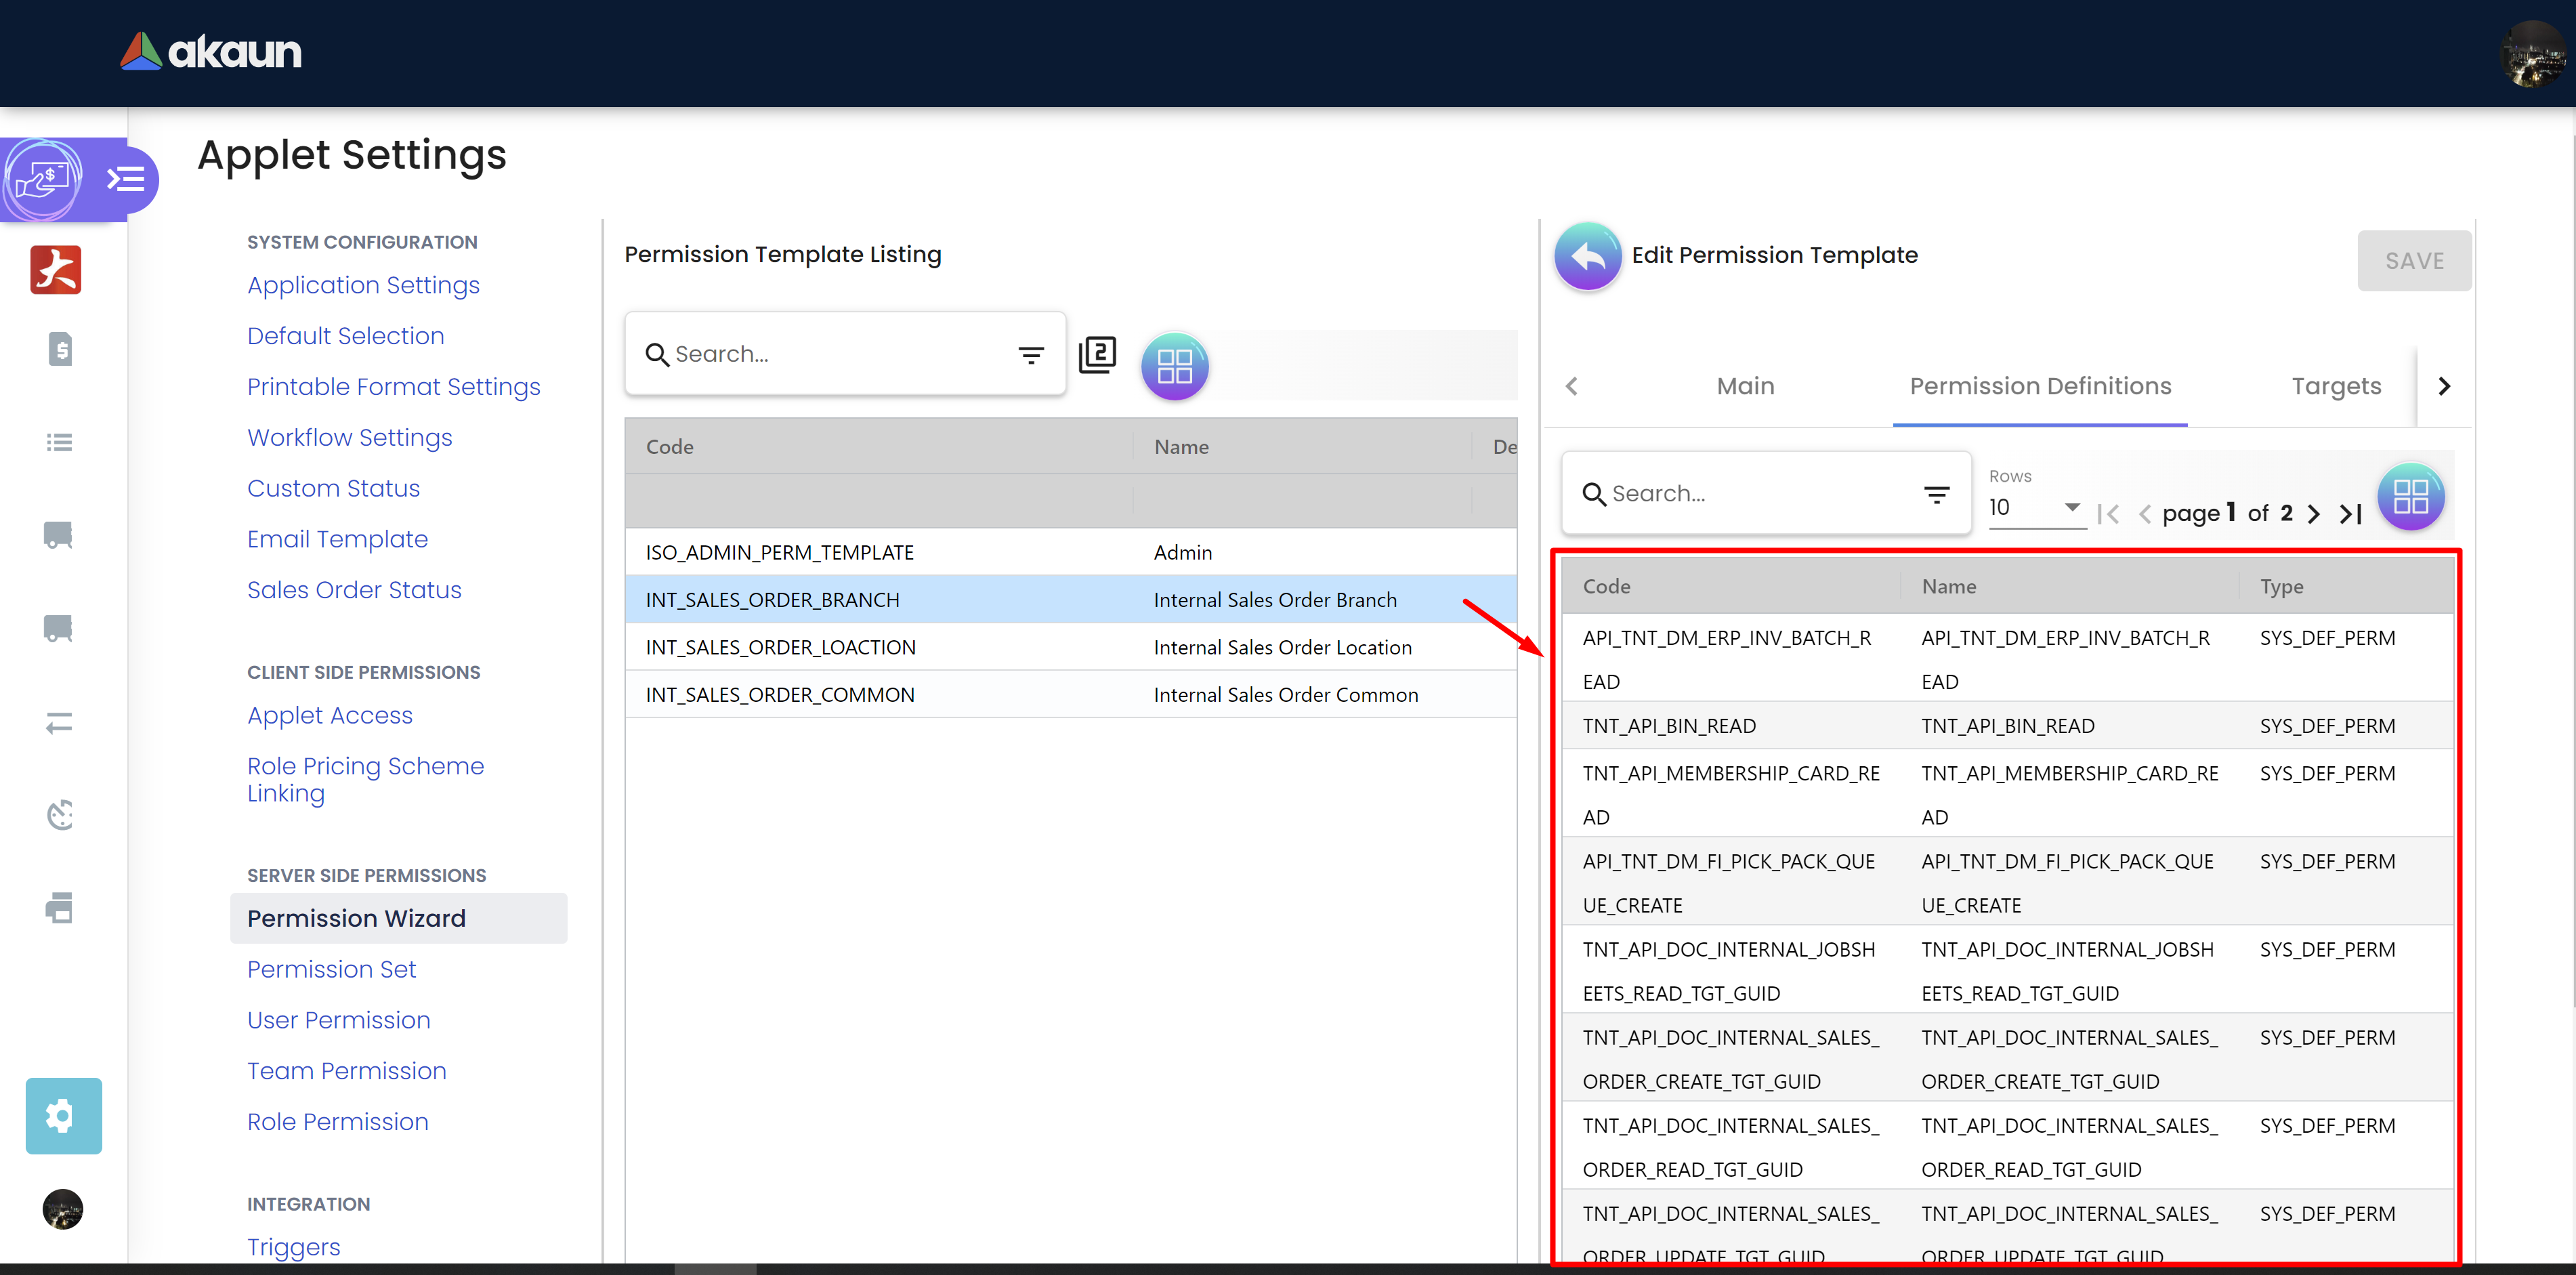
Viewing Permission Definitions for each Permission Template:
Before proceeding with permission duplication, users can review the permission definitions of each template. This step ensures that administrators have a clear understanding of the access levels and roles associated with each template before making any changes.
Copying Permission Templates:
With the Permission Wizard, users can easily duplicate permission templates across various branches, locations or companies. This feature significantly reduces the time and effort required to set up permissions for similar entities within the organization.
Setting Prefixes:
The wizard allows users to specify roles and permission set prefixes. This customization feature ensures that the generated permission sets and roles are labeled in a way that aligns with your organization’s naming conventions and standards.
2.3. Getting Started:
To access the Permission Wizard, follow these steps:
1) Log in to the akaun platform using your valid credentials.
2) Go to the Applet and Navigate to "Permission Wizard" section of the dashboard
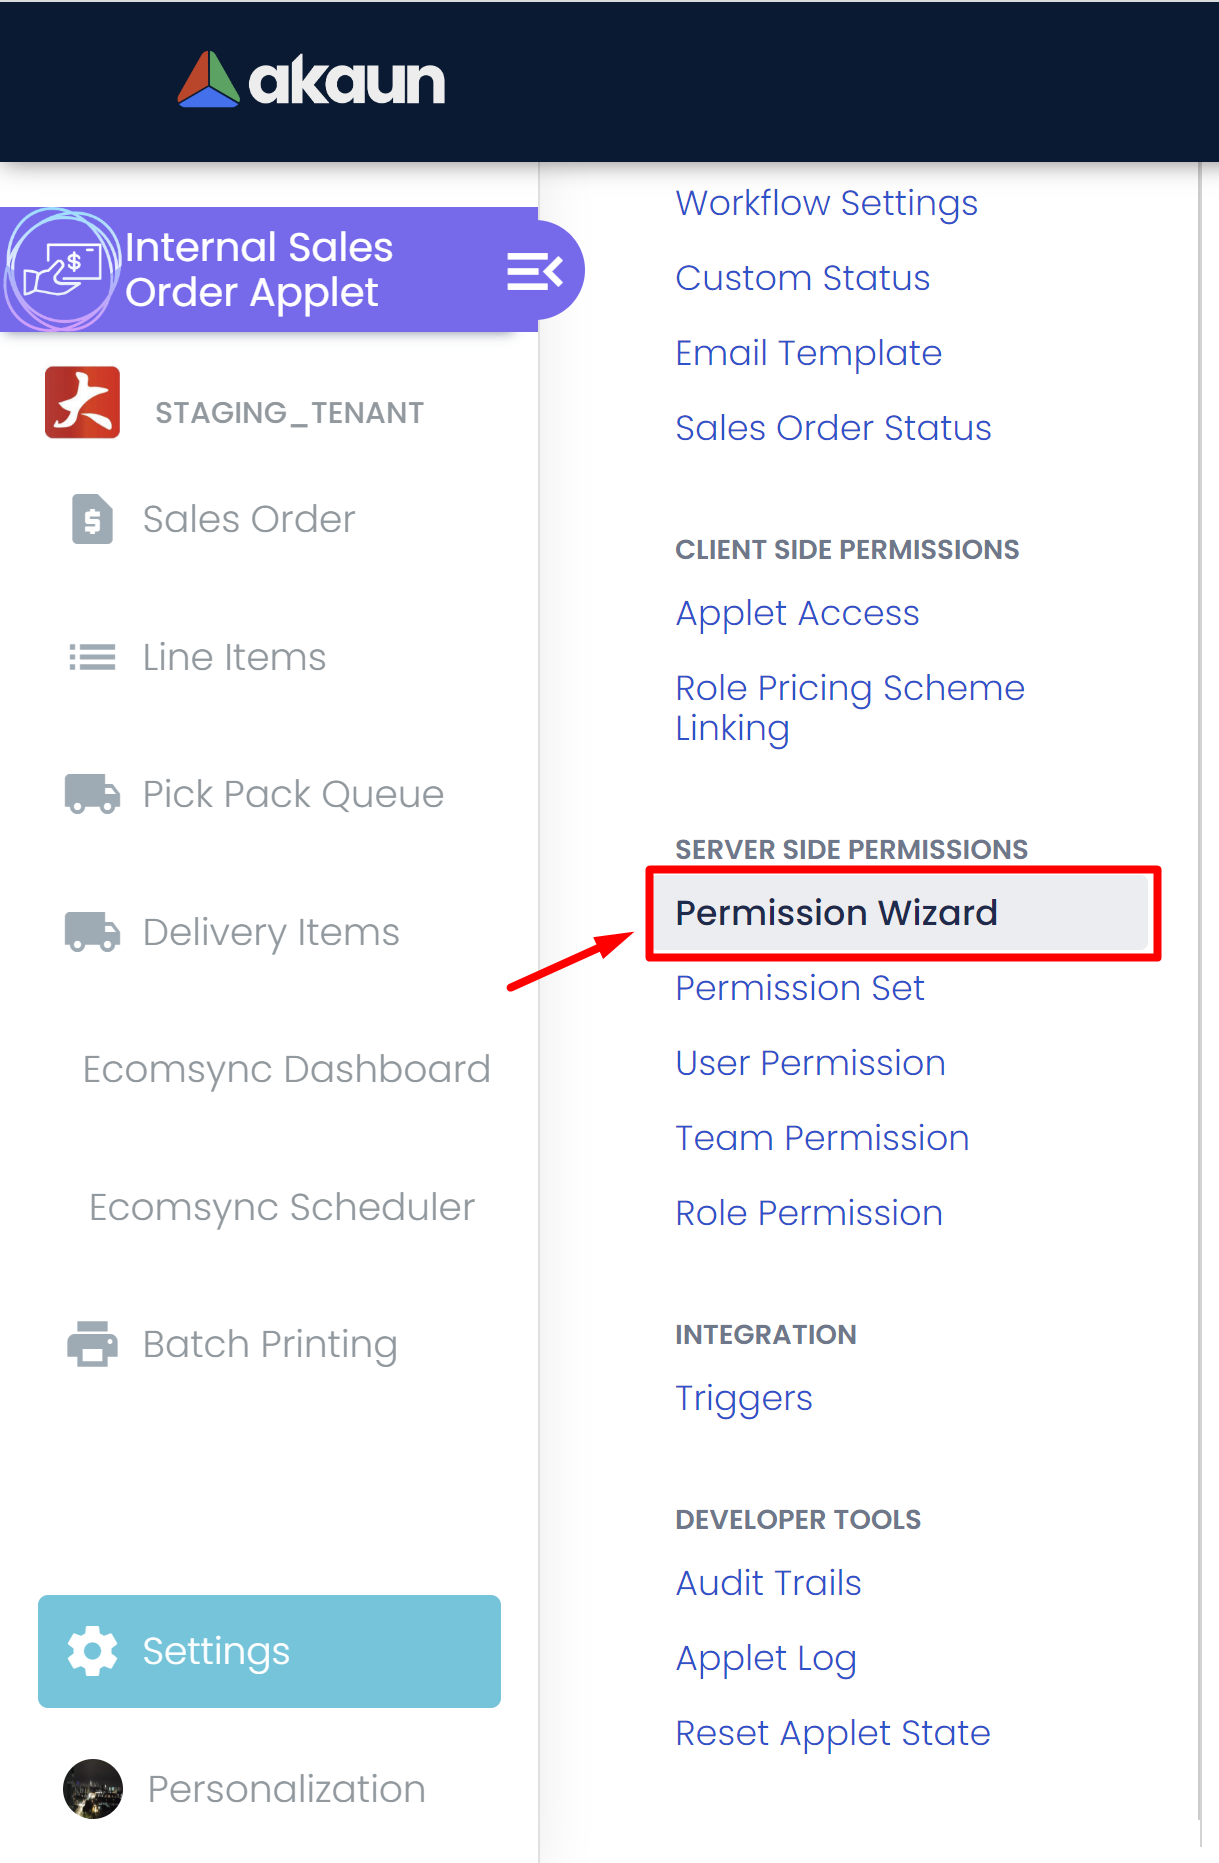
3) Look for and select the "Permission Wizard" option. This will launch the wizard interface.
4) Using the Permission Wizard
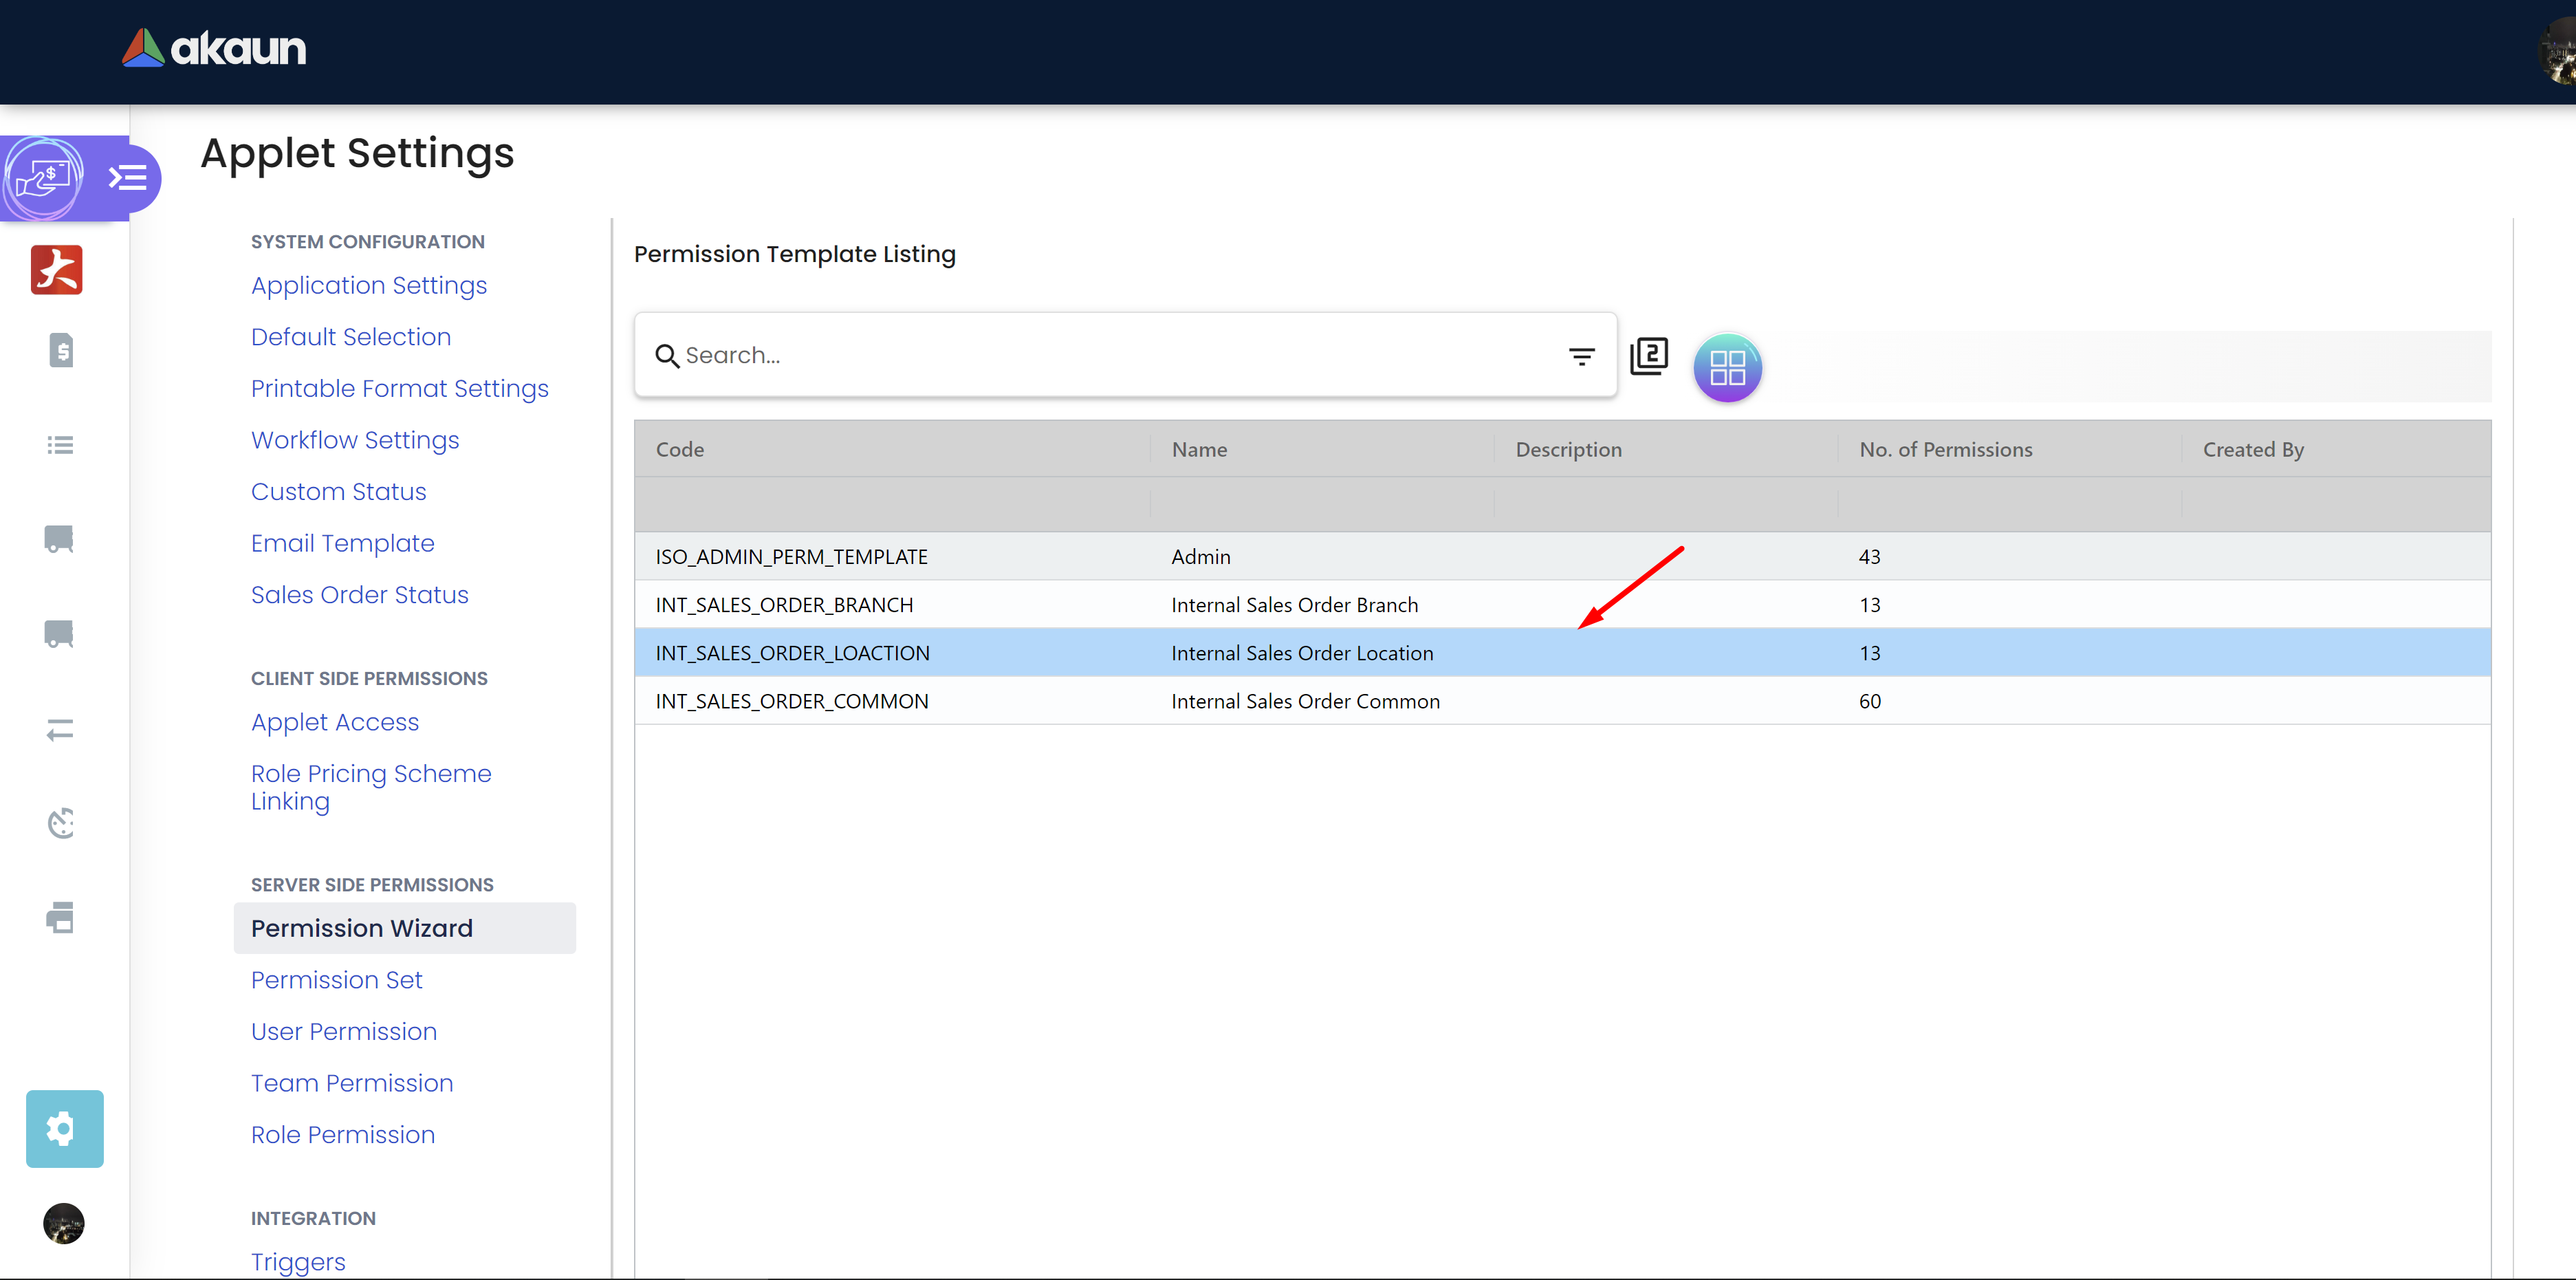
Step 1: Selecting a Template: From the Permission Wizard interface, browse the list of available templates for different companies, branches and locations.
Click on the desired template to proceed.
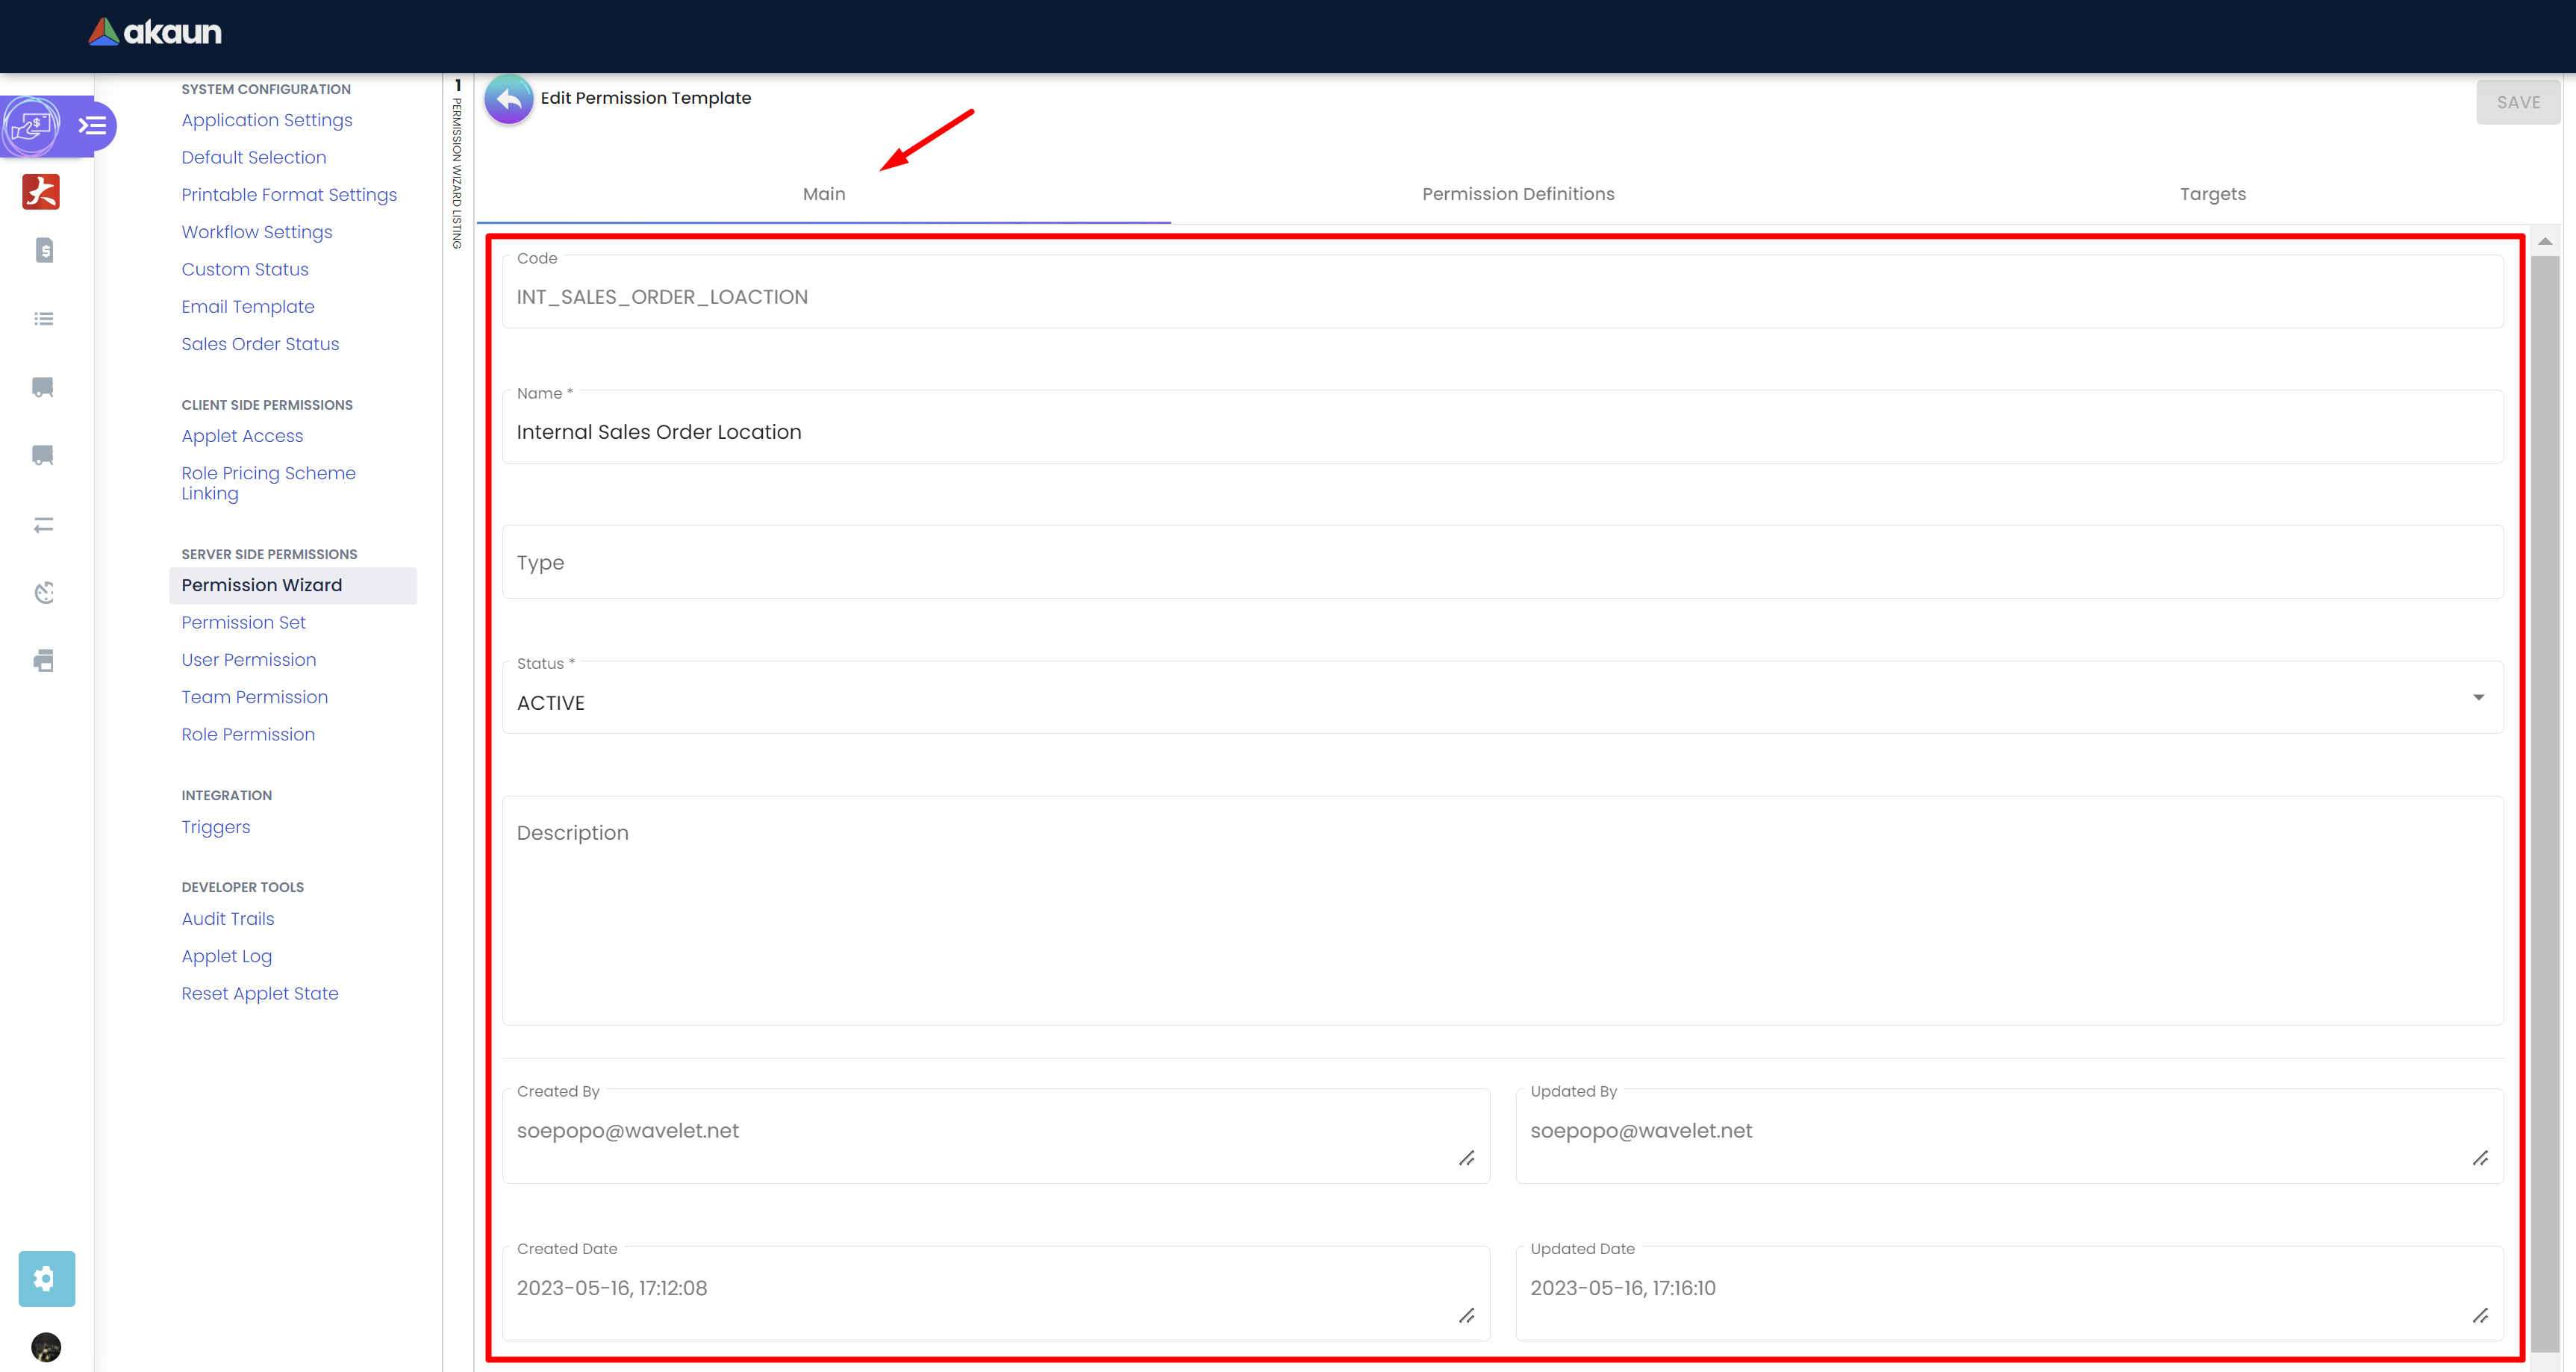
Step 2: Review Template Main Details: Upon selecting a template in Step 1, you will be directed to the Template Details page. Here, you can view essential information about the template, including its code name, type, description, creation/update date, and created/updated by, providing you with a comprehensive understanding of the selected template.
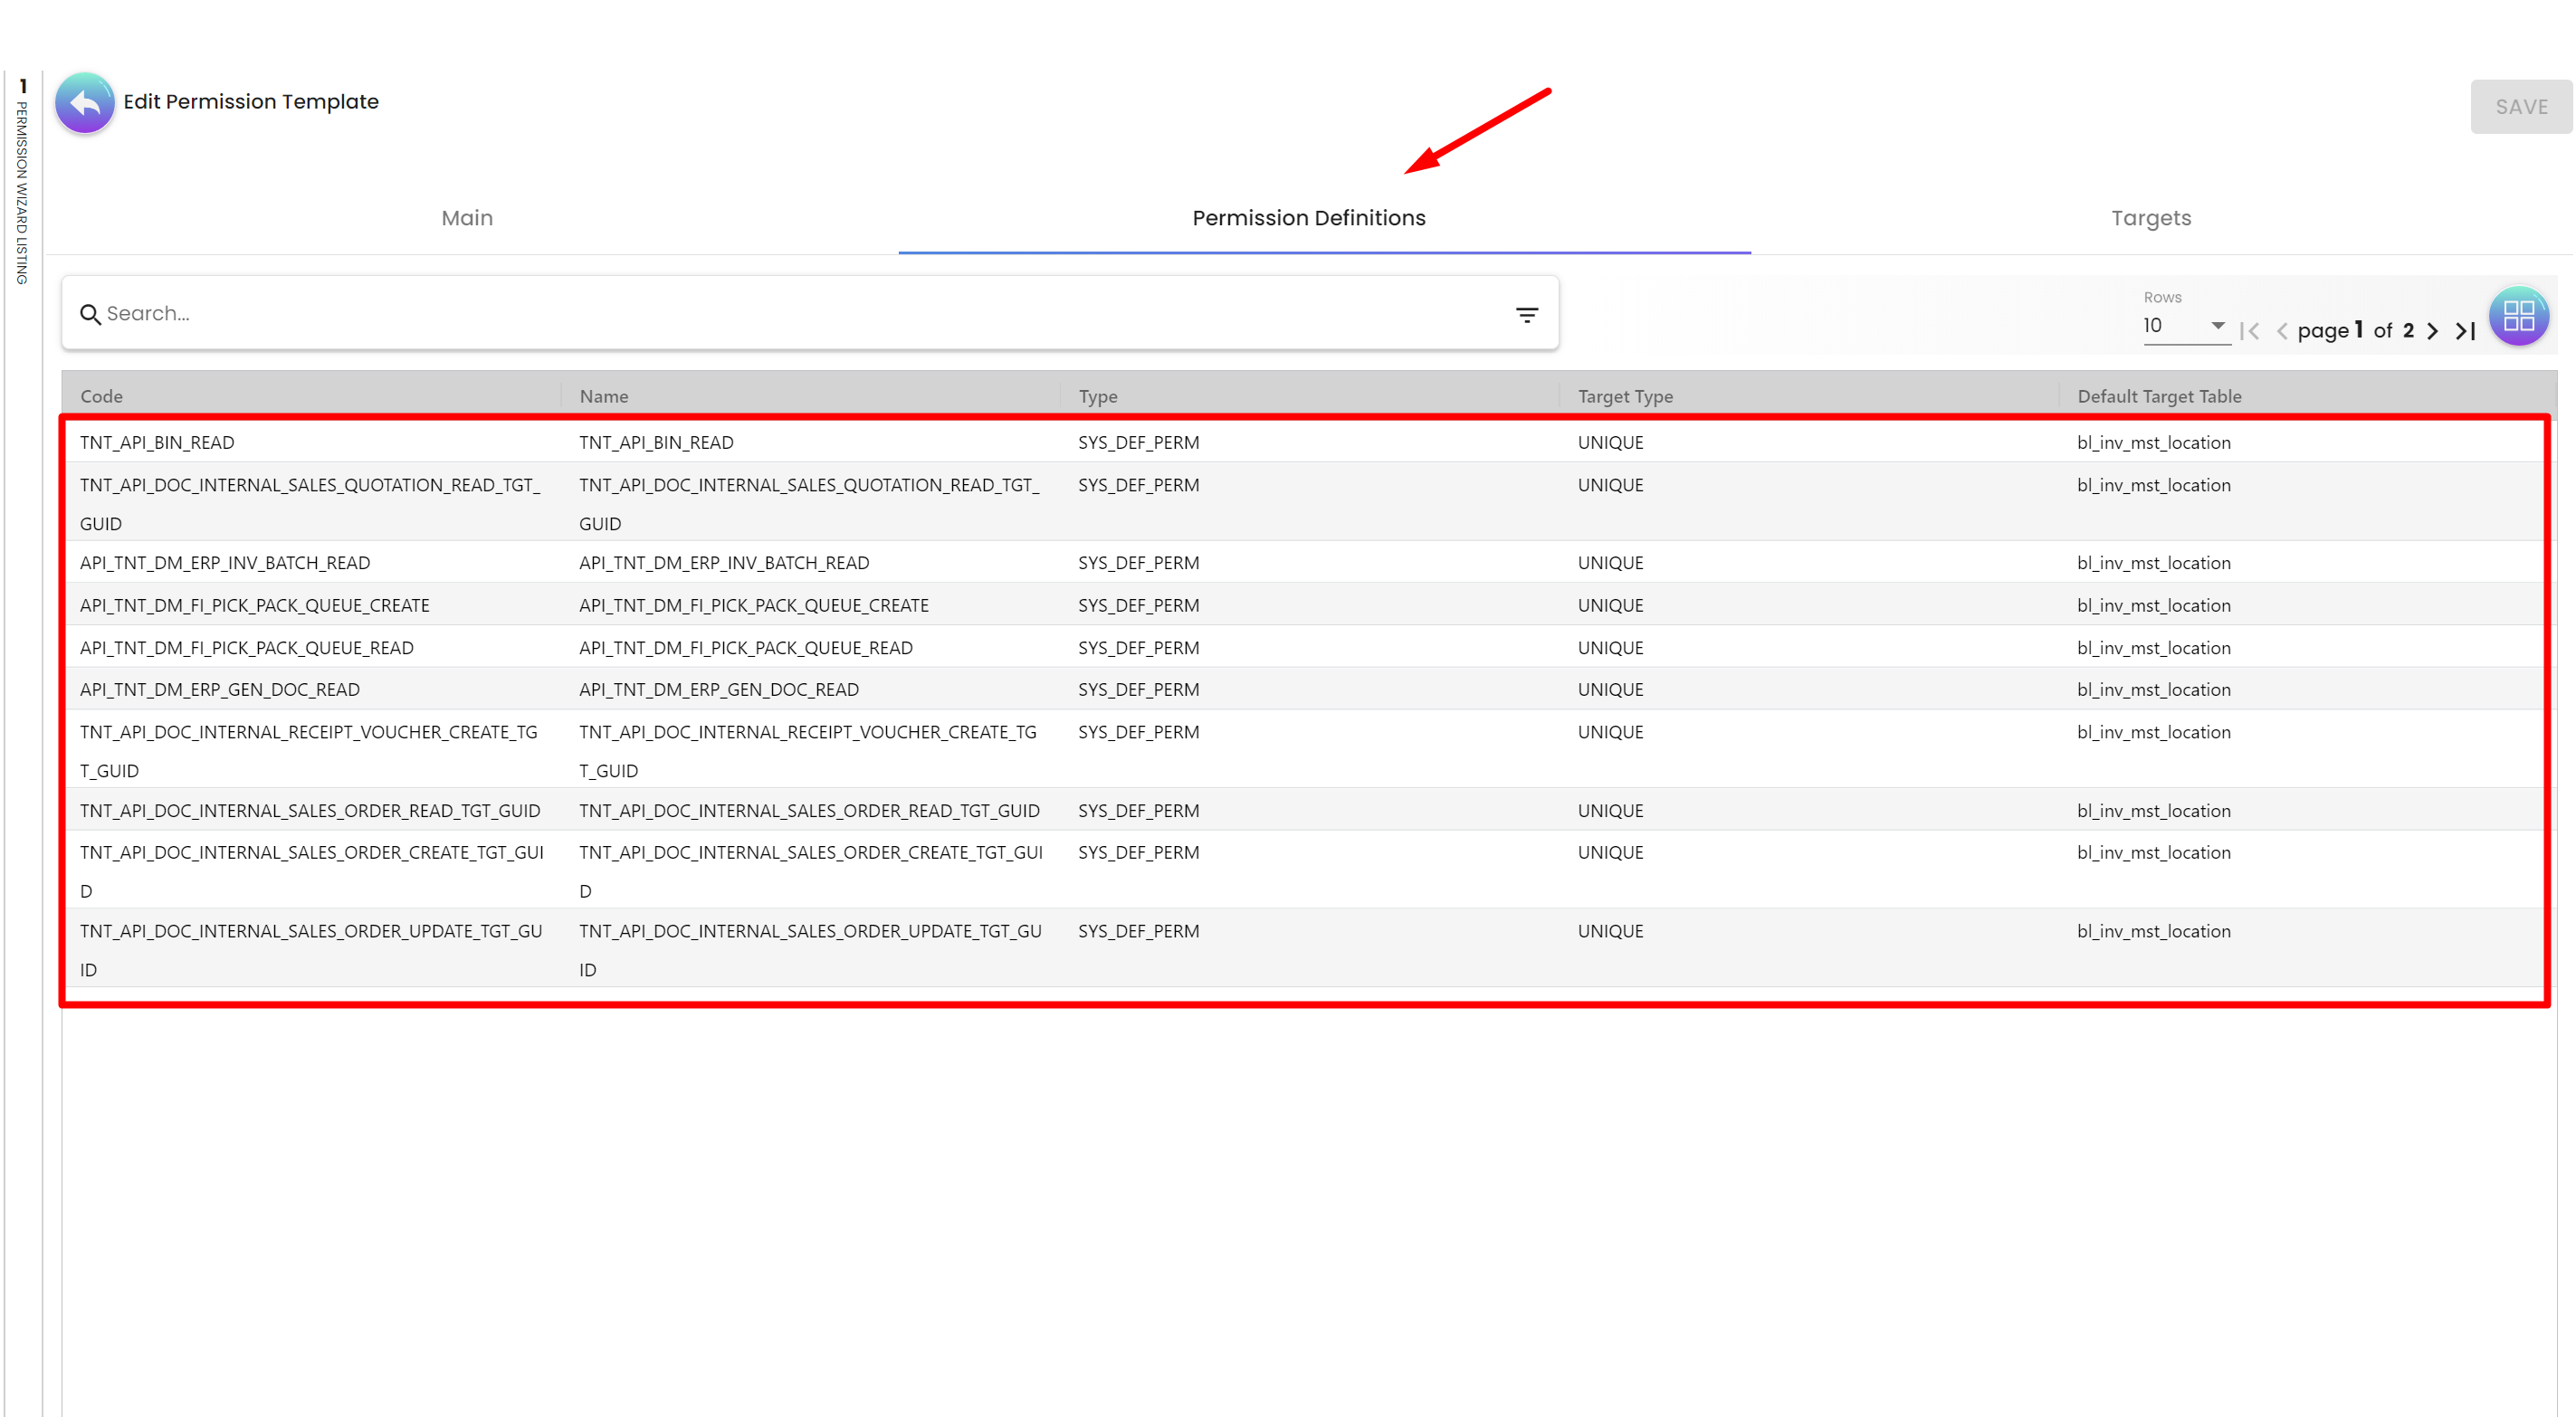
Step 3: Review Permission Definitions: This step ensures that administrators have a clear understanding of the access levels and roles associated with each template before making any changes. Here, you can view permission definition for each template
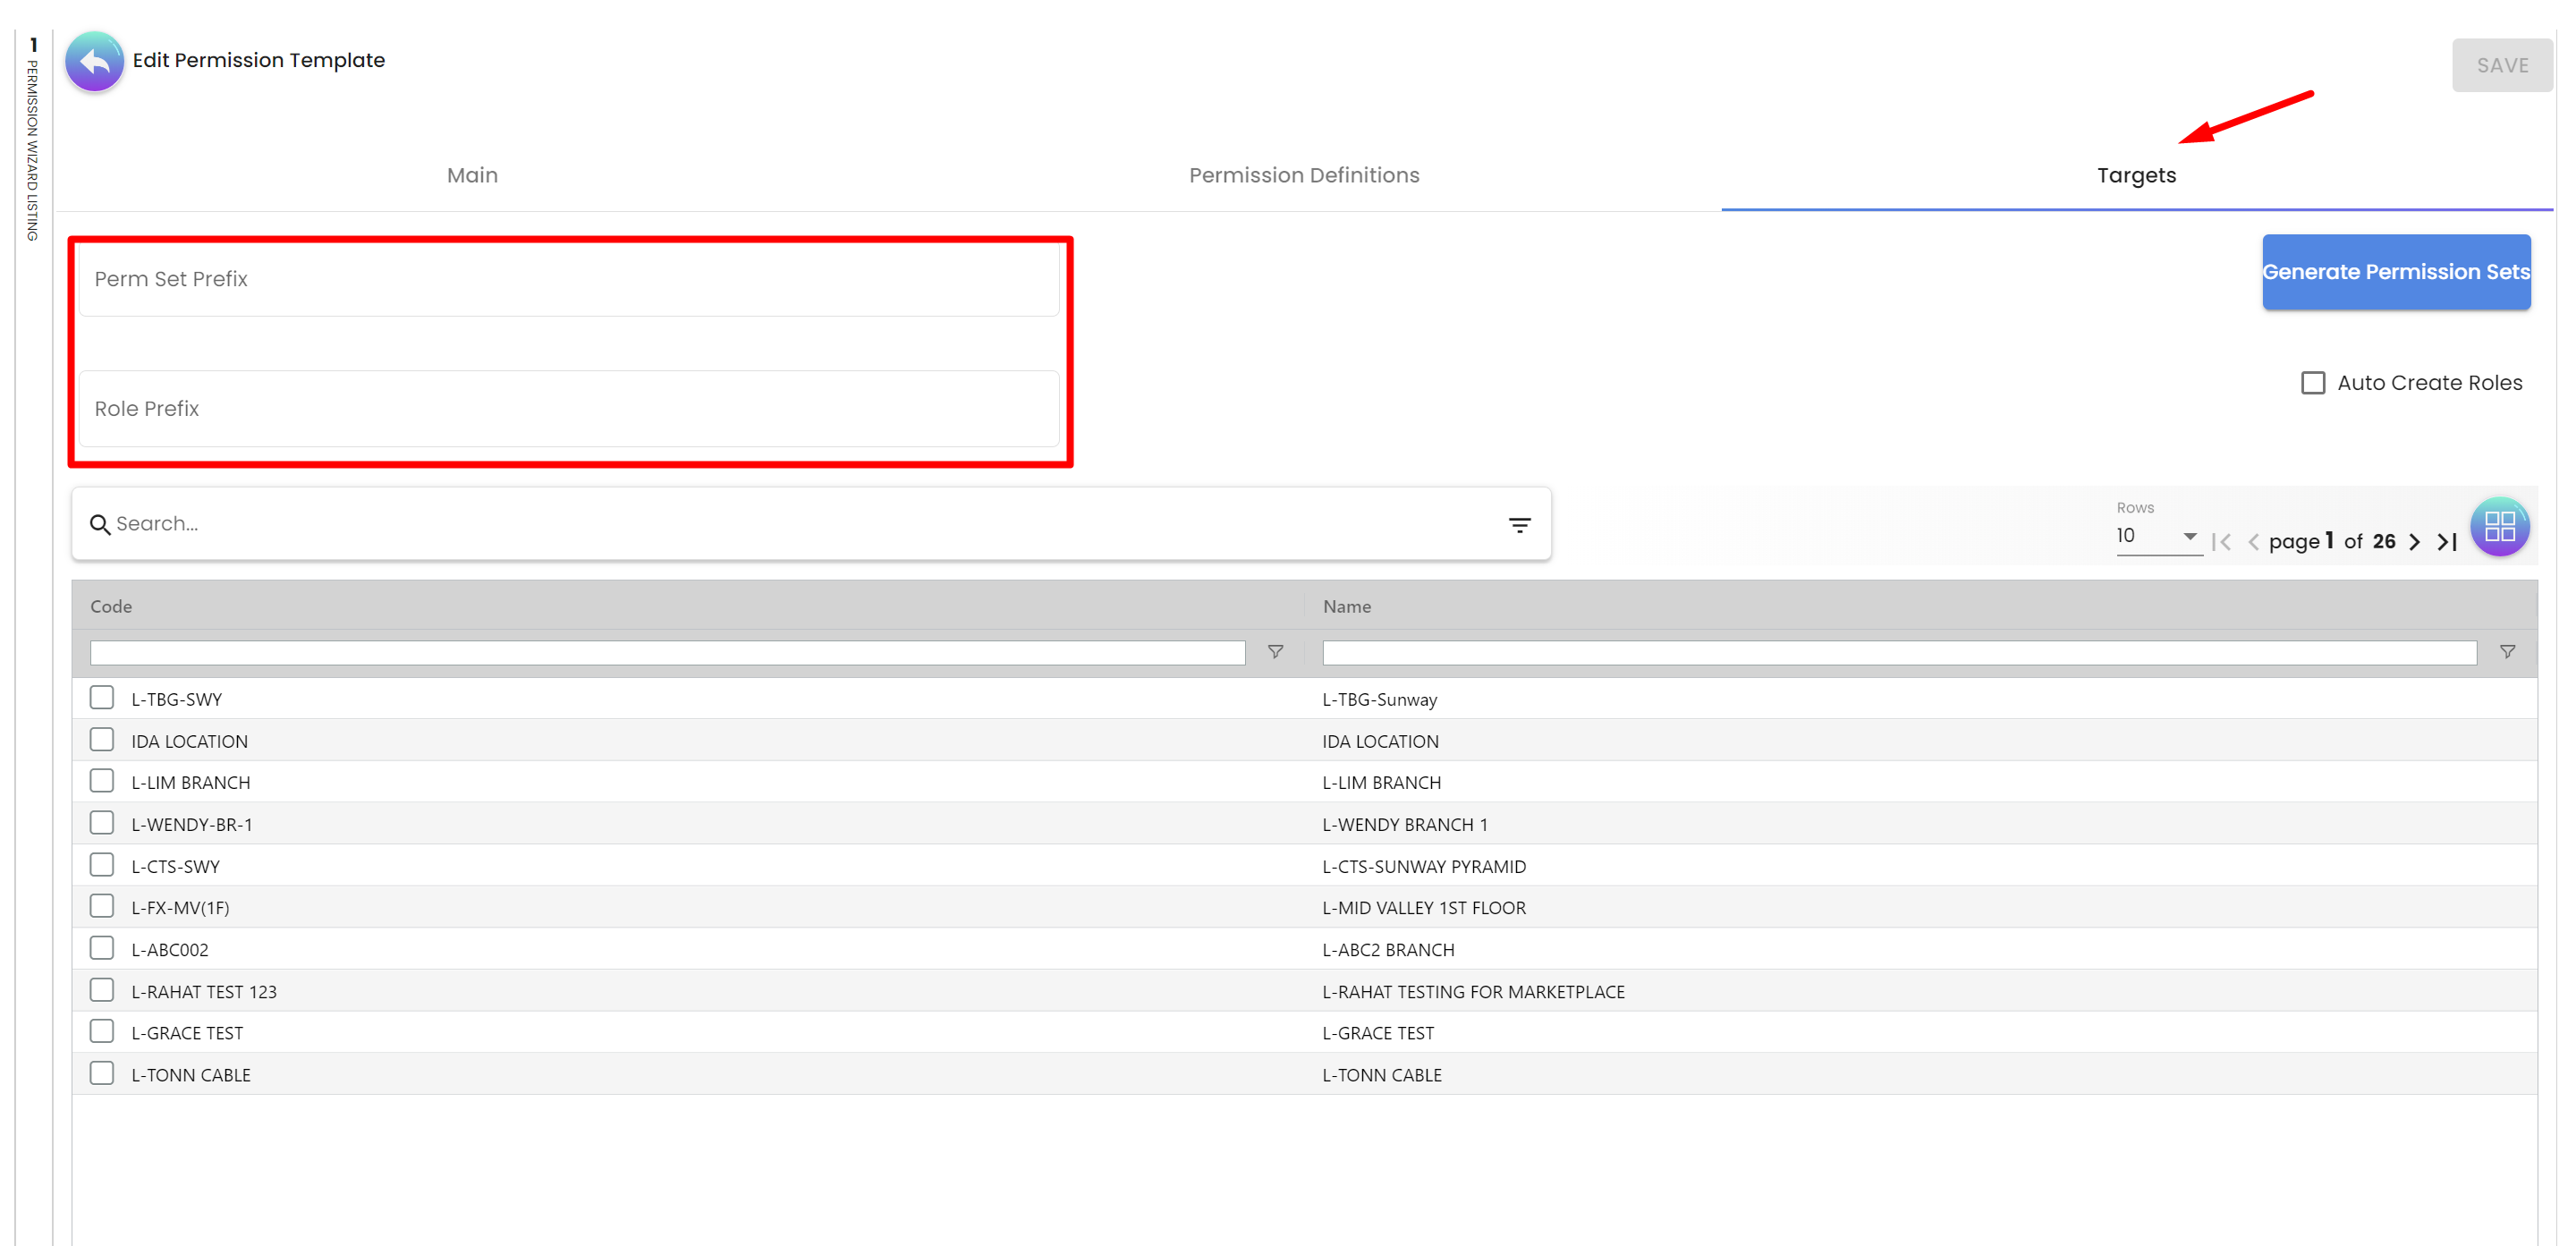
Step 4: Customizing Prefixes: In this step, the user has the option to set a custom prefix for roles and permission sets.
Enter the desired role prefix and permission set prefix in the designated fields.
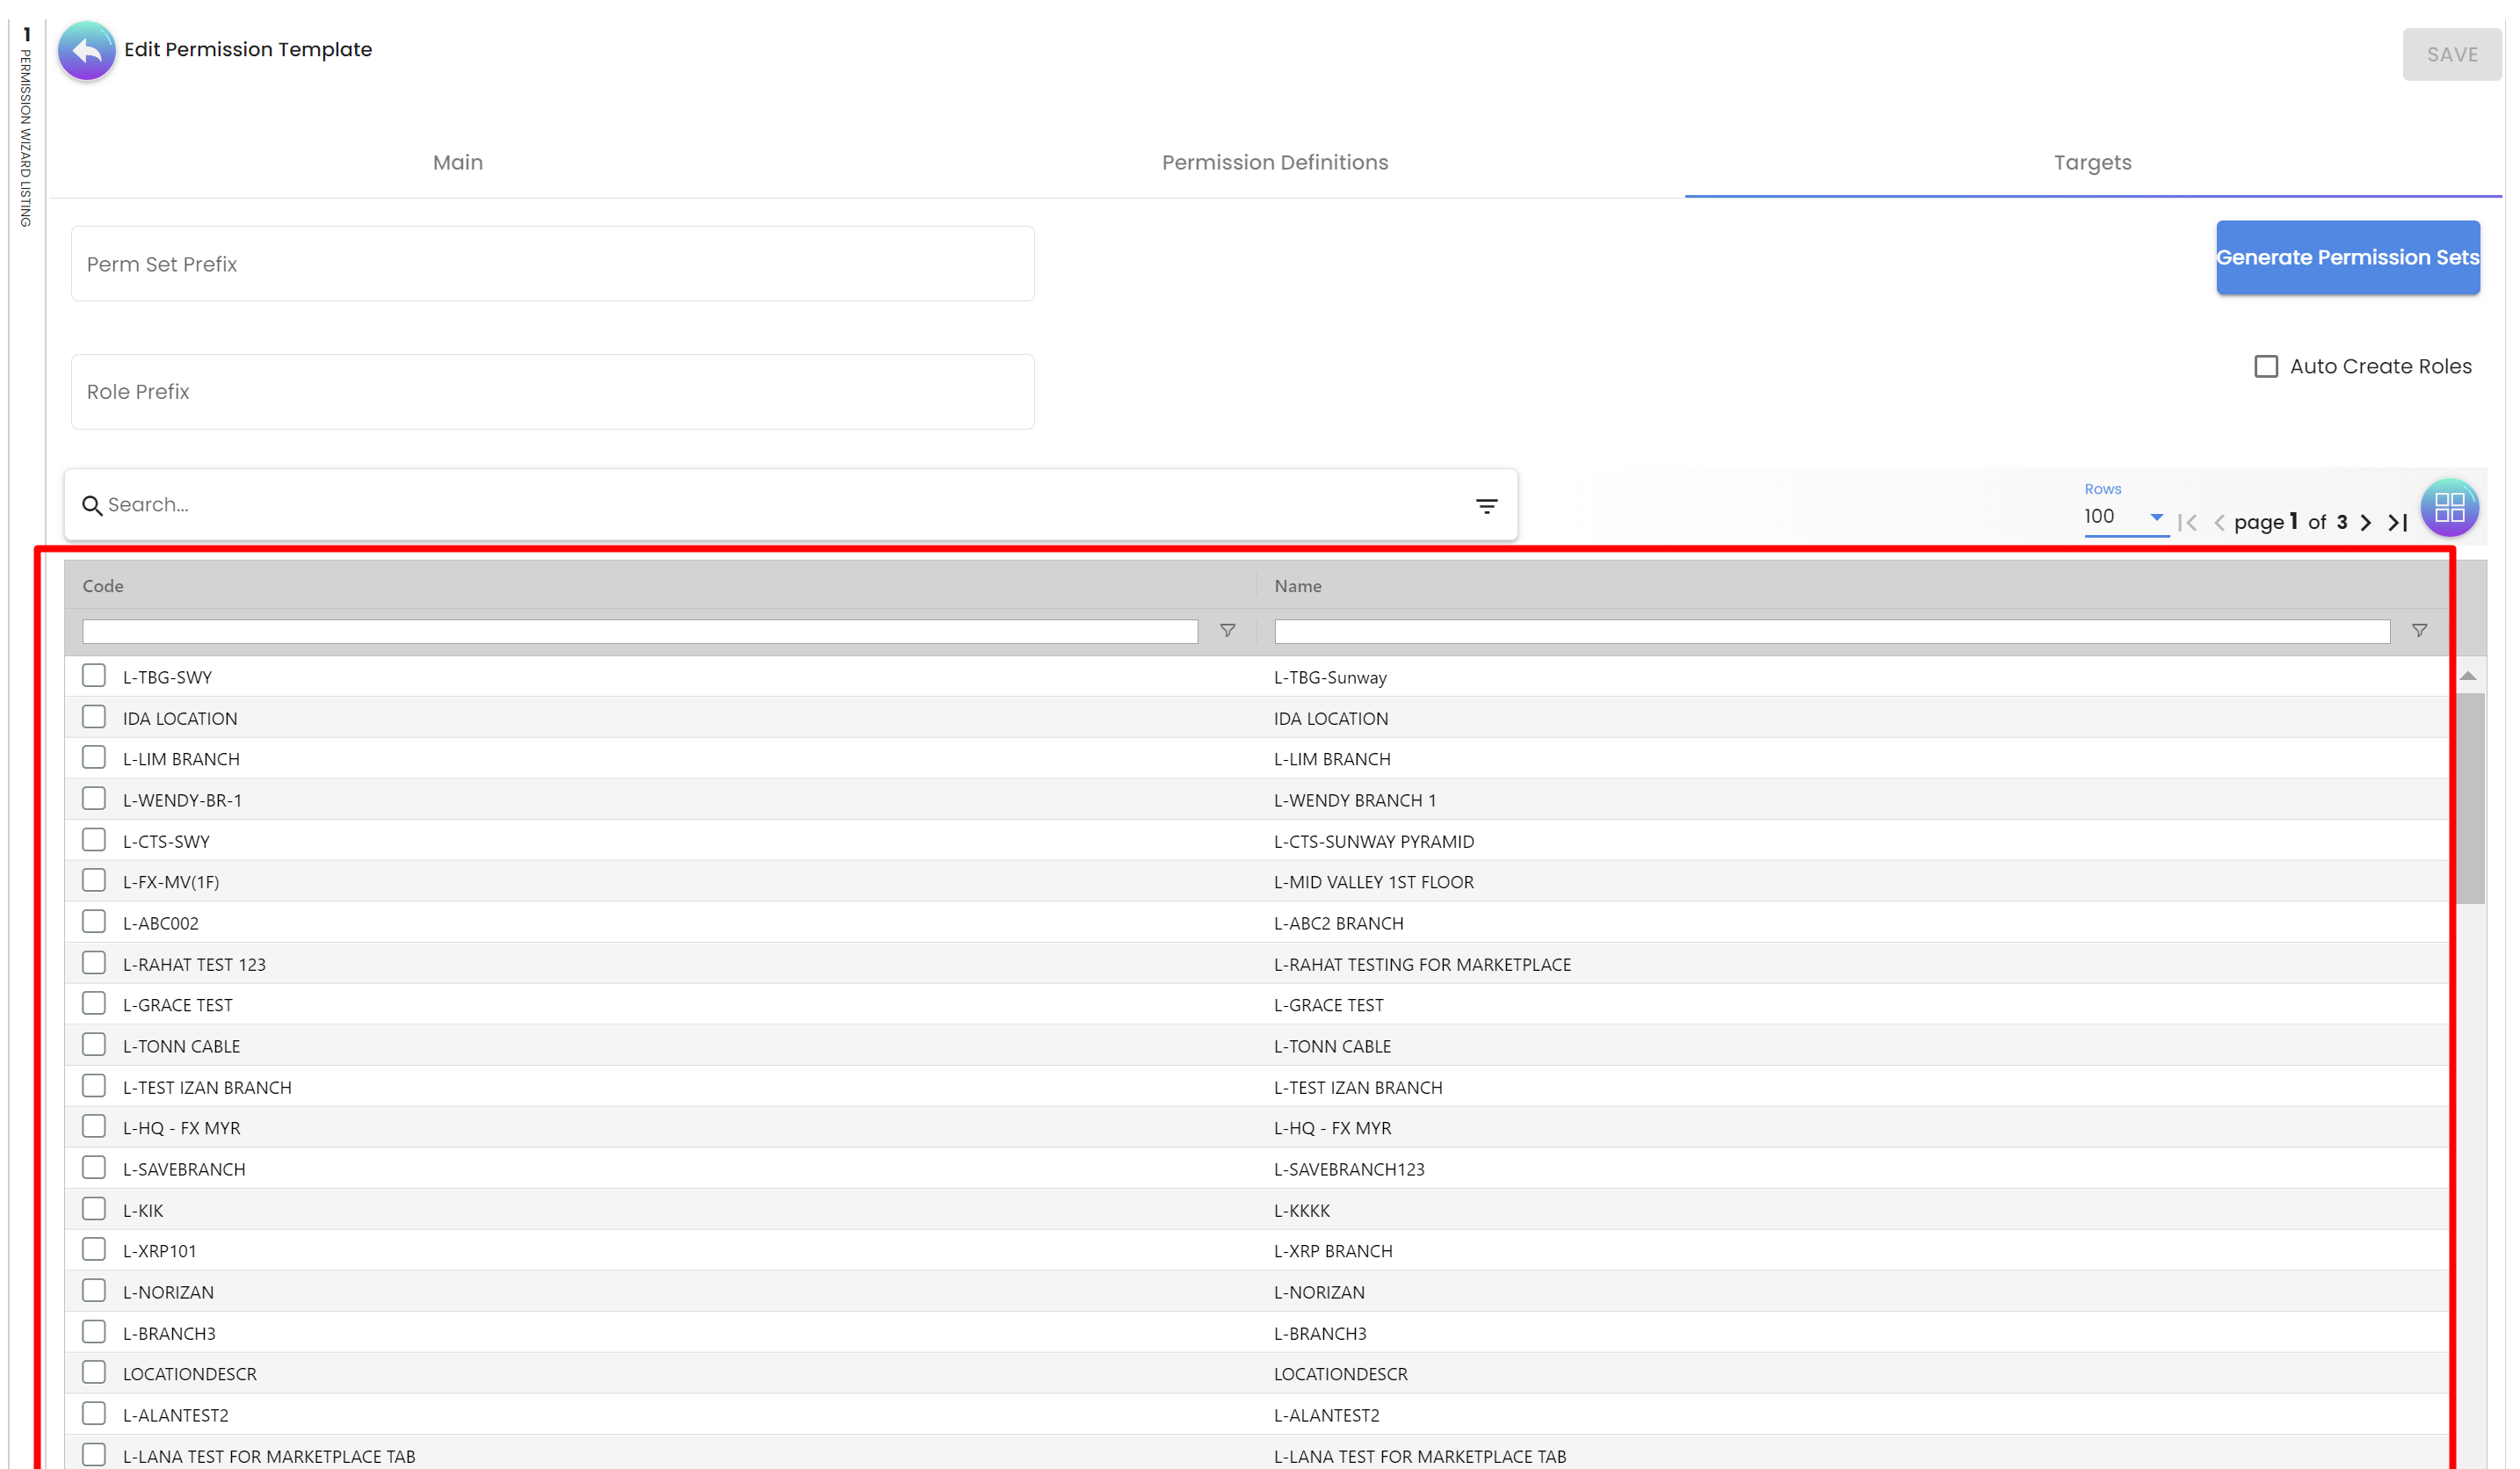
Step 5: Selecting Target Entities: Choose the branches locations or companies where you want to duplicate the permission template.
You can select multiple entities or choose to copy the template to all entities.
Step 6: Auto-generating Permission Sets: Decide whether you want the wizard to auto-generate permission sets for the selected entities.
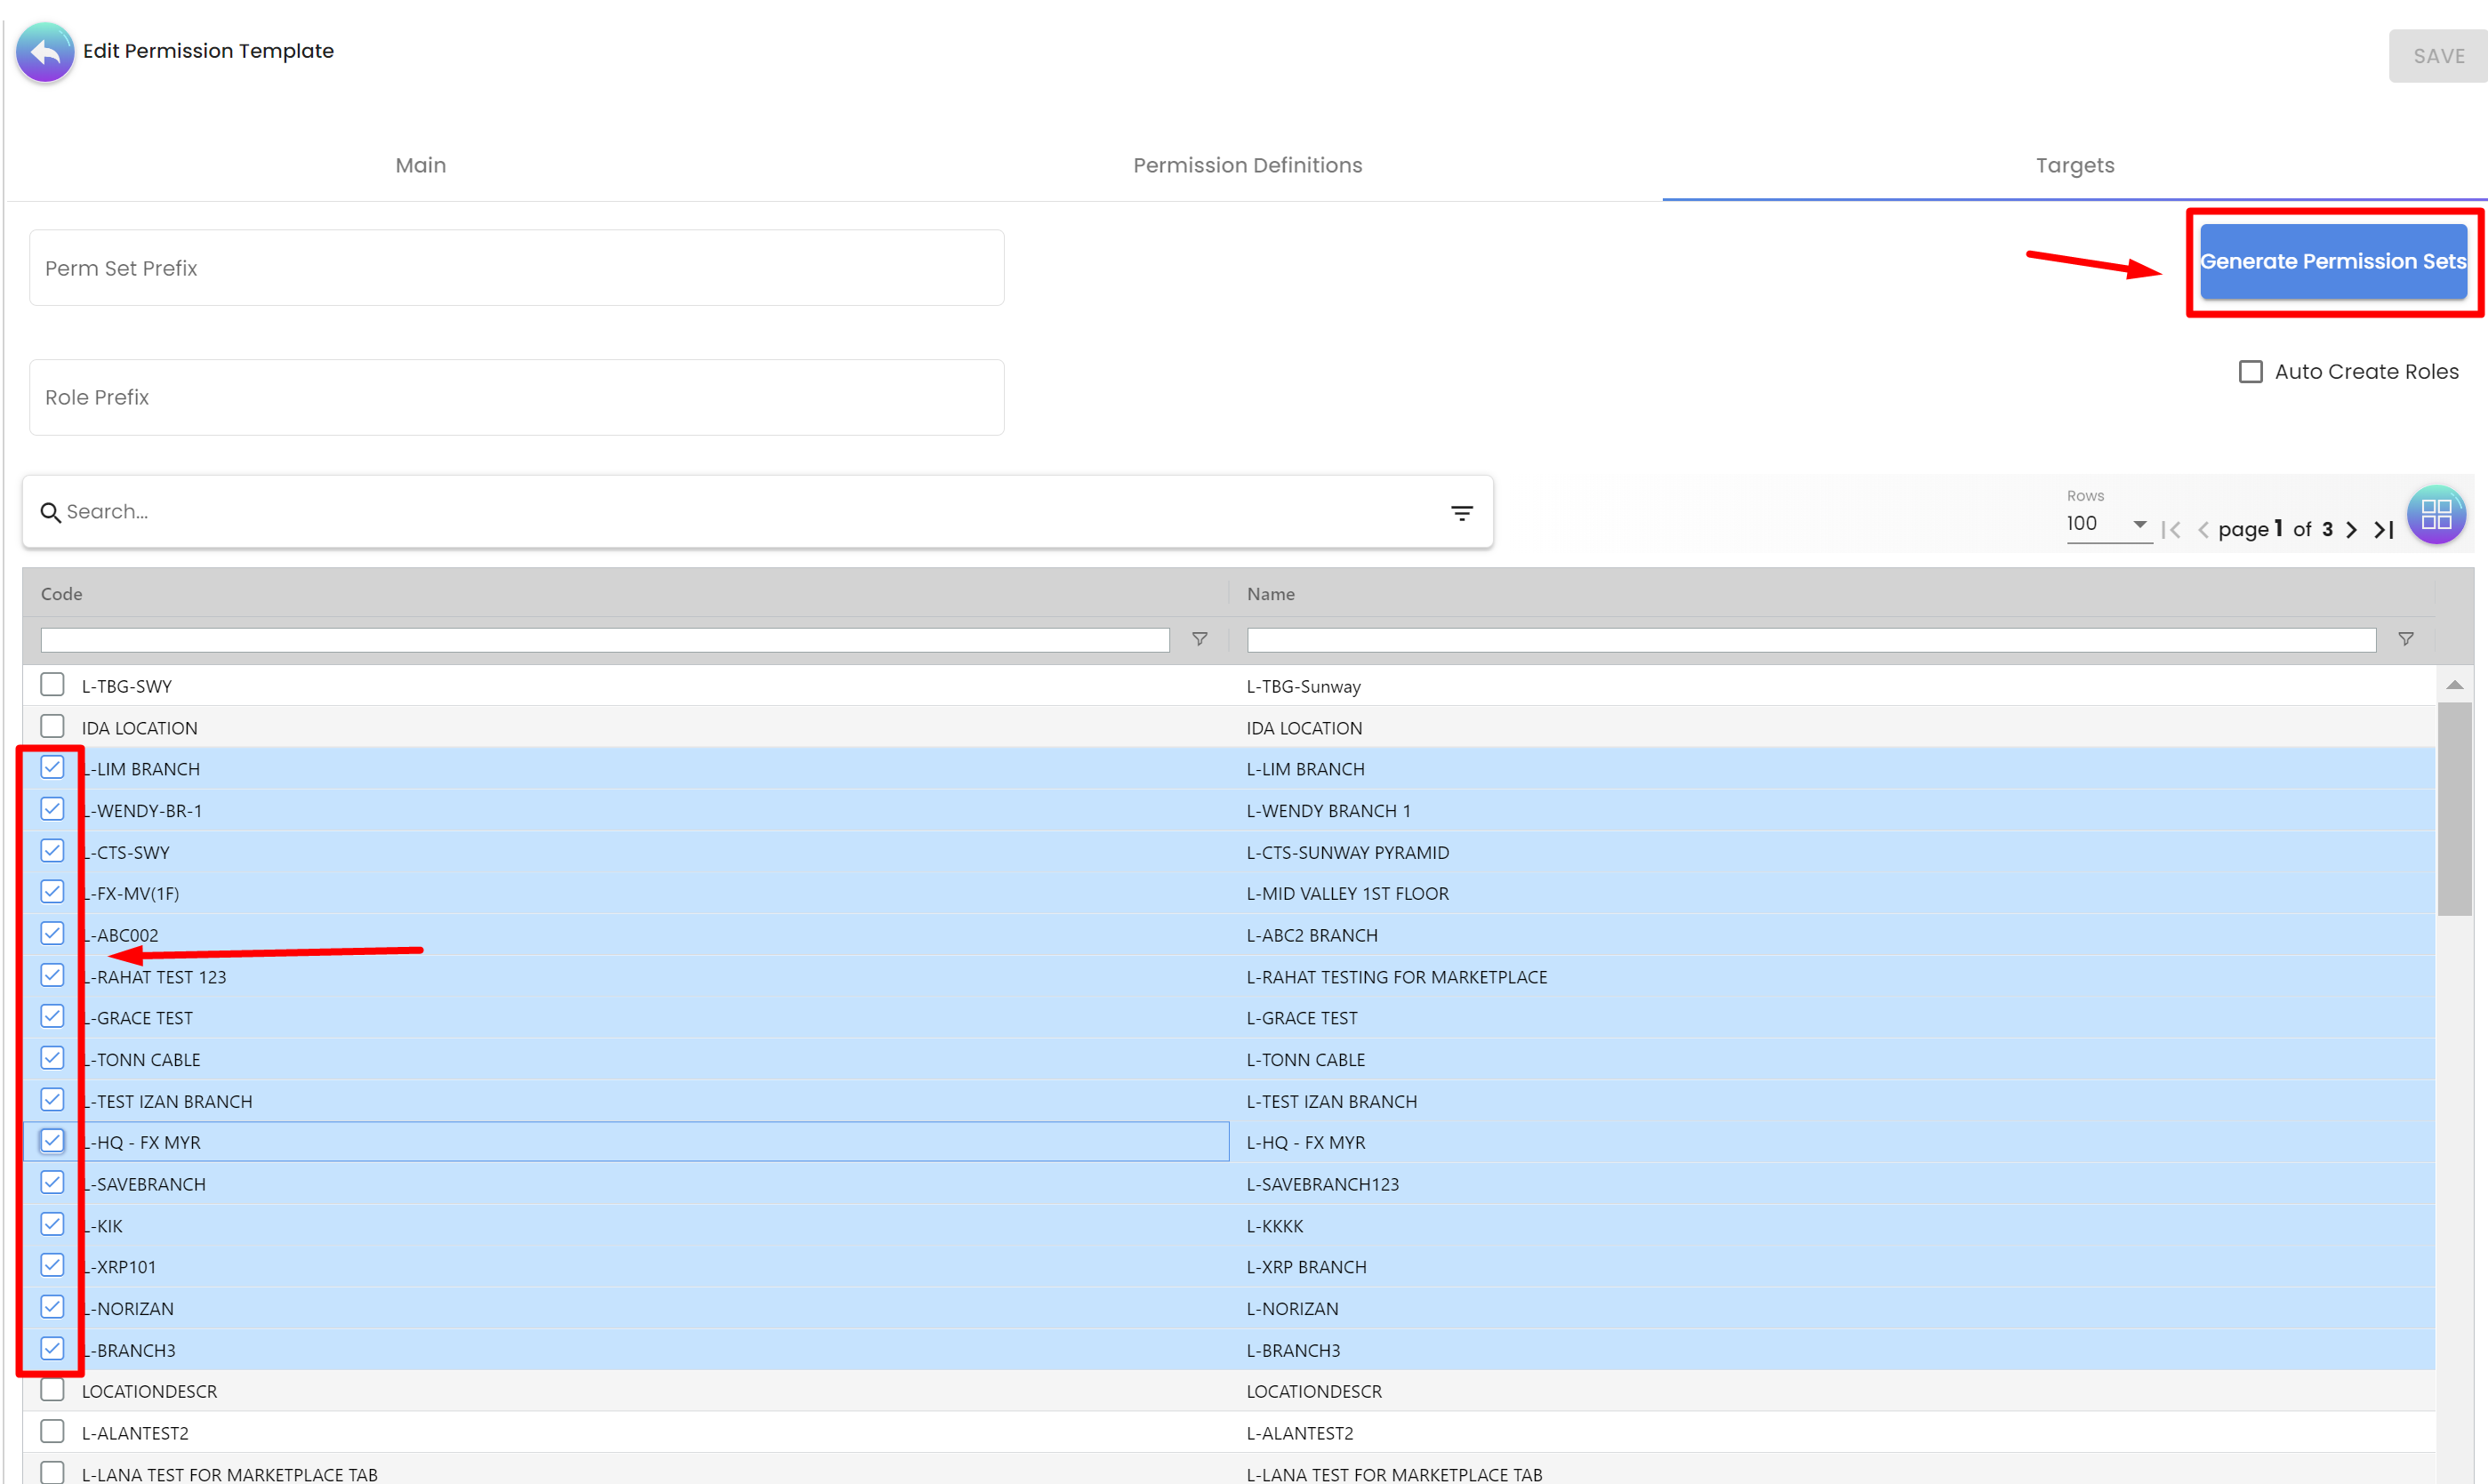
If enabled, the wizard will create permission sets based on the specified permission definitions and prefixes.
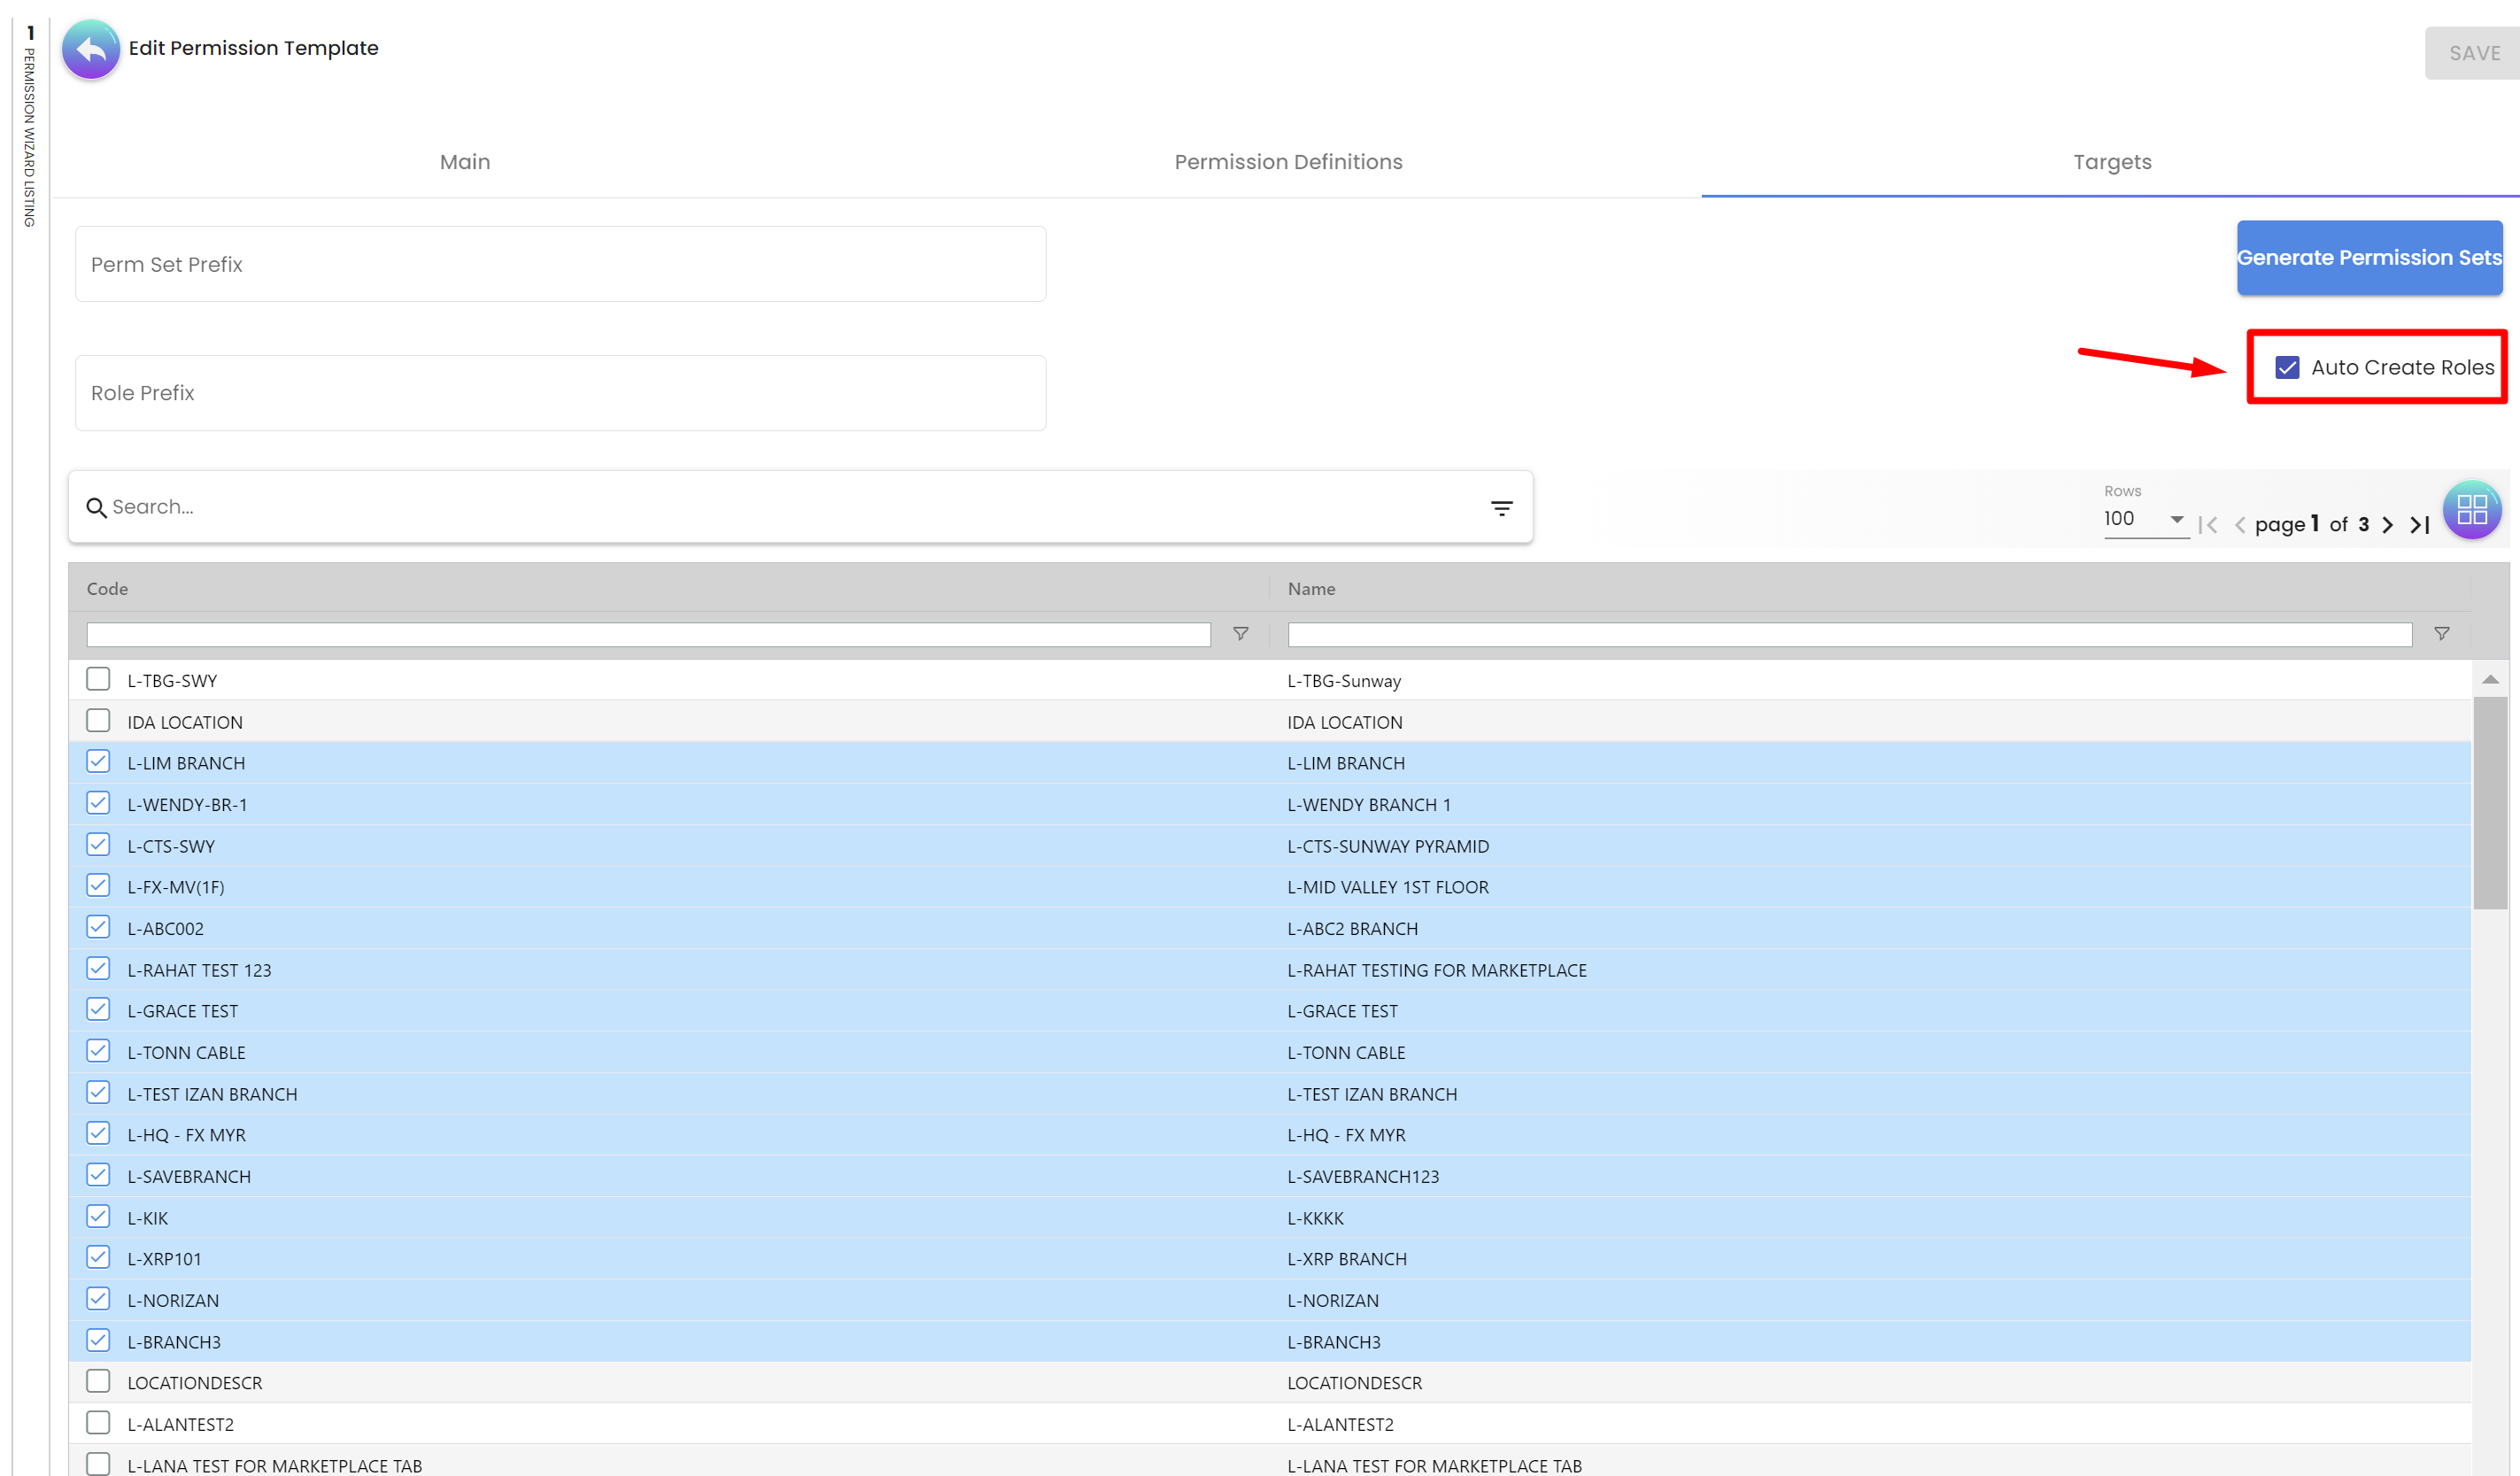
Step 7: Auto-creating Roles: To save time and effort, the Permission Wizard allows you to auto-create roles based on the provided prefixes and permissions.
Check the "Auto-create roles" checkbox to enable this feature.
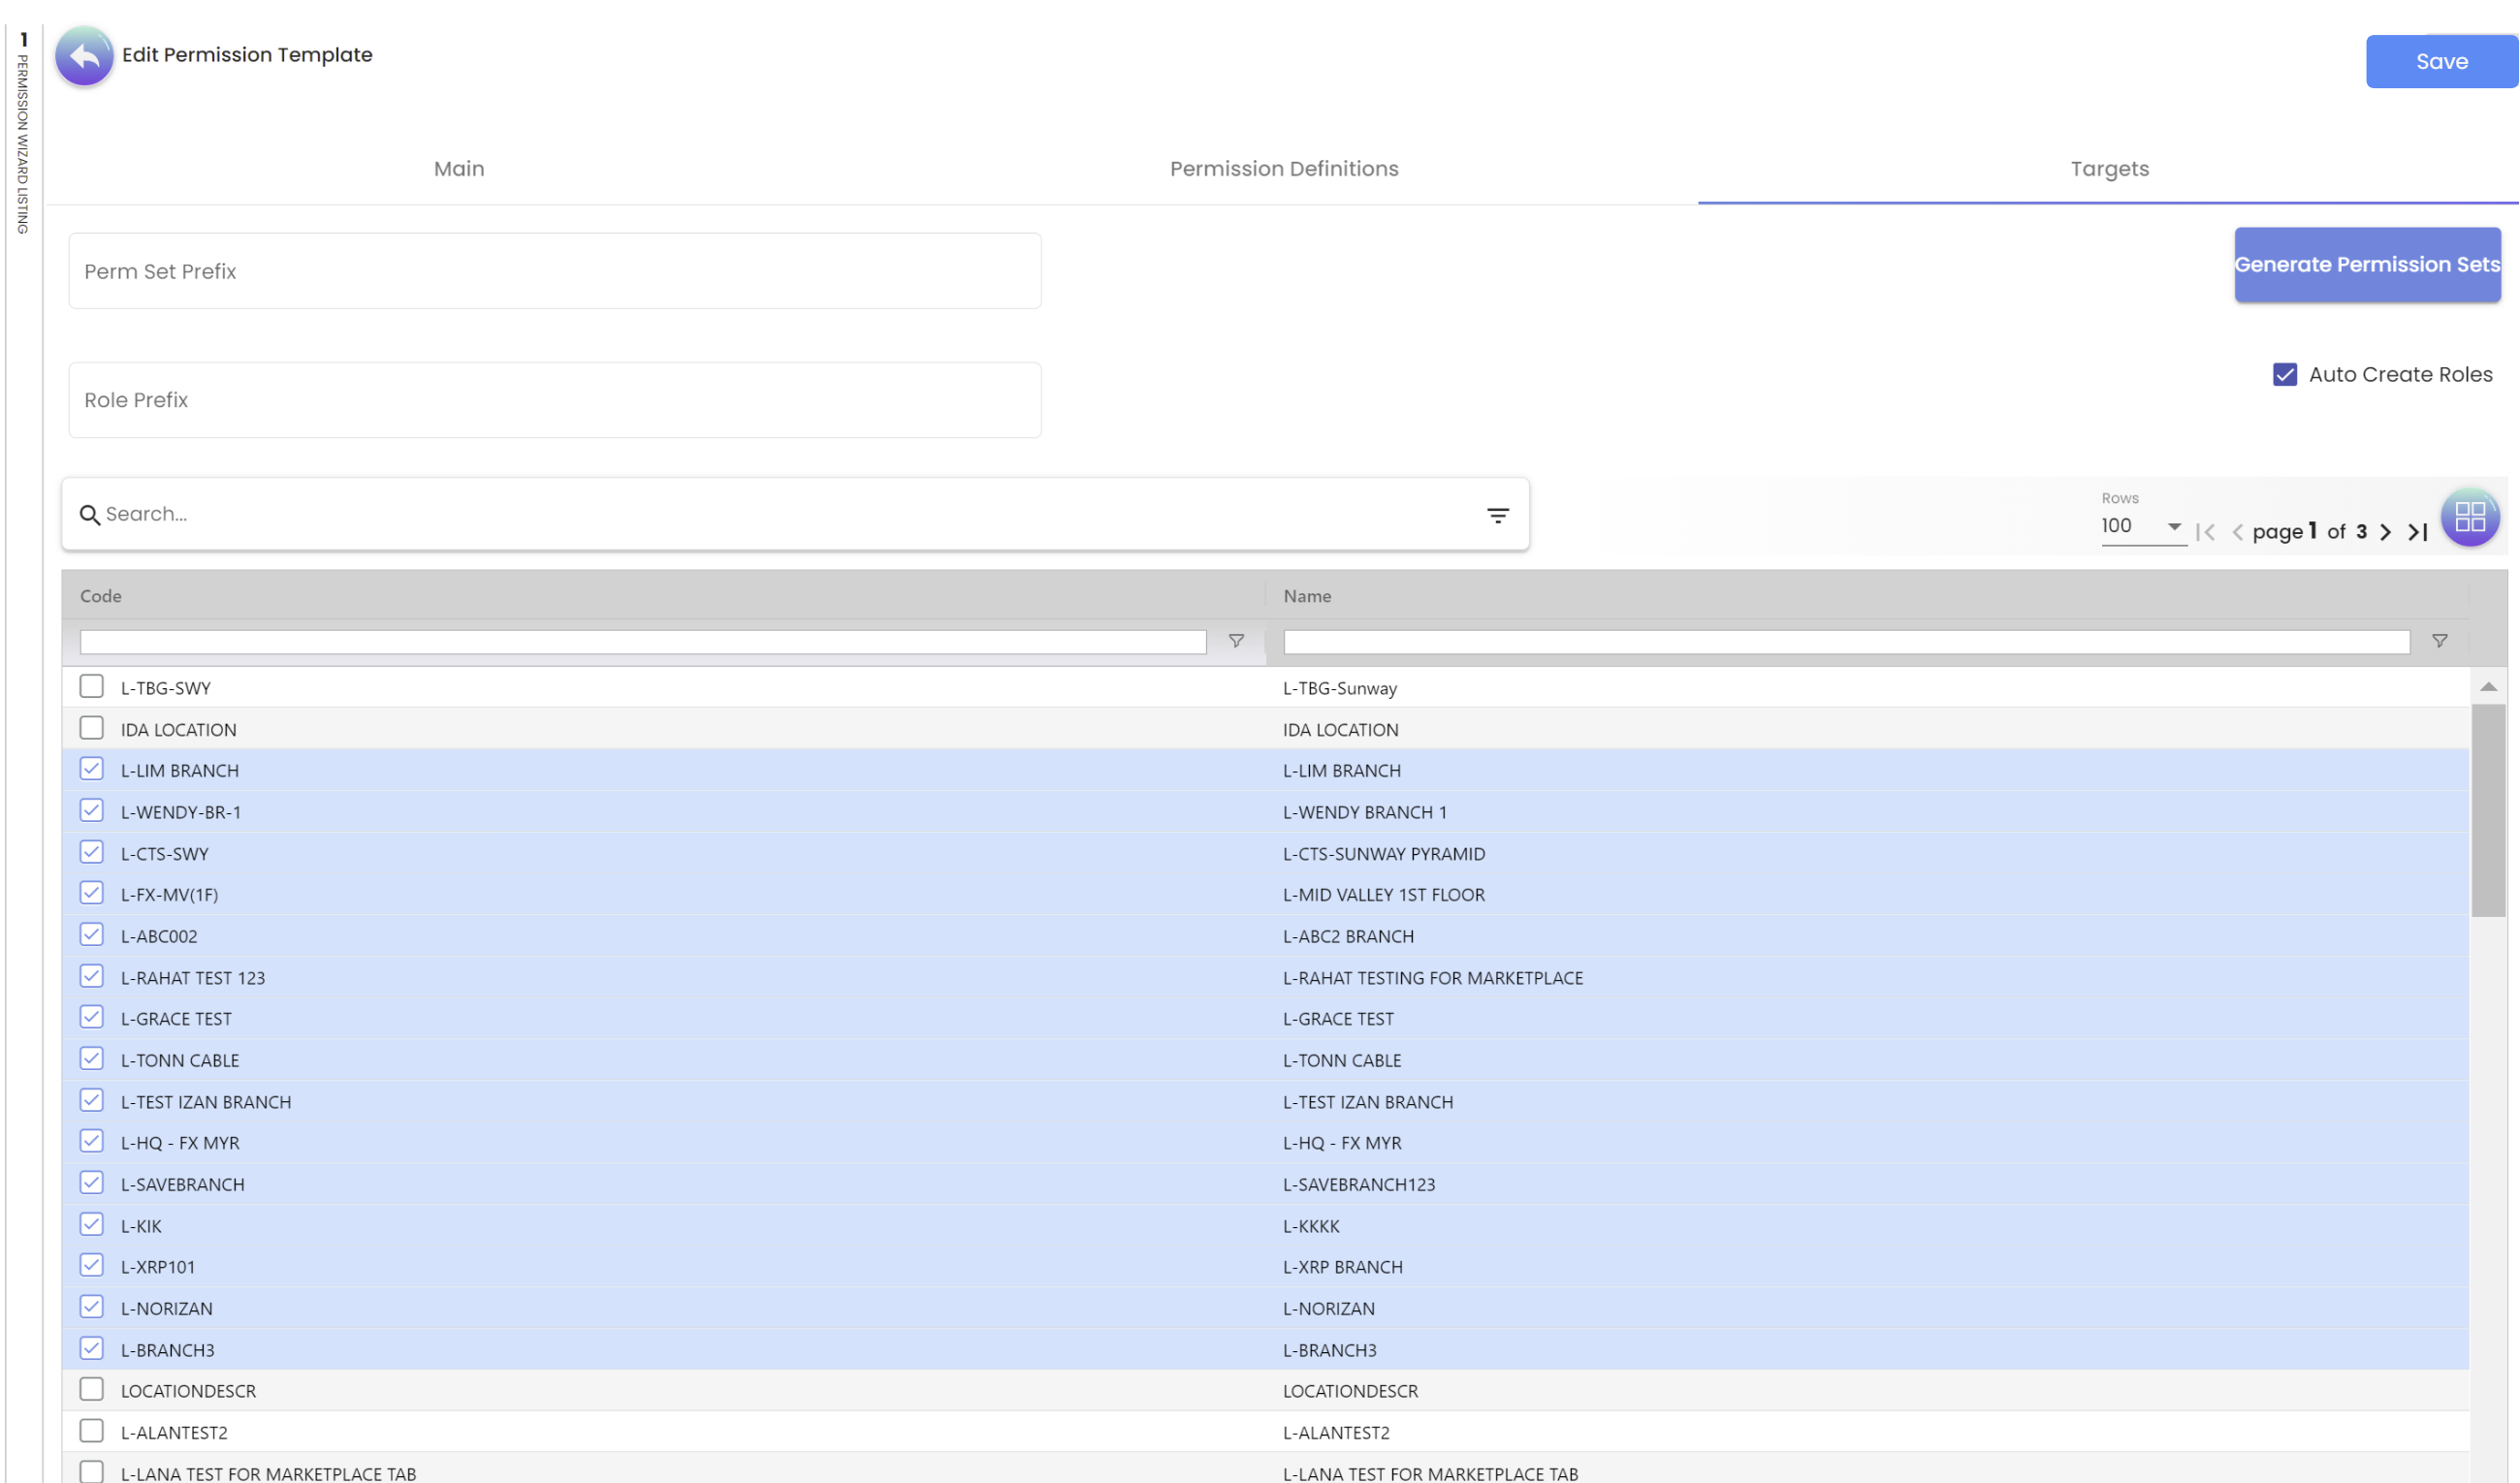
Step 8: Confirm and Execute: Review your selected options and configurations to ensure they match your requirements.
Click the "Save" button to initiate the permission duplication and generation process.
Conclusion: The Permission Wizard empowers administrators to efficiently manage permission templates across various companies, branches and locations. By leveraging the ability to copy templates, set prefixes, and auto-generate permission sets and roles, users can ensure consistent access control throughout the organization, saving valuable time and resources.
Remember, the Permission Wizard is designed to simplify the process of handling permissions, providing a seamless experience for managing user access across the organization’s entities.
3. Permission Set:
3.1 Overview:
Permission sets in the application allow users to define groups of permissions that can be applied to specific target entities, such as companies, branches, or locations. This feature simplifies the process of managing permissions for various entities by creating reusable sets of permissions that can be easily assigned as needed.
3.2 Step-by-Step Guide:
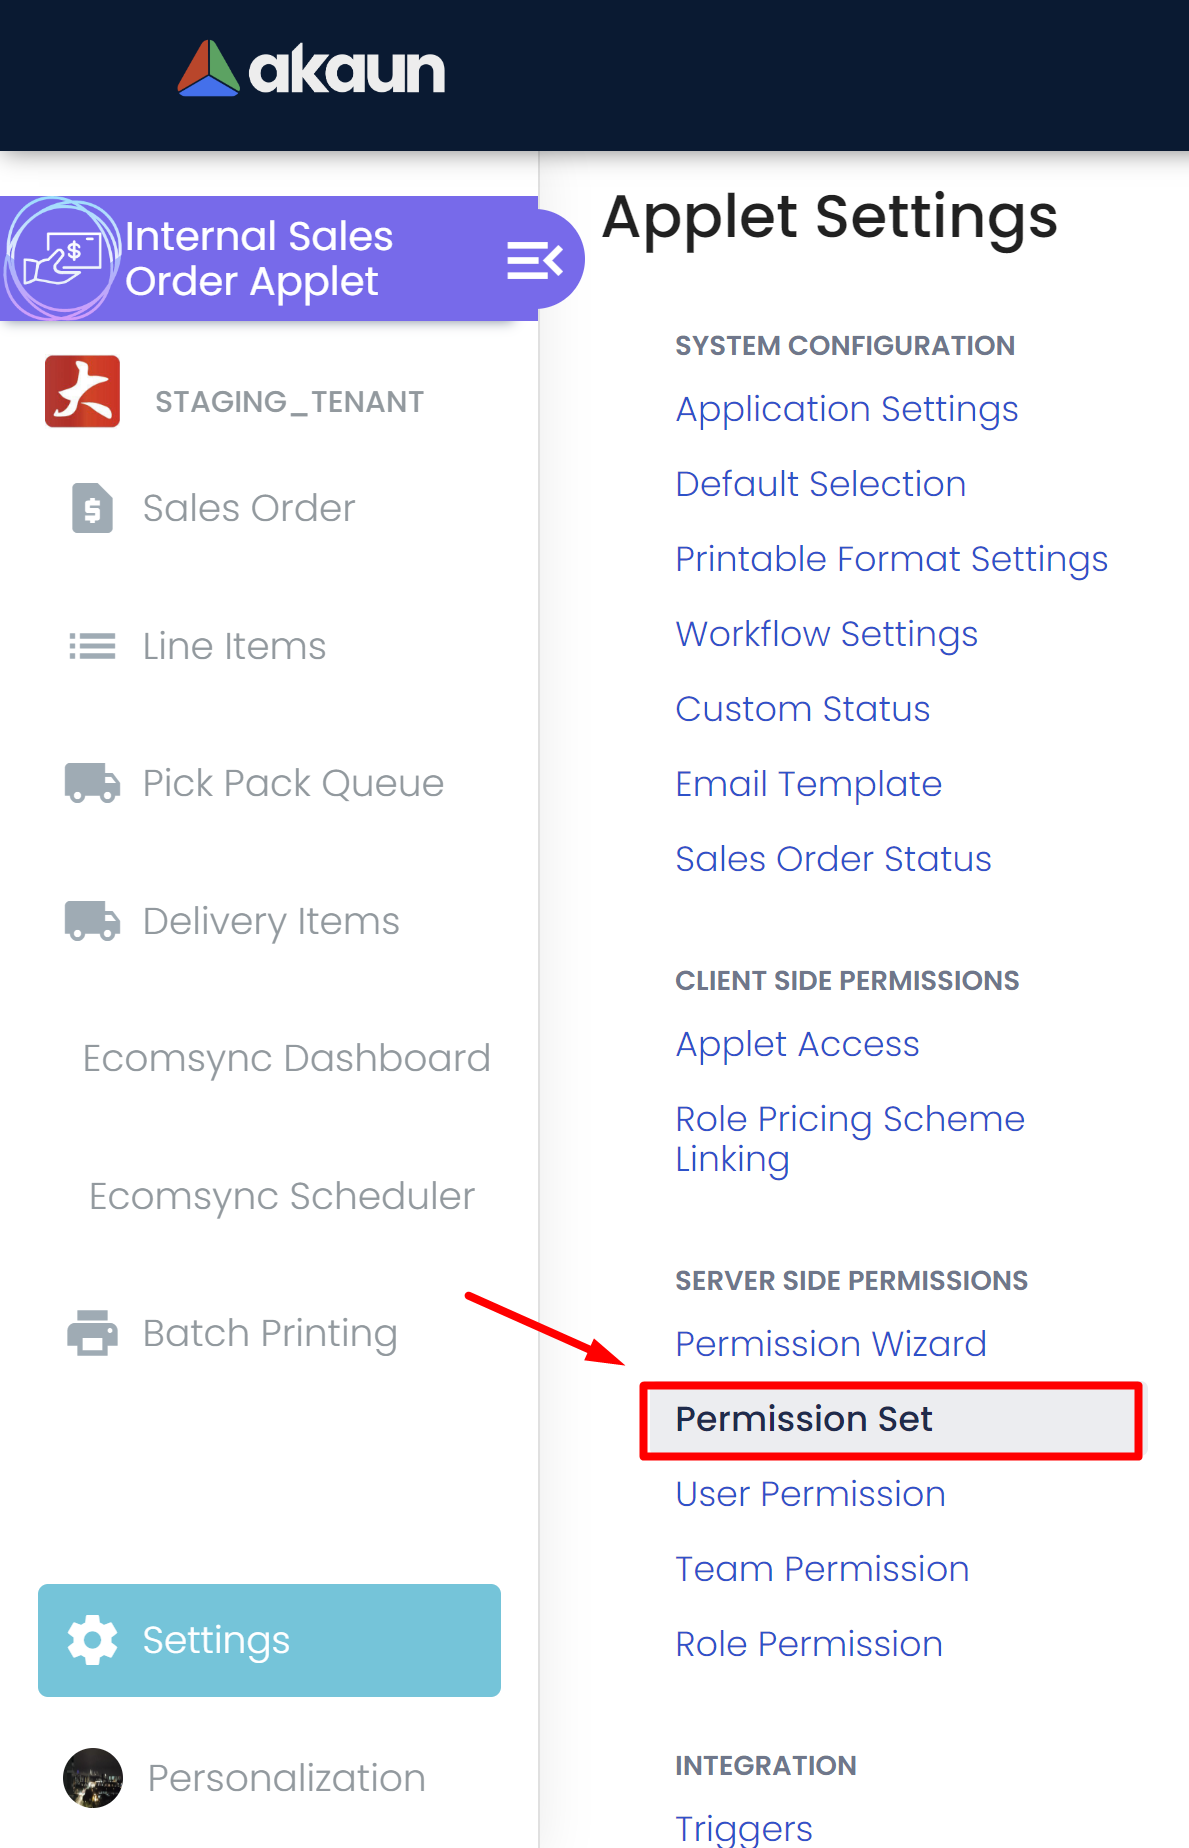
Step 1: Accessing Permission Sets:
To access the permission sets functionality, follow these steps:
-
Log in to the application with appropriate user credentials.
-
Navigate to the "Settings" section of the applet.
-
Look for the "Permission Sets" option and click on it to enter the Permission Sets interface.
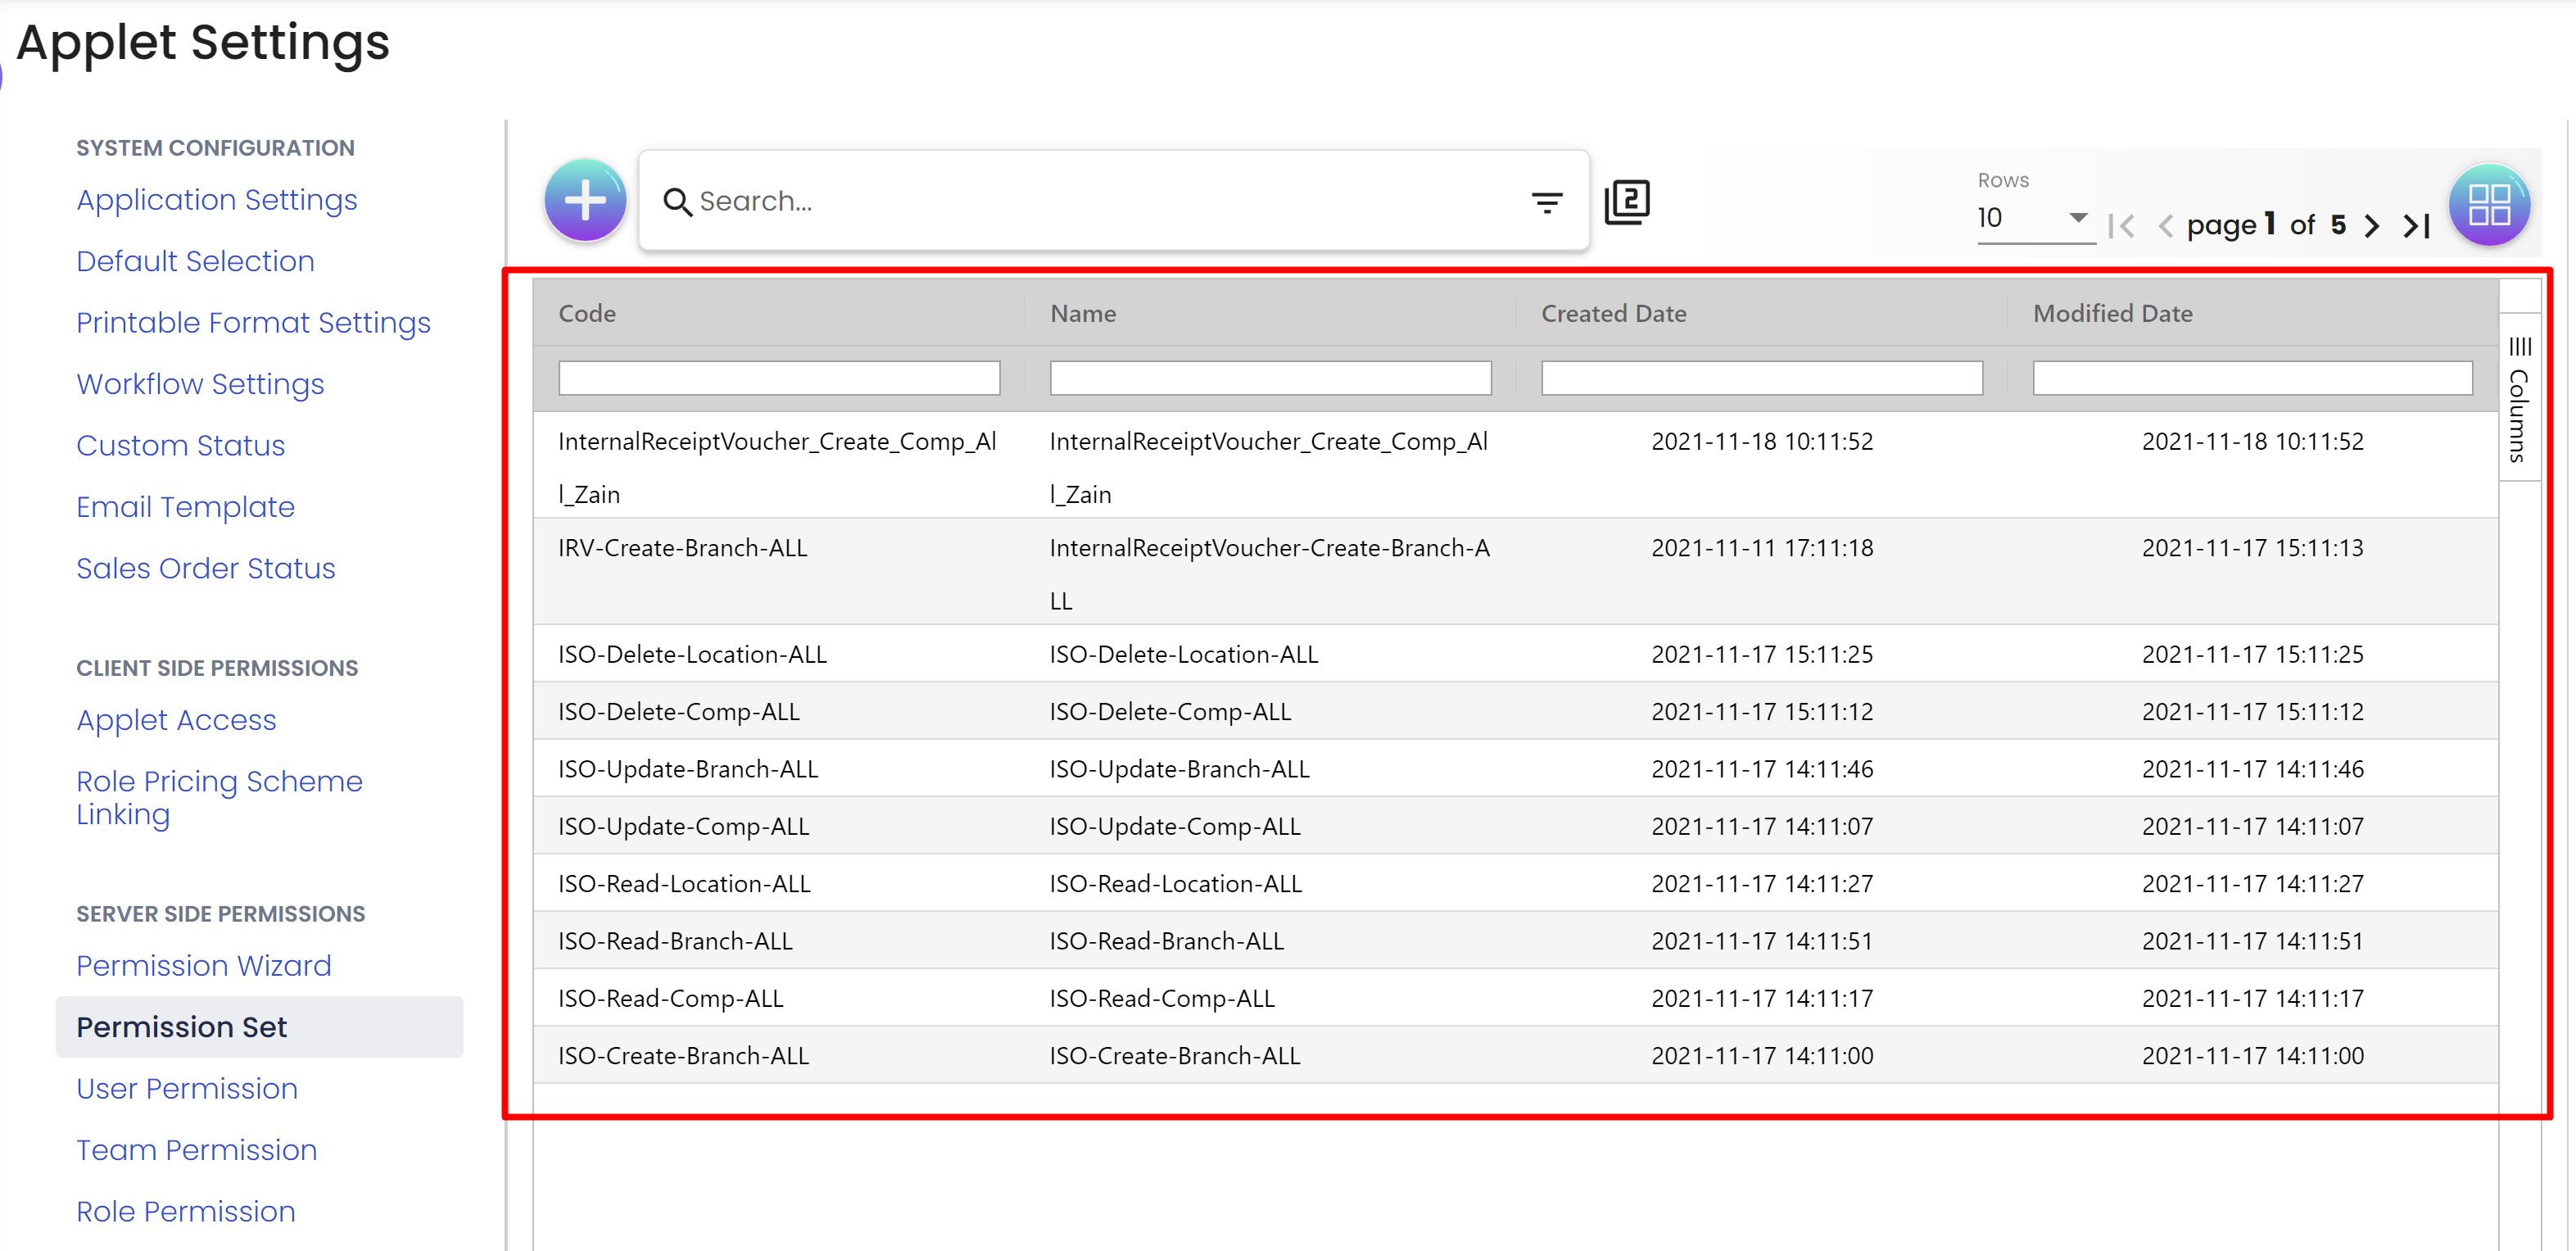
Step 2: Viewing Existing Permission Sets:
Upon entering the Permission Sets interface, you will see a list of existing permission sets. This list displays essential information about each permission set, such as its name, description, created date and the date it was last updated.
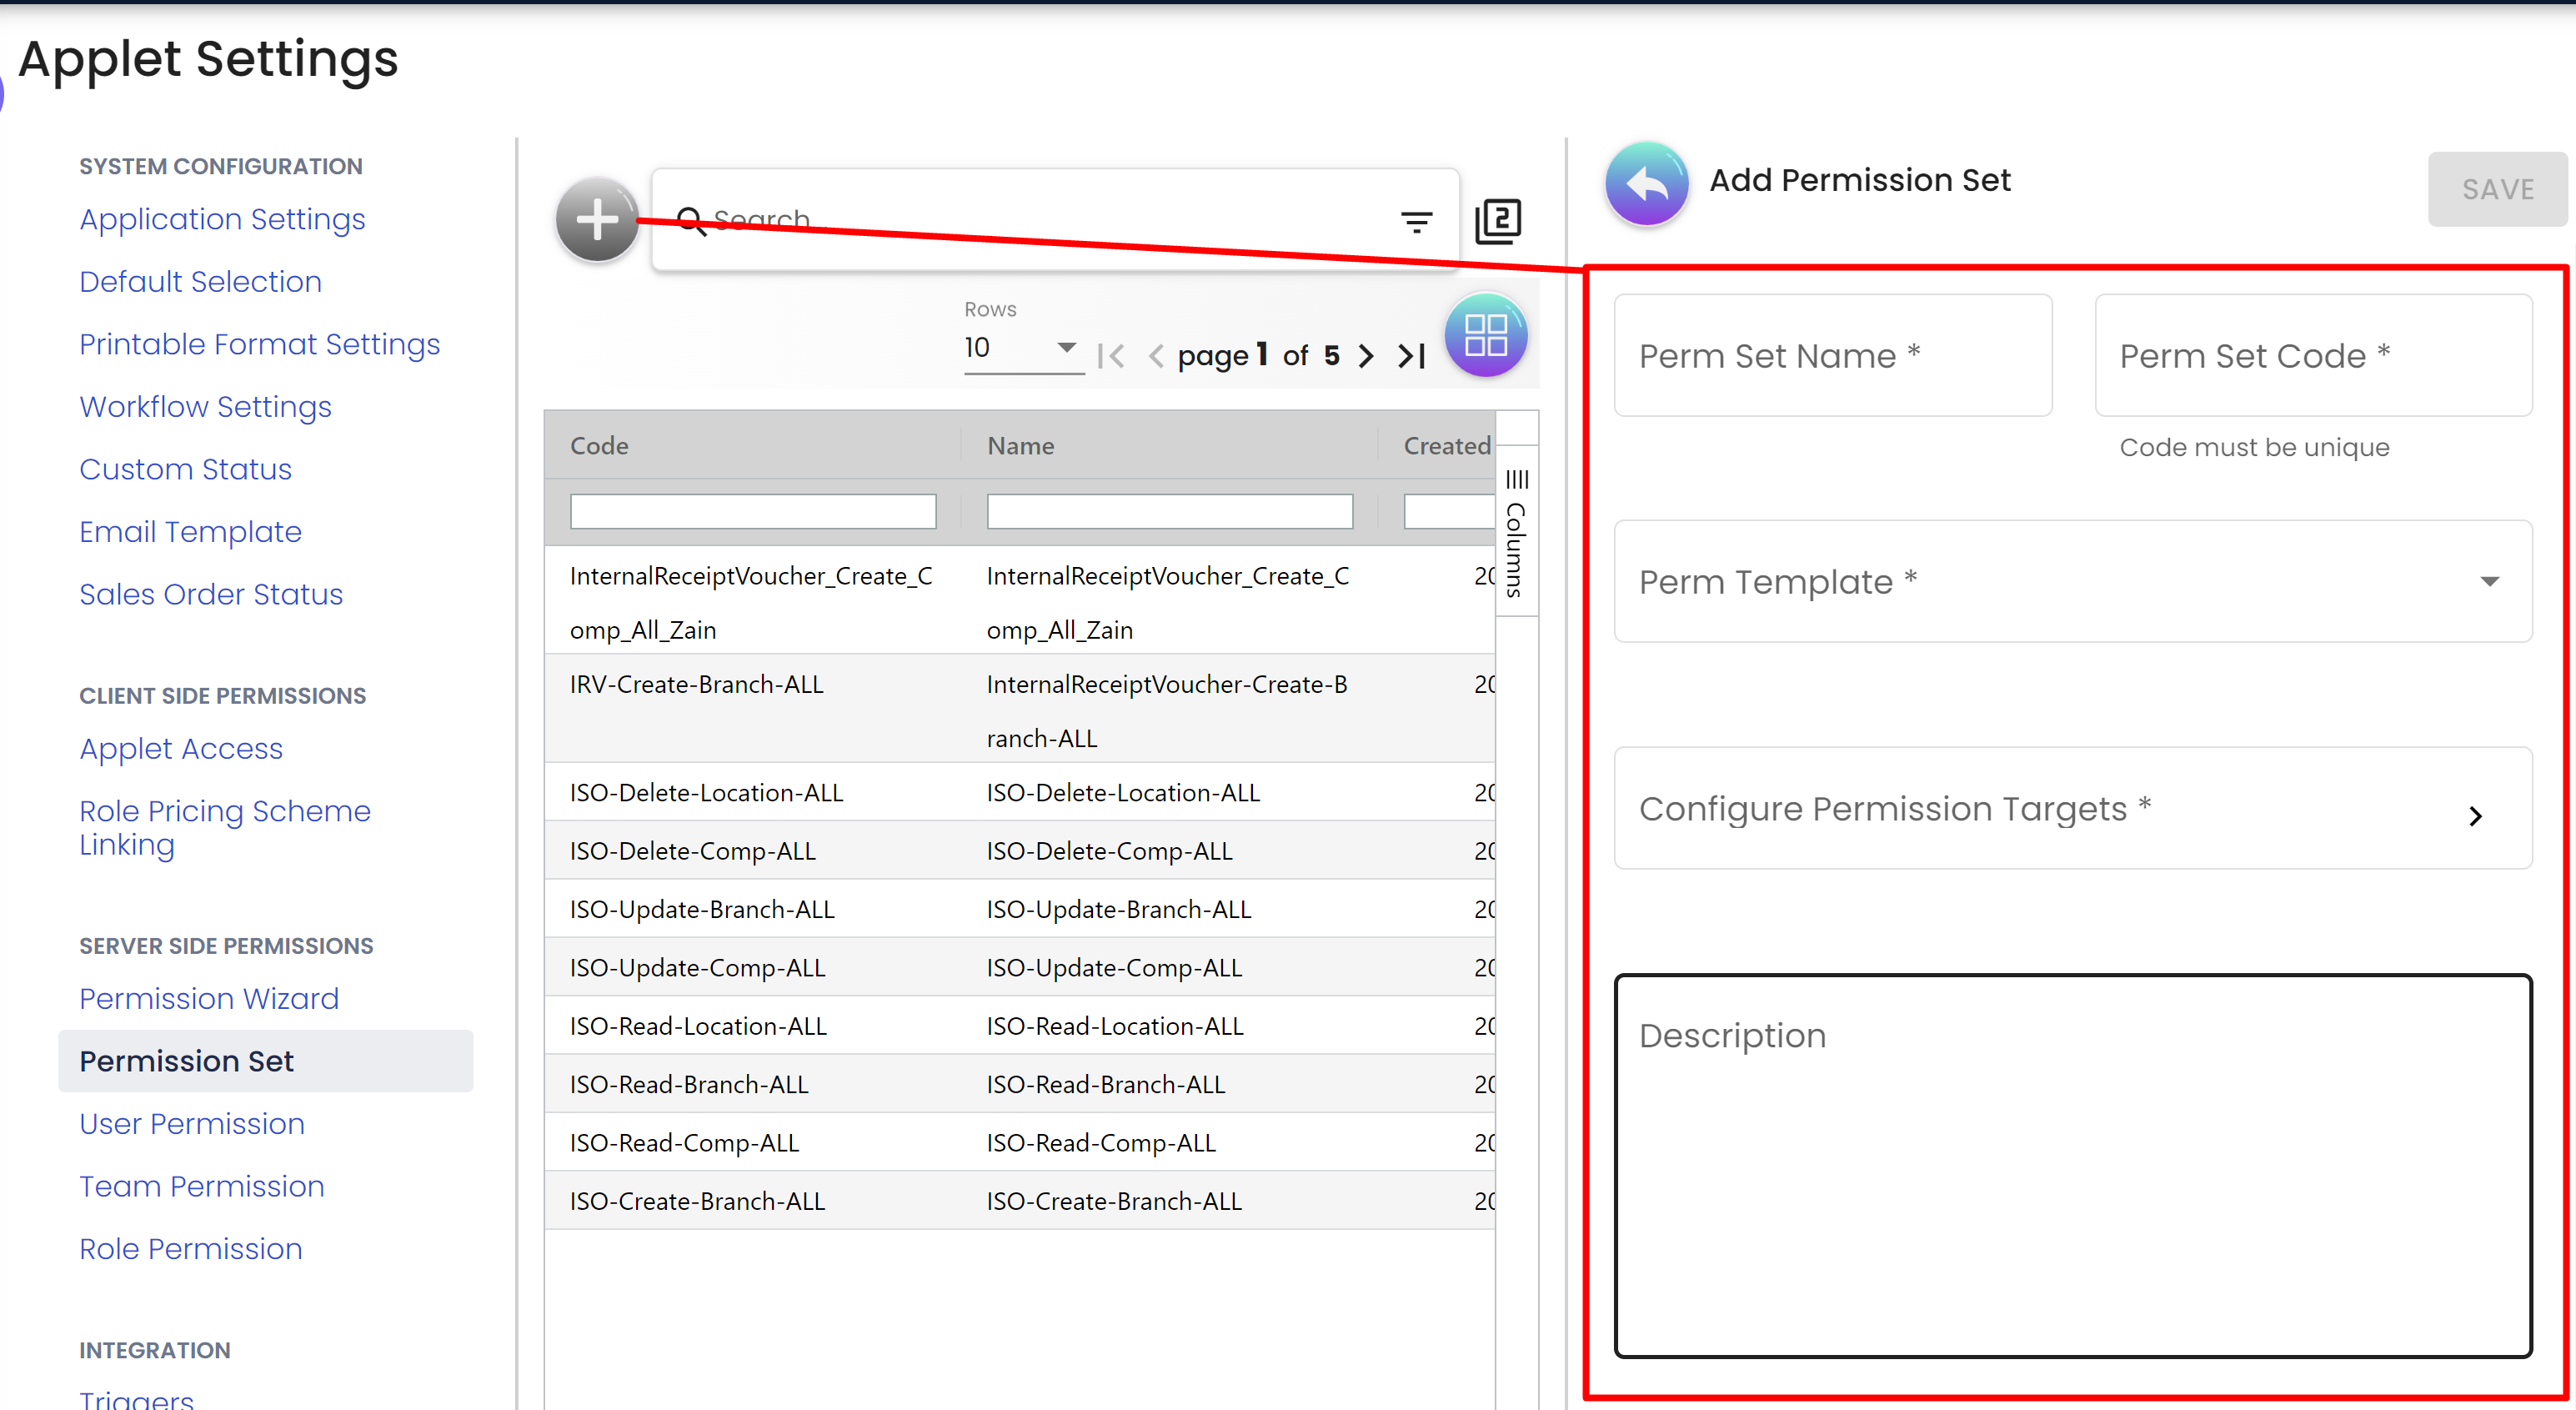
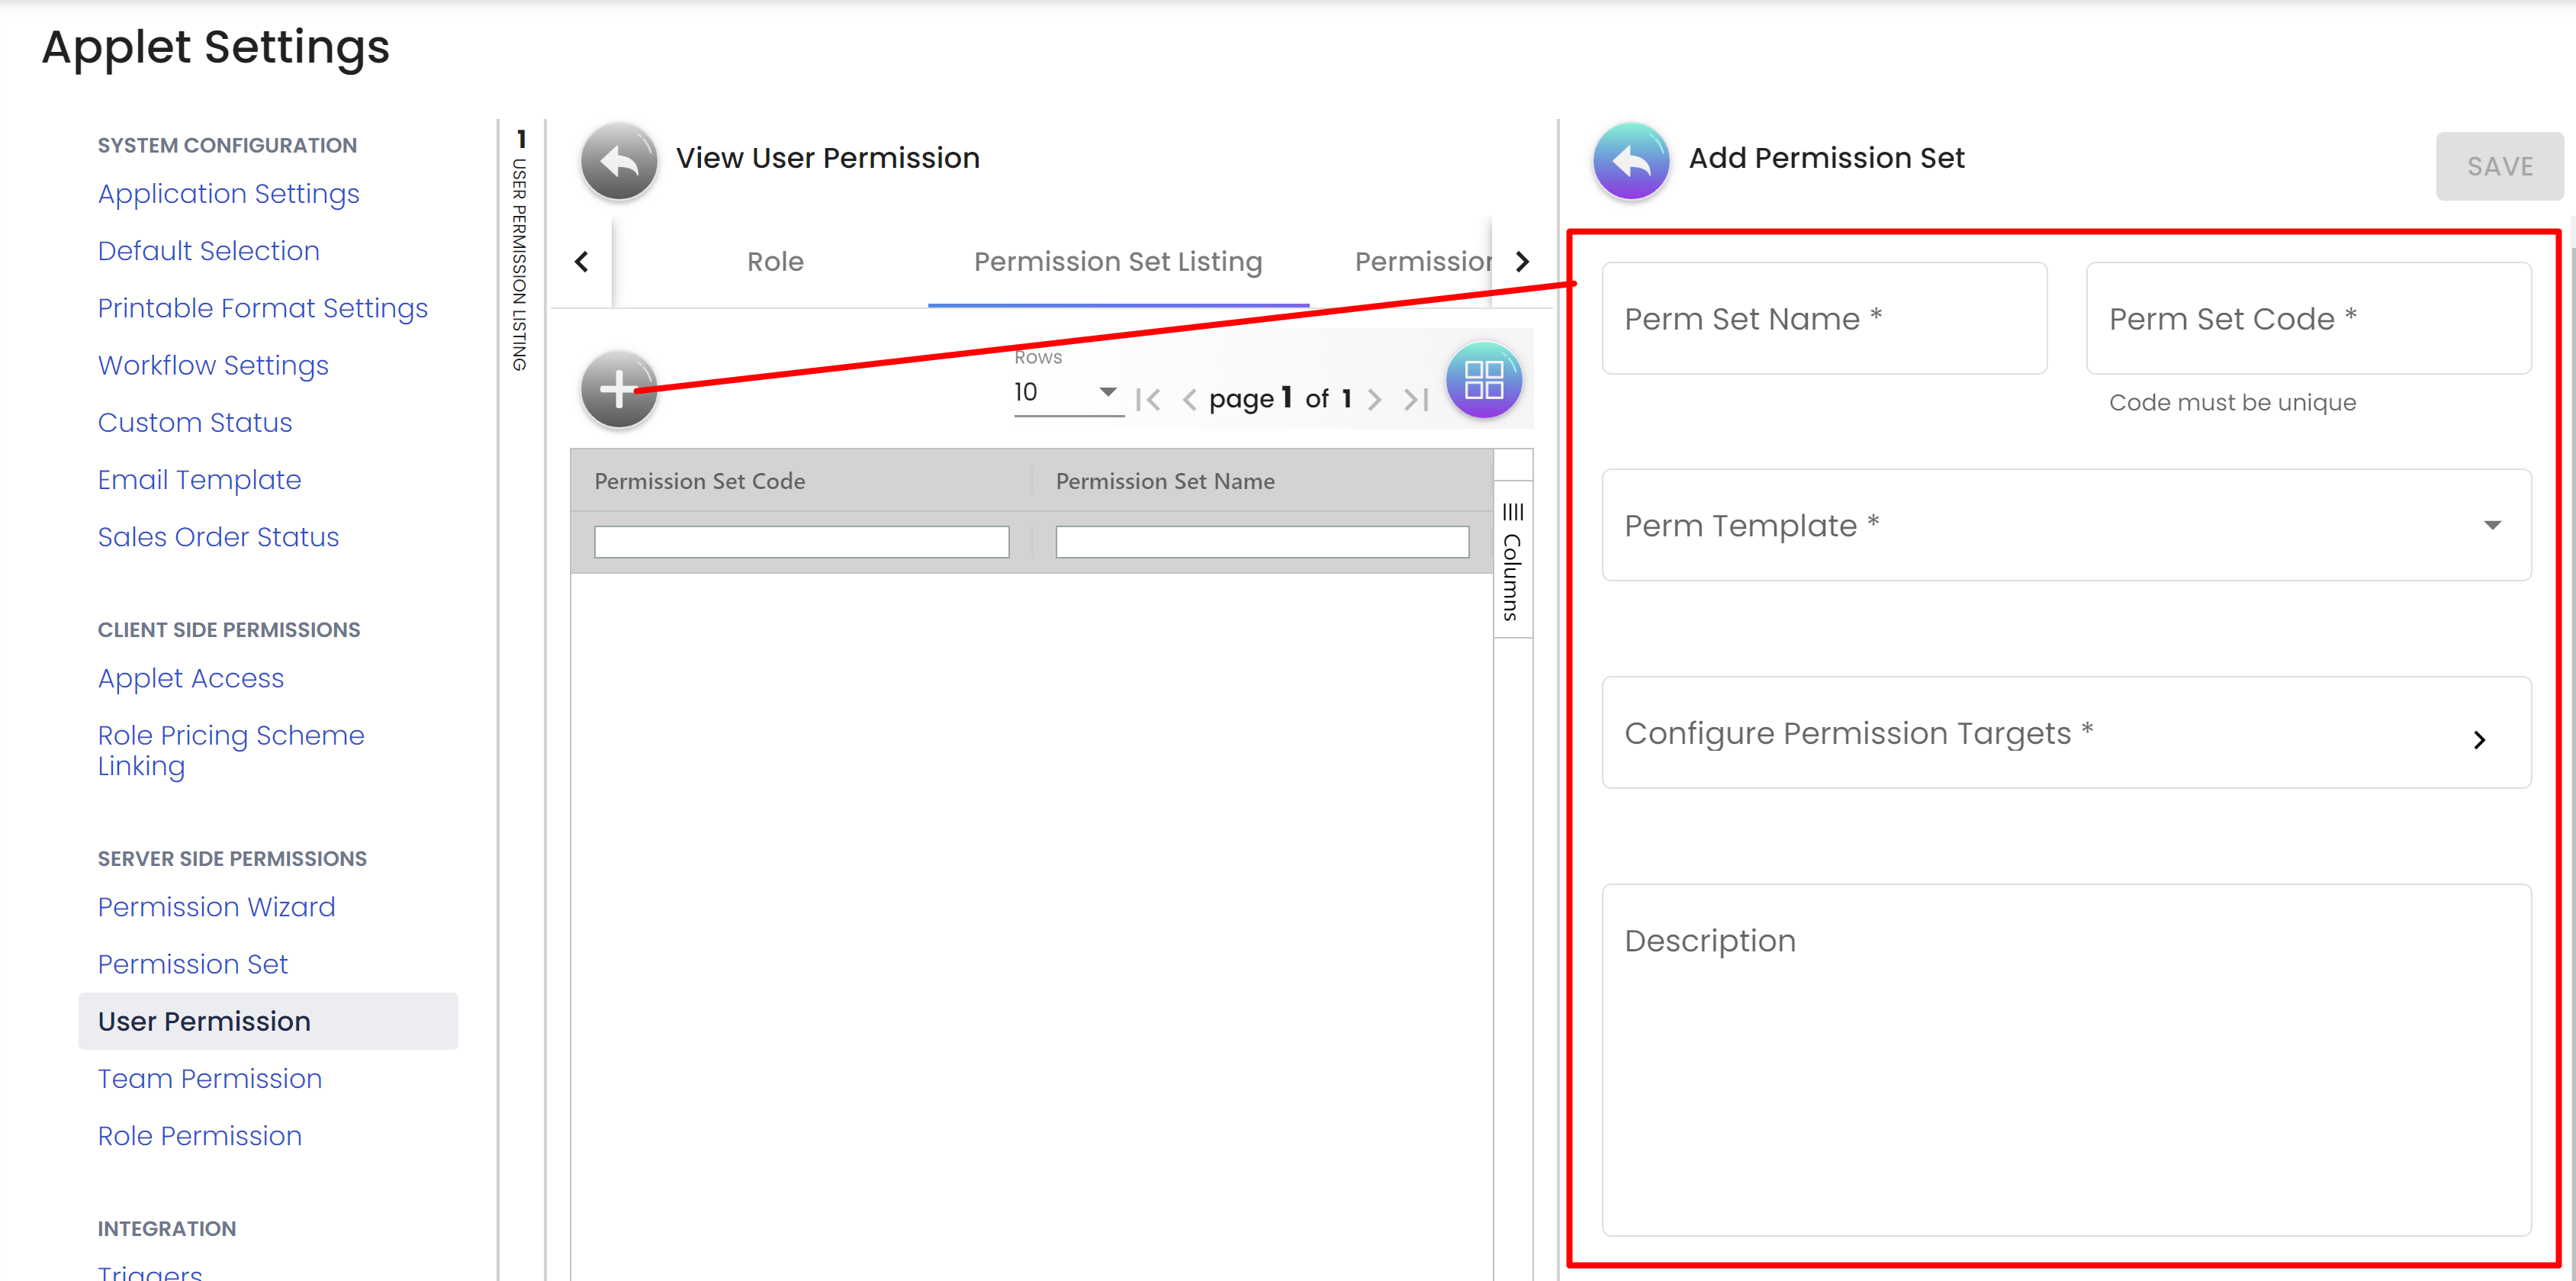
Step 3: Creating a New Permission Set:
To create a new permission set, follow these instructions:
-
Click on the "+" or "Add" button, usually located near the top of the listing.
-
Provide a unique code, name and an optional description for the new permission set in the designated fields.
-
Select the target entity (explained in step 6)
-
Once the details are filled in, save the new permission set.
Step 4: Editing a Permission Set:
If you need to modify an existing permission set, follow these steps:
-
Locate the desired permission set from the list of existing sets.
-
Click on the permission set to view the detais.
-
Update the necessary details, such as the name and description associated with the set.
-
Save the changes once you are satisfied with the modifications.
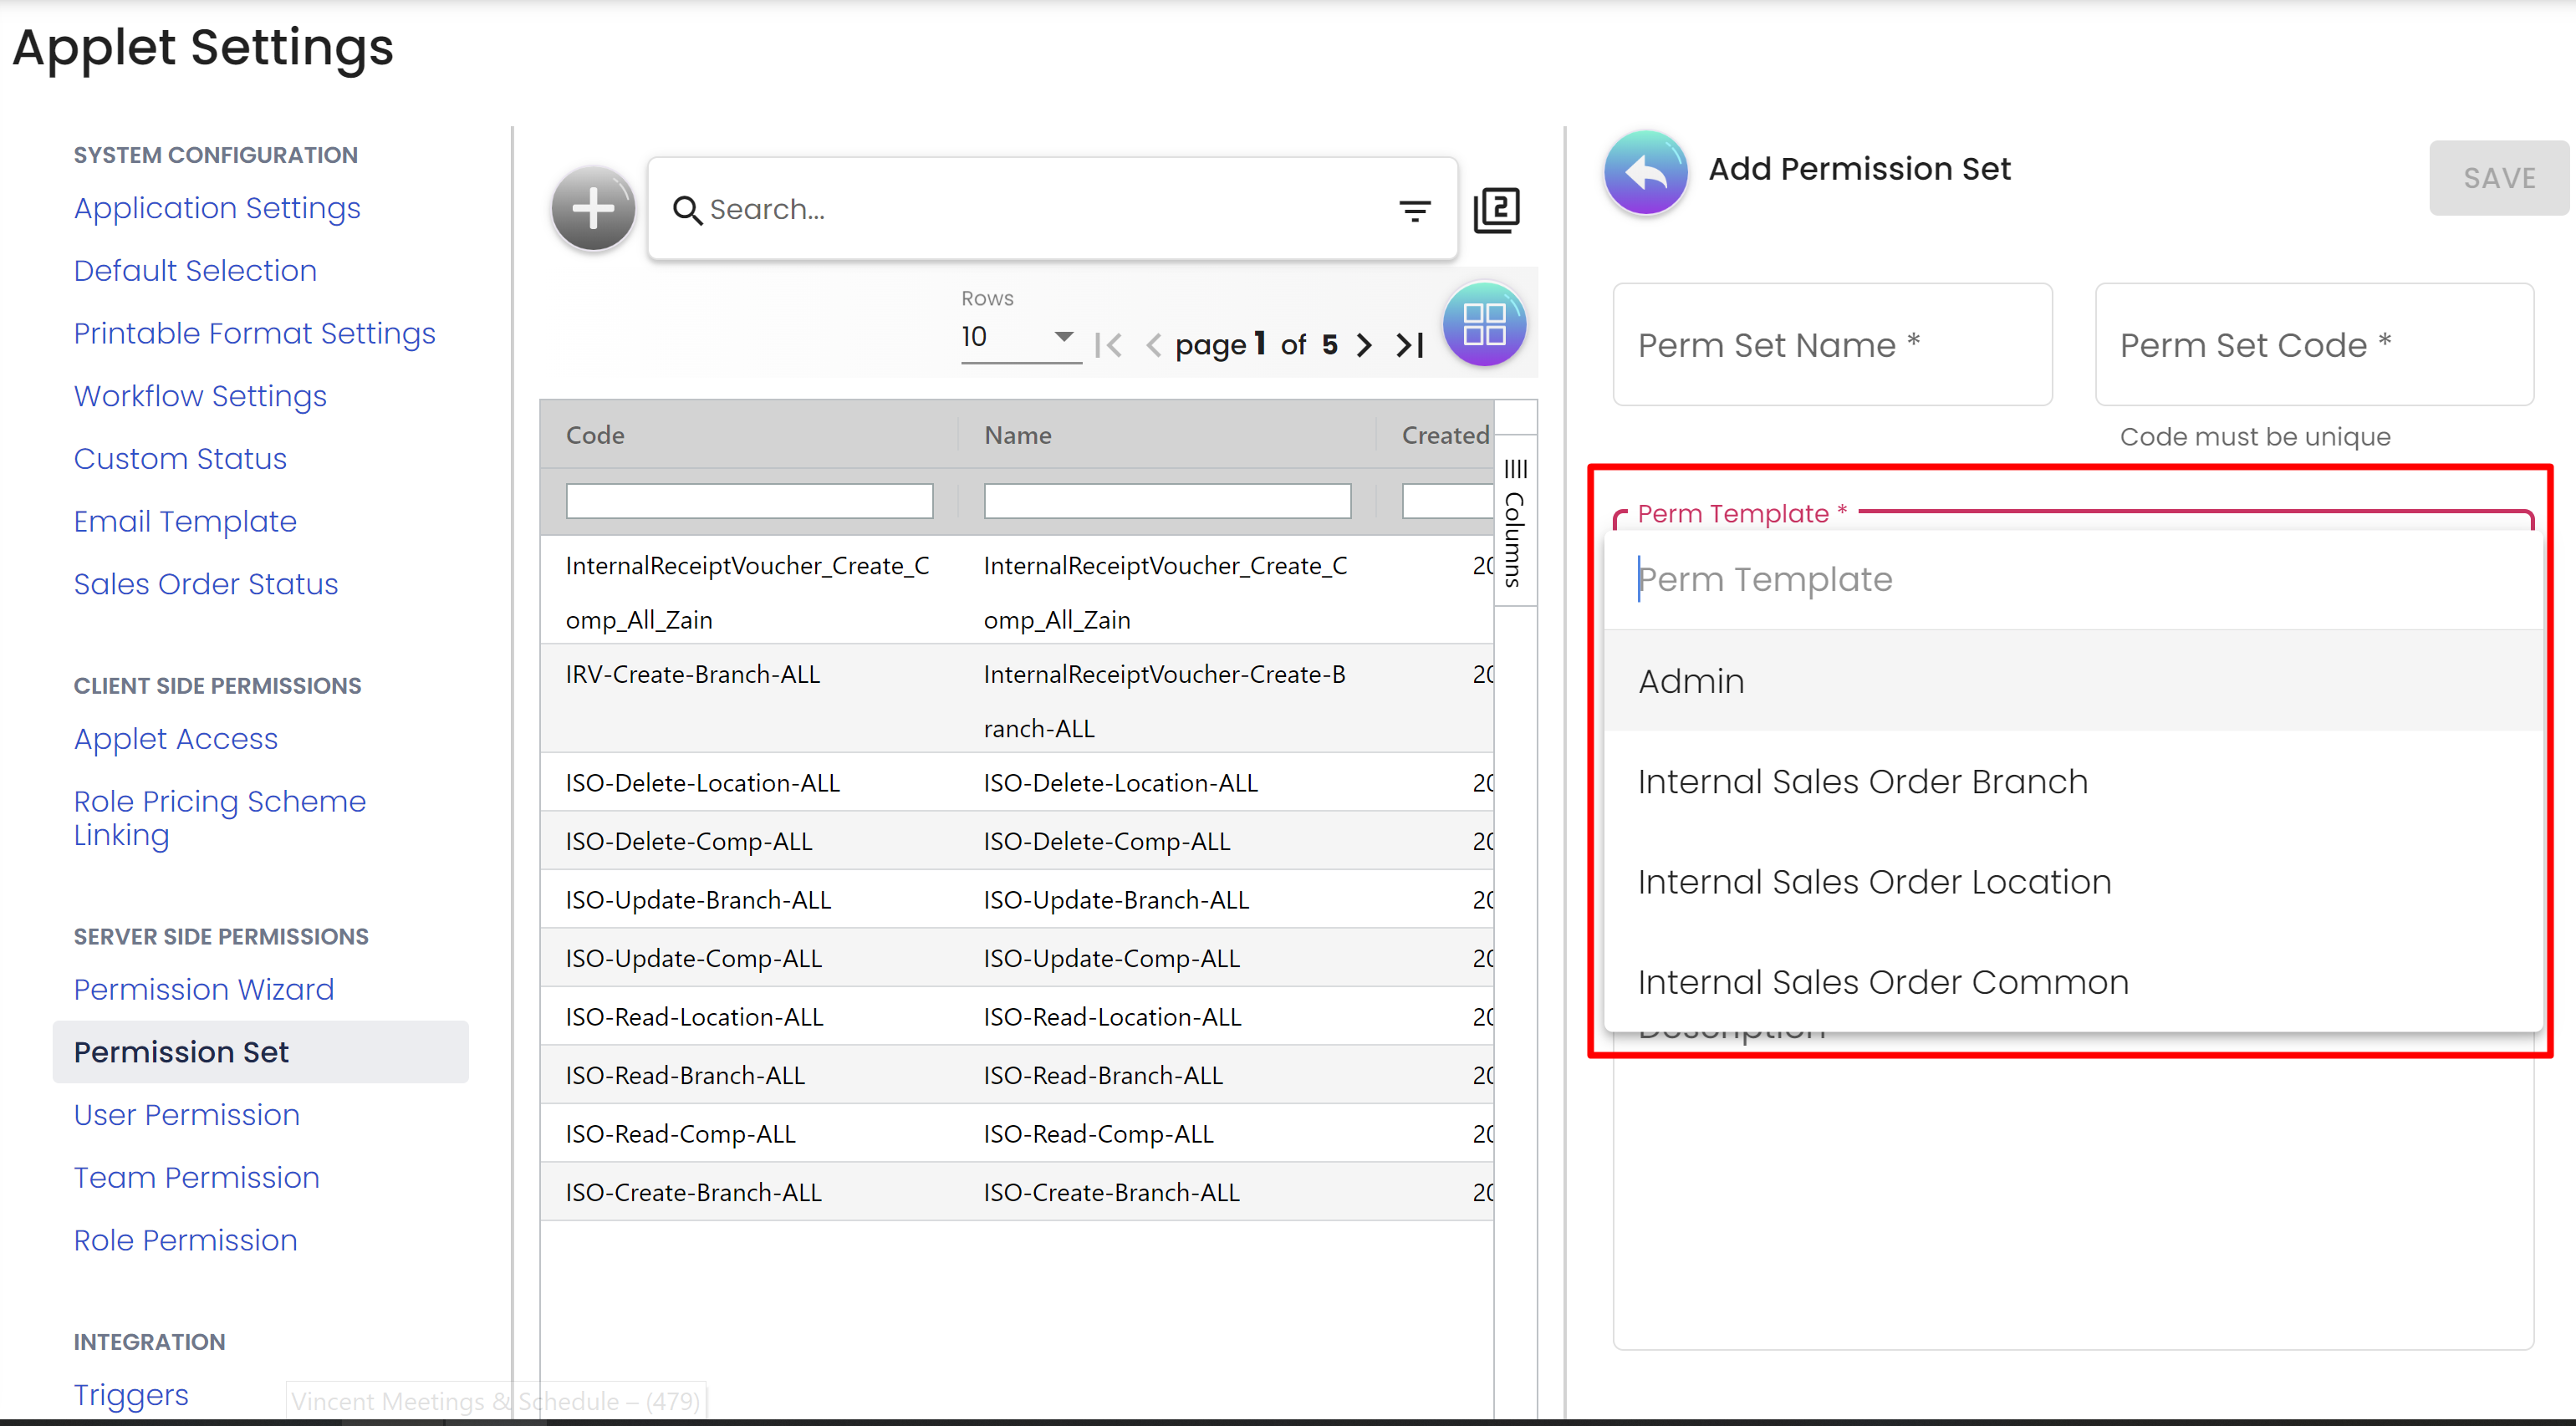
Step 5: Adding Permissions to a Permission Set:
To add permissions to a permission set, do the following:
-
Access the details of the permission set you want to modify (you can do this through Step 4).
-
Look for the "Permission templates" drop down section within the permission set details page.
-
From the available list of permissions templates, select the ones you want to include in the permission set.
-
Save the changes to update the permissions within the set.
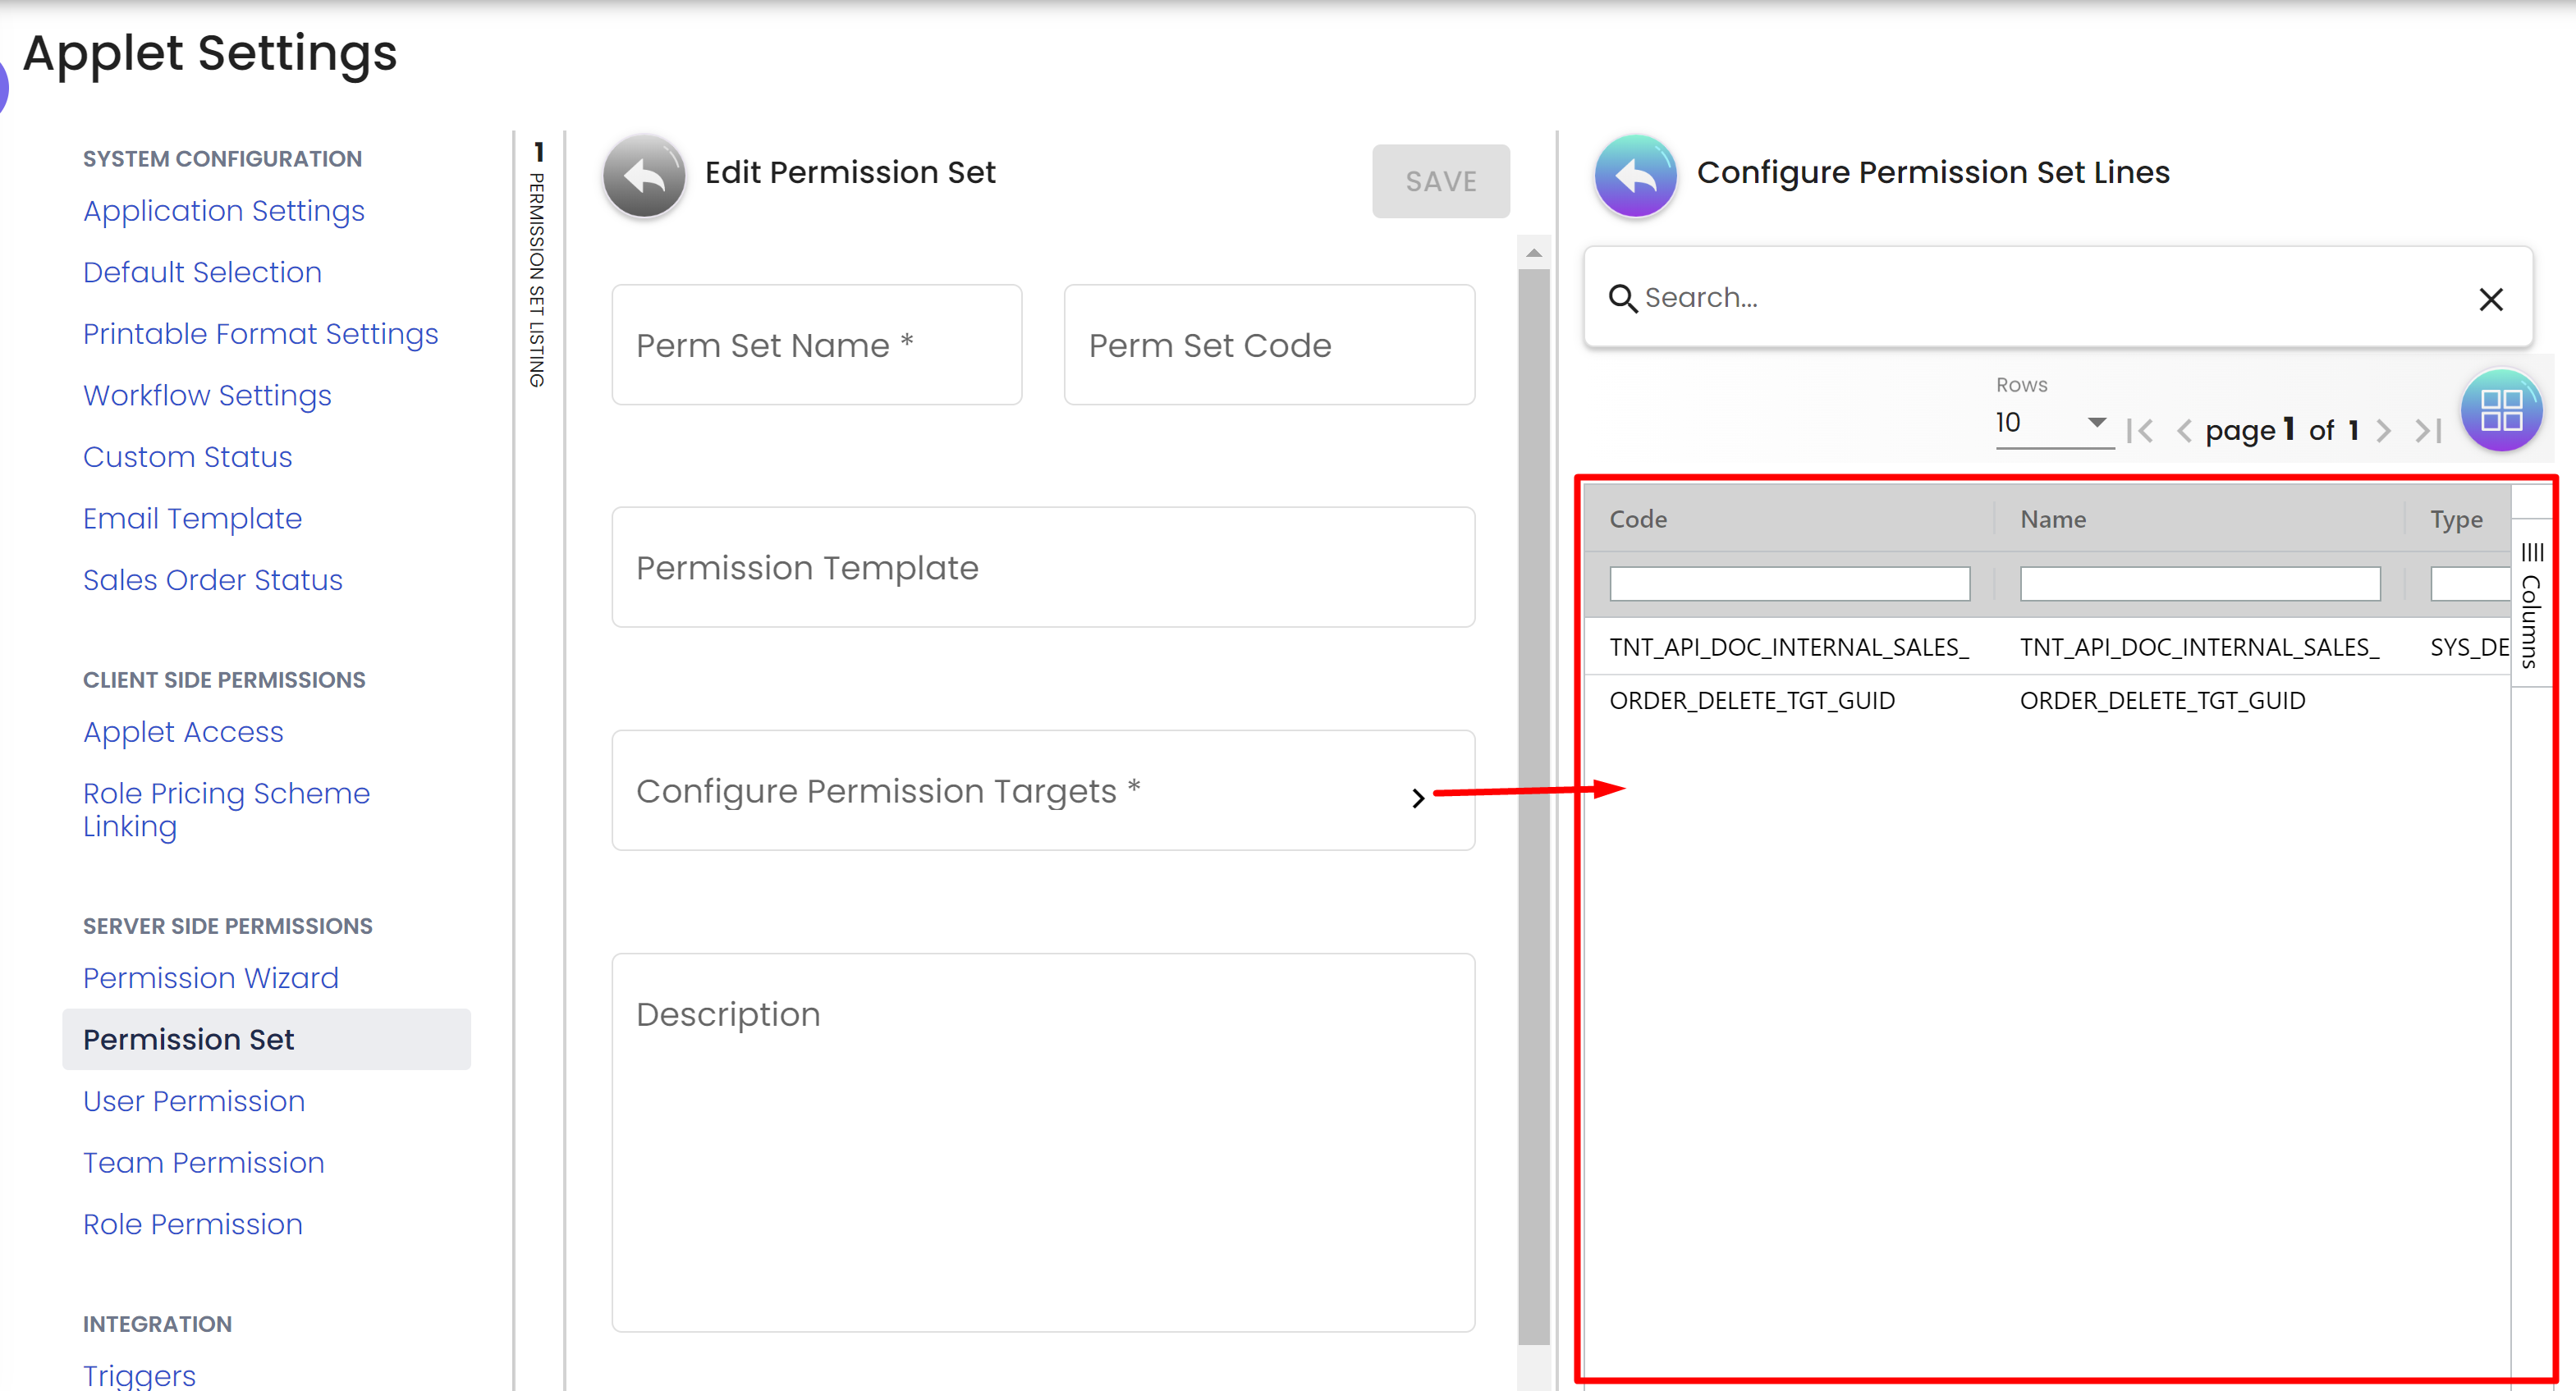
Step 6: Selecting Target Entities for the Permission Set:
Once you have created or edited a permission set and added the required permissions, the final step is to select the target entities for which this permission set should be applied. Follow these steps:
-
Within the permission set details page, find the "Select Targets" or "Assign to Entities" section.
-
Choose the specific target entities, such as companies, branches, or locations, from the available list.
-
Save the changes to apply the permission set to the selected entities.
Conclusion:
With the permission sets feature, users can efficiently manage permissions across different entities by creating customized groups of permissions and applying them to specific targets. This streamlines the permission management process and enhances the overall security and control within the application.
4. User Permission:
4.1 Overview:
The User Permissions section in the application provides a comprehensive view of all users within the applet, along with their associated details, such as email, mobile number, and applet rank (owner, admin, or member). Additionally, this section includes three tabs that allow users with appropriate access rights to view assigned roles, permission sets, and permission definitions for each individual user.
4.2 Step-by-Step Guide
Step 1: Accessing User Permissions:
To access the User Permissions functionality, follow these steps:
-
Log in to the application with appropriate user credentials.
-
Navigate to the "Settings" section of the applet.
-
Look for the "User Permissions" option and click on it to enter the User Permission interface.
-
View all users listed within the applet.
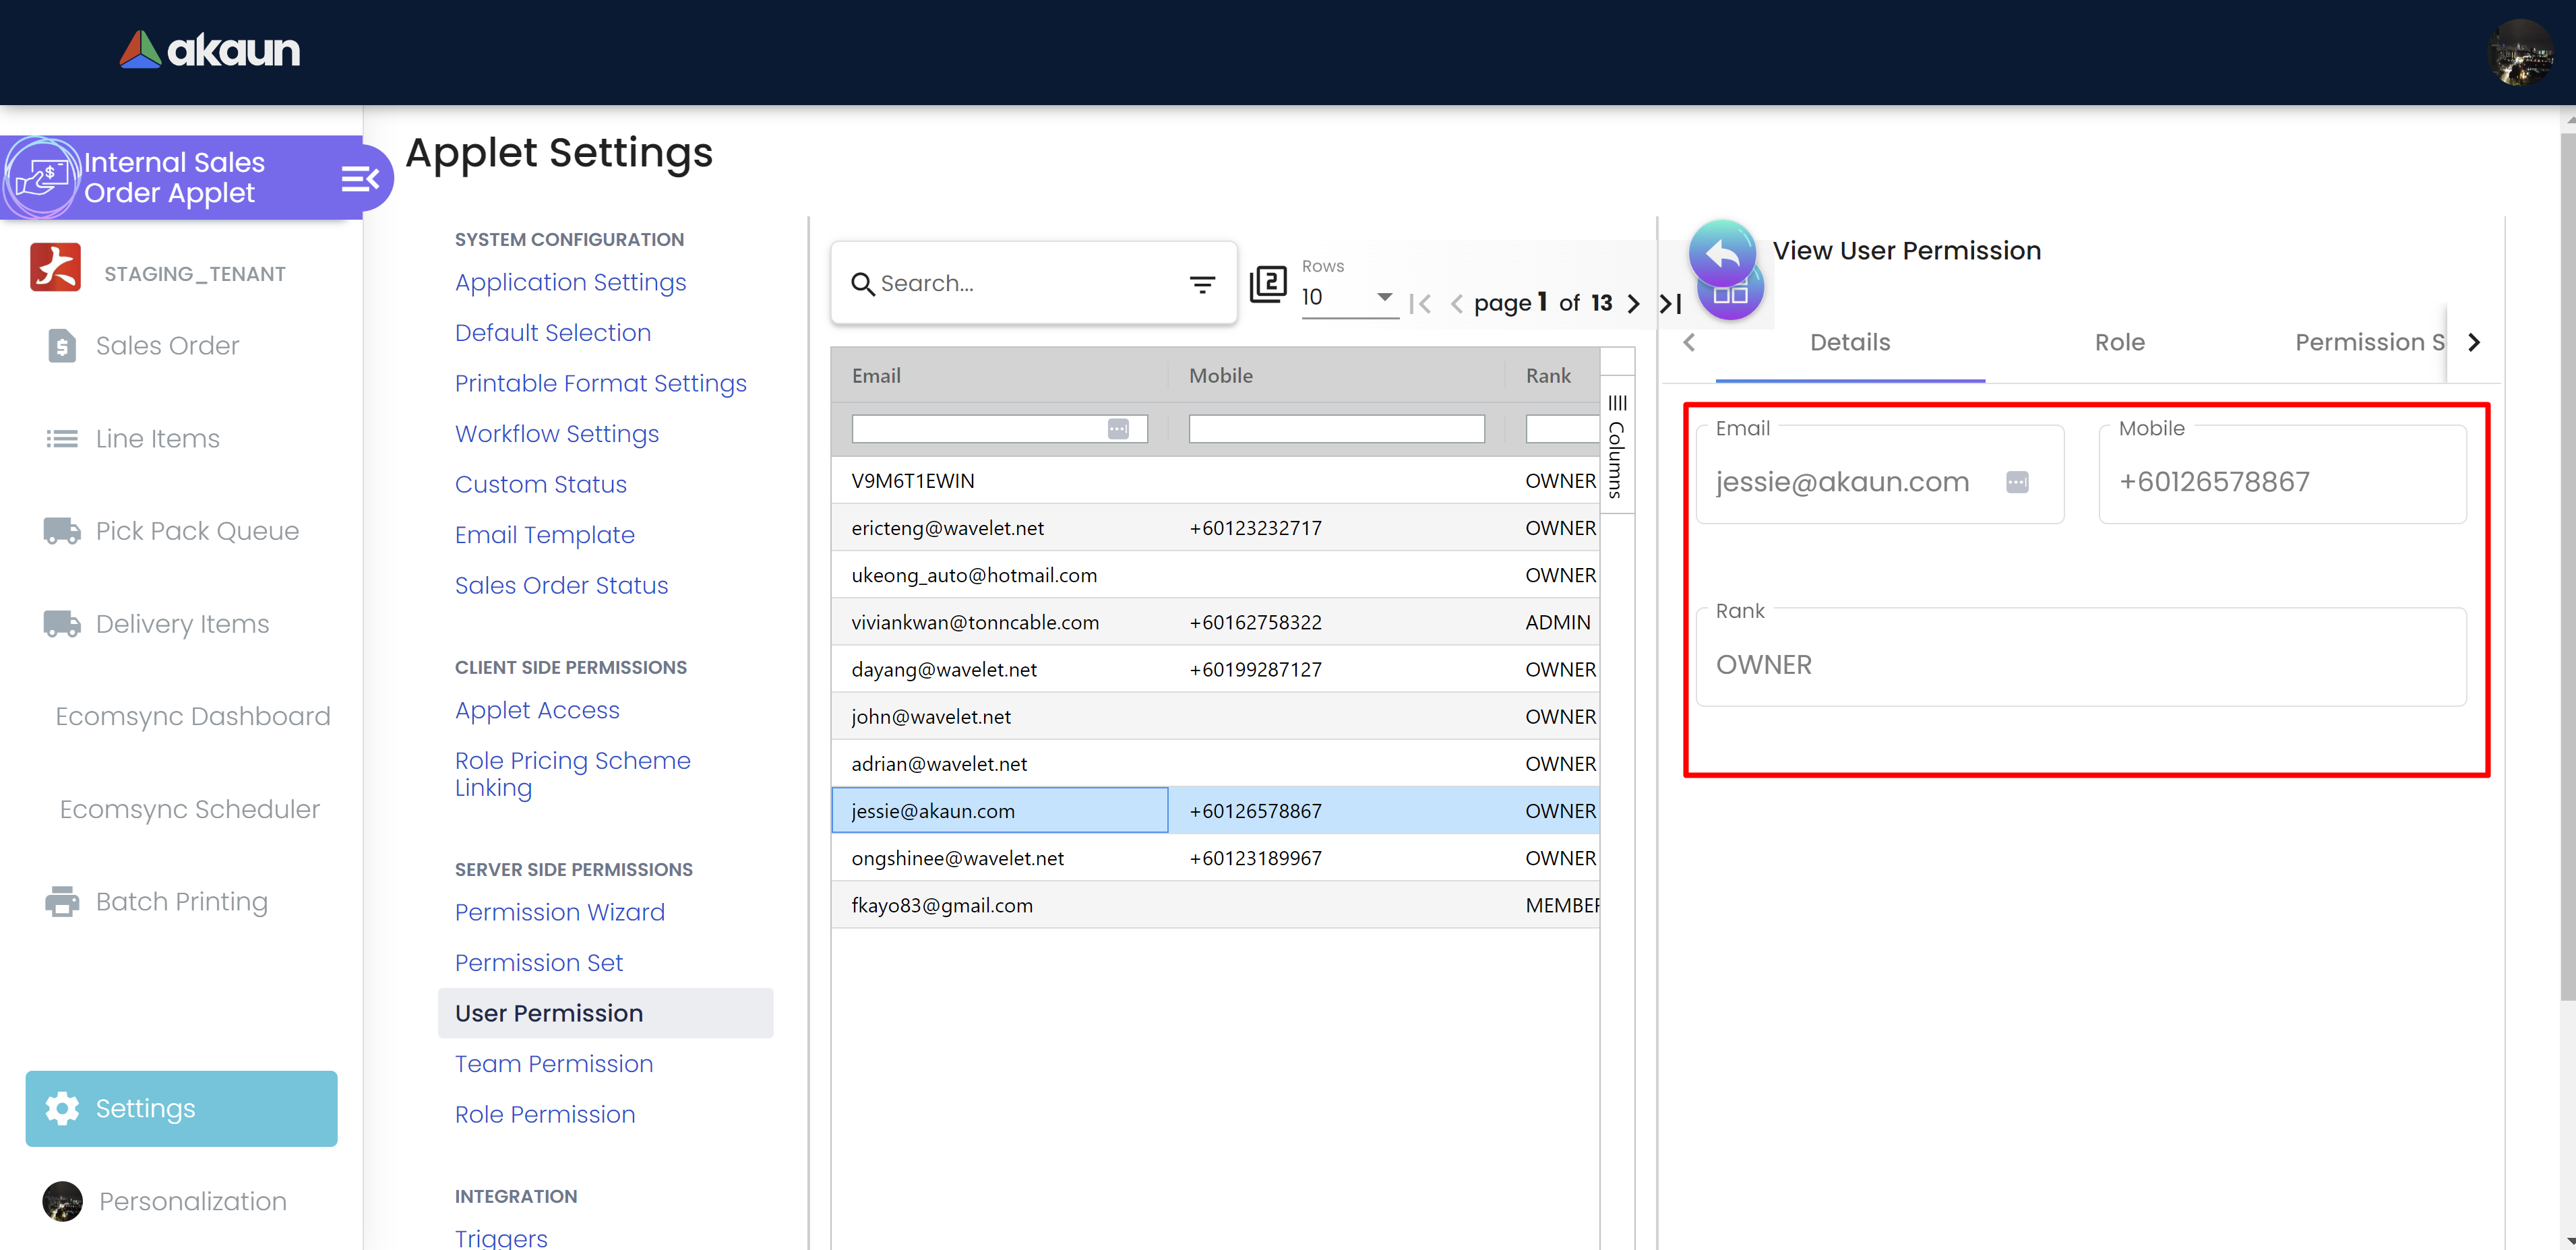
Step 2: Viewing User Details:
Upon entering the User Permissions interface, you will be presented with a comprehensive list of all users associated with the applet. This list displays essential information for each user, including their email, mobile number, and applet rank, making it easy to identify and manage users efficiently.
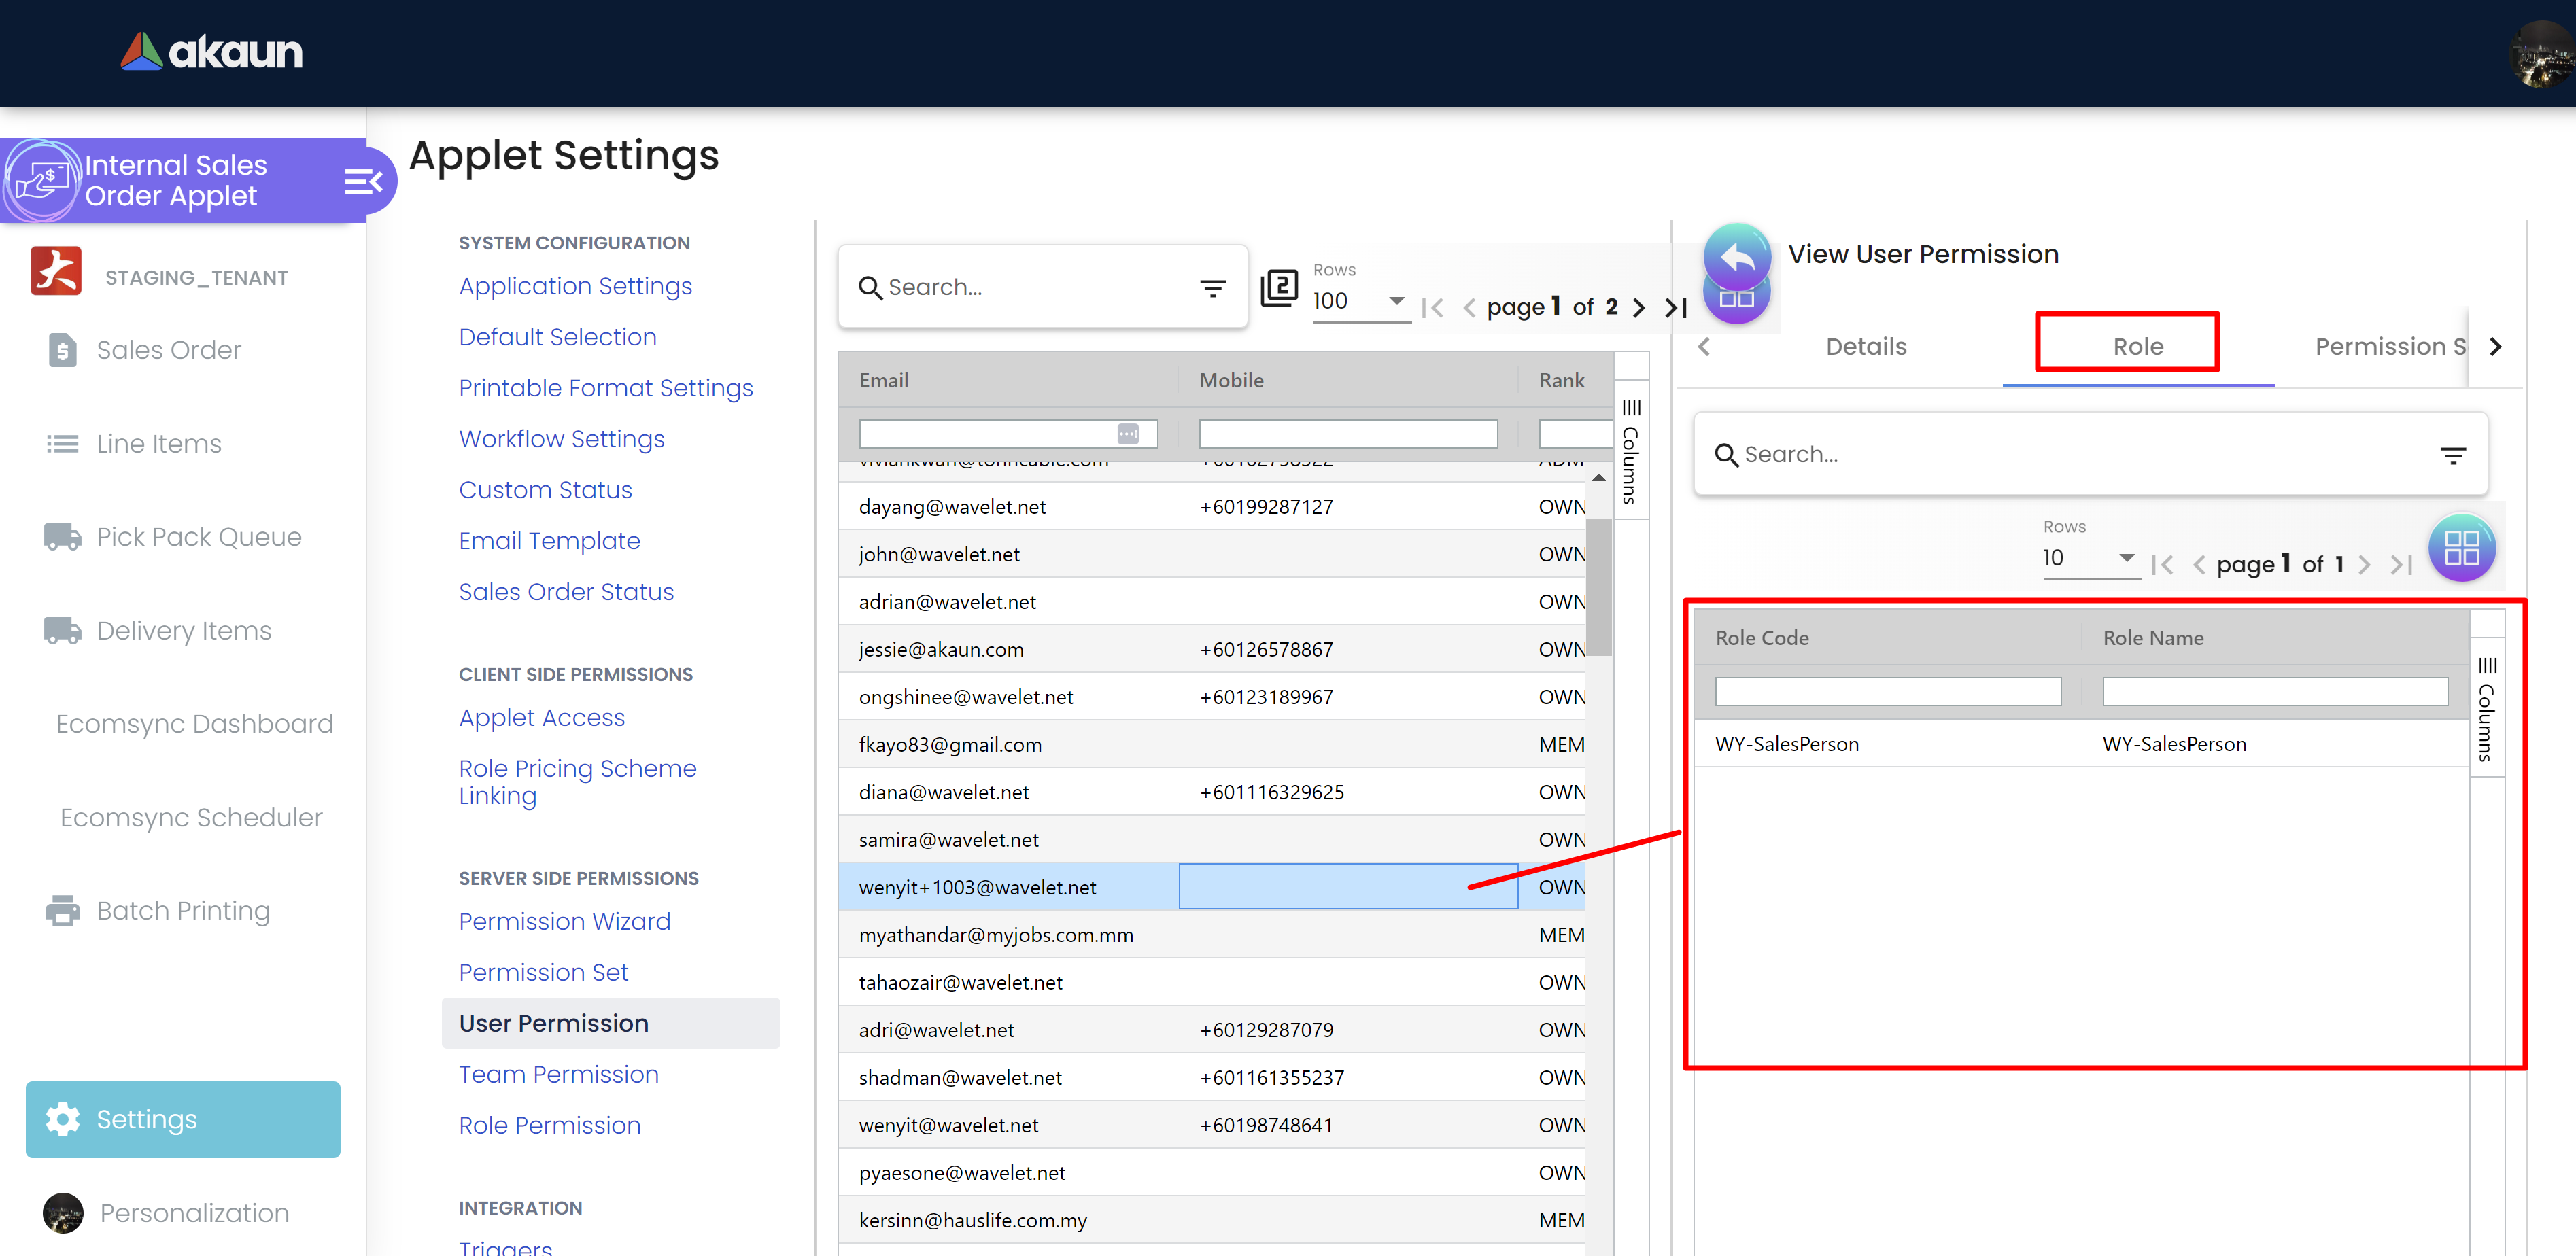
Step 3: Viewing User Roles (Read-Only):
In this tab, you can view the roles assigned to individual applet users. However, roles are read-only and cannot be modified directly from this interface.
Step 4: Managing Permission Sets:
The Permission Sets tab allows users with sufficient permissions to configure and manage permission sets for each user. Follow these steps to manage permission sets:
-
Locate the user for whom you want to configure permission sets from the list of users.
-
Click on the "Permission Sets" tab associated with the selected user.
-
Within the Permission Sets tab, you can view the existing permission sets assigned to the user.
-
Add or remove permission sets as necessary by configuring them as explained in *3.1 Steps 3 *.
-
Save the changes to update the user’s permission sets.
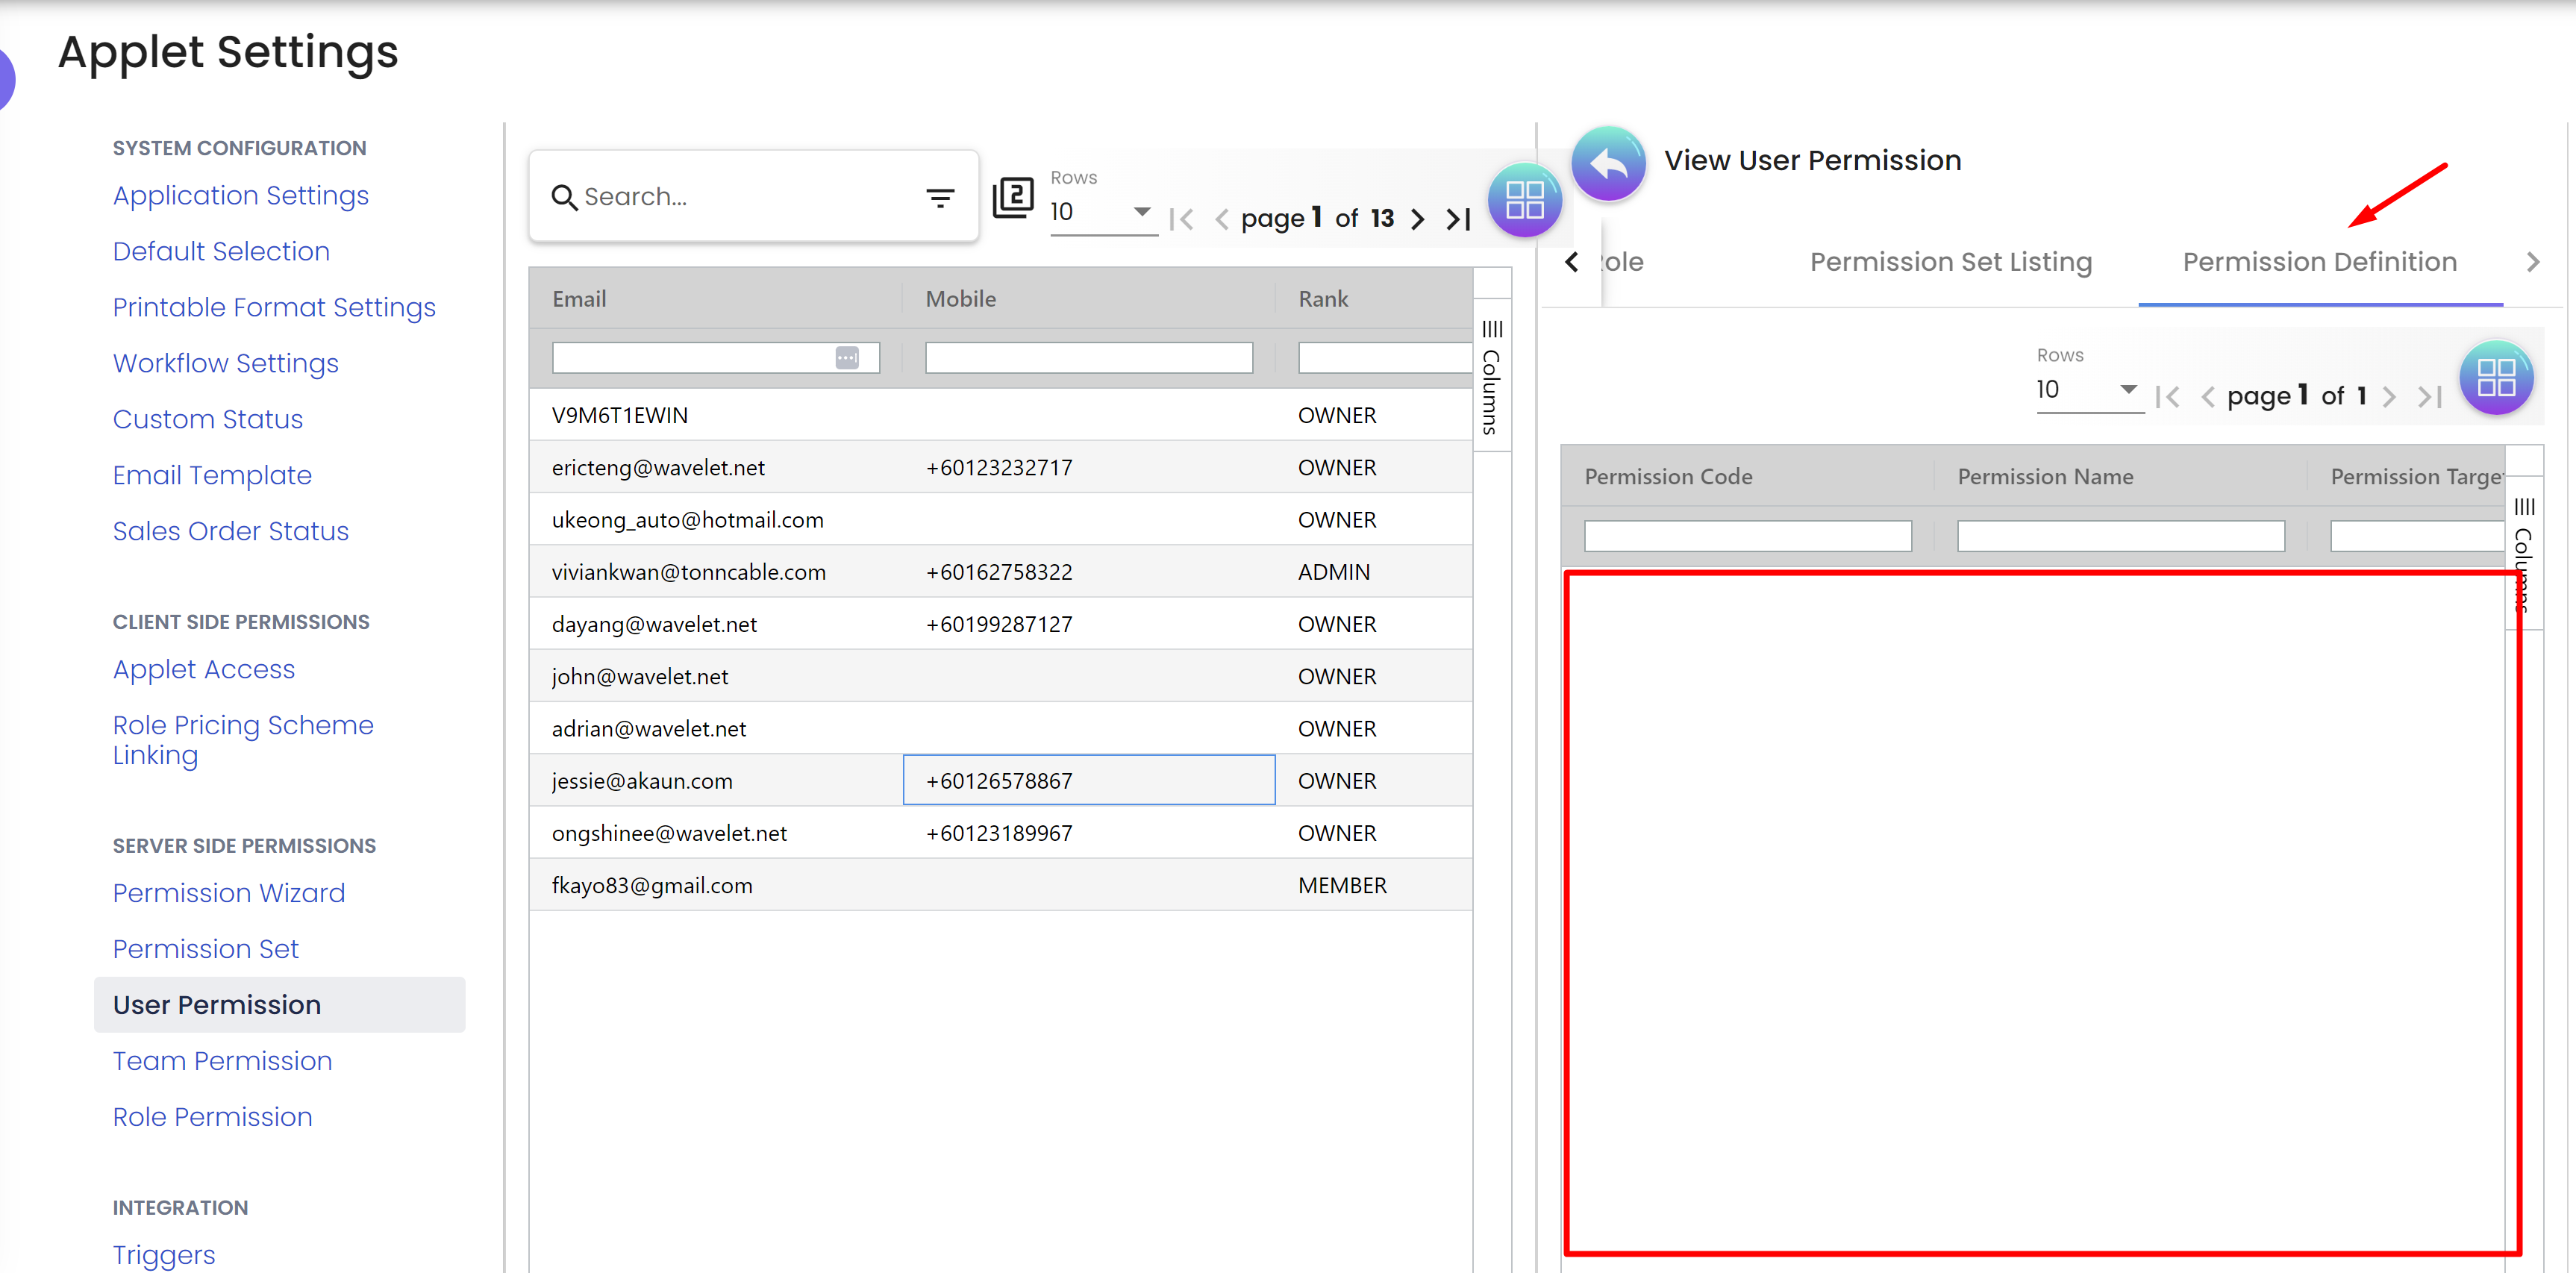
Step 5: Viewing Permission Definitions (Read-Only):
The Permission Definitions tab displays a list of available permissions and their descriptions for each user. However, permission definitions are read-only and cannot be modified directly from this interface.
Conclusion:
With the User Permissions functionality, applet administrators and privileged users can efficiently manage and configure permission sets for individual applet users. The ability to assign permission sets empowers administrators to control access rights and tailor the user experience to meet the unique needs of each user within the application. Roles and permission definitions, while read-only, provide essential information about the user’s access privileges within the applet.
5. Team Permission:
5.1 Overview:
Team Permissions provide users with the ability to manage teams and their associated members and roles within the each Applet. This documentation outlines the features and functionalities provided by Team Permissions and how to use them effectively.
5.2 Step-by-Step Guide:
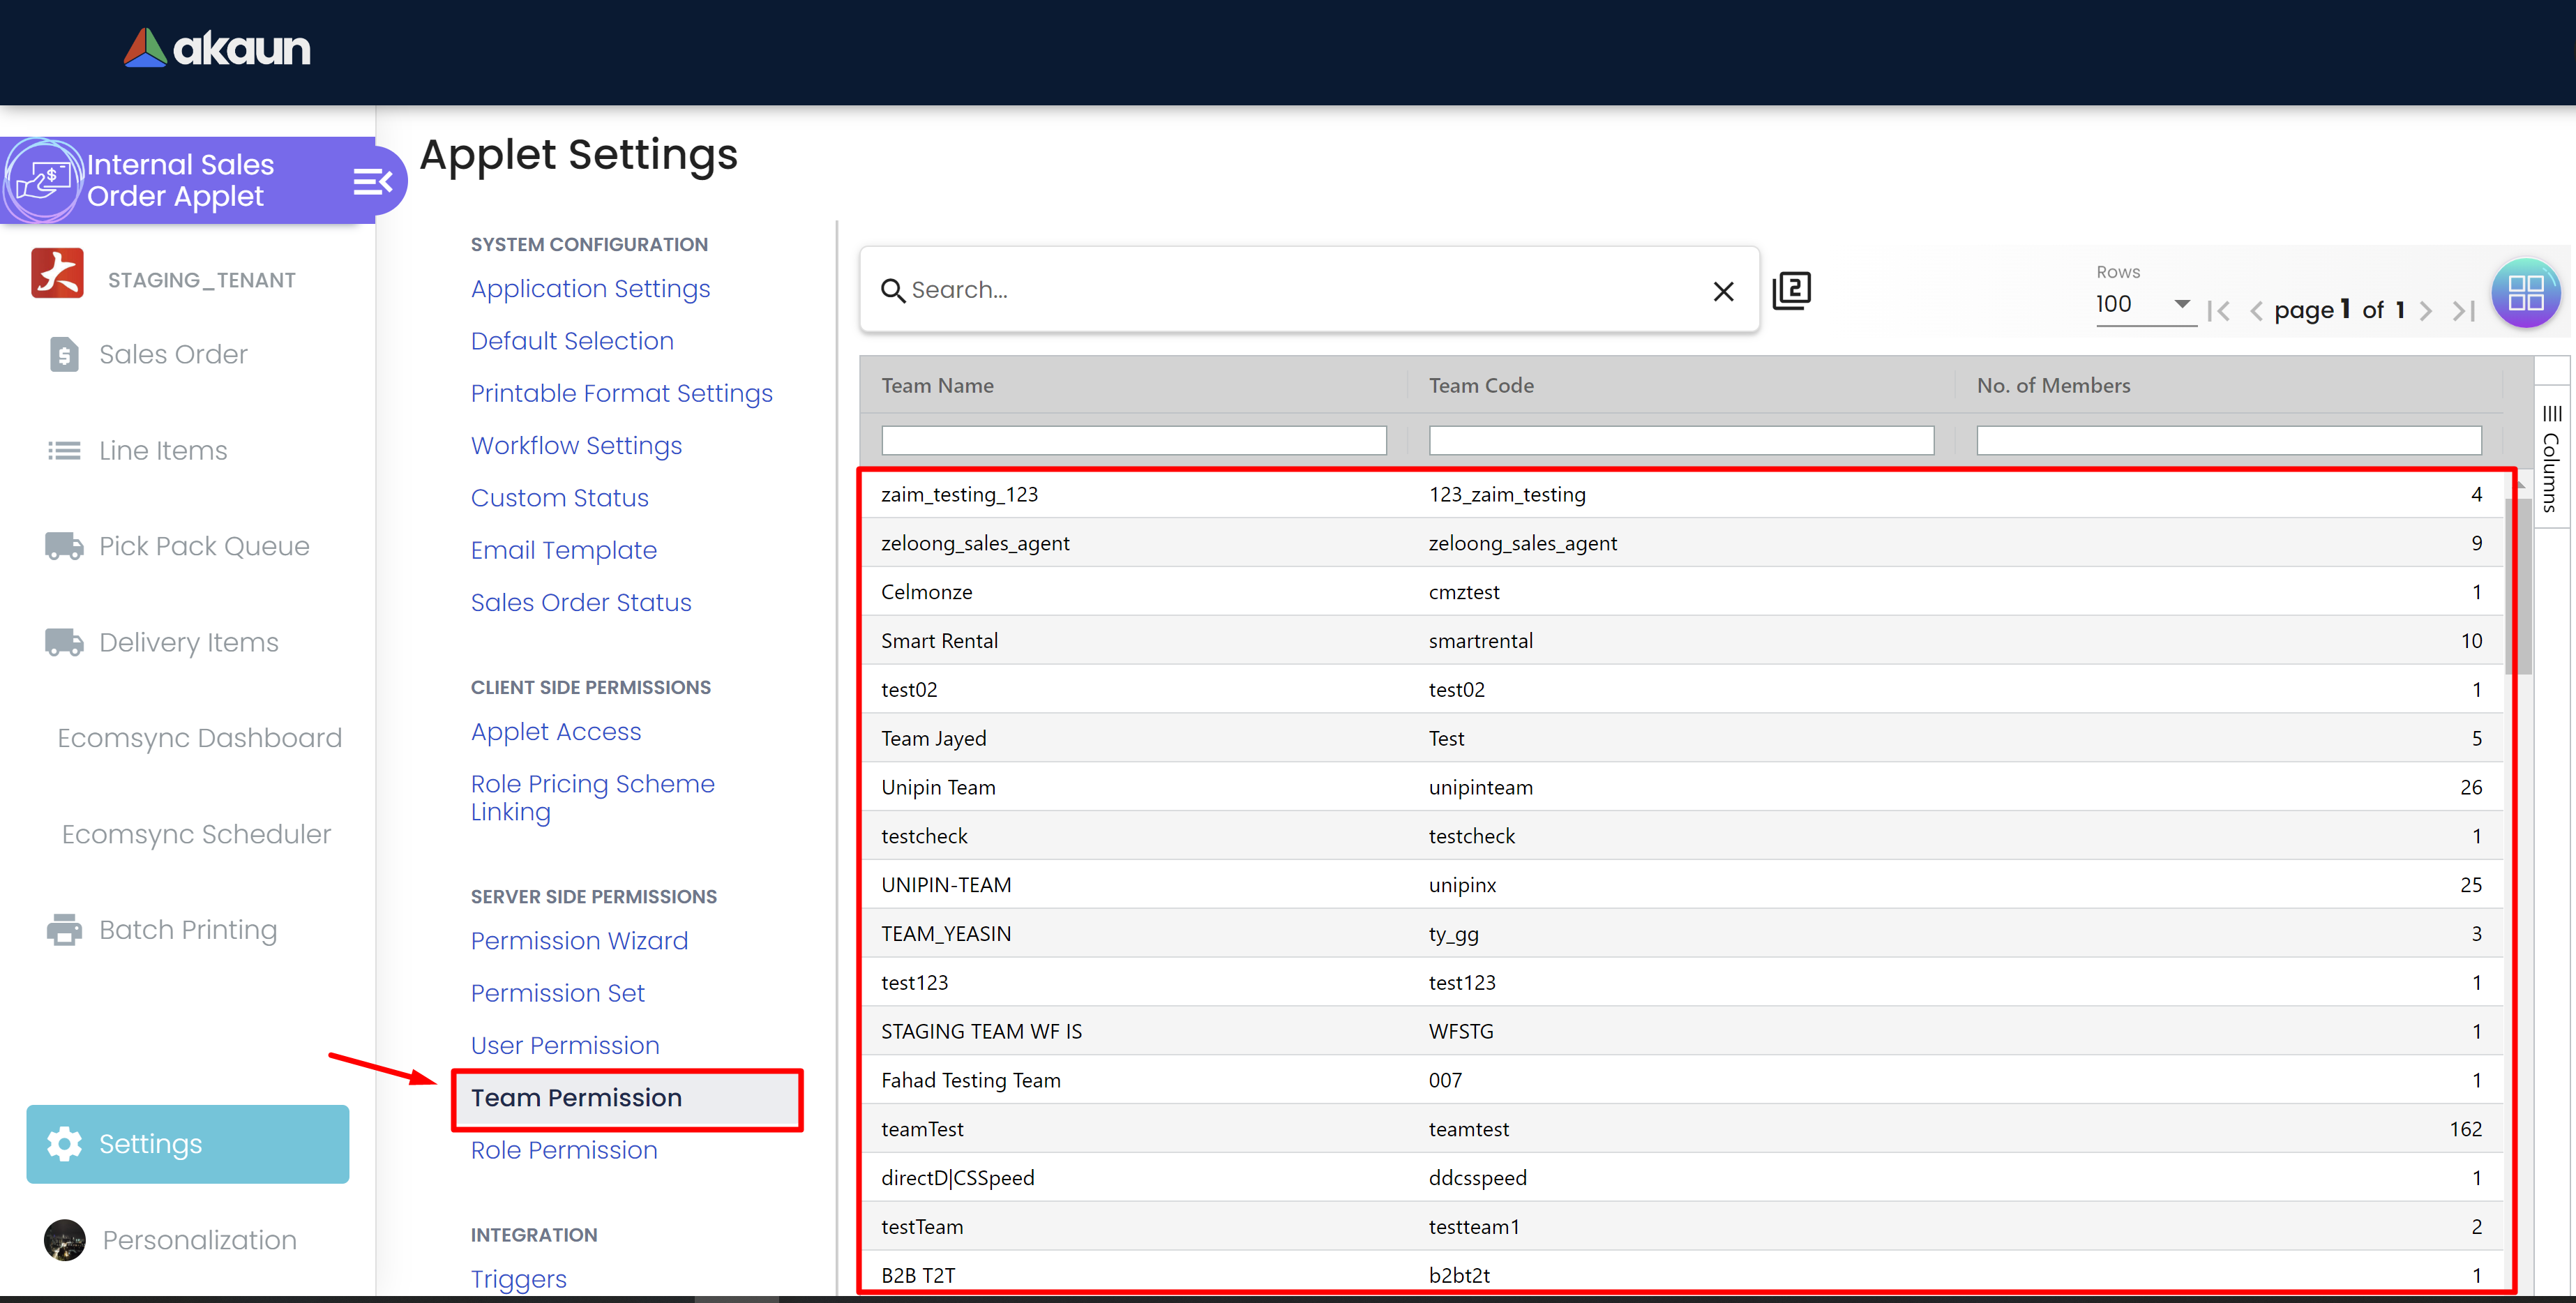
Step 1: Listing Teams:
To view all teams within the application, follow these steps:
-
Log in to the akaun platform with appropriate credentials and go to the desired applet settings menu.
-
Navigate to the "Teams permission" section.
-
A list of all existing teams will be displayed, showing their names and other relevant information.
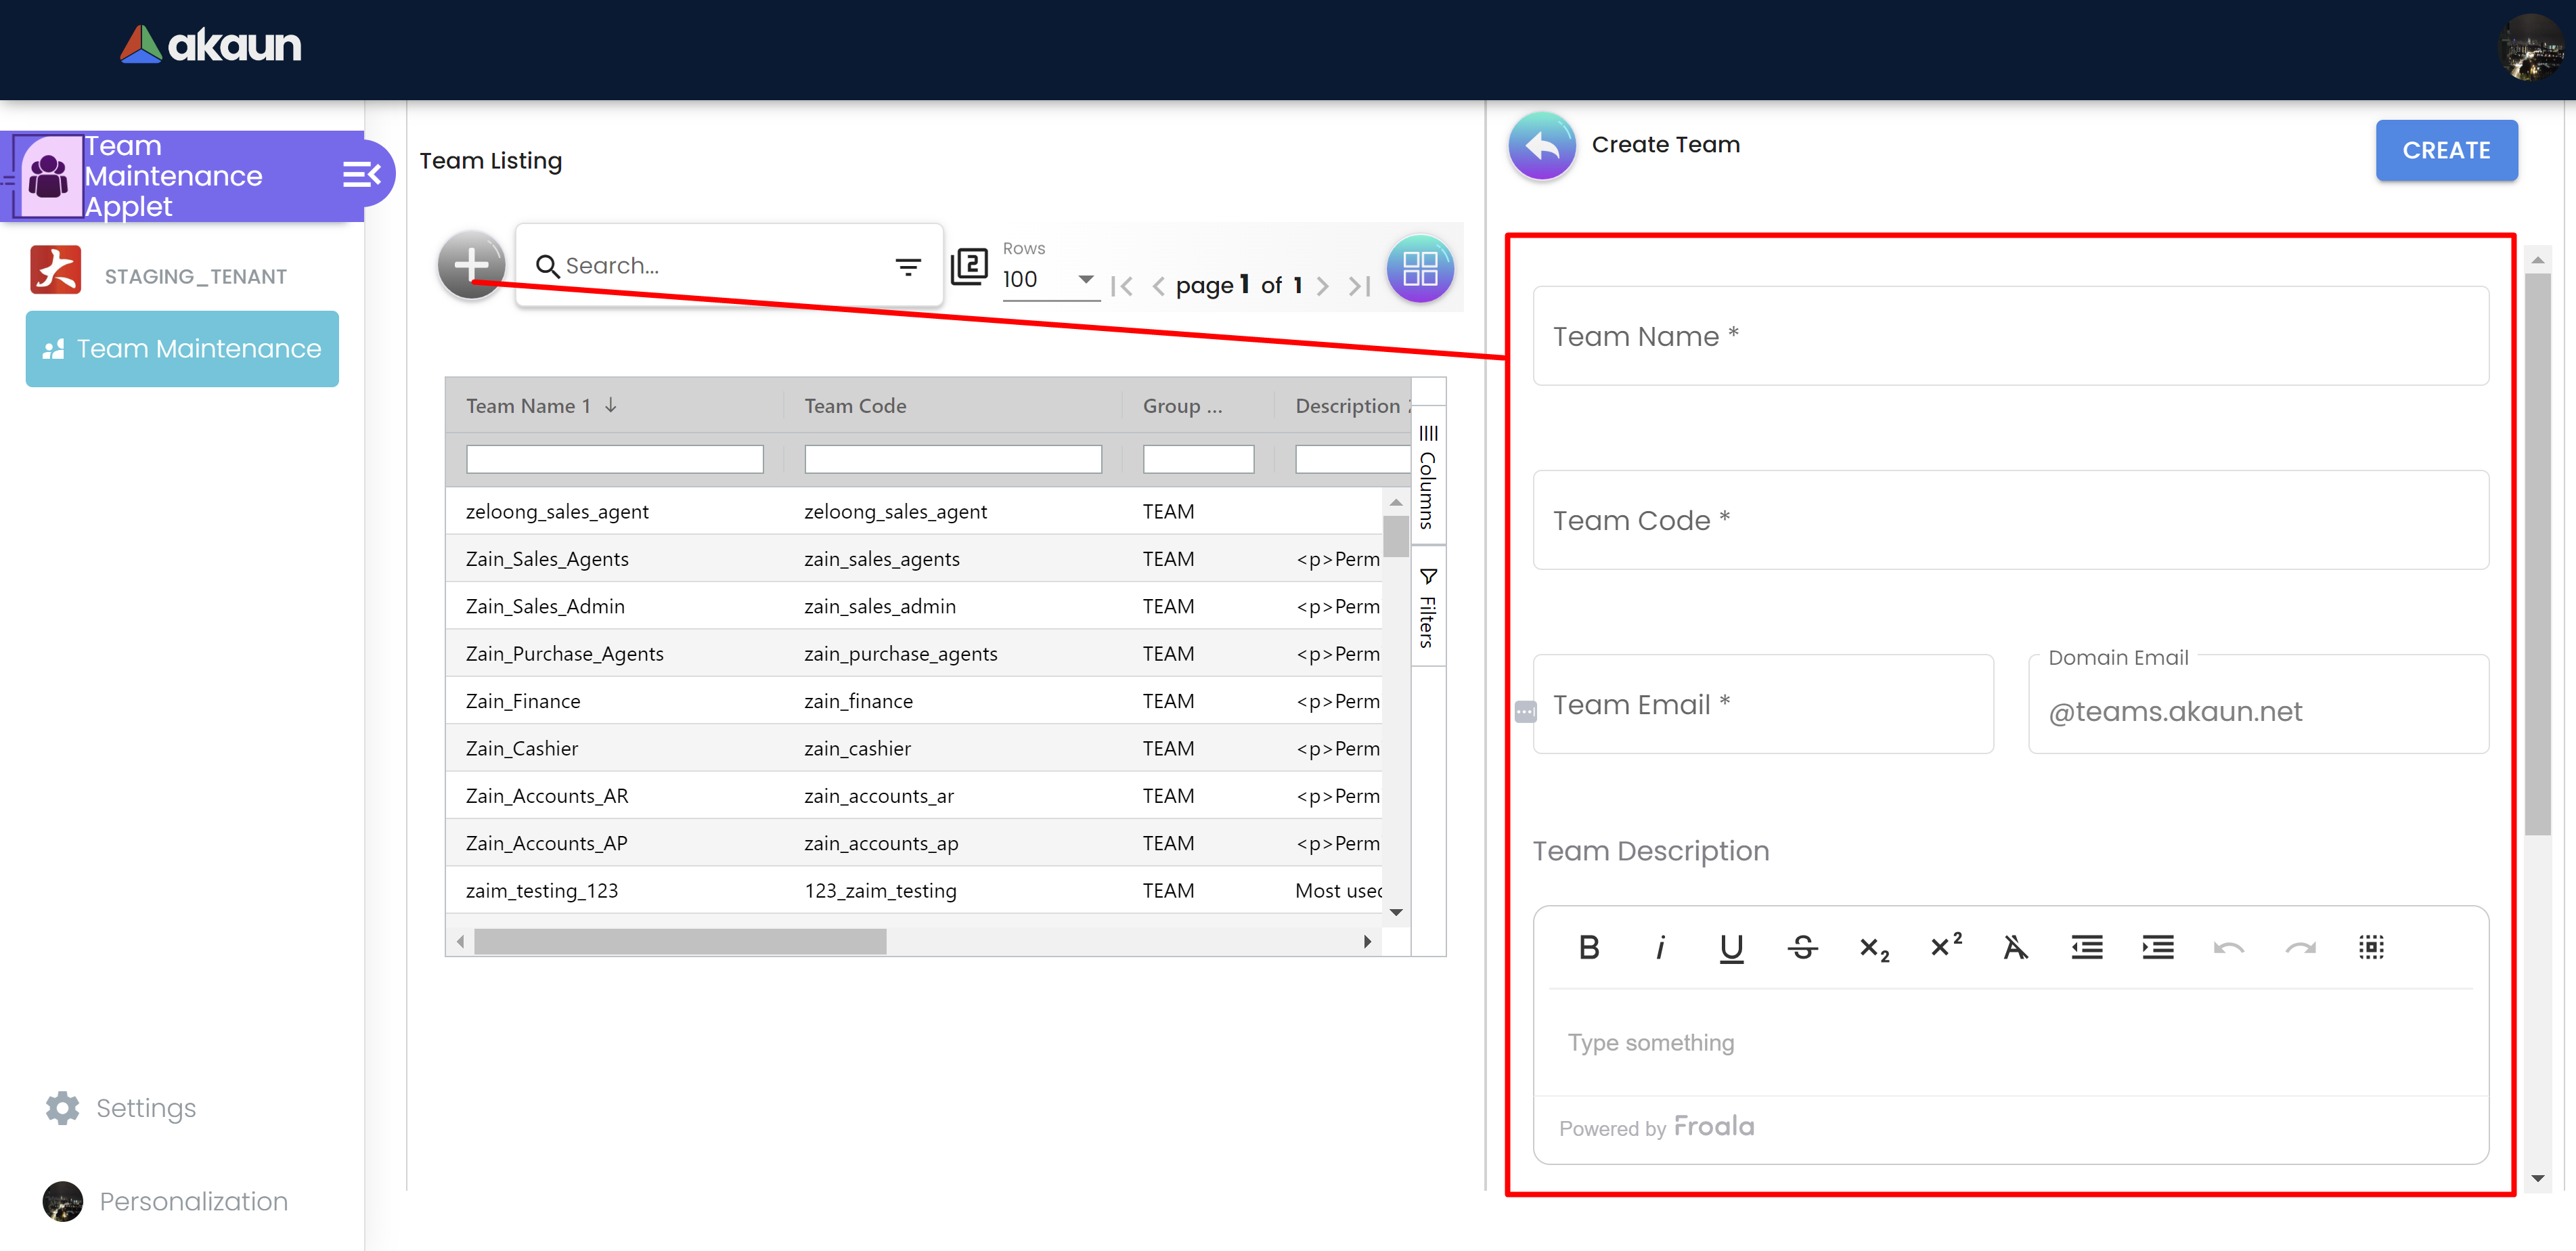
Step 2: Team Creation:
To create a new team, follow these steps:
-
Access the Team Maintenance Applet and "Create New Team."
-
Provide the necessary details for the new team, including the team name, description, and any other required attributes.
-
Save the information to create the new team.
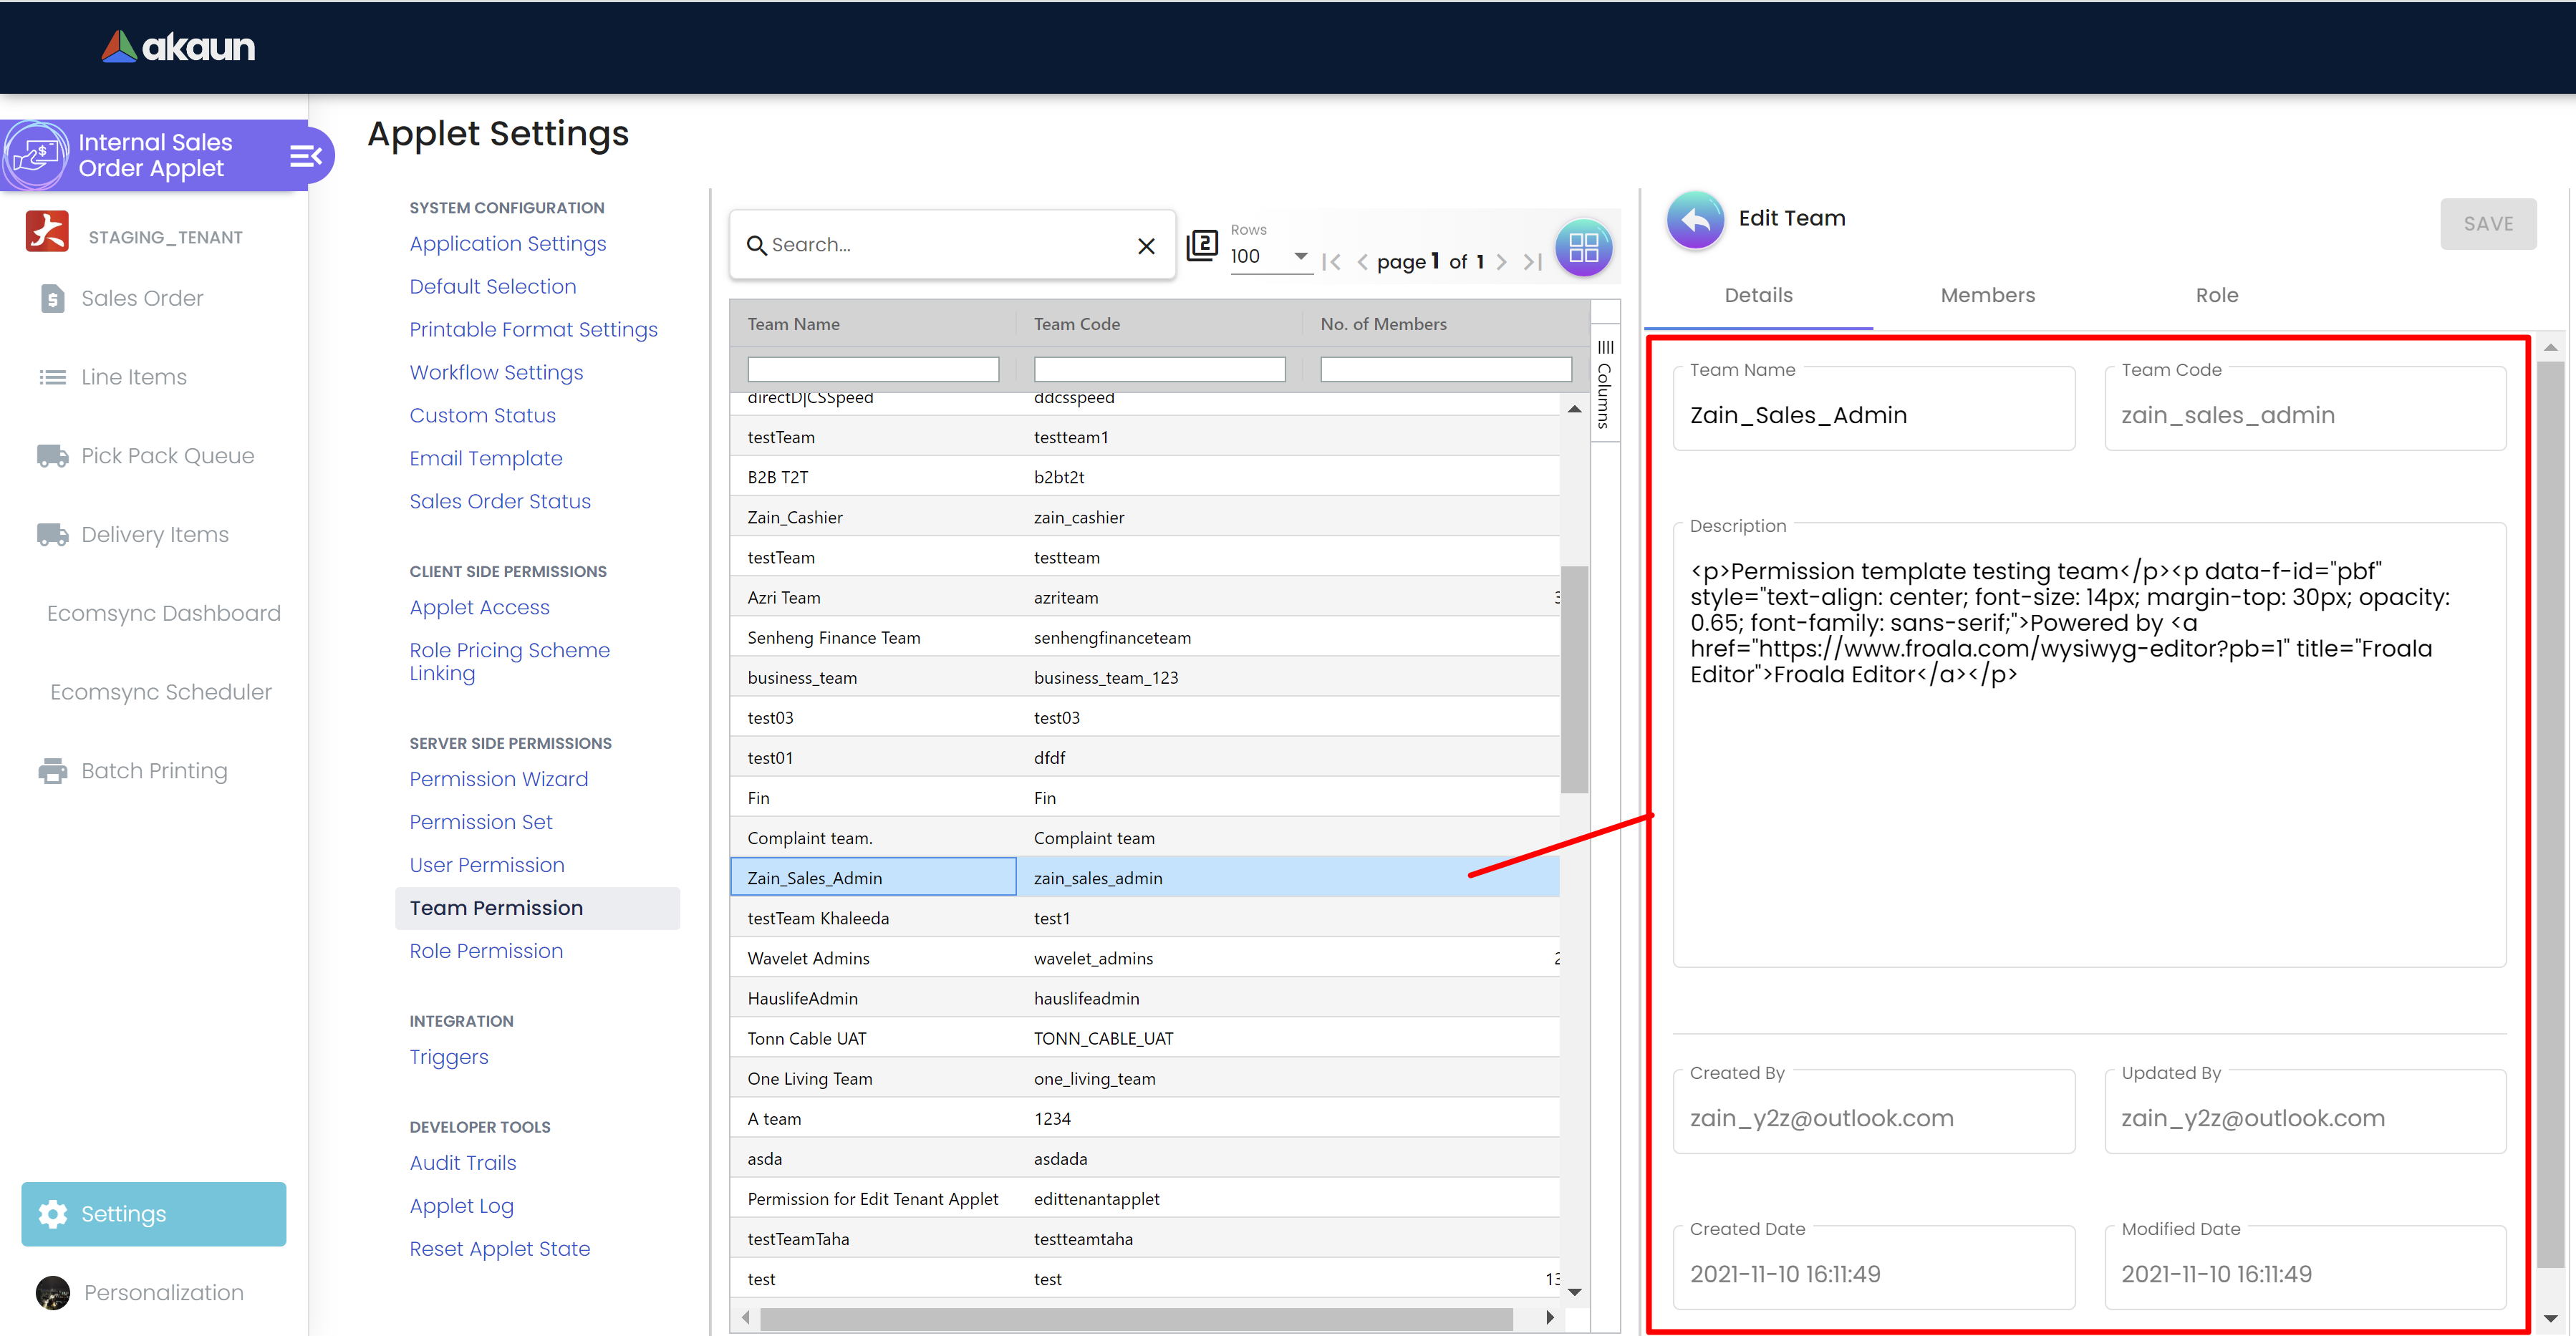
Step 3: Viewing Team Details:
To view detailed information about a specific team, follow these steps:
-
From the list of teams, click on the desired team’s name.
-
The team’s details, such as name, description, and other attributes, will be displayed.
Step 4: Managing Team Members:
To add, remove, or view members of a team, follow these steps:
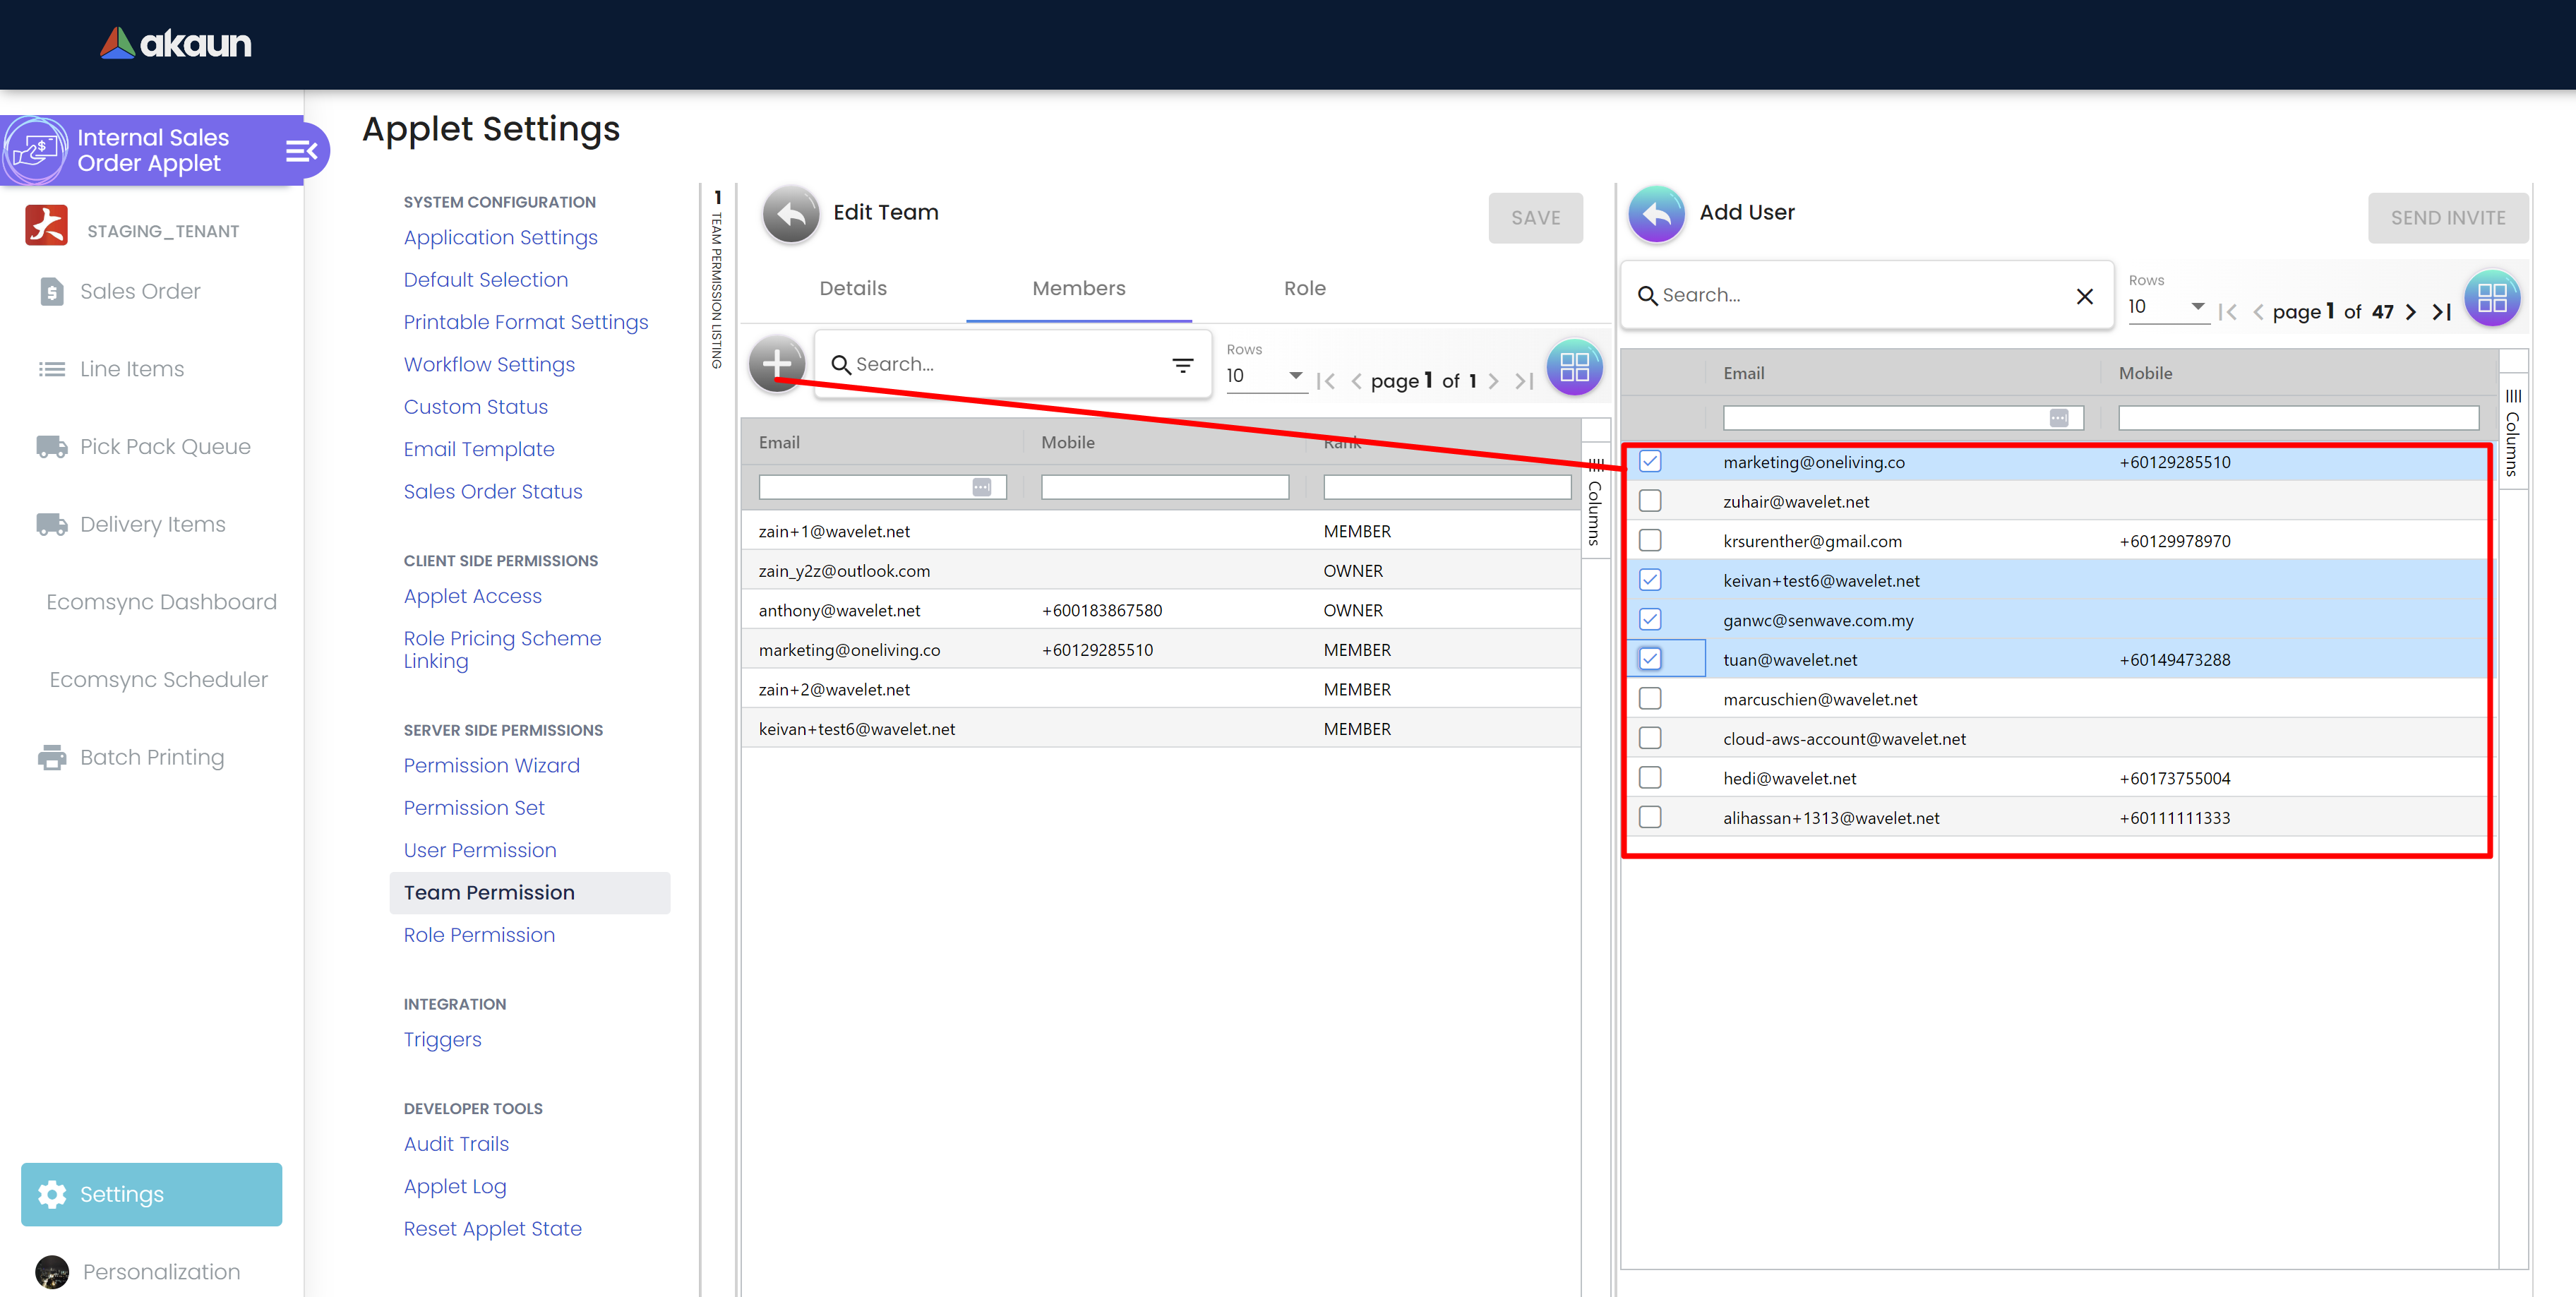
Step 4.1: Adding Team Members:
-
From the list of teams, click on the desired team’s name.
-
Go to "Members" tab.
-
Click on the "+" button and select the desired member from the list
-
Upon selecting, specify the "Rank" of the member and click "Save" to add the new member to the team.
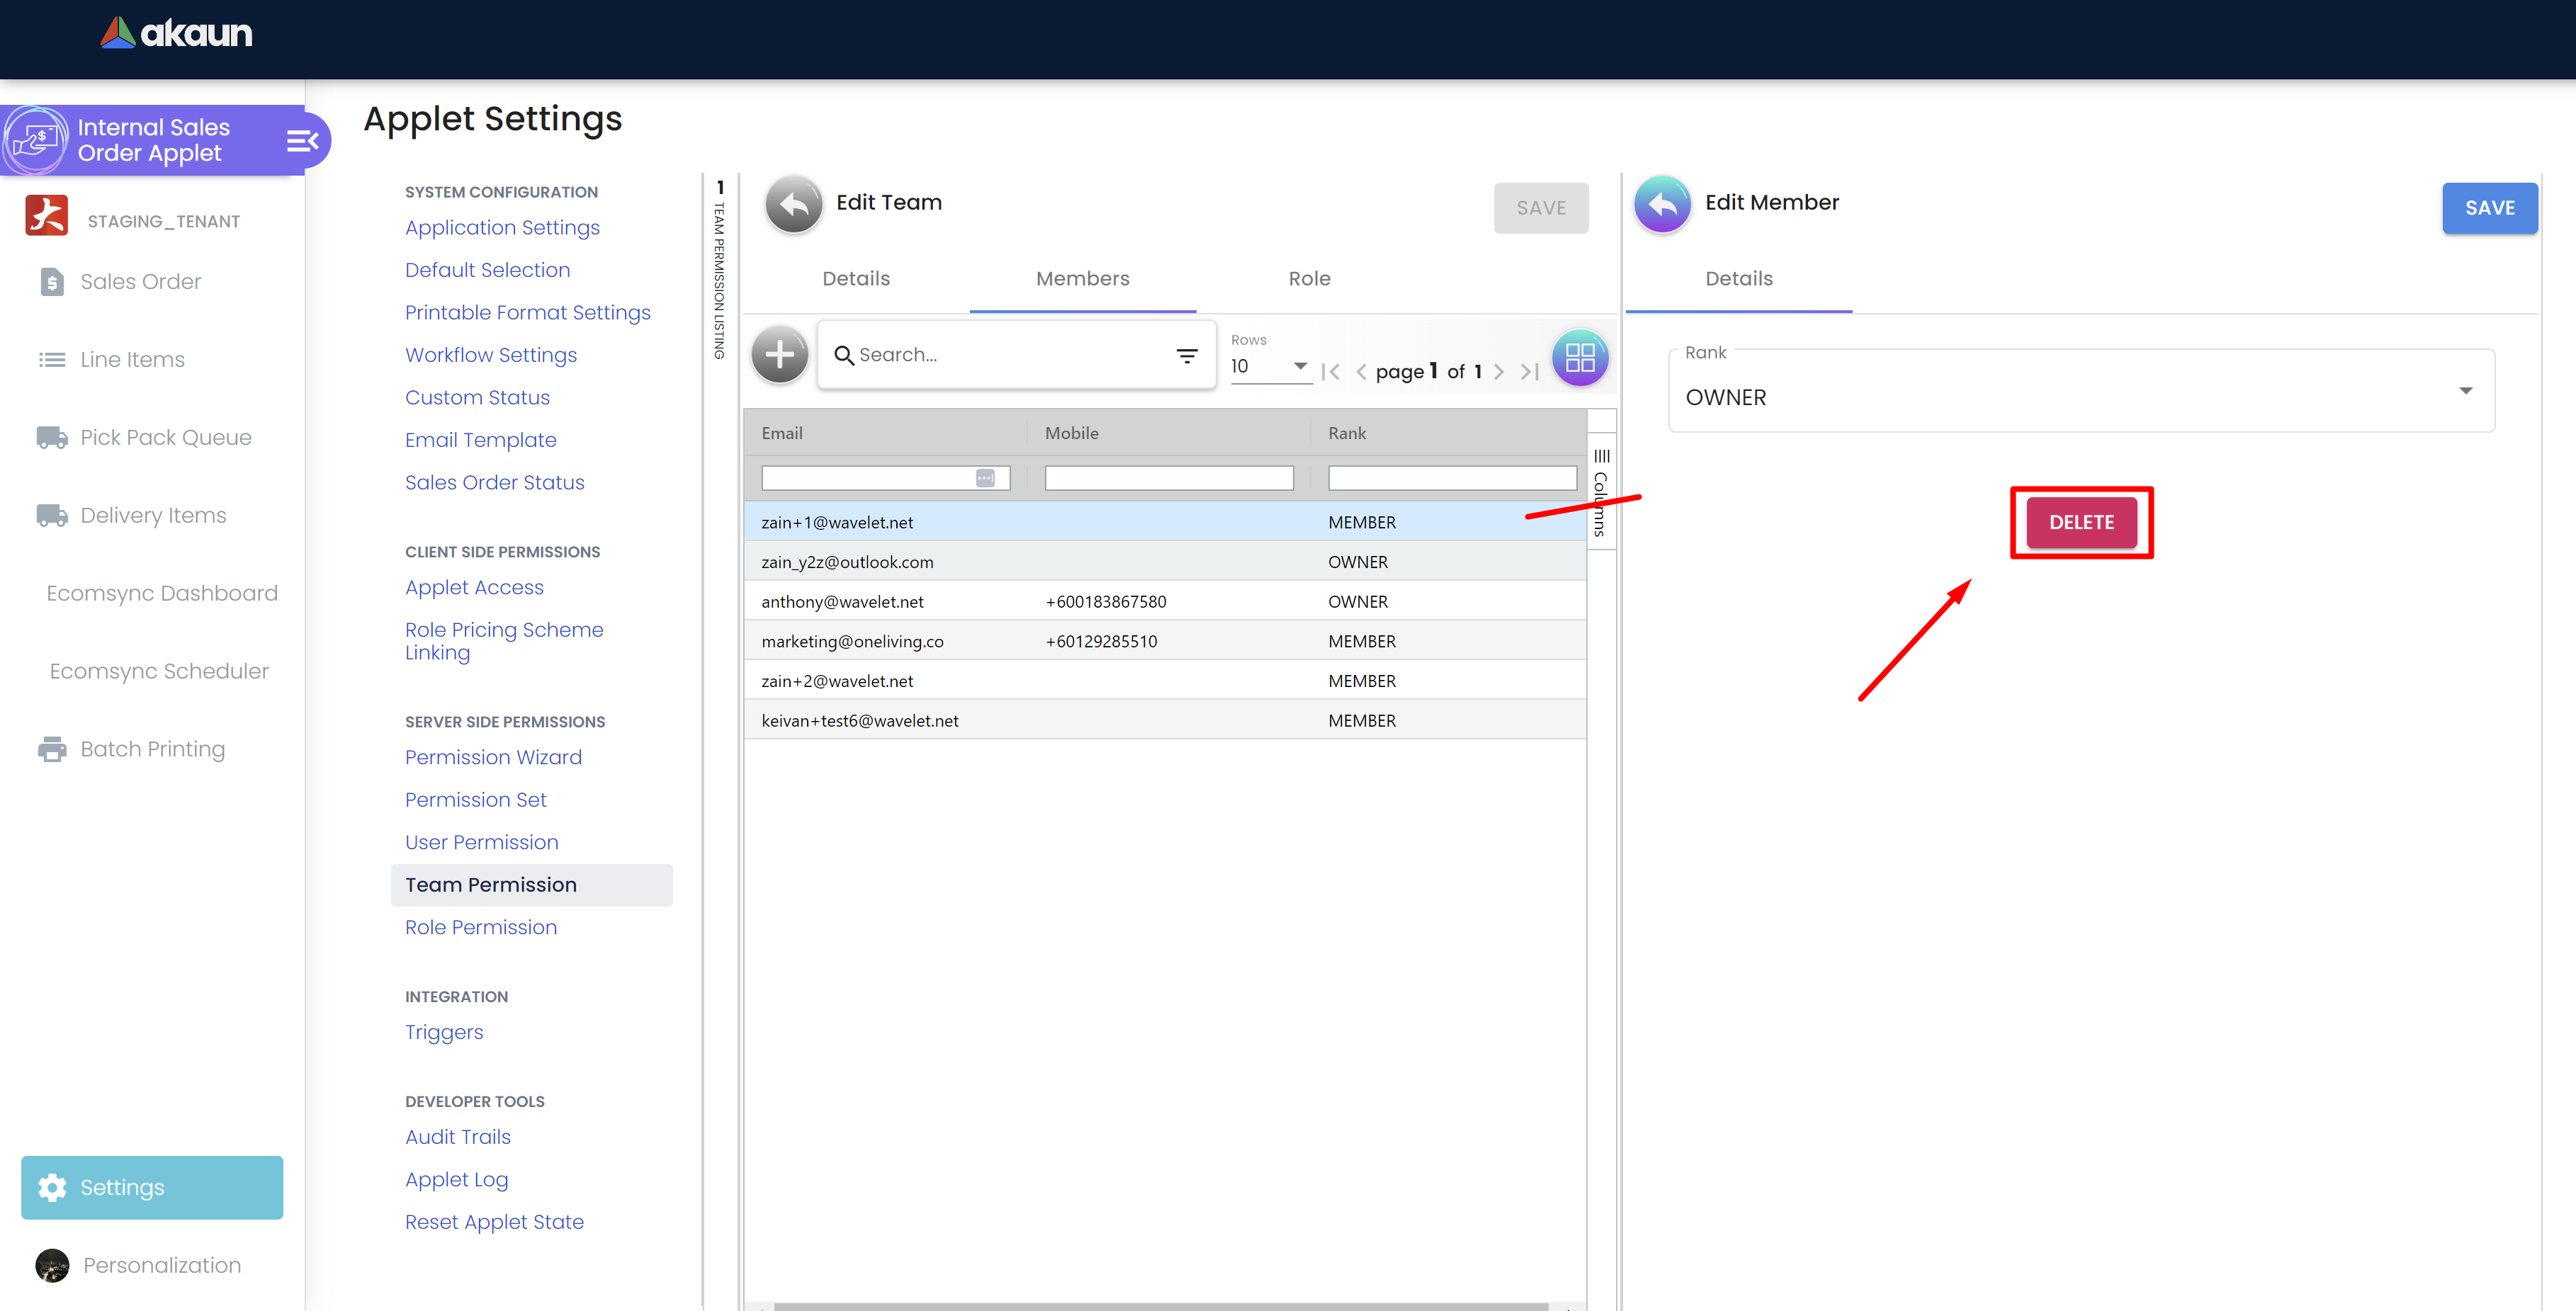
Step 4.2: Removing Team Members:
-
From the list of teams, click on the desired team’s name.
-
Go to "Members" tab.
-
Click and select the desired member from the list
-
Upon selecting, view the details of the member.
-
Click the delete button to remove the member from the team
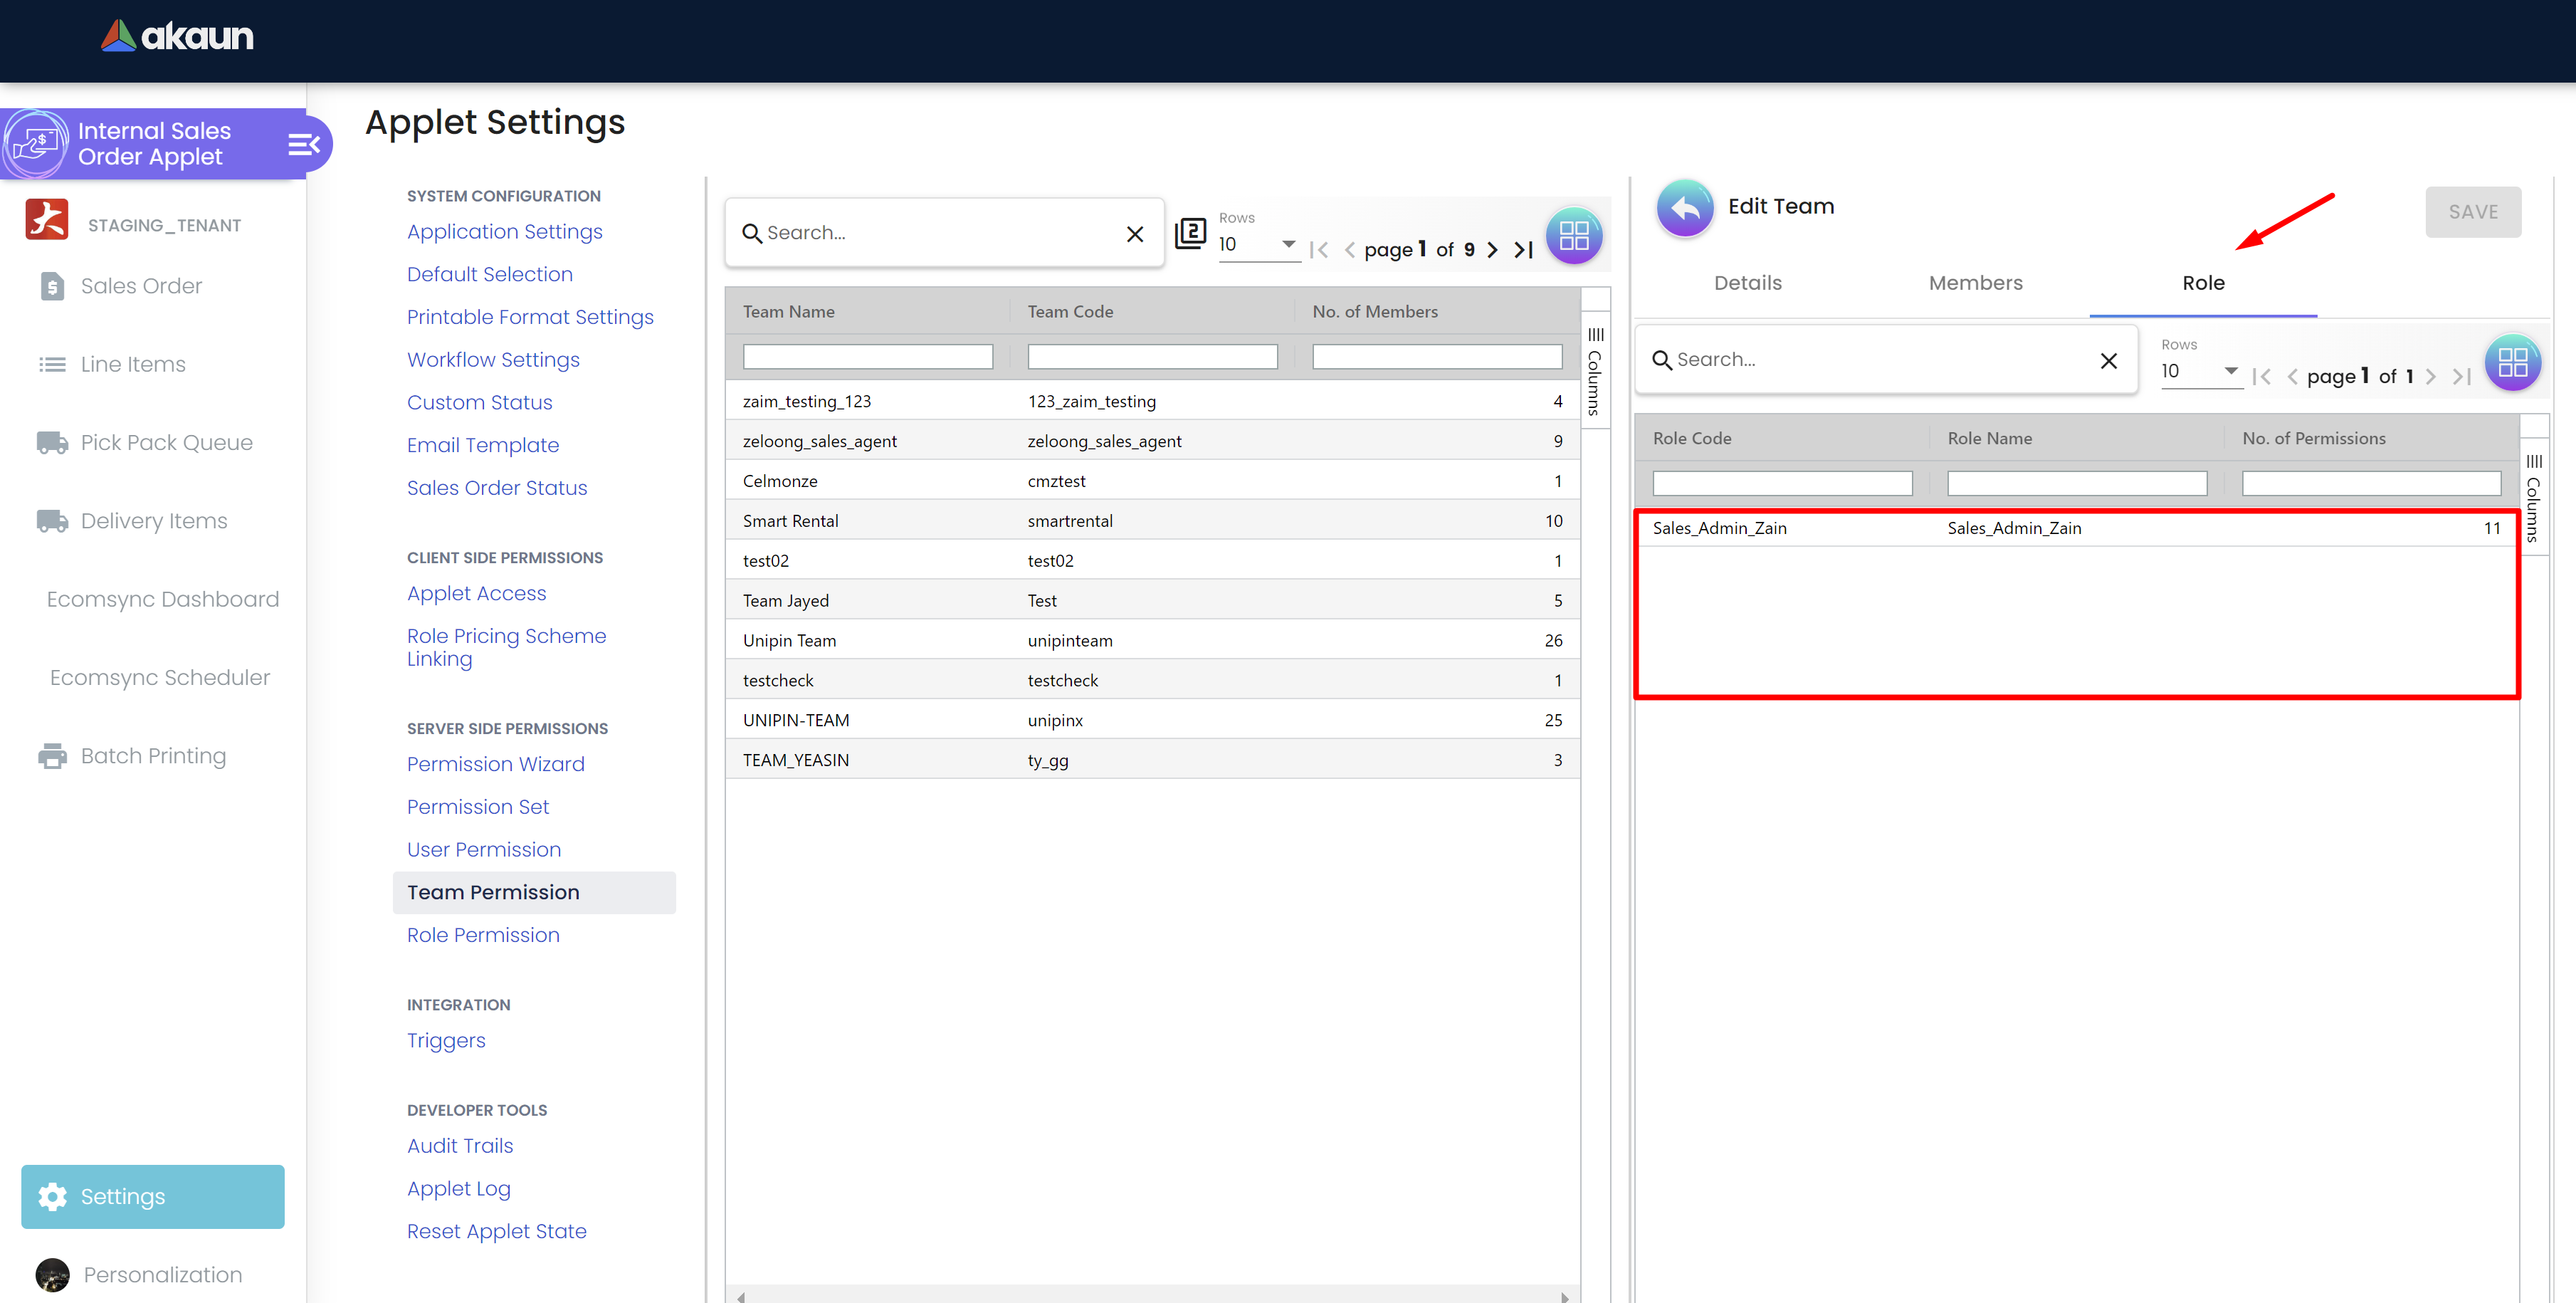
Step 5: Viewing Roles:
To see the roles assigned to a particular team, follow these steps:
-
From the list of teams, click on the desired team’s name.
-
Go to "Roles" tab.
-
View the list of assigned "Roles" to the team (read-only).
Conclusion:
Team Permissions play a crucial role in efficiently managing teams within the applet. By following the step-by-step guide, users can effortlessly manage team members, and understand the roles assigned to each team. The comprehensive set of features ensures effective team management, streamlines workflows, and contributes to a more organized and productive work environment.
6. Role Permission:
6.1 Overview:
Role Permissions allow users to manage roles within the application and control access to various features and data. This documentation outlines the features and functionalities provided by Role Permissions and provides a step-by-step guide on how to use them effectively.
6.2 Step-by-Step Guide:
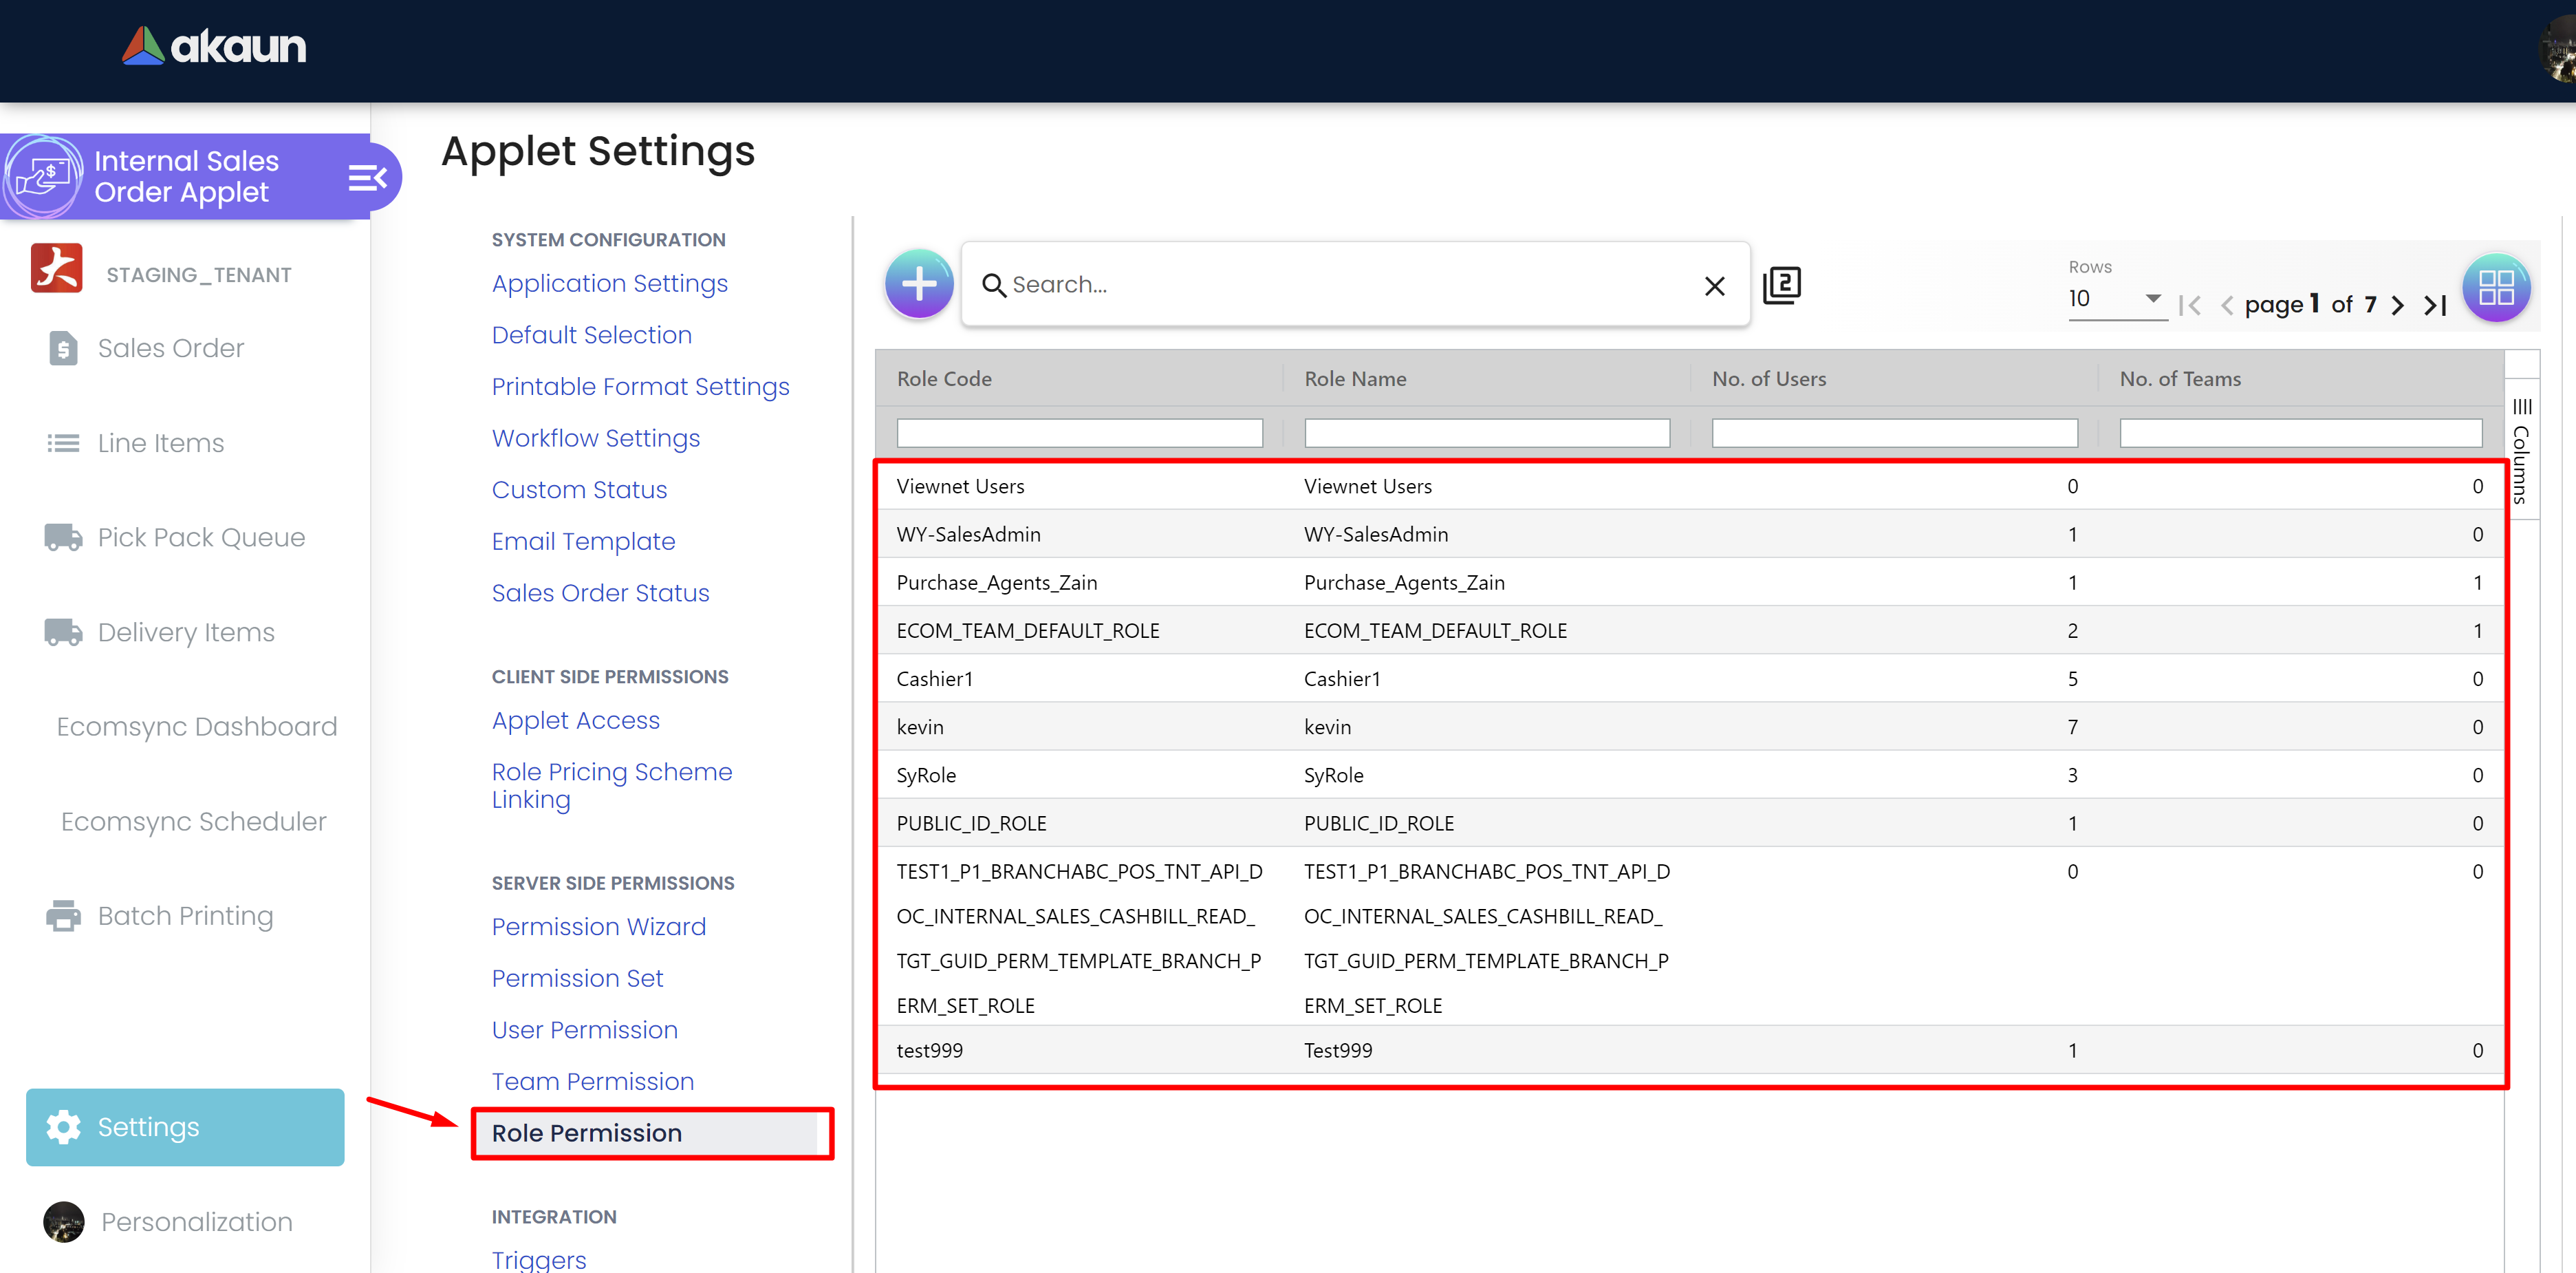
Step 1: Listing Roles:
To view all roles within an applet, follow these steps:
-
Log in to the akaun platform with appropriate credentials and go to the desired applet settings menu.
-
Navigate to the "Rolw permission" section.
-
A list of all existing roles will be displayed, showing their names and other relevant information.
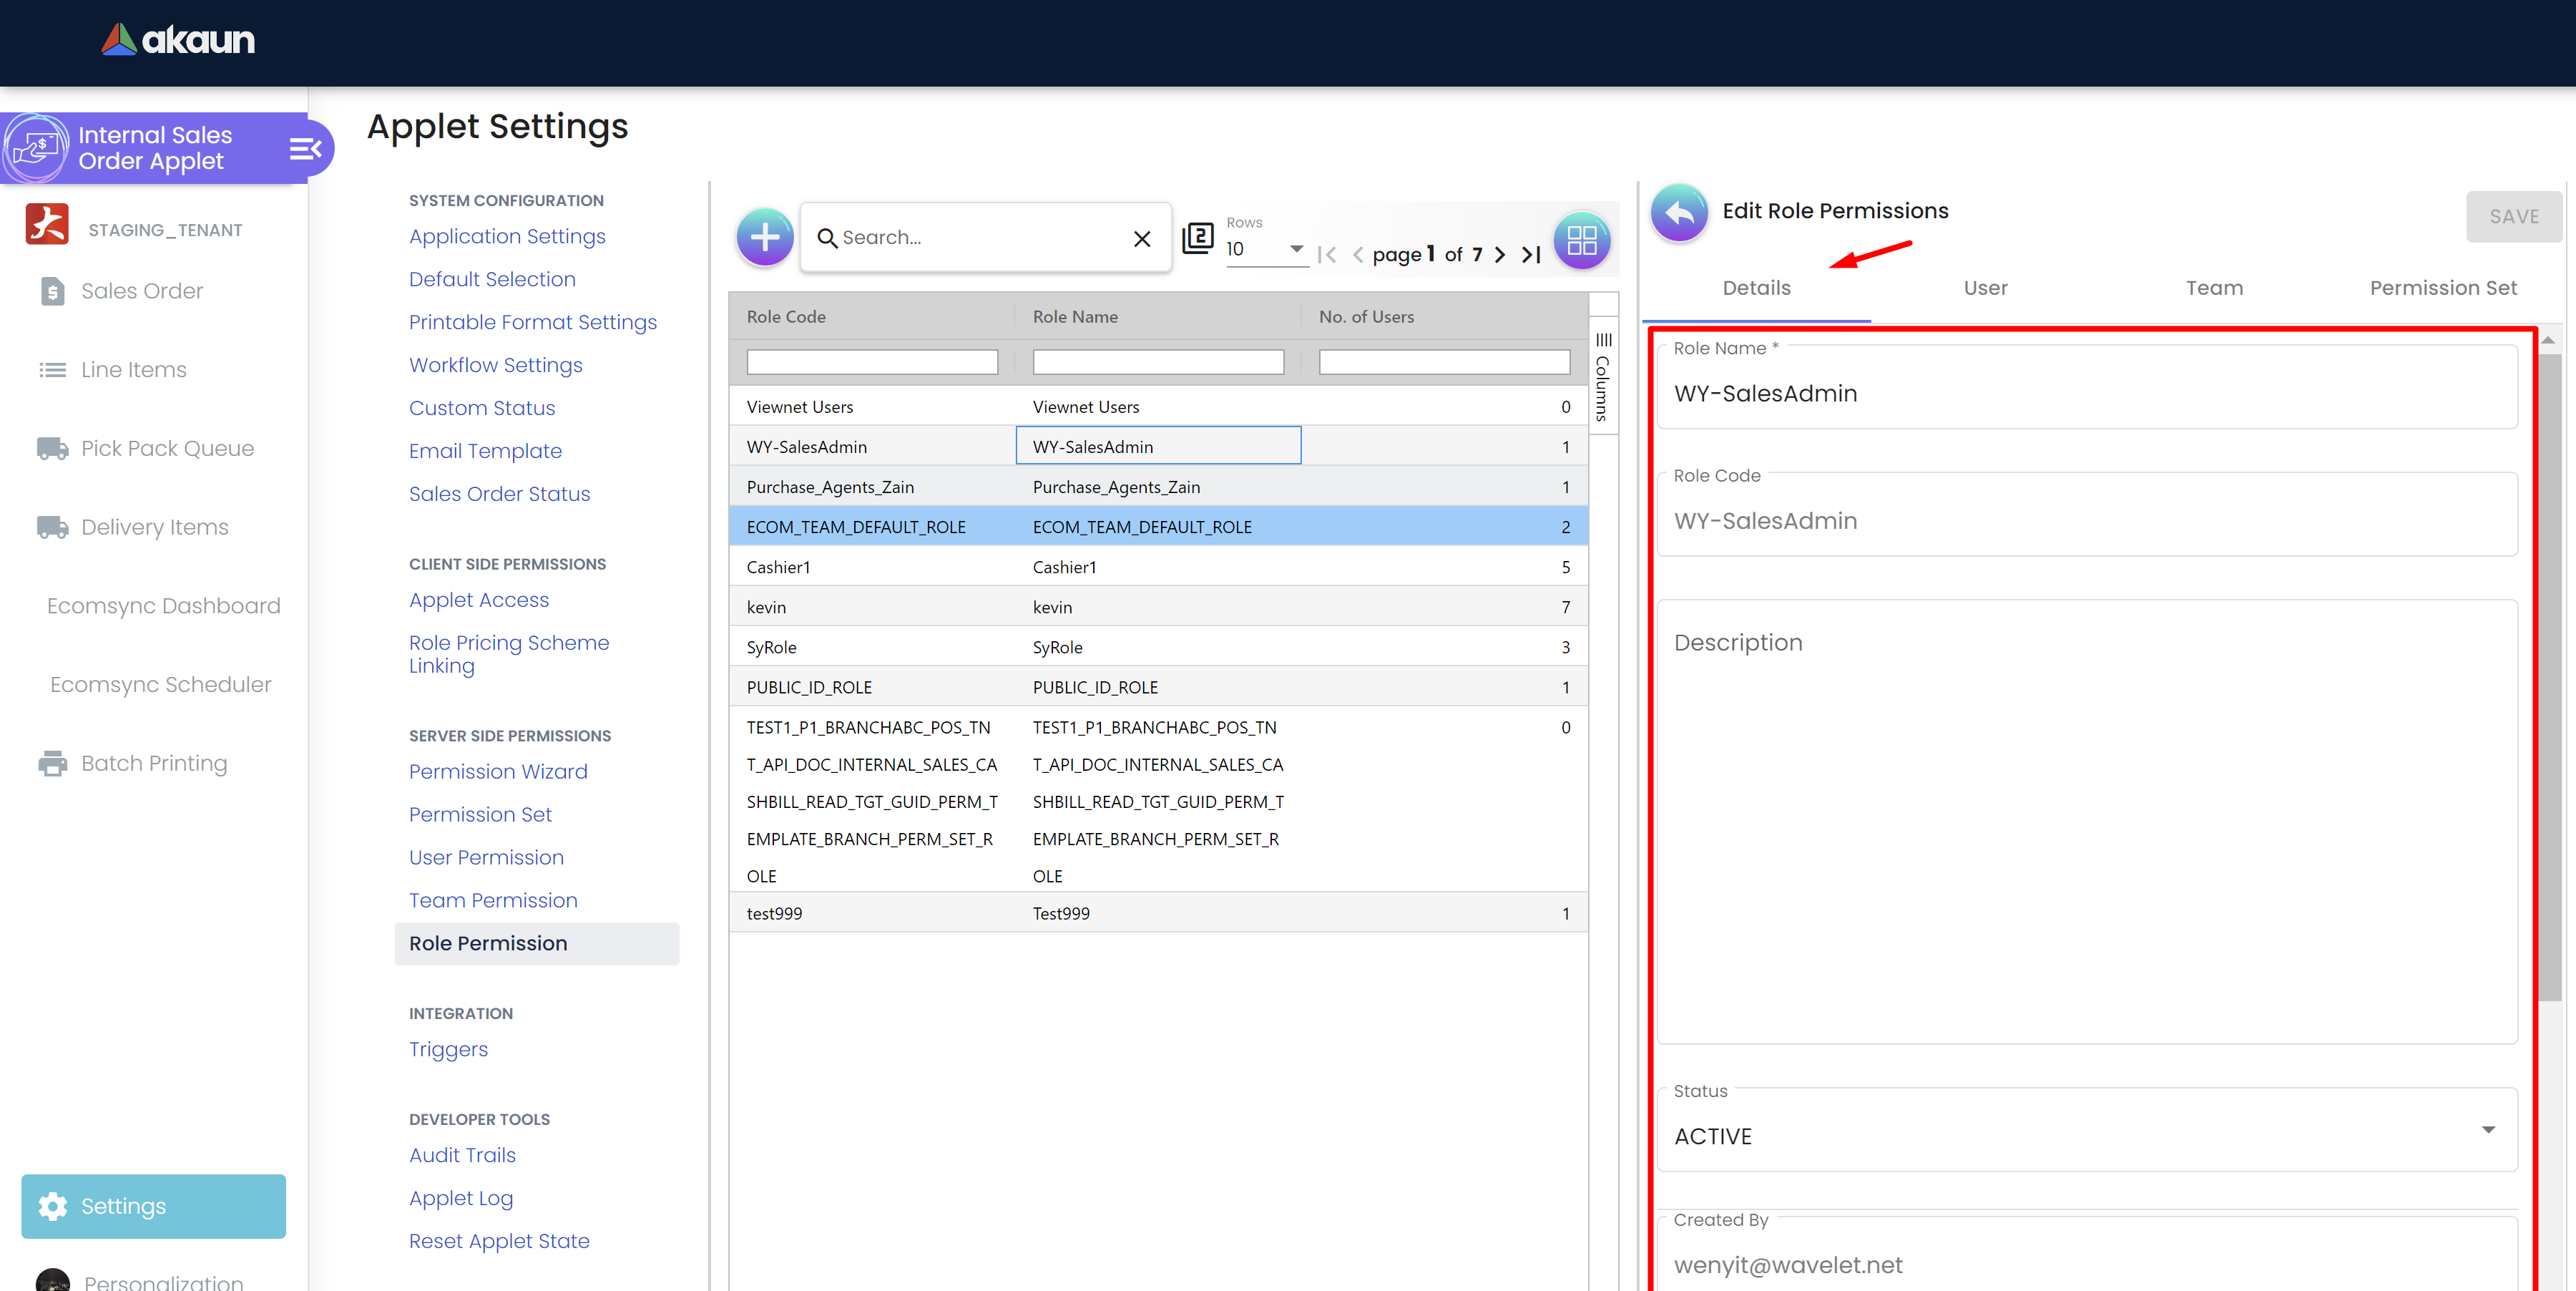
Step 2: Role Details:
To view detailed information about a specific role, follow these steps:
-
From the list of roles, click on the desired role’s name.
-
The role’s details, including its name, code description, created/updated by, and created/updated date will be displayed.
Step 3: Managing Users, Teams, and Permission Sets for the Role:
To add, remove, or view users, teams, and permission sets associated with a role, follow these steps:
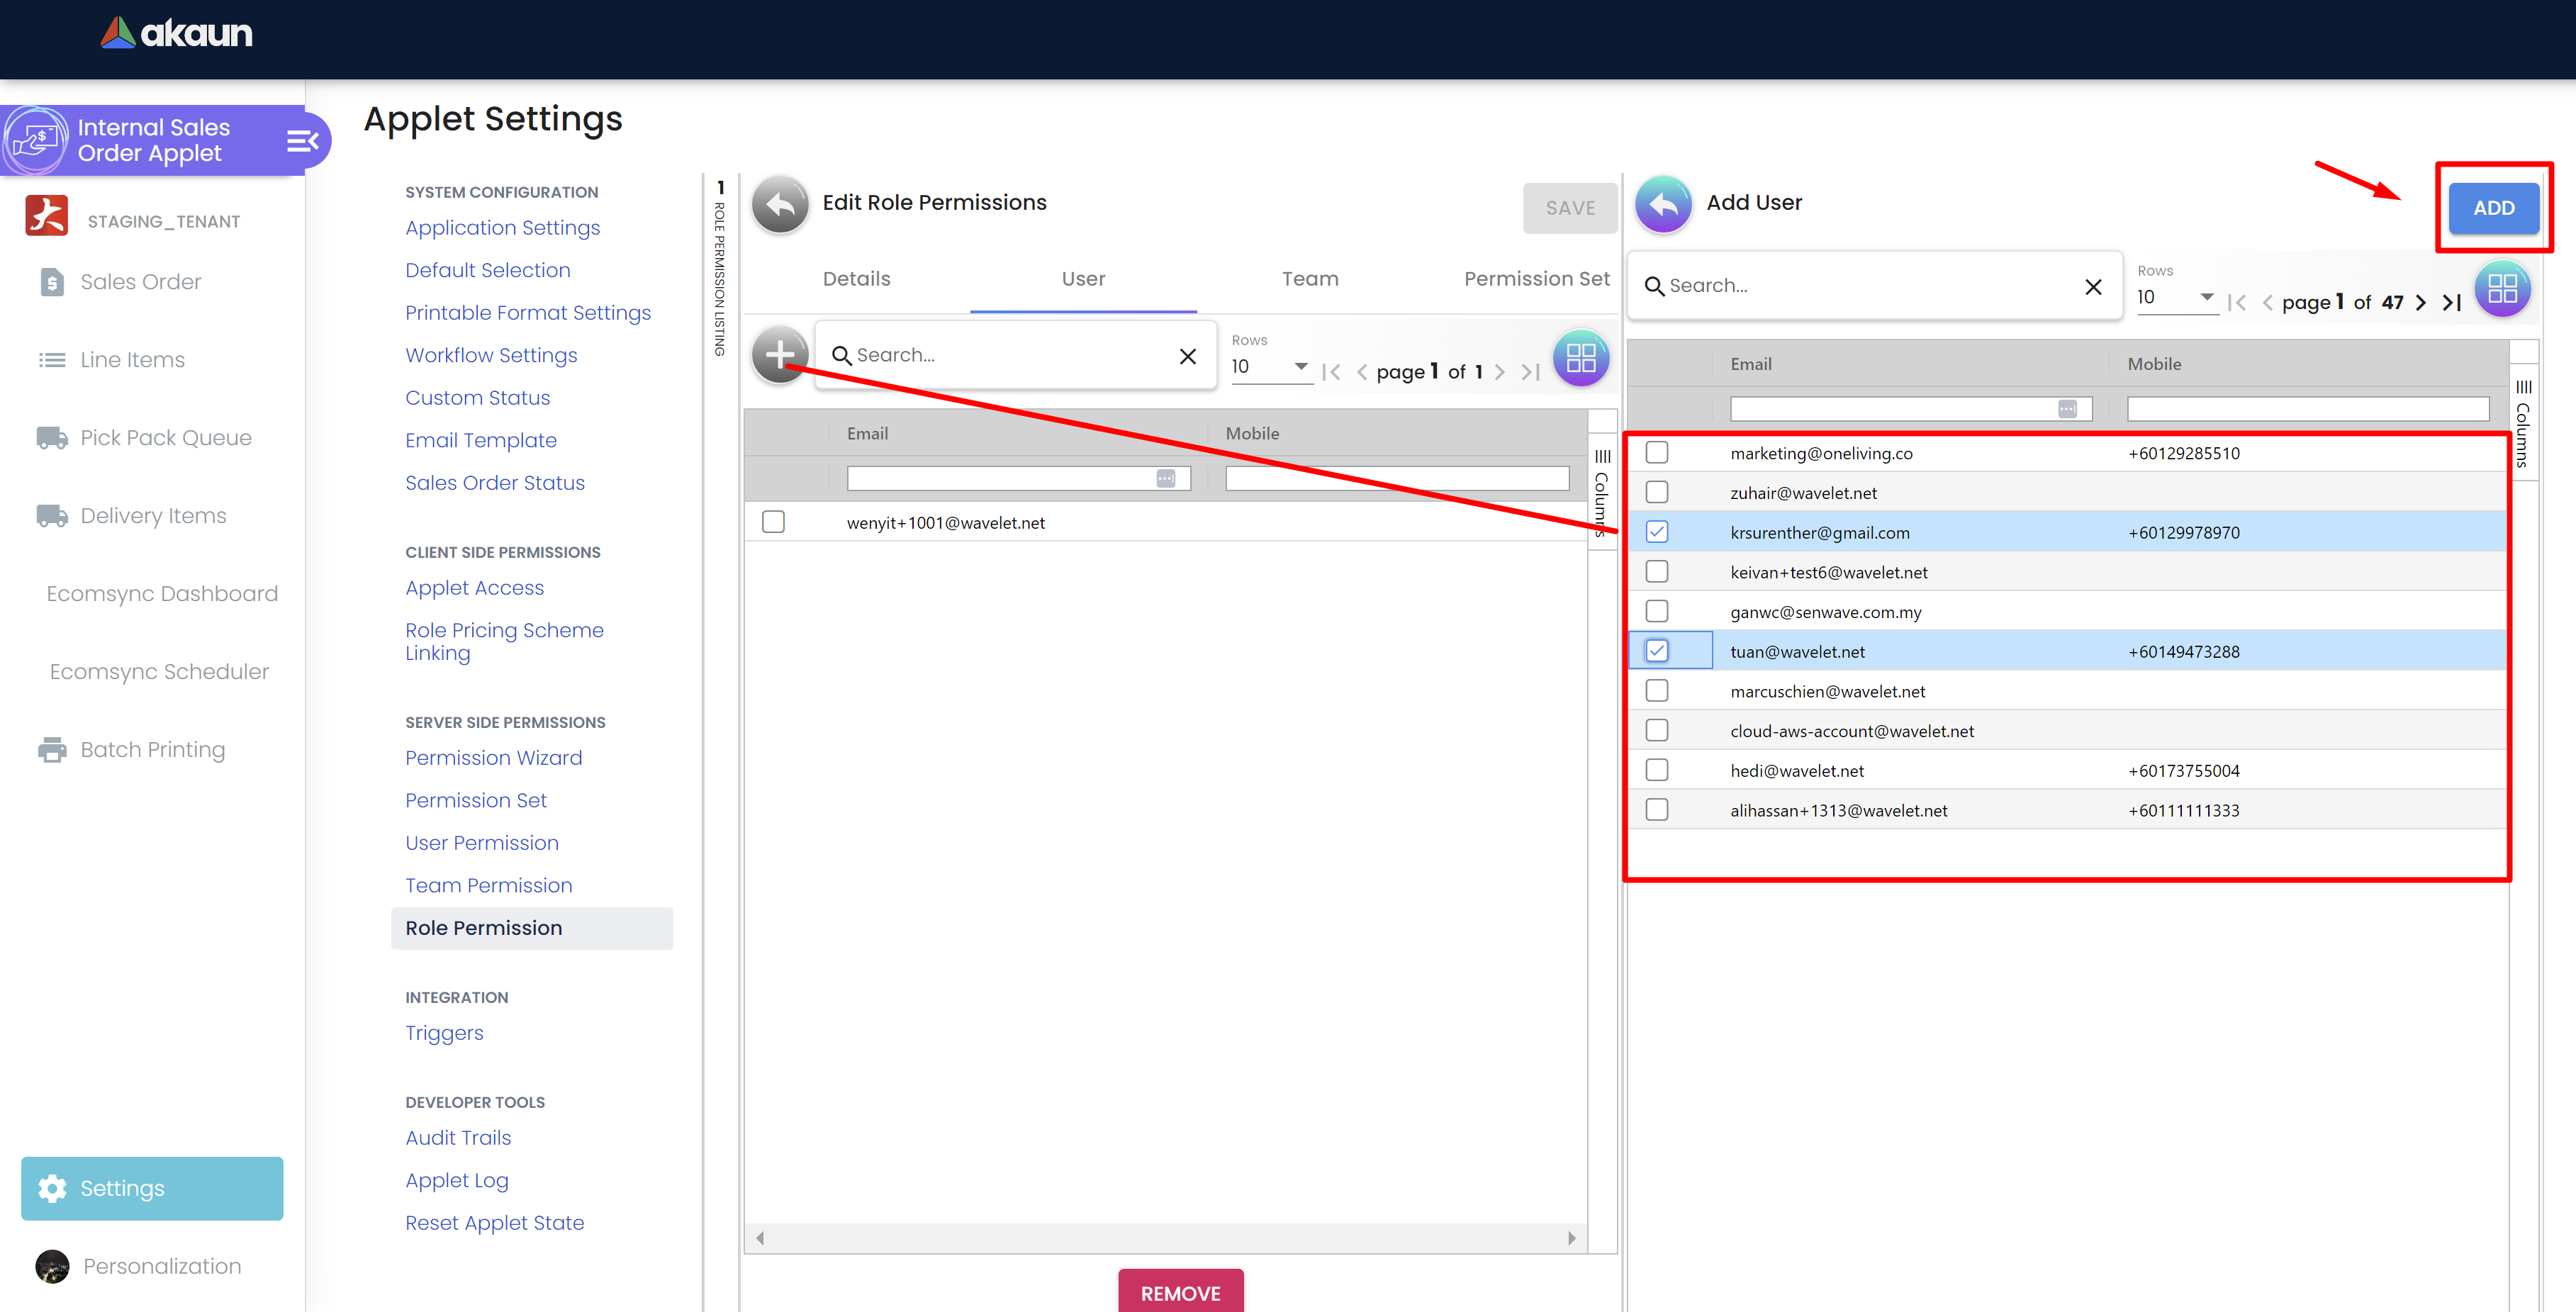
Step 3.1: Adding Users to the Role
-
Access the users tab.
-
Look for the "+" button to associate user(s) to the role.
-
Multi select the users and click "Add" button.
-
Save the information to associate the user with the role.
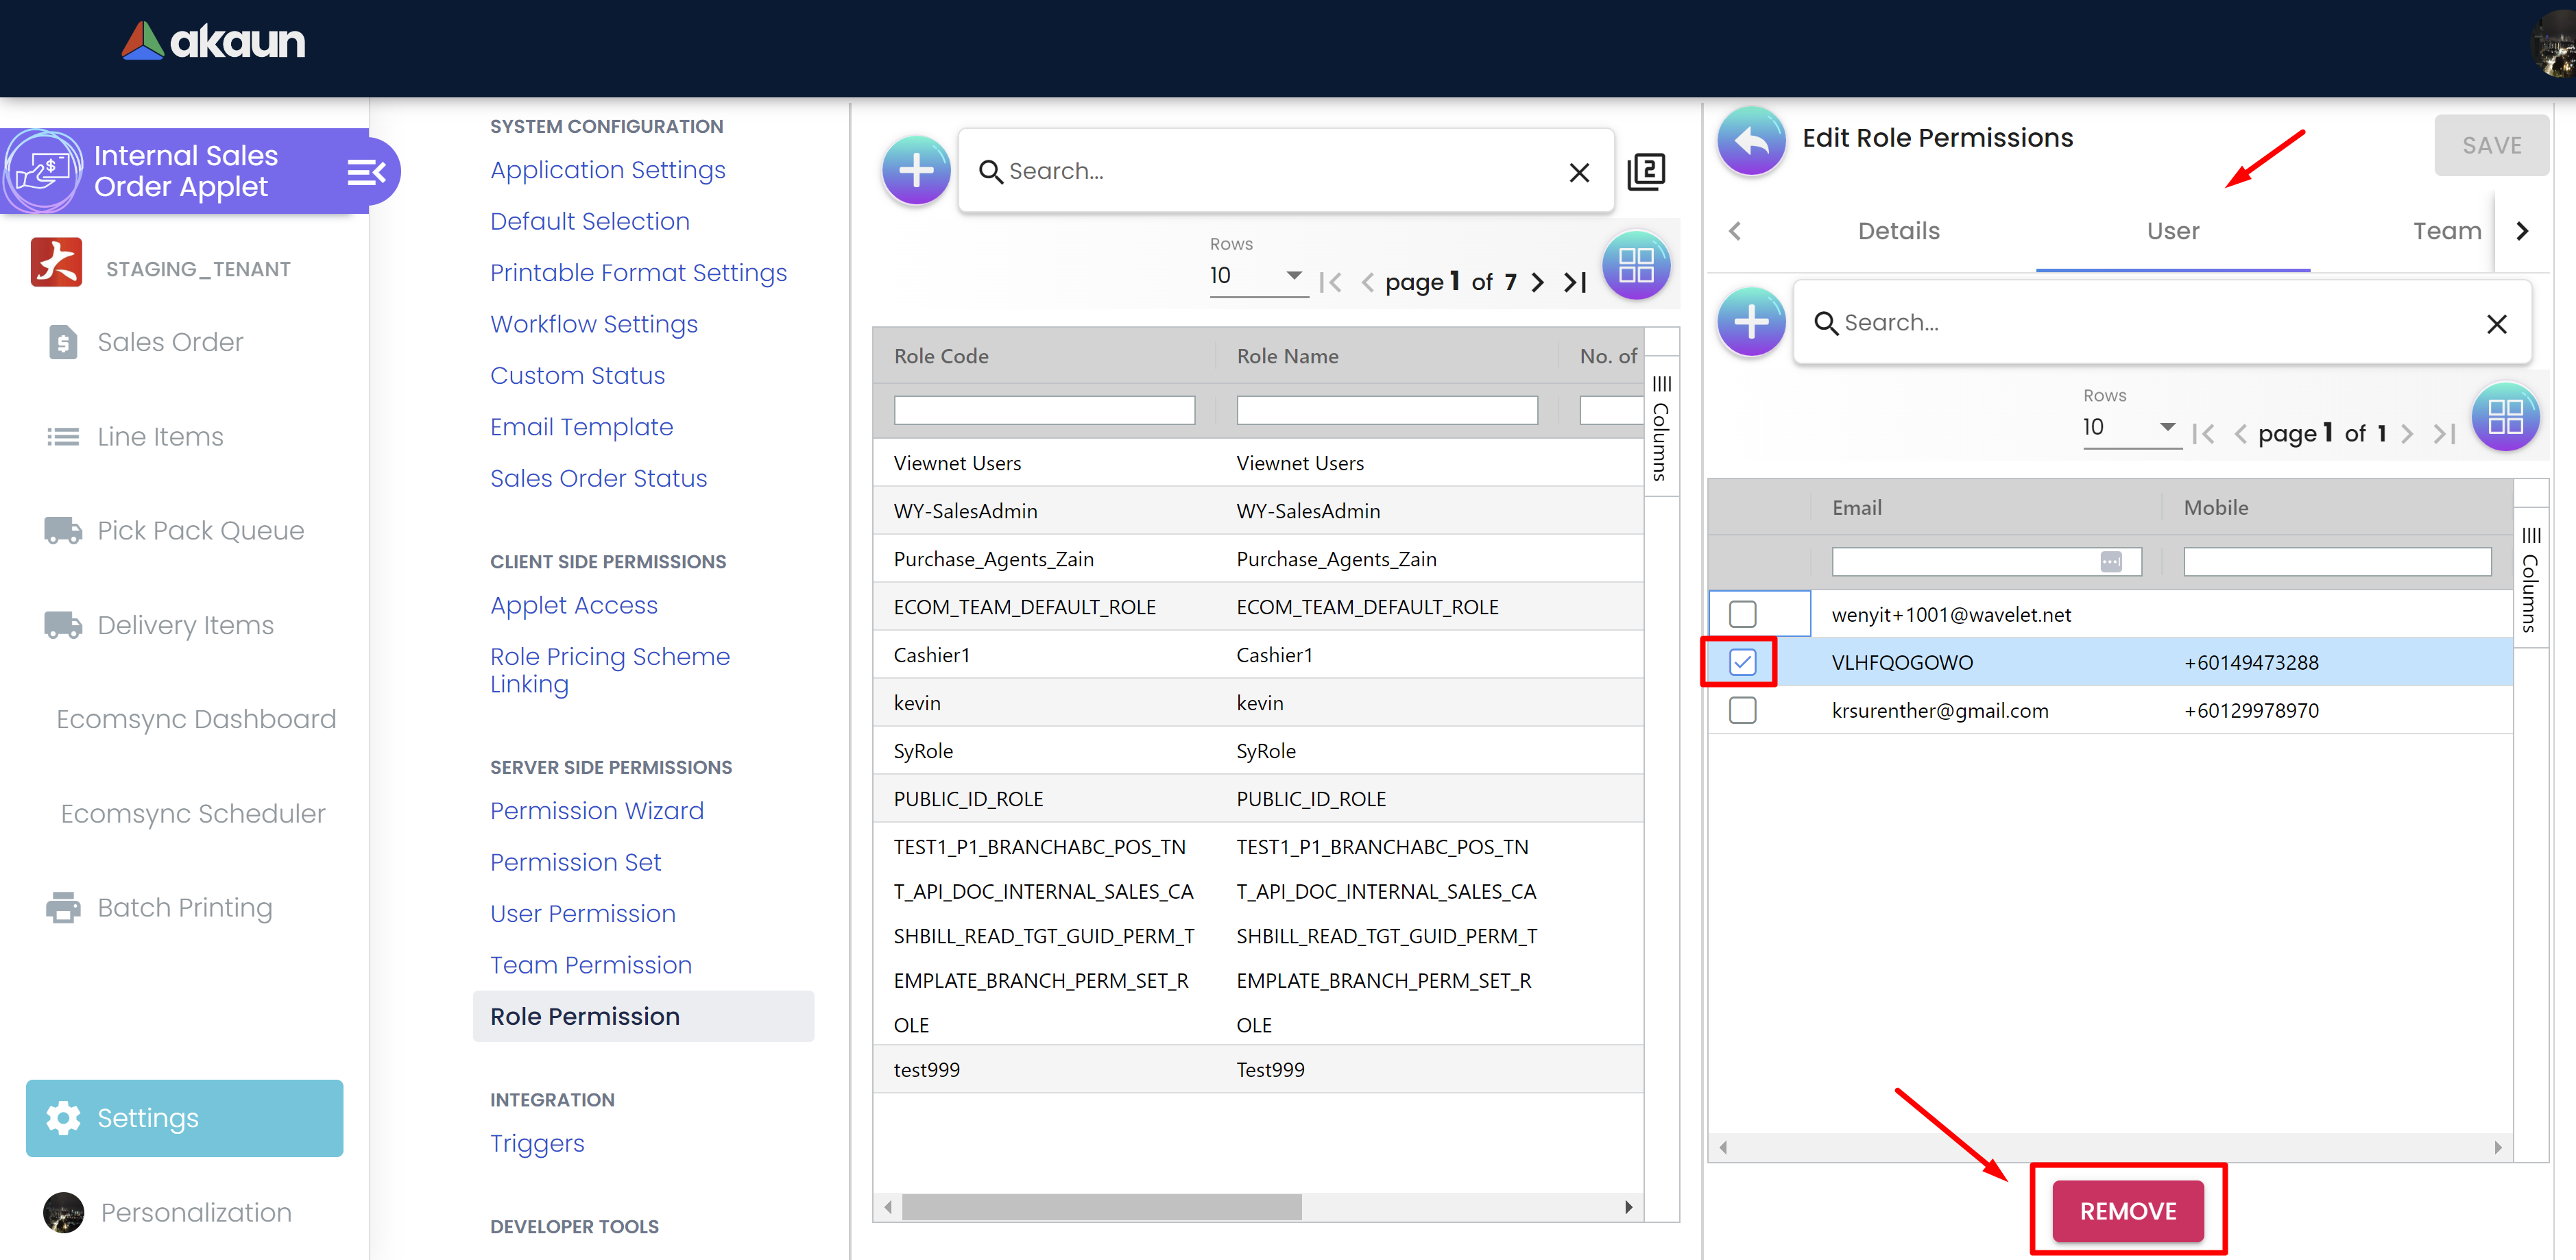
Step 3.2: Removing Users from the Role:
-
Navigate to the users tab.
-
Multi select the users and click "Remove" button.
-
Save the information to remove user(s) from the role.
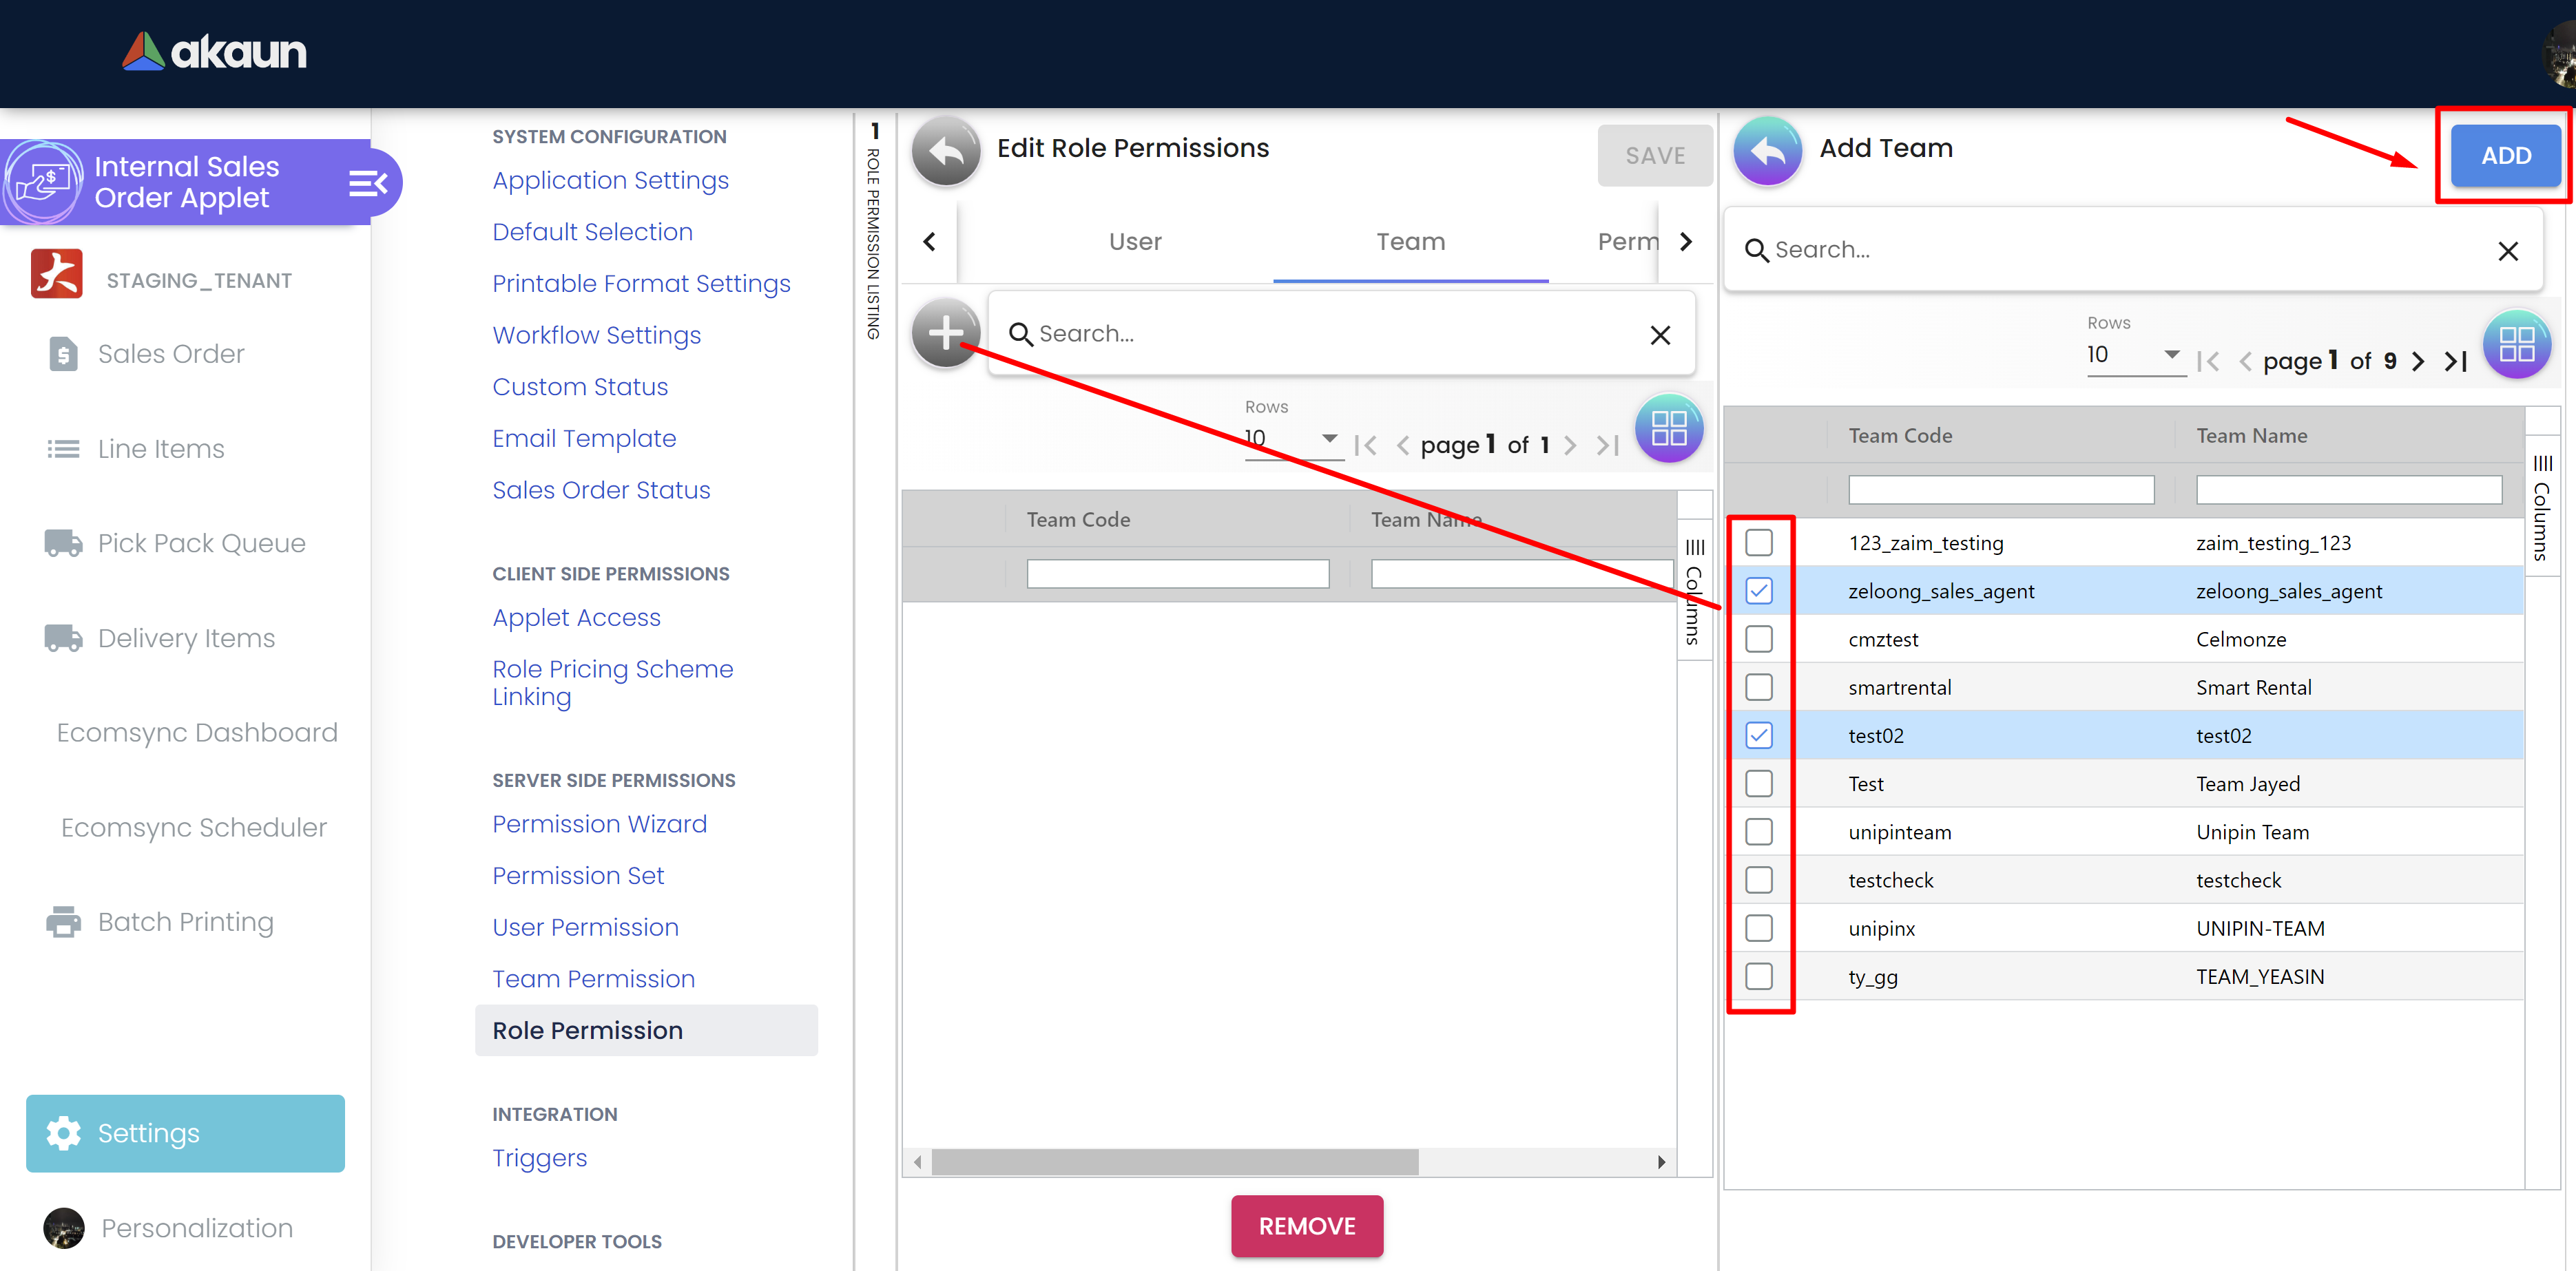
Step 3.3: Adding Teams to the Role:
-
Navigate to the Teams tab.
-
Look for the "+" button to associate team(s) to the role.
-
Multi select the teams and click "Add" button.
-
Save the information to add teams to the role.
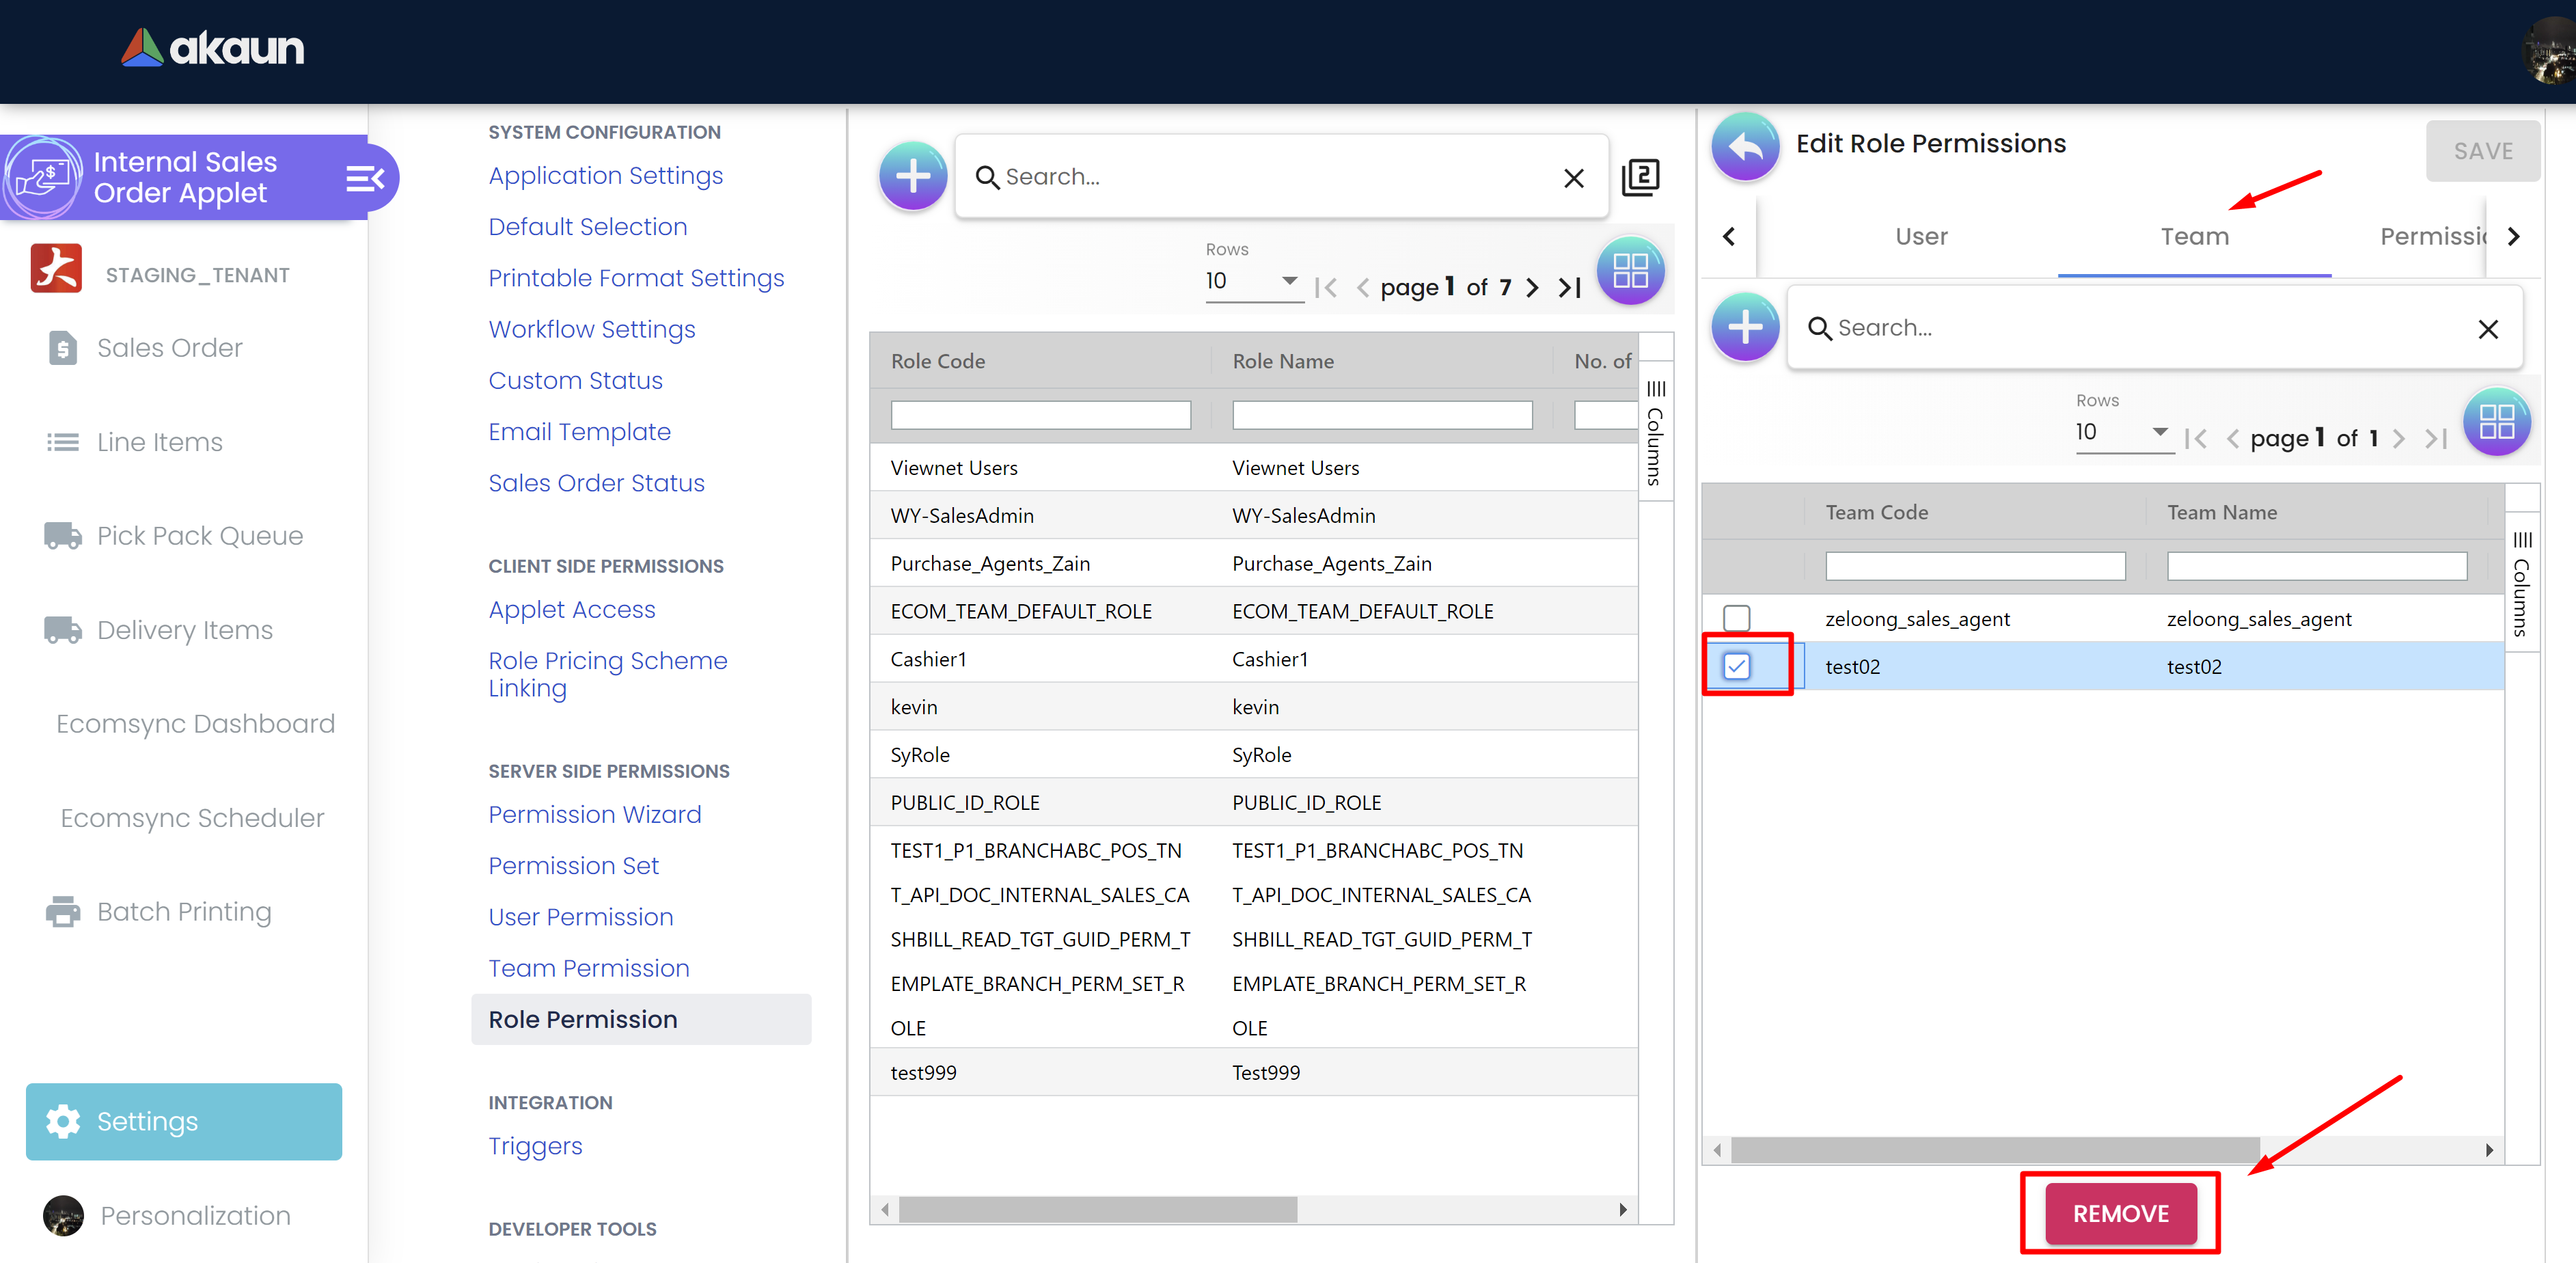
Step 3.4: Removing Teams from the Role:
-
Navigate to the teams tab.
-
Multi select the teams and click "Remove" button.
-
Save the information to remove team(s) from the role.
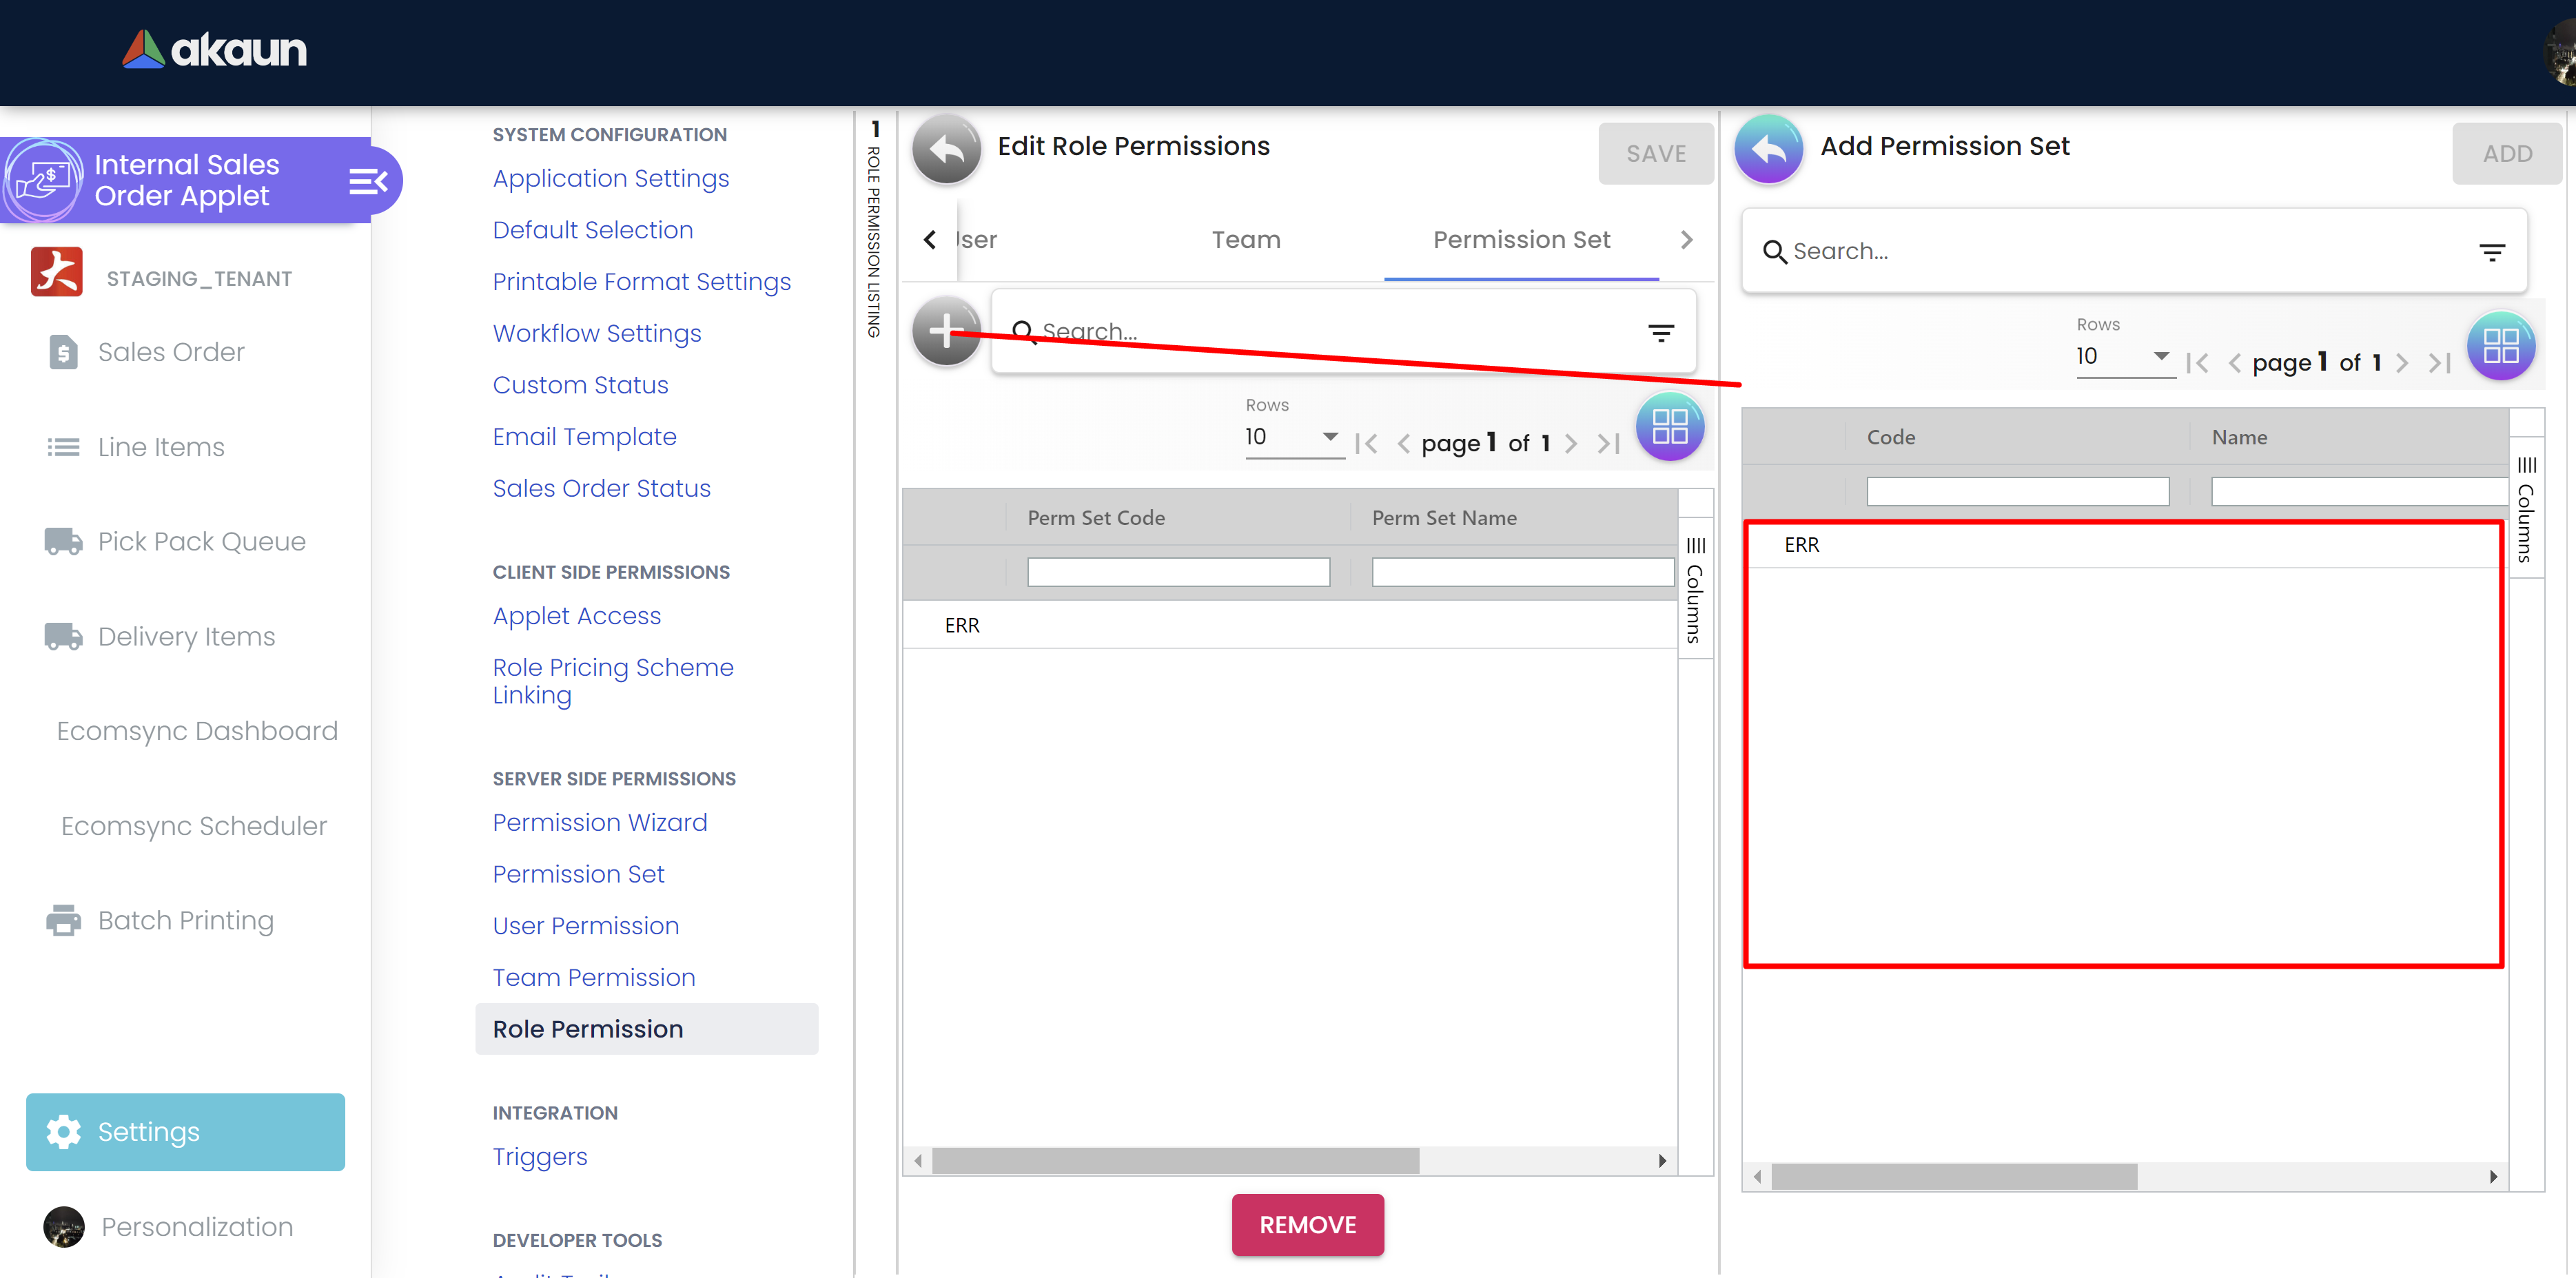
Step 3.5: Adding Permission Sets to the Role:
-
Navigate to the Permission Sets tab.
-
Multi select the Permisson Sets and click "Add" button.
-
Save the information to add Permission set(s) to the role.
Step 3.4: Removing Permission Sets from the Role:
-
Navigate to the Permission Sets tab.
-
Multi select the Permission Sets and click "Remove" button.
-
Save the information to remove Permission Set(s) from the role.
Conclusion:
Role Permissions are essential for controlling access to features and data within the application. By following the step-by-step guide, users can efficiently list all roles, view role details, manage users and teams associated with roles, and understand the permission sets linked to each role. The comprehensive set of features ensures effective role management, maintains data security, and provides a structured approach to access control within the application.