Populating Created Local Databases (pg_dump utility and liquibase)
Once you’ve created the local databases following the previous steps, populating them with data is essential for testing and development. As of now you might have noticed that the databases you have created are empty. Here we are going to discuss various techniques to achieve this population of the database, each suited for different scenarios and preferences:
1. DBeaver GUI Backup and Restore (pg_dump Utility)
This method involves creating a backup of an existing database and using the generated backup to restore data in our own local database. Meaning use the same data in your new local database.
Execution Method:
1) Backup
-
First we will need to create a backup of the existing database. Let us take akaun_staging_master database from the staging database connection. This will be for our local master.
-
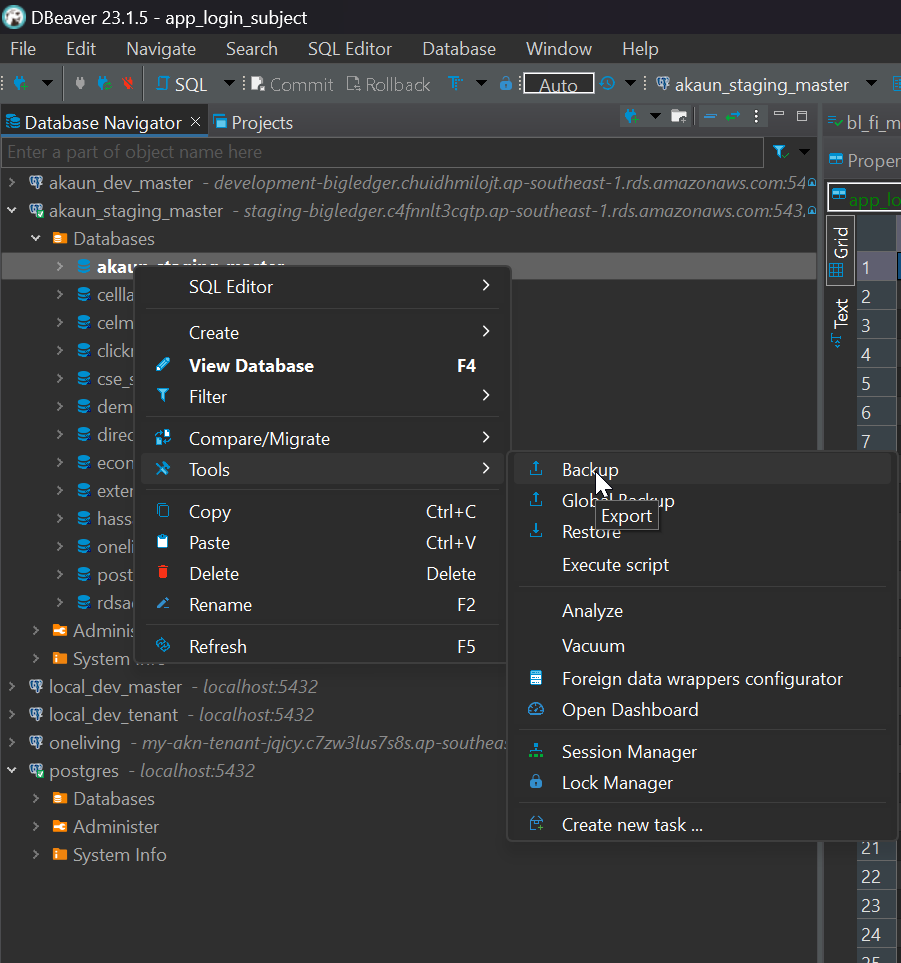
Open DBeaver. In the database navigator right click on the database you want to create a backup from. In our example it is akaun_staging_master. Hover over tools then click "Backup".
-
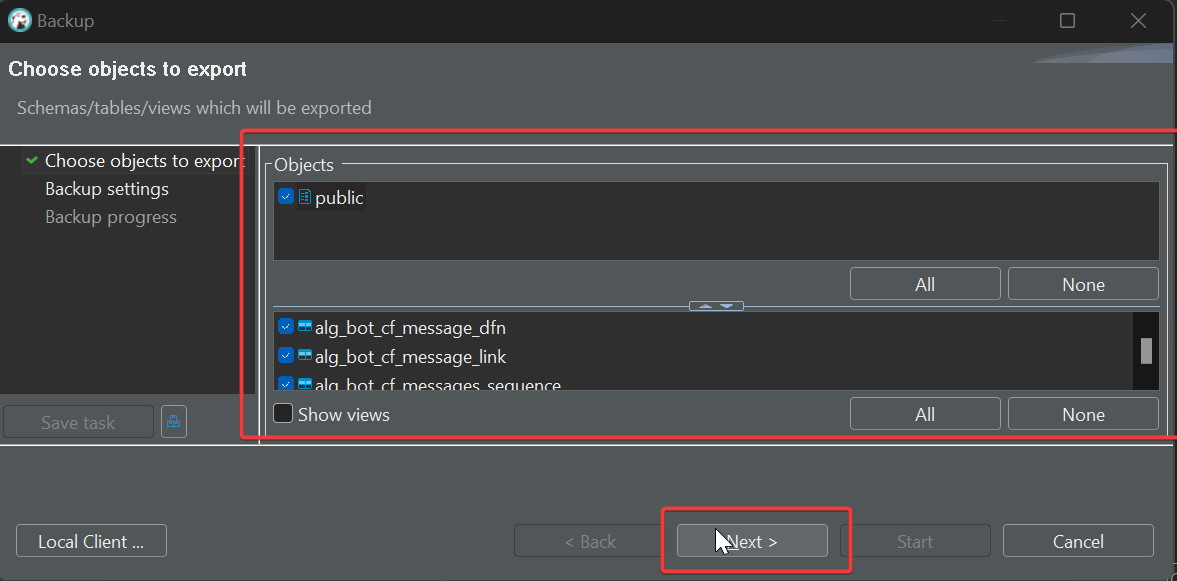
In the "Backup" window toolbar that pops up, select "public" in the objects section, then click Next.
-
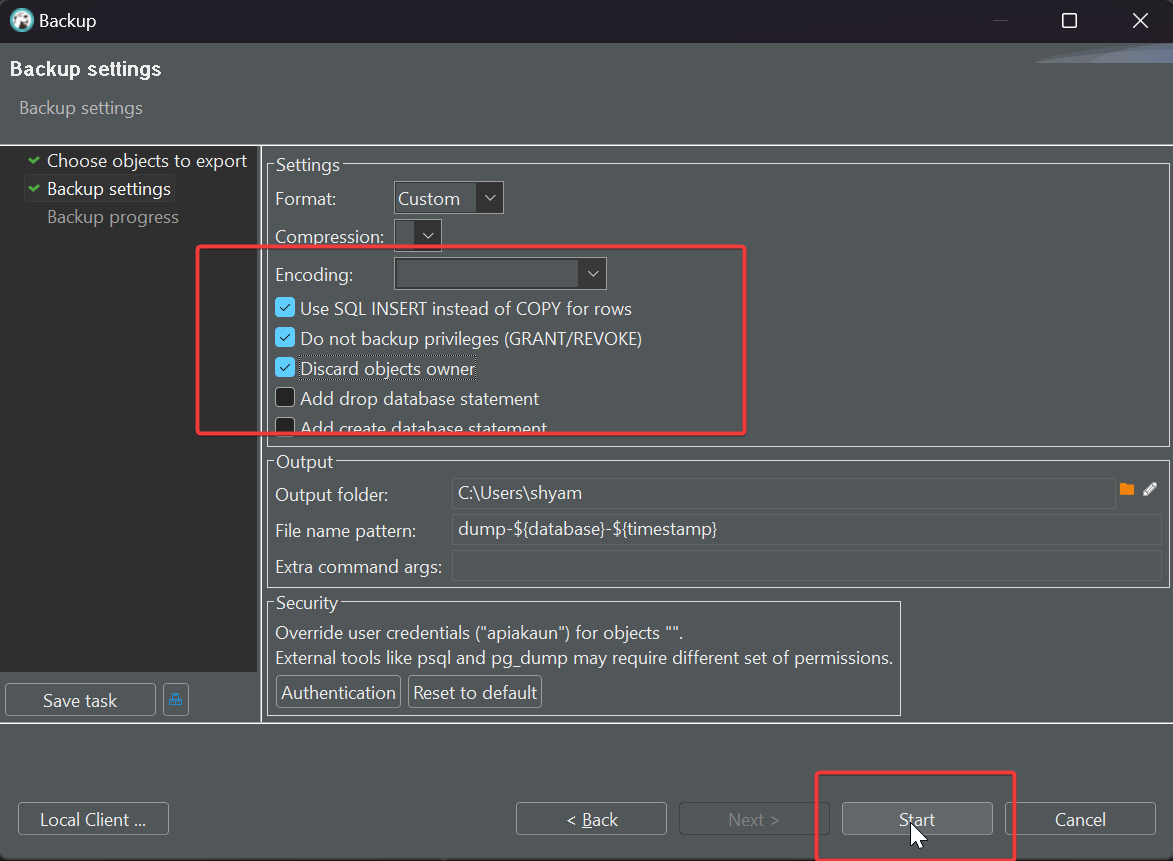
Now in the settings section make sure the following are selected: "Use SQL INSERT instead of COPY for rows", "Do not backup privileges (GRANT/REVOKE)", "Discard objects owner".
-
Then click on start.
-
This will take a while and it will now generate a dump file with all the backup data and place it in the specified file location with the name format as mentioned in the Backup tool winodw before starting the backup.
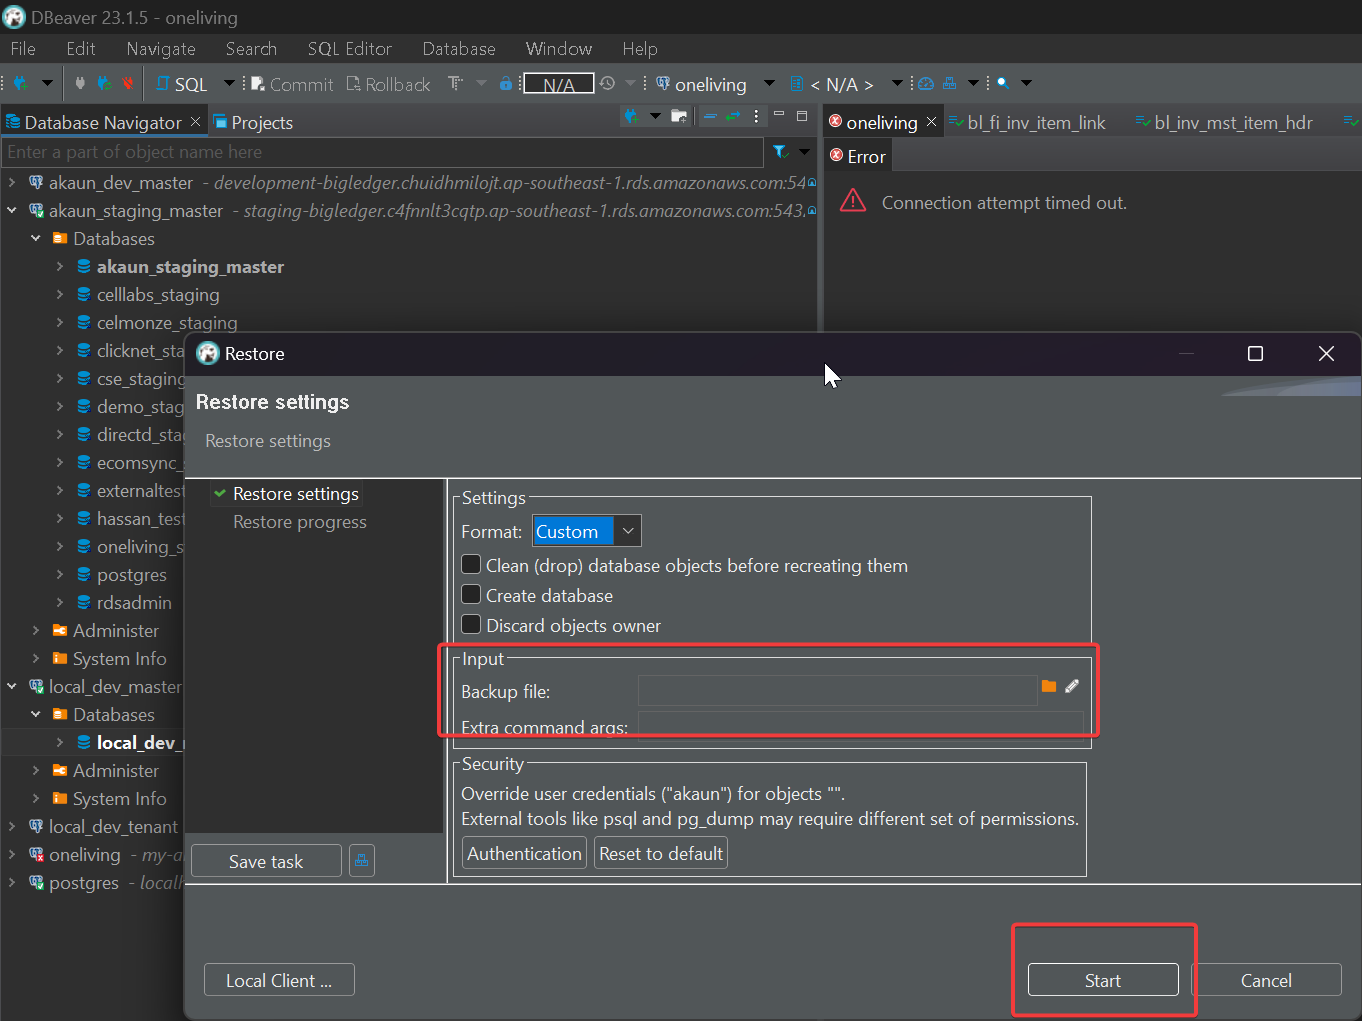
2) Restore
-
Now that you have created a backup you will restore the backup in your local database.
-
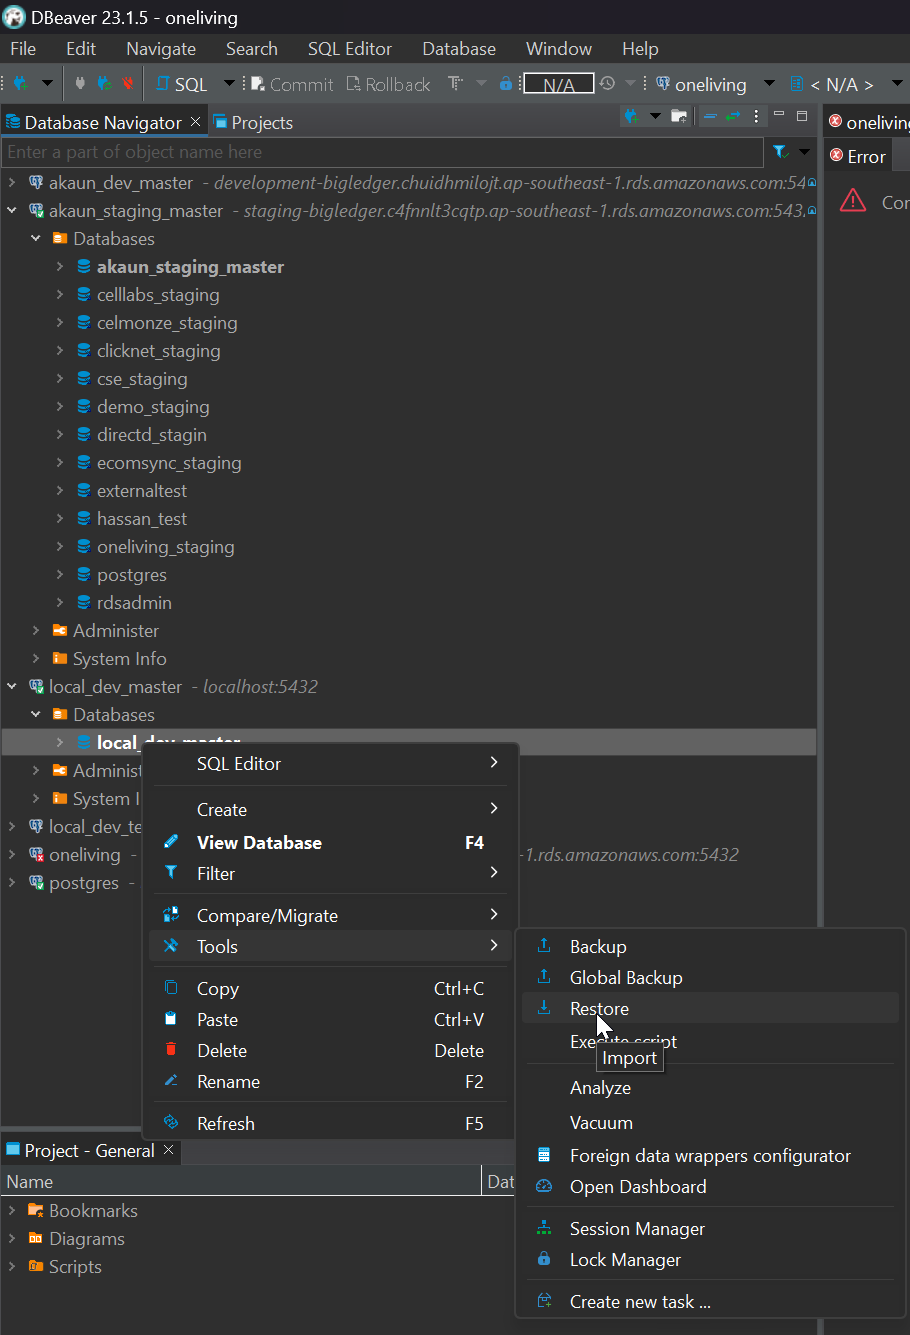
In DBeaver navigate to your local database (our case local_akaun_master since we are restoring from akaun_staging_master).
-
Right click then hover over tools then click "Restore".
-
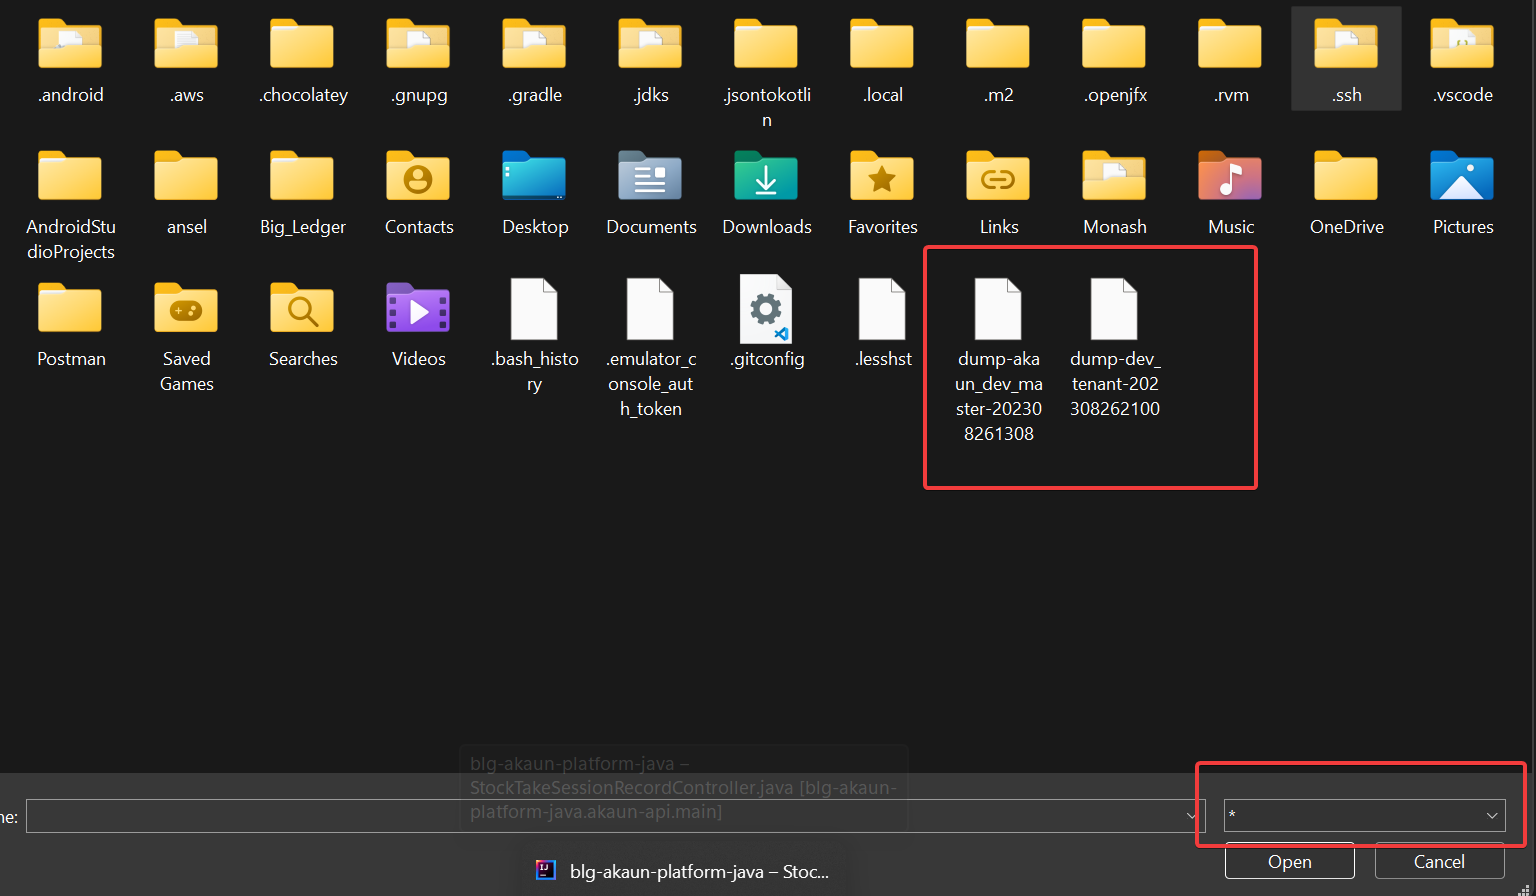
In the "Restore" window choose the backup file from the previous backup you created then click start.
-
If you cannot find your file in the folder in file explorer make sure that all types of files are displayed through the drop down at the bottom right.
-
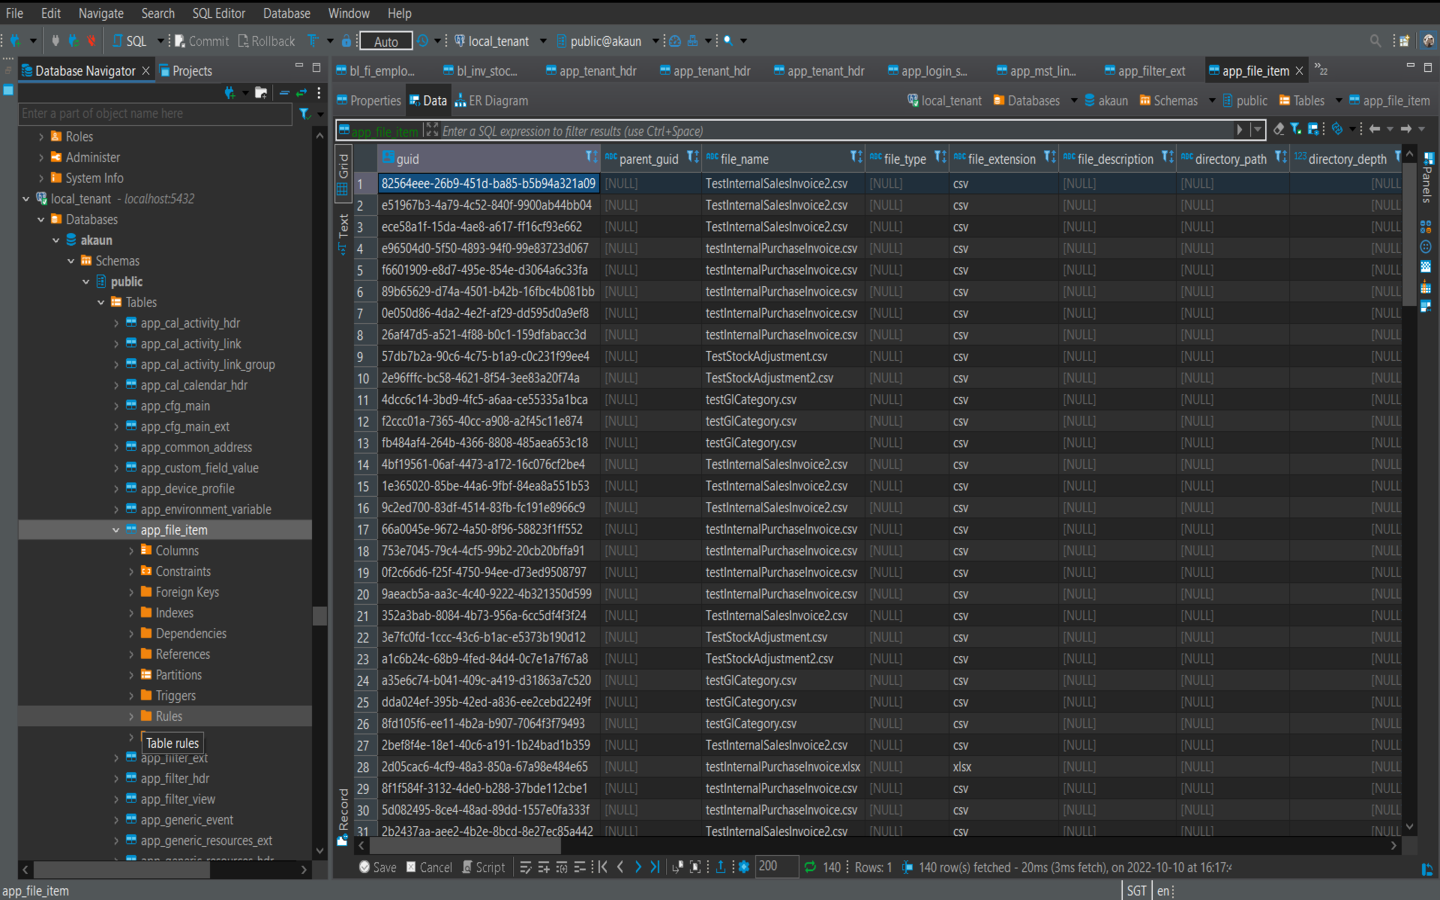
After the restore is complete if you go to your local database you can see that it has now been populated with data.
-
Conclusion:
-
-
This method of populating databases is very simple and user friendly and it is the preferred option as it saves time and effort compared to the next option we will discuss.
2. Liquibase Script Execution and export data through command line
This method involves running the liquibase scripts containing data changesets to populate the local database.
Execution Method:
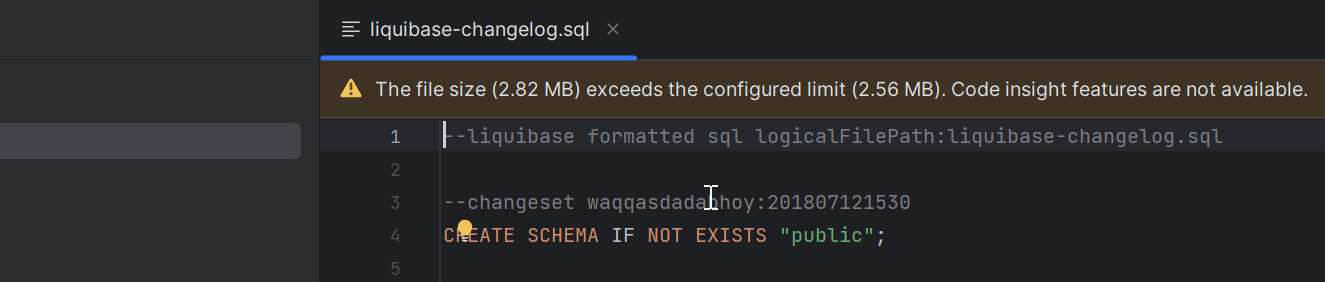
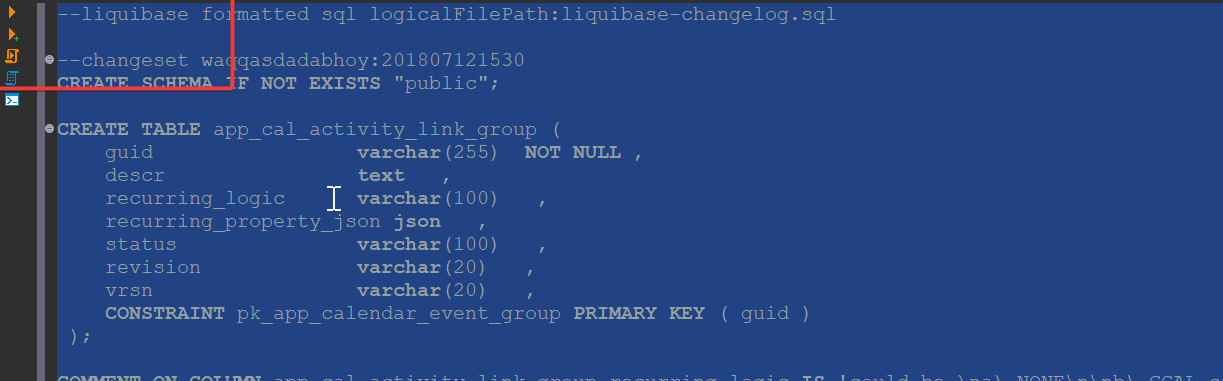
1) Copy the latest sql from liquibase and execute the script:
-
First open the blg-akaun-platform-java project in Intellij and navigate to the liquibase files (as of when this was written there are 2 liquibase files).
-
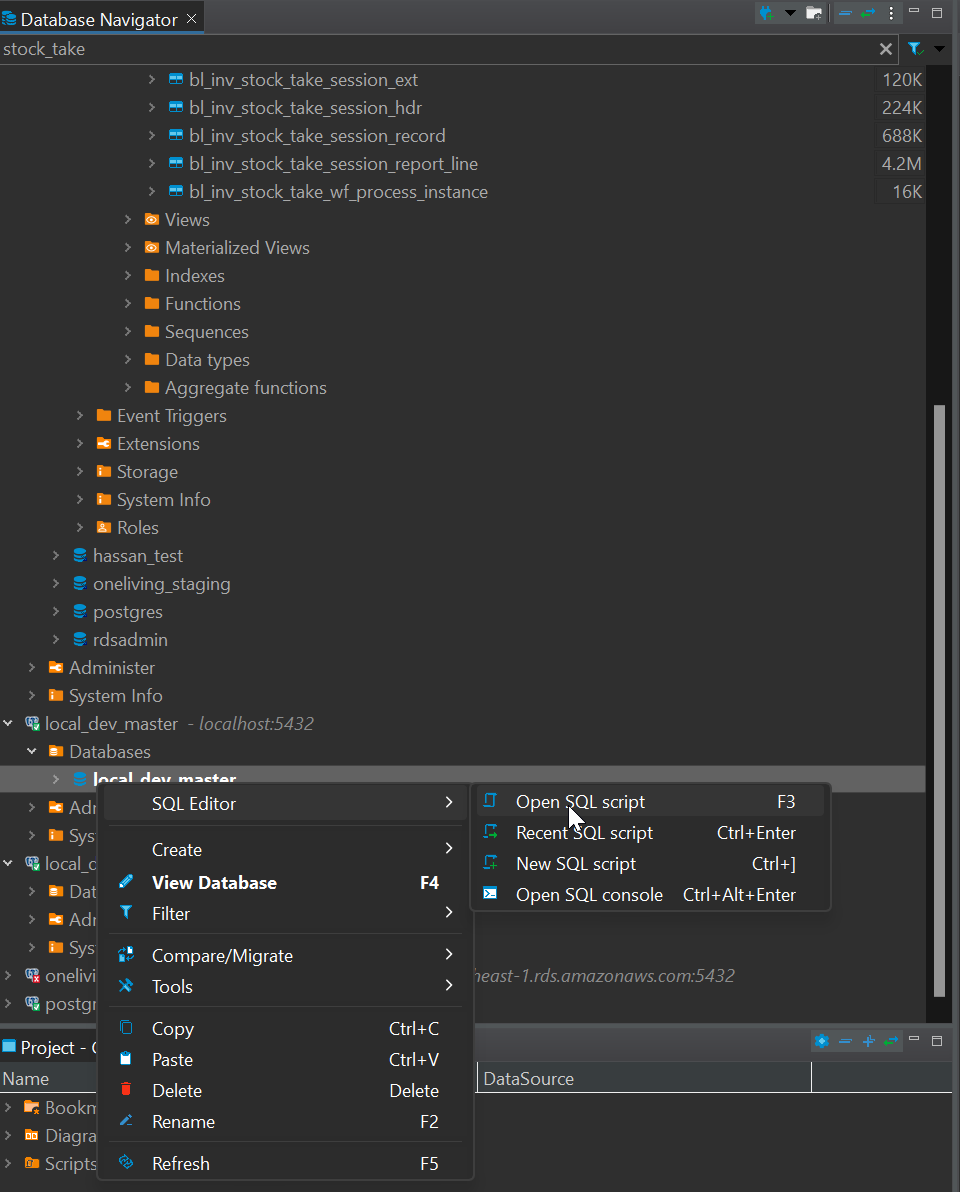
Open DBeaver application. In the database navigator find the database that you want to populate with the schema.
-
Now right click the database you want to populate then hover over "SQL Editor" and then click "Open SQL Script".
-
Now go back to Intellij and copy everything in the first liquibase script (remember order of liquibase scripts matter) and paste it in the SQL editor script that you just opened in DBeaver.
-
Continue this step for the remaining liuibase script files in Intellij.
-
After done, select the entire sql script in DBeaver and click the run button on the top left corner of the SQL editor to run the SQL. You can also select all and then just click CTRL + ENTER to run the sql.
-
While running if there are any errors that come from some changesets you can just remove those lines that cause the run to fail and continue running again or you can just skip/ignore them.
-
After the run is successful you will see that your local database has a schema with all the database table designs. Although there will not be any data in them as we purely ran DDL commands from the liquibase scripts.
2) Export the data from actual database (in this example: akaun_dev_master) and import the data to local db (that we will be using as a local master):
-
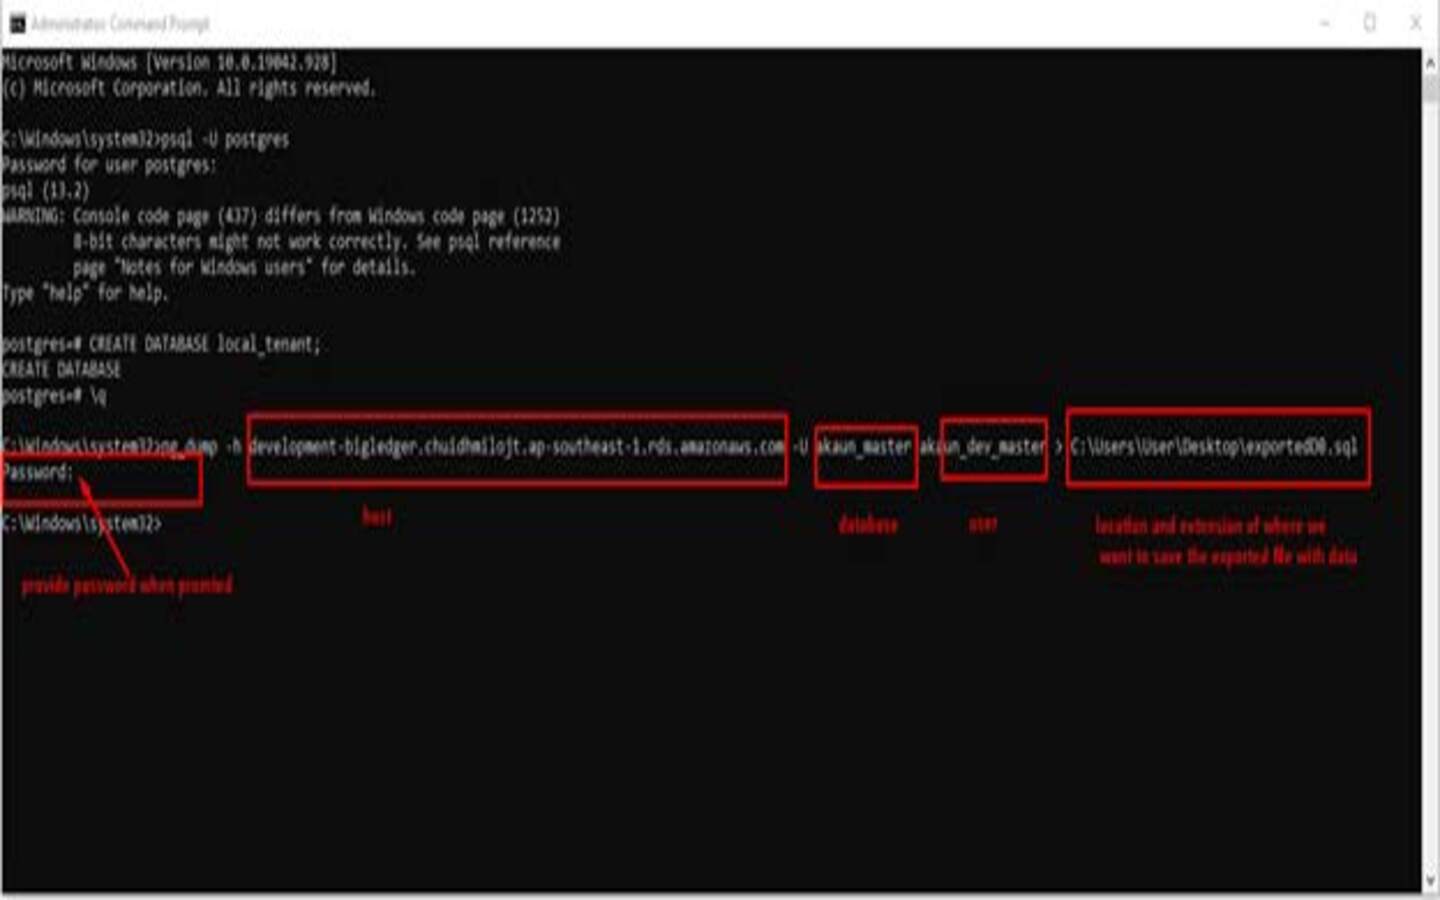
Go to User (your system default folder) → Username → create a .pgpass file → put the following credentials (of the master/tenant database that we want to export) following this format and save it.
-
#hostname:port:database:username:password
-
Please confirm the correct database name and password from Arriyadi or any senior, as we will change it for security purpose.
-

-
-
Open cmd and follow this format to export data from the targeted database. Here we are using .sql and it will save the file as an SQL formatted file.
-
Here the purpose of export data from targeted database(development database) is for developer has a data in their own local database for testing purpose.
-
There are many ways to export data from development database, you can try them, as long as you have the dummy data for your own local database.
-
-
-
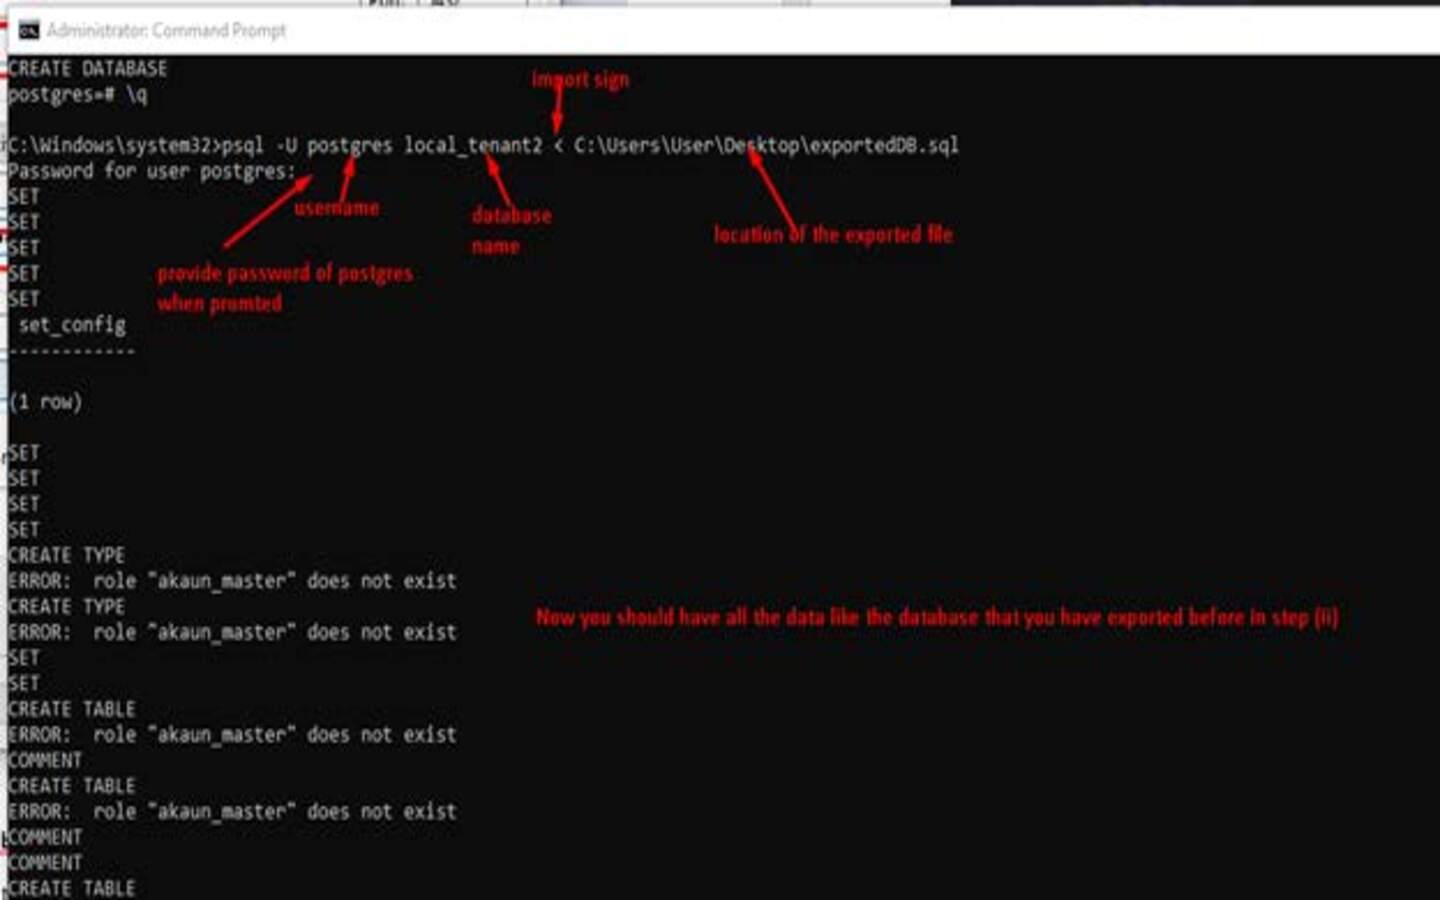
Import the data to the expected local master database using this following format that has been created in the previous step.
-
Psql –U <username> <database > < <exportedfilename><.extension>
-
Provide password when promted of your local master database that has been created before.
-
-
Check the database tables, now you should have all the data like the database that you have exported before.
-
-
The purpose of importing the data into your own local database is for the developer to have data in their own local database for testing purposes.
-
Conclusion:
-
-
This method of populating databases is quite time consuming and tedious but is great to understand this as one of the options.
Section Conclusion
You can use these methods to populate any local databases you create in the future. You can apply the methods to create both the master and tenant local database however make sure that the databases you use are actually infact the actual master and tenant database depending on the environment. For example for akaun_staging_master the externaltest database is a tenant. Now that you have setup the local database it is time for adding some new entries into the created databases in the next section. Keep in mind that the next section is very much related to the logic and design of the companies system.