6.0 Applet Permission Settings
Generally, all applets in the Applet Store share some common features. One of the essential features is the permission setting for an applet. This is because a client who uses the applets may want to set specific permissions to regulate the access control of his employees in using the applets.
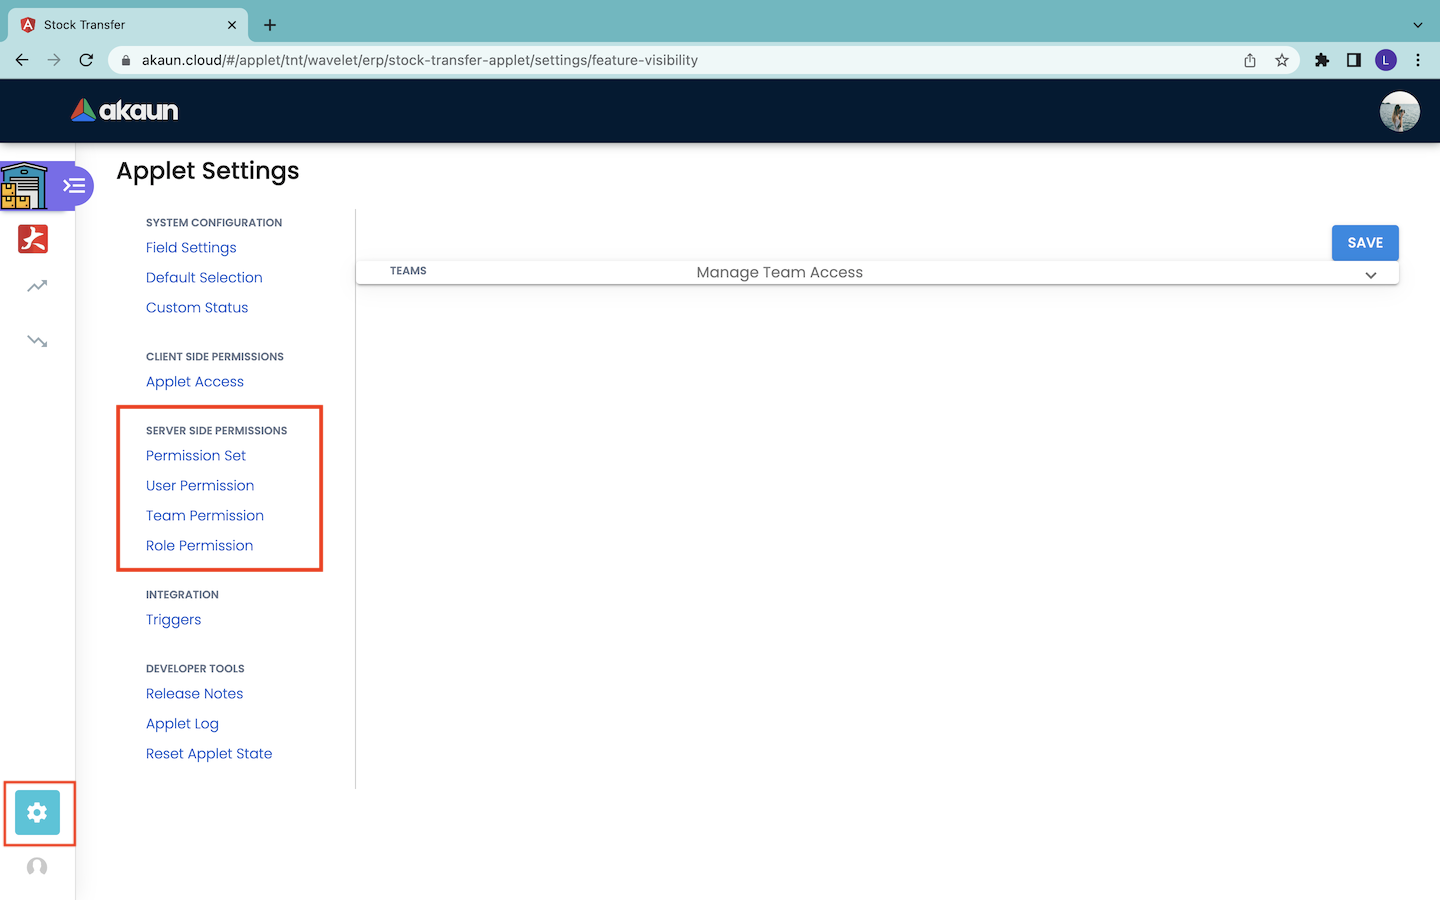
Firstly, users can navigate to the “Settings” tab which is located at the bottom left of every opened applet as shown in the screenshot above to configure their applet settings.
6.1 Permission Set
A permission template is a template that consists of one or multiple permission lines. Every permission line refers to a specific defined permission. For example, permission to create internal sales order invoices.
A permission set is a permission template in which the permission lines are configured to targets. The target can be a branch, company or location, depending on the permission template. By doing that, the targets are given permissions to perform certain operations.
Only users with the ADMIN or OWNER rank in the applet can have read and write access in assigning the permissions to the applet users. Users with MEMBER rank have only read access to the permissions settings in the applet.
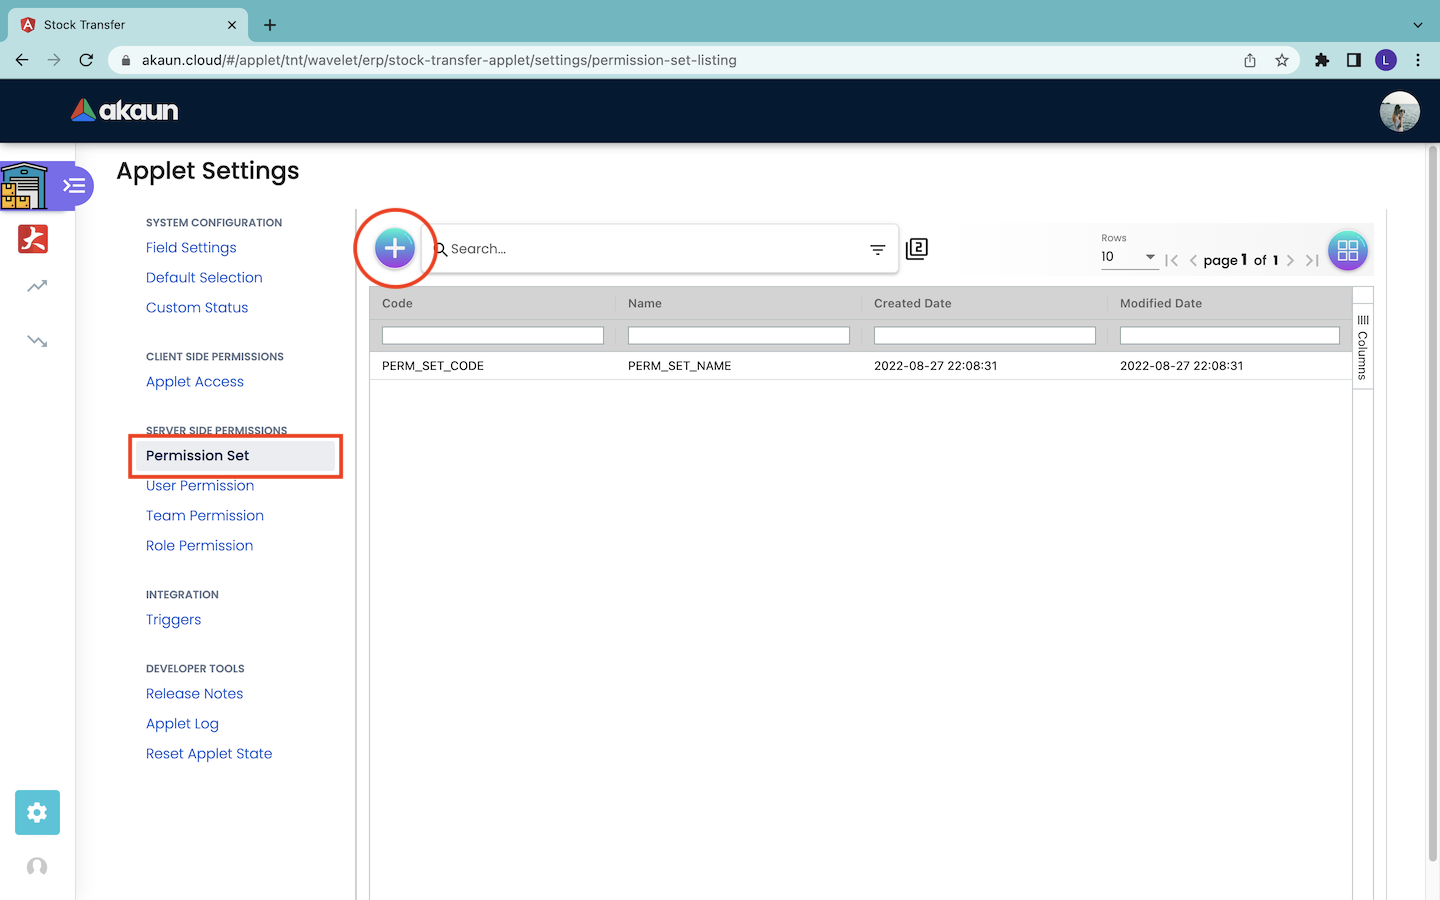
6.1.1 Create Permission Set
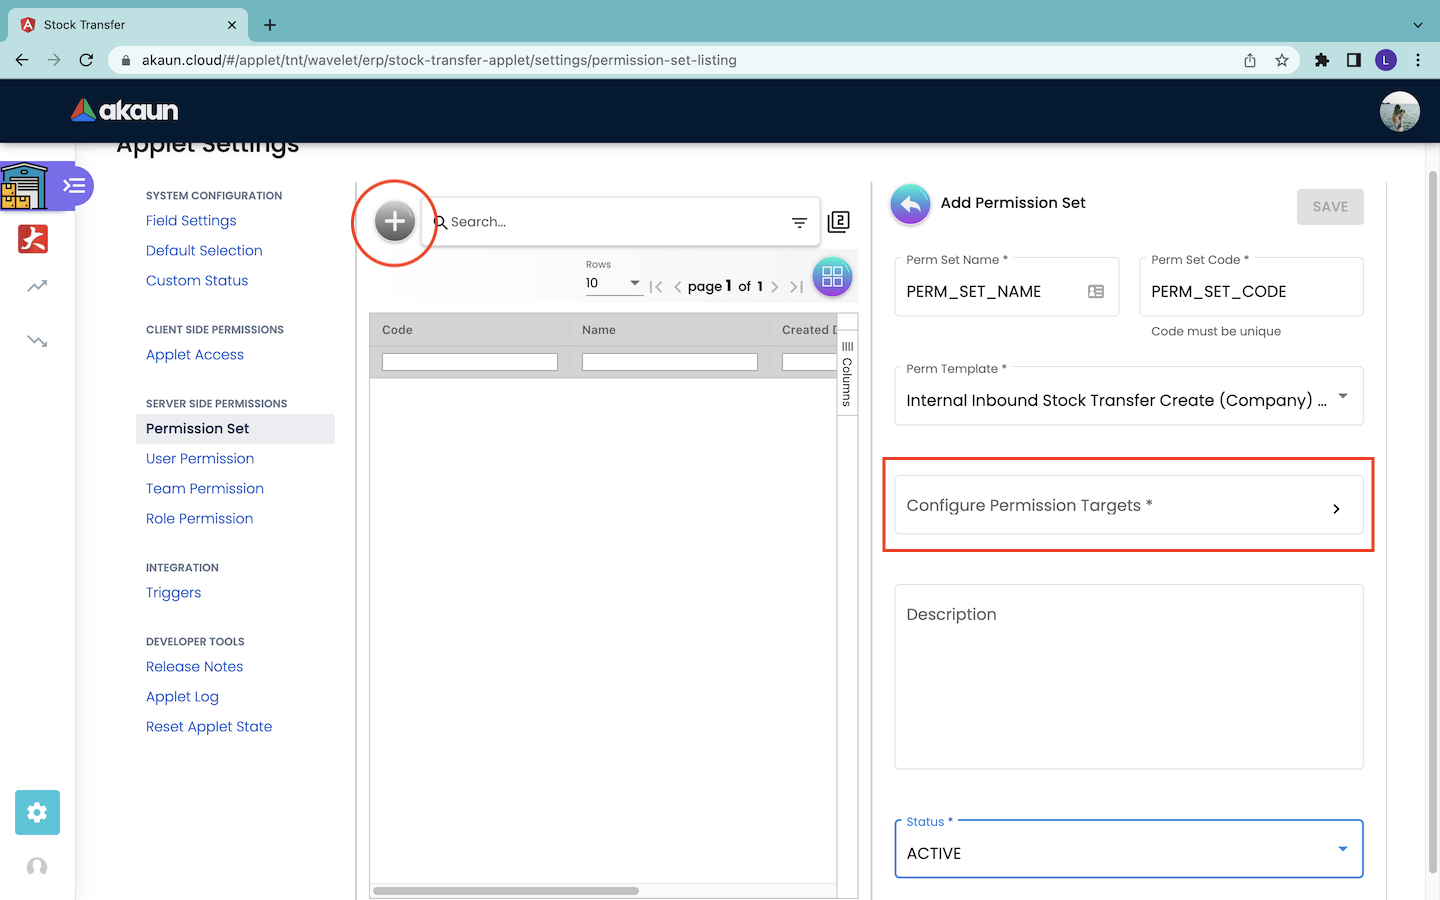
Users click on the “+” button to start creating the permission set. After clicking on the button, the Add Permission Set page will appear from the right. Users then fill in the information of the permission set. The information to be filled includes:
-
Perm Set Name* : The name of the permission set.
-
Perm Set Code* : The code of the permission set. The code value should be unique and is immutable once it is saved.
-
Perm Template* : The permission template. A permission template consists of many defined permission lines.
-
Description (Optional) : The description of the permission set.
-
Status* : Users should select the status “ACTIVE” in order to use the permission set.
The * symbol indicates information that is compulsory to be filled.
Next, the users have to click on the “Configure Permission Targets” box in order to start linking the permission lines in the selected permission template to the available targets.
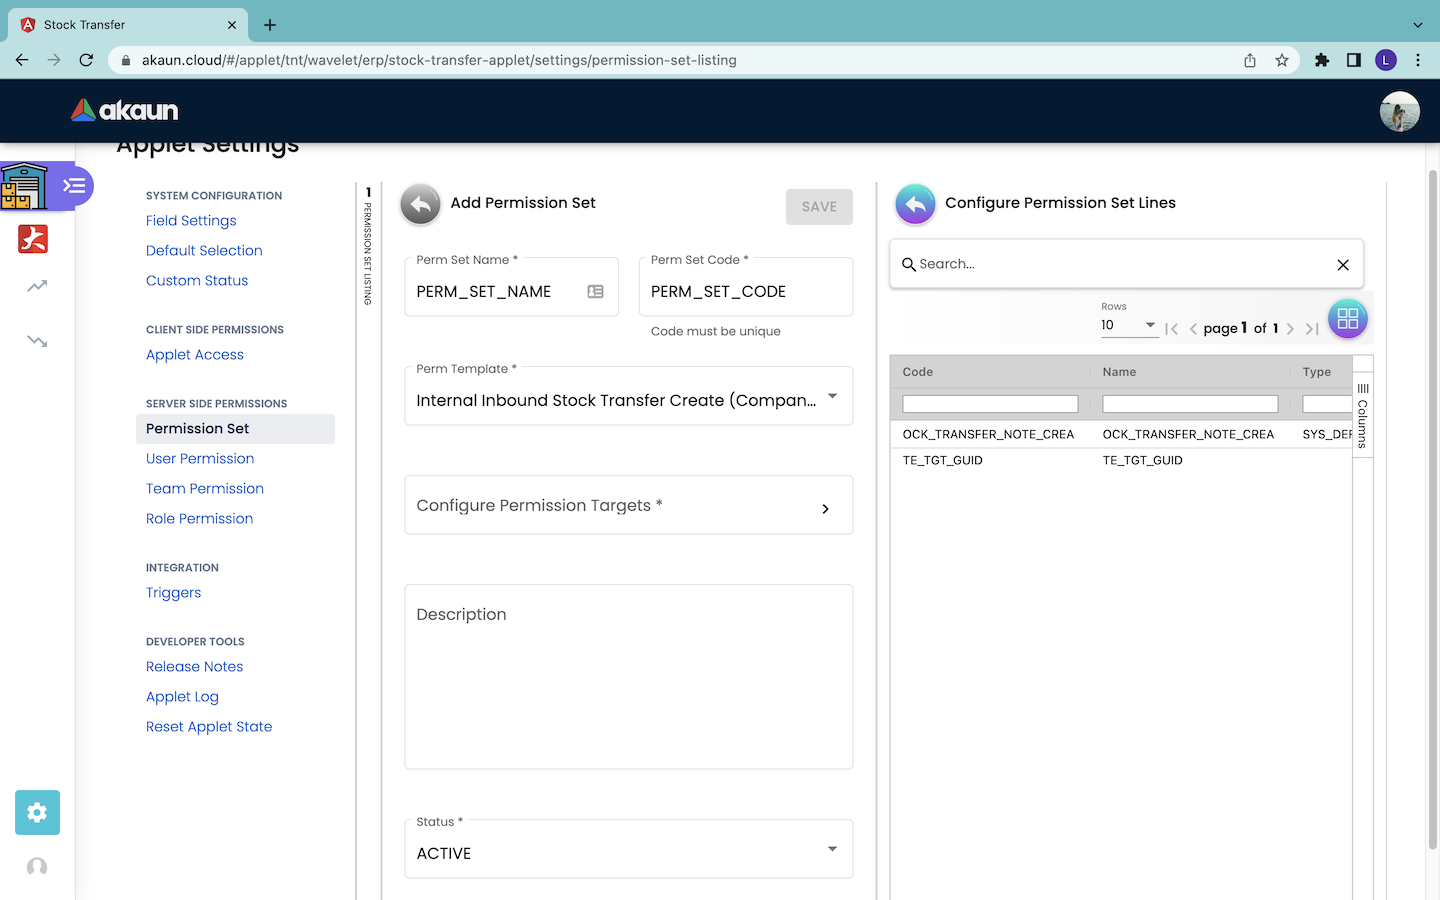
A permission template consists of many permission lines. Thus, in the Configure Permission Set Lines page, users can select the permission set lines and assign each of them to a target. The users can proceed by clicking on the permission set line record they want to configure.
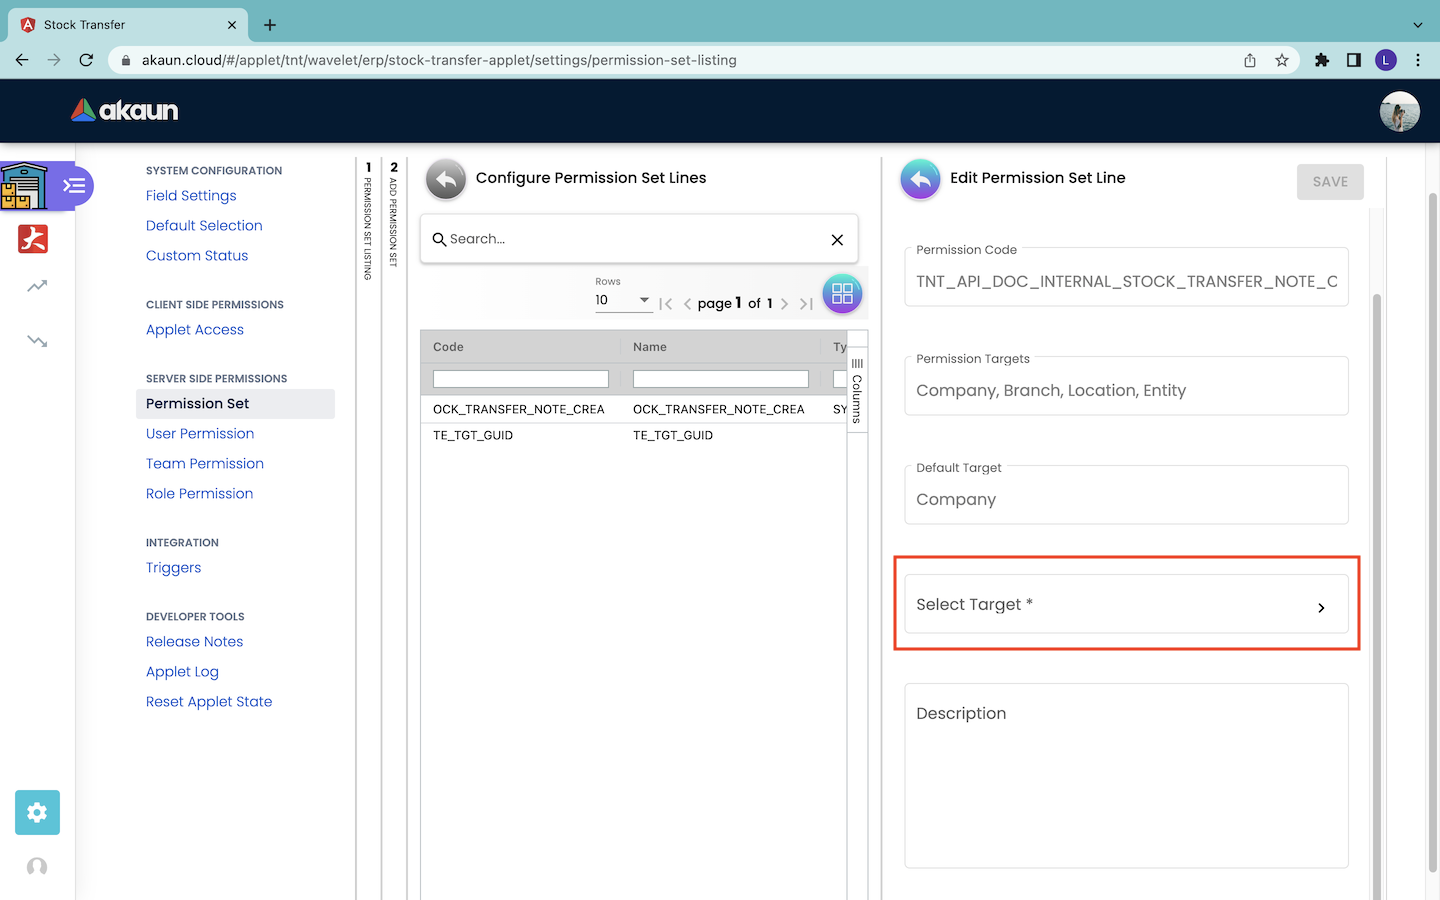
Then, users will be directed to the Edit Permission Set Line page as shown above.
Under this page, the Permission Code, Permission Targets and Default Target information of the selected permission line are already filled and cannot be modified. The value of the Default Target information varies between Company, Location and Branch, depending on the permission template that is selected.
Users can provide some description for the permission set line. Then, users have to click on the “Select Target” box in order to assign the permission set line to a target.
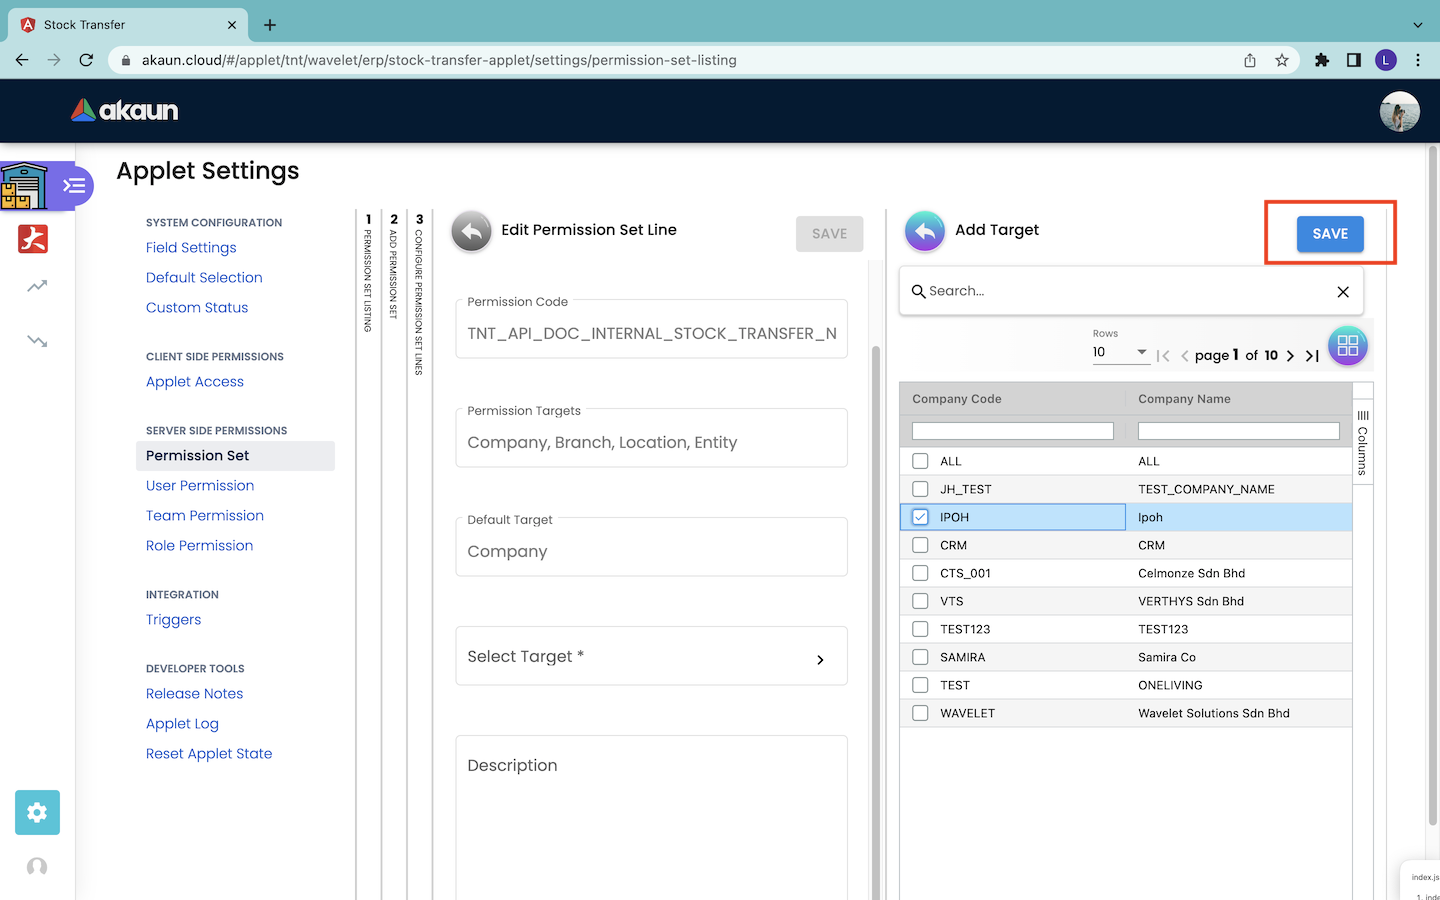
Then, users are directed to the Add Target page. In this example, the default target is the company. Thus, the Add Target page shows the information of the available companies. The information includes the Company Code and Company Name. Users can tick only one of the available companies and click the “SAVE” button to link it to the permission set line.
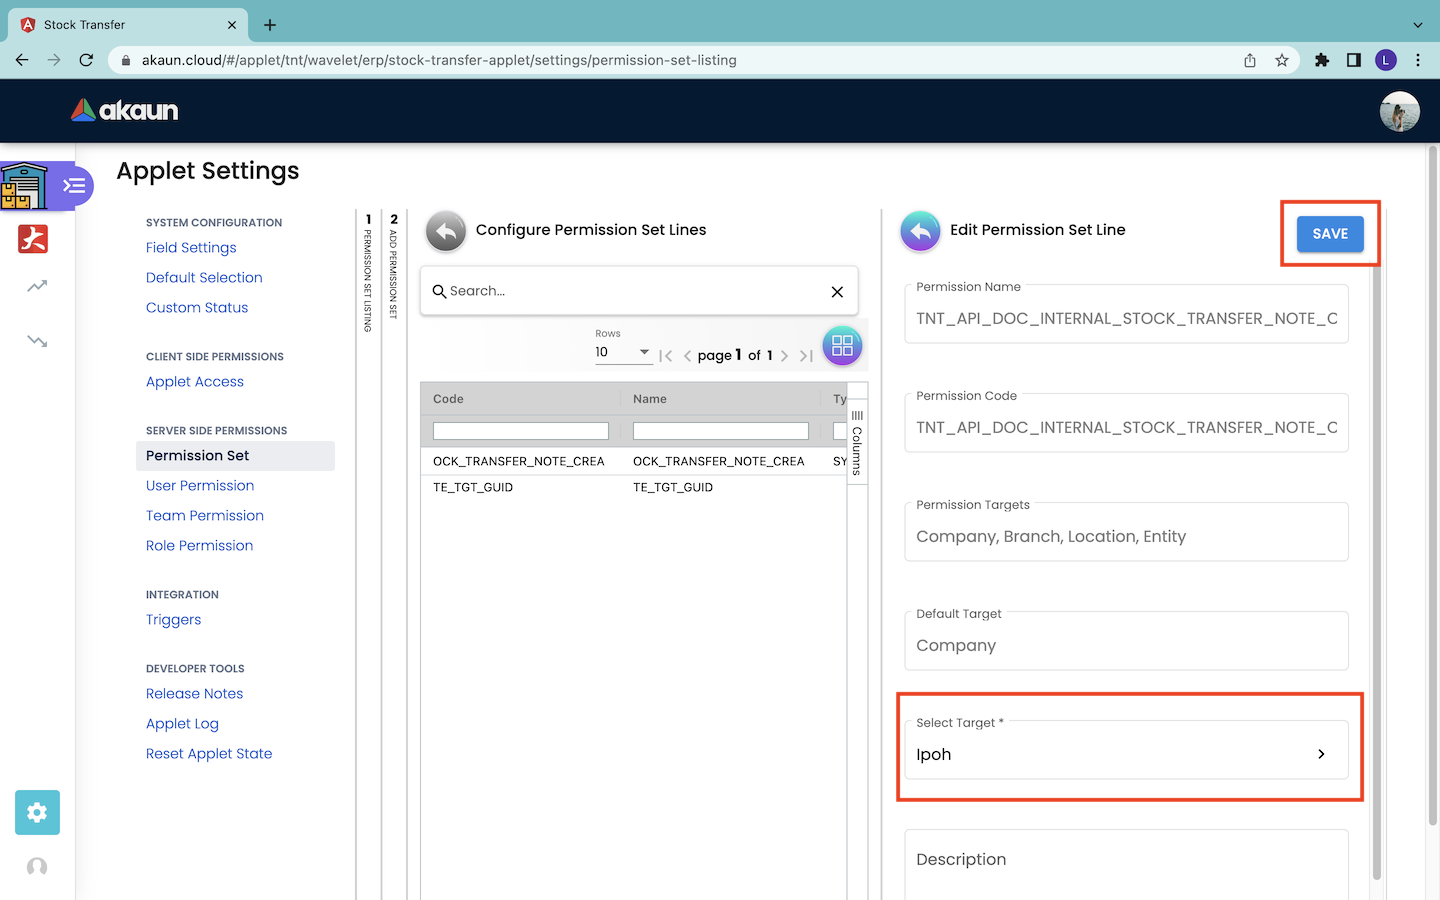
Then, the users will be directed back to the previous page, which is the Edit Permission Set Line page. The target is selected successfully. They can continue to click the “SAVE” button to save the changes.
Then, the users will be directed back to the previous page, which is the Configure Permission Set Lines page. Users can repeat the process for the other permission set lines to assign the target to the permission lines respectively.
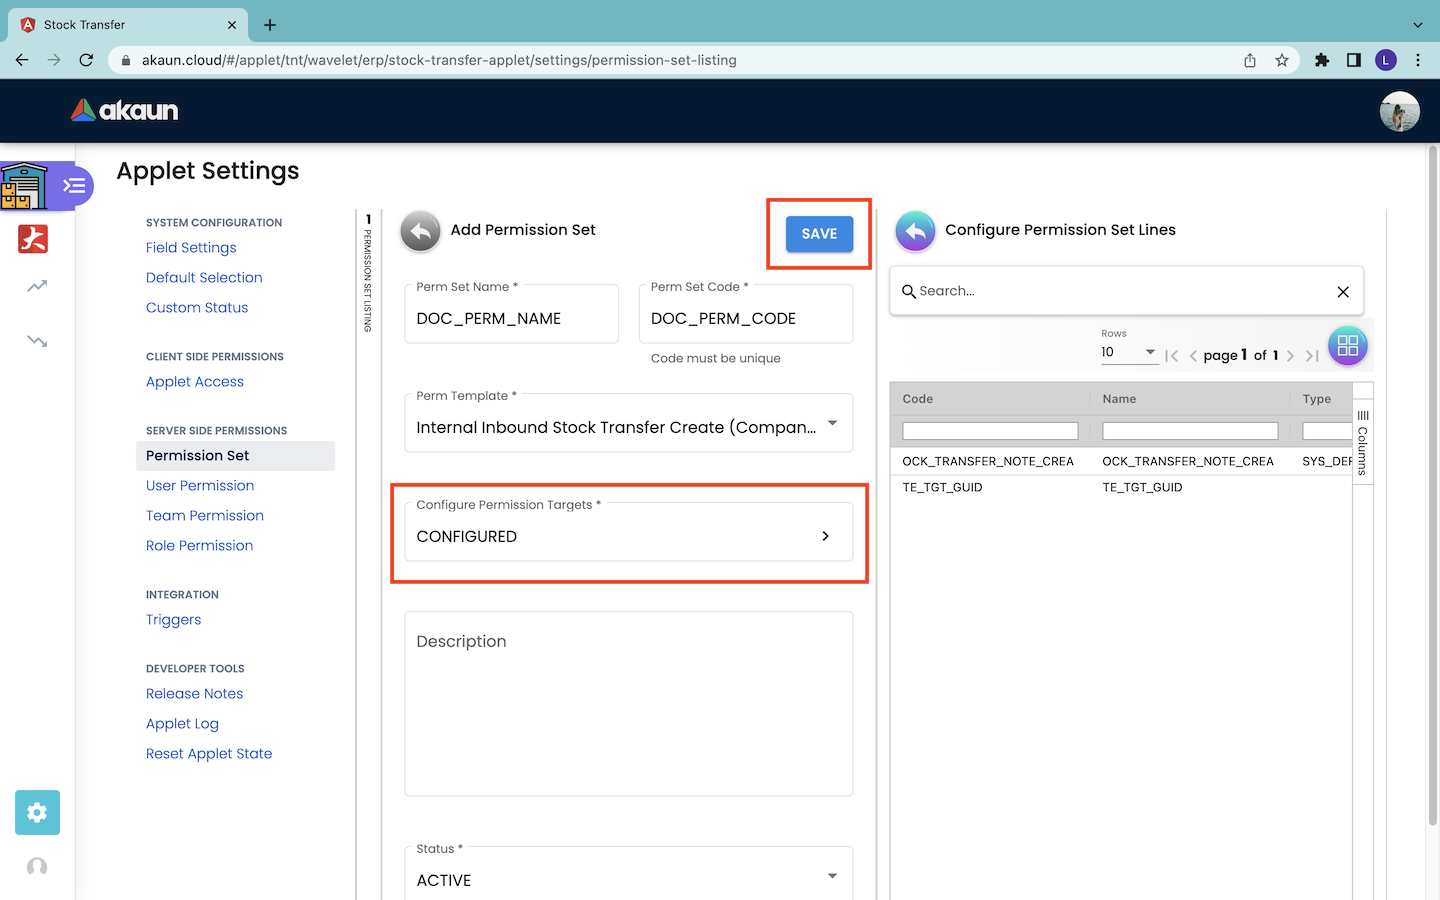
When all the permissions targets are configured as desired, users can click on the “SAVE” button in the Add Permission Set page to save the changes.
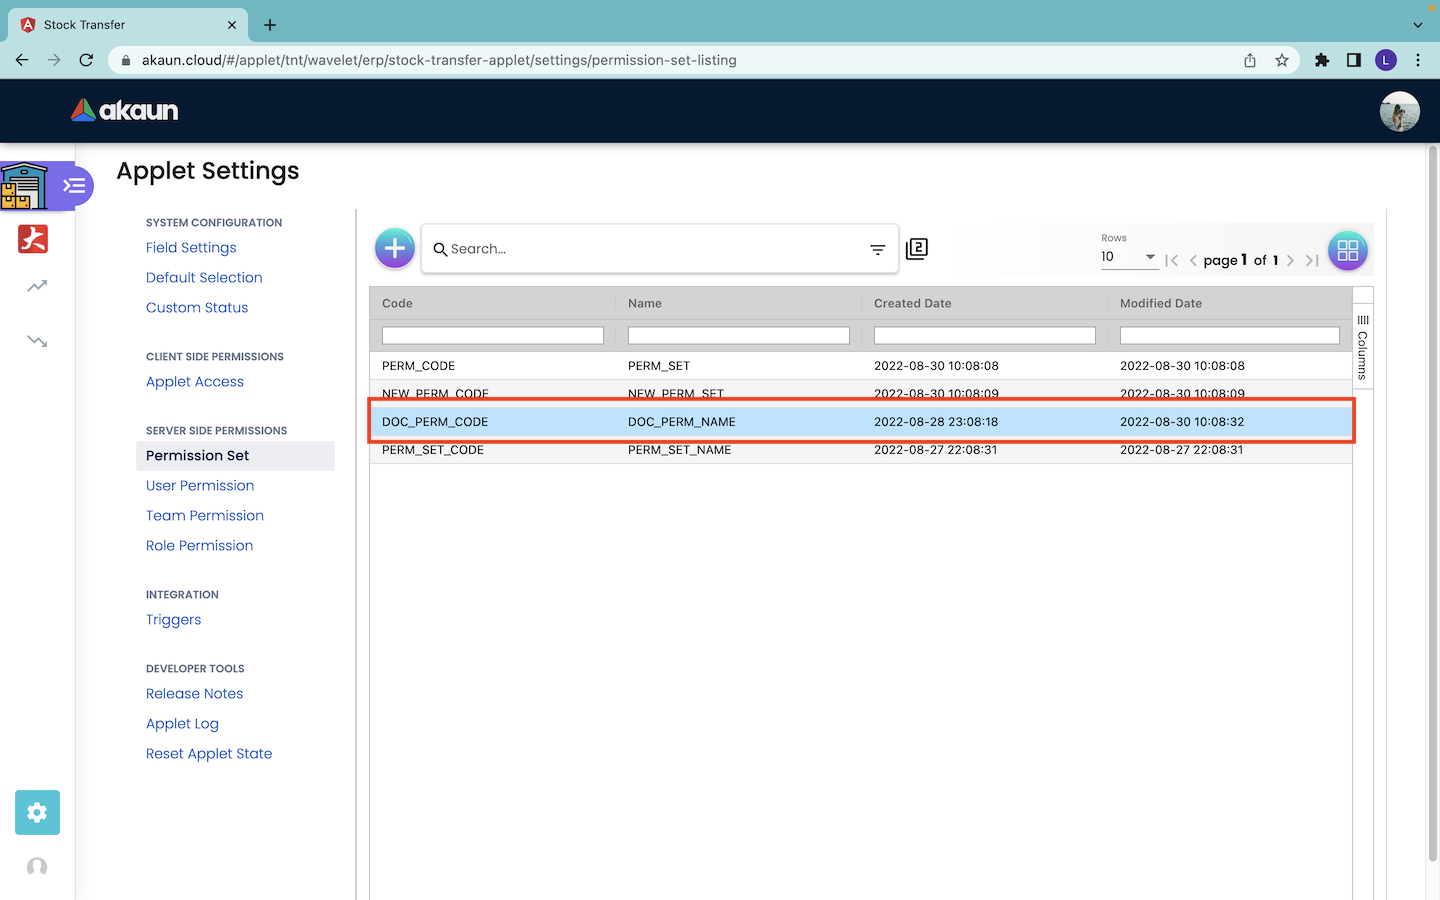
The permission set that is successfully created will appear in the Permission Set page as shown in the screenshot above.
Note:
In order to assign the same permission set to multiple targets, the users have to create multiple permission sets. Every permissions set consists of the same permission lines but different naming. Then, users assign each permission set to the respective target.
For example:
-
Permission_Set_Target_A to Target A.
-
Permission_Set_Target_B to Target B.
6.1.2 Edit and Delete Permission Set
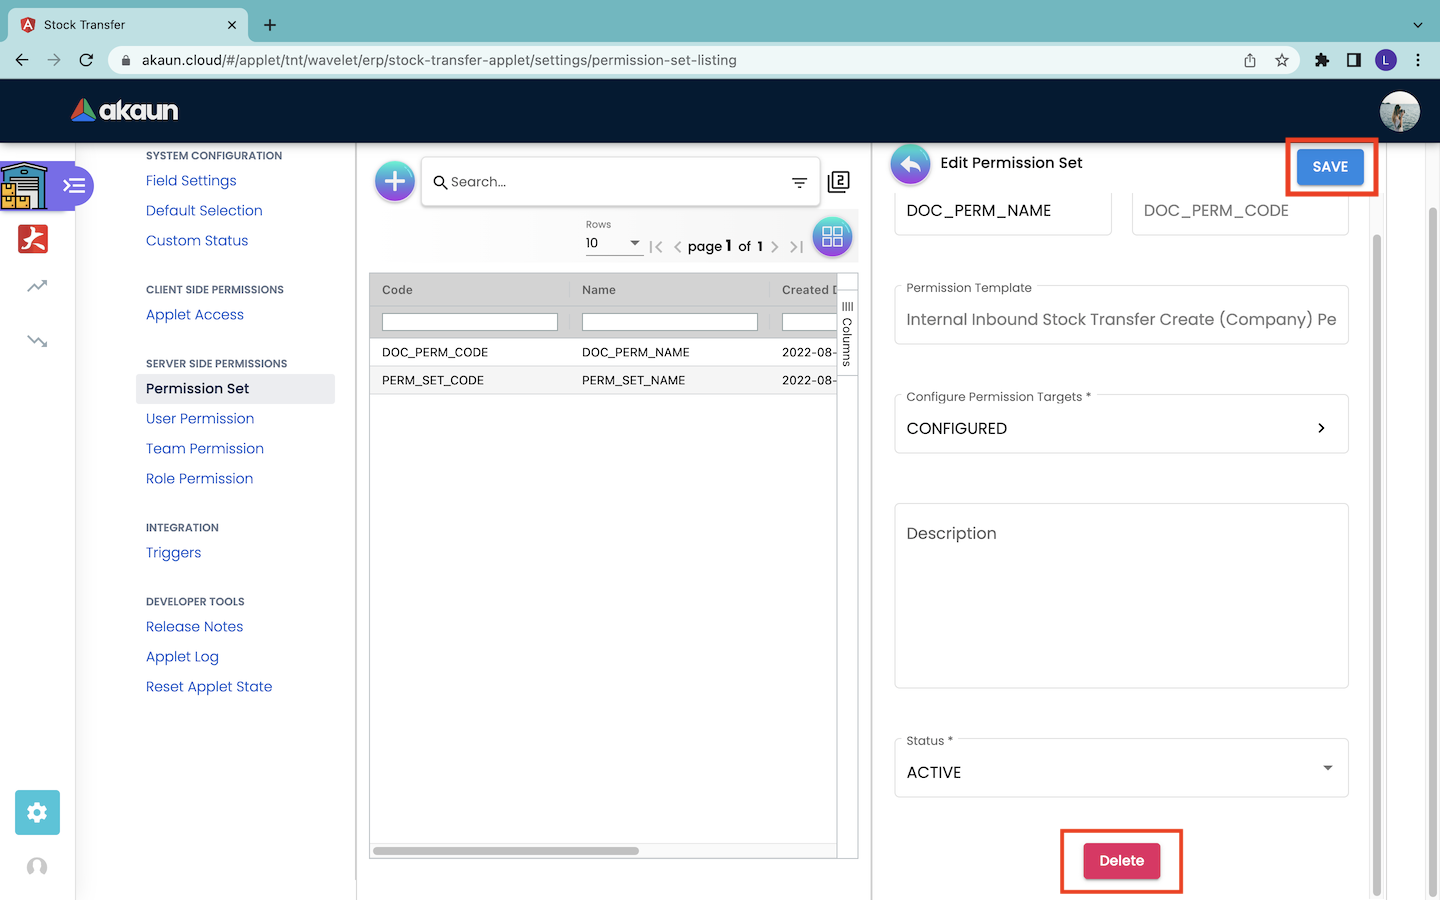
If the users want to edit or delete a created permission set, users have to click on that permission set record in the Permission Set page. Then, the Edit Permission Set page will appear from the right as shown in the screenshot below, showing the details of the permission set.
-
Edit the Permission Set.
The process flow of editing a permission set is similar to the process flow of creating the permission set. Users have to click the “SAVE” button in order to save the changes.
-
Delete the Permission Set.
Users click on the permission set row in the Permission Set page and then click on the “DELETE” button in the Edit Permission Set page to delete the permission set.
6.2 User Permission
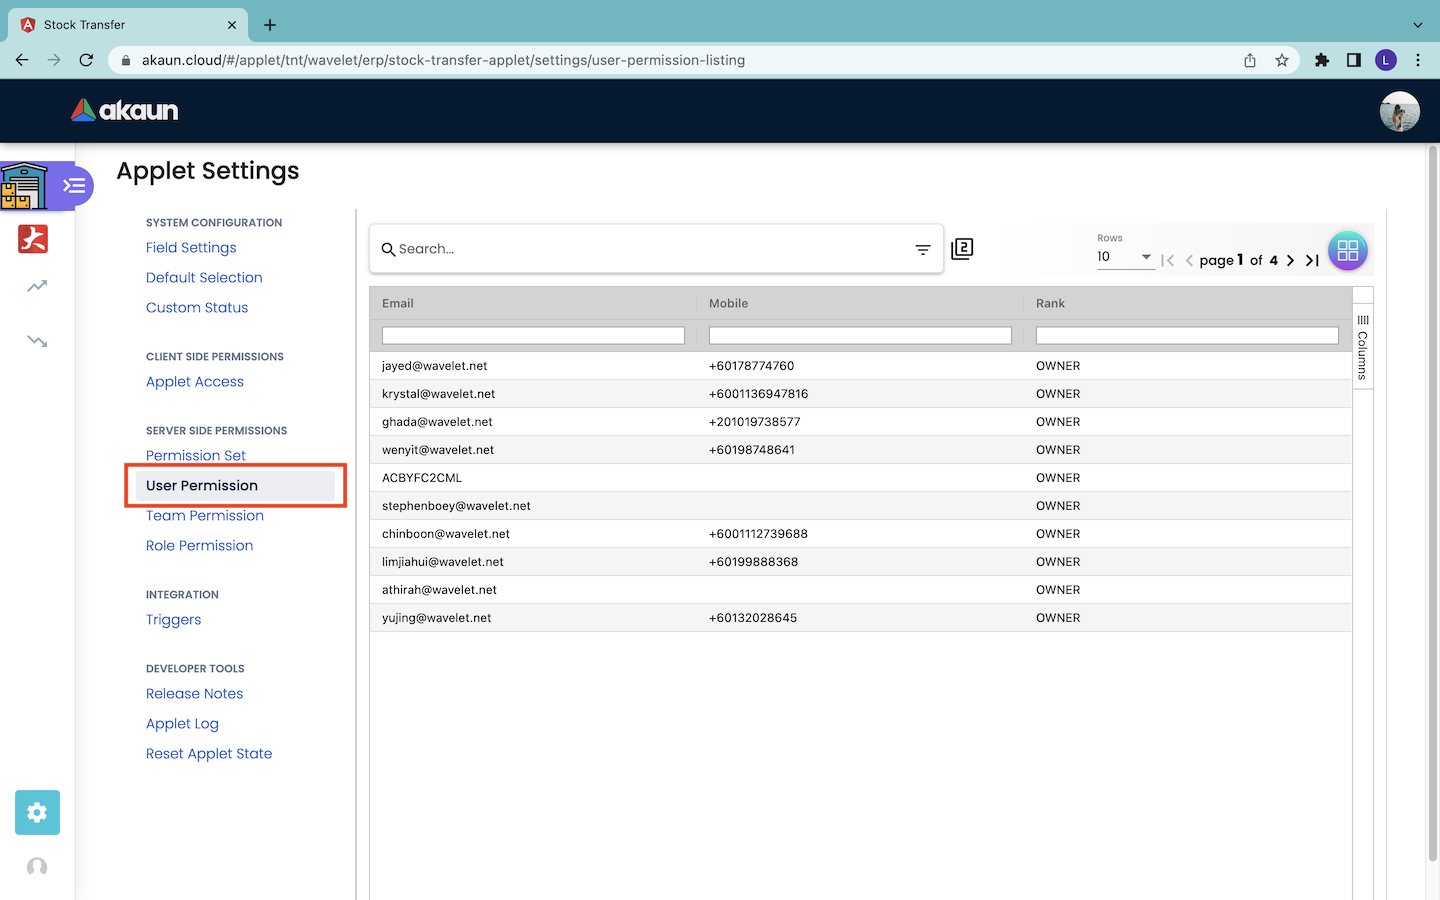
The User Permission page stores the information of the users who can access and use the particular applet. These information include the email address, mobile phone number and the rank of the user in using the applet.
Once the users have successfully installed an applet, their information will appear as a new record under the User Permission page of that applet.
6.3 Team Permission

The Team Permission page stores the information of the teams who can access and use the particular applet. This information includes the team name, team code and number of members in the team.
6.3.1 Read the Details of the Team
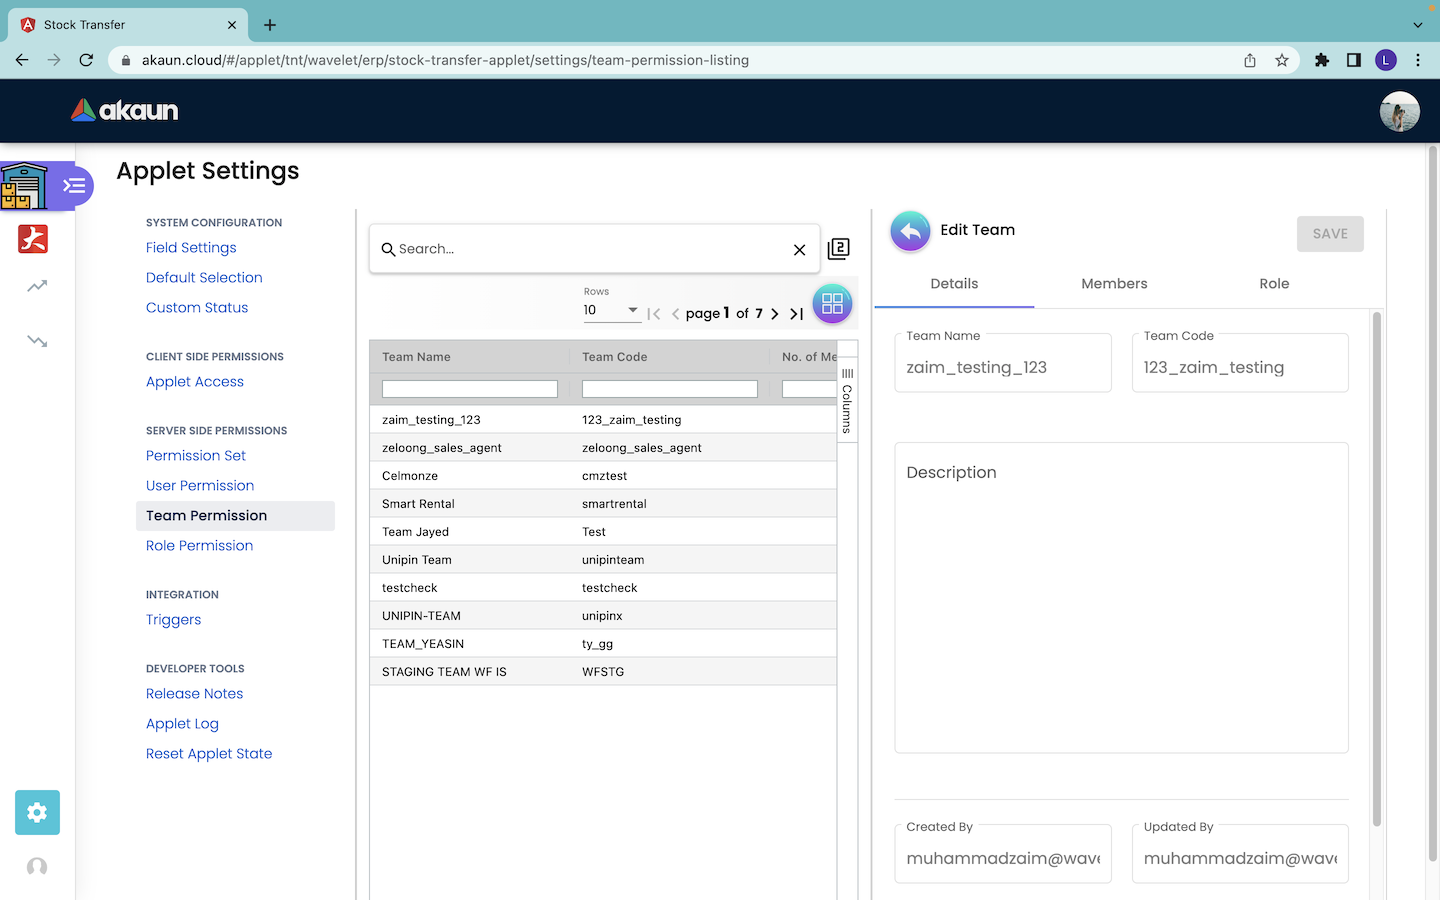
Users can read the details of the team by clicking on the row that represents the team in the Team Permission page. Then, the Edit Team page will appear from the right. Users can read the details of the team from the Edit Team page. However, users cannot edit the information of the team in this page.
6.3.2 Read the Members of the Team
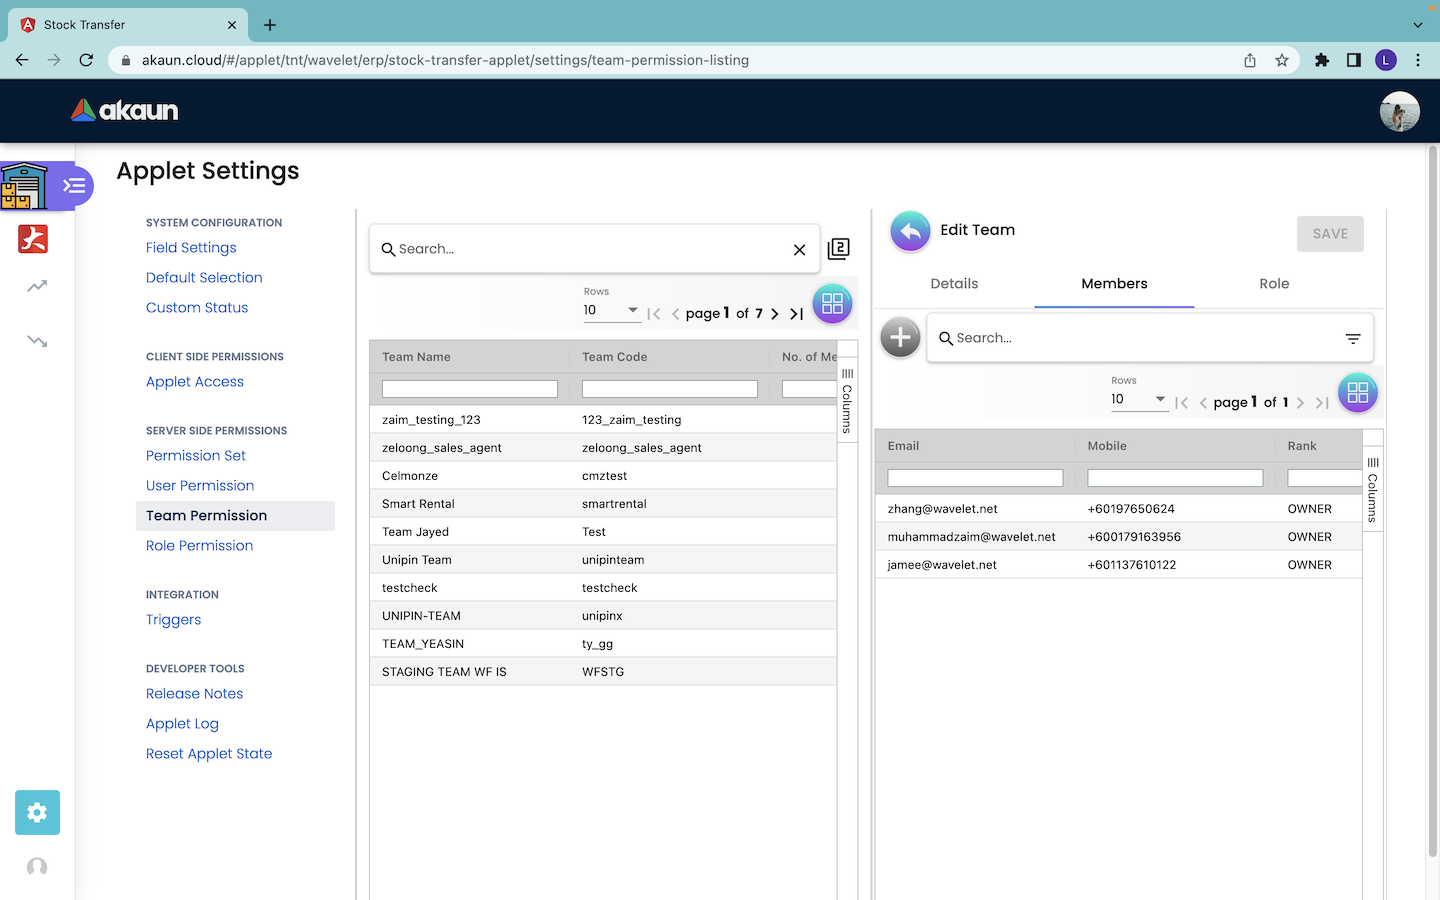
Next, under the Members tab in the Edit Team page, users can see the information of the members that belong to the team. The information of the members include the email address, mobile phone number and the rank of the members in using the applet.
However, users cannot create new members or edit the information of current members for the team in this page.
6.3.3 Read and Edit the Role for the Team
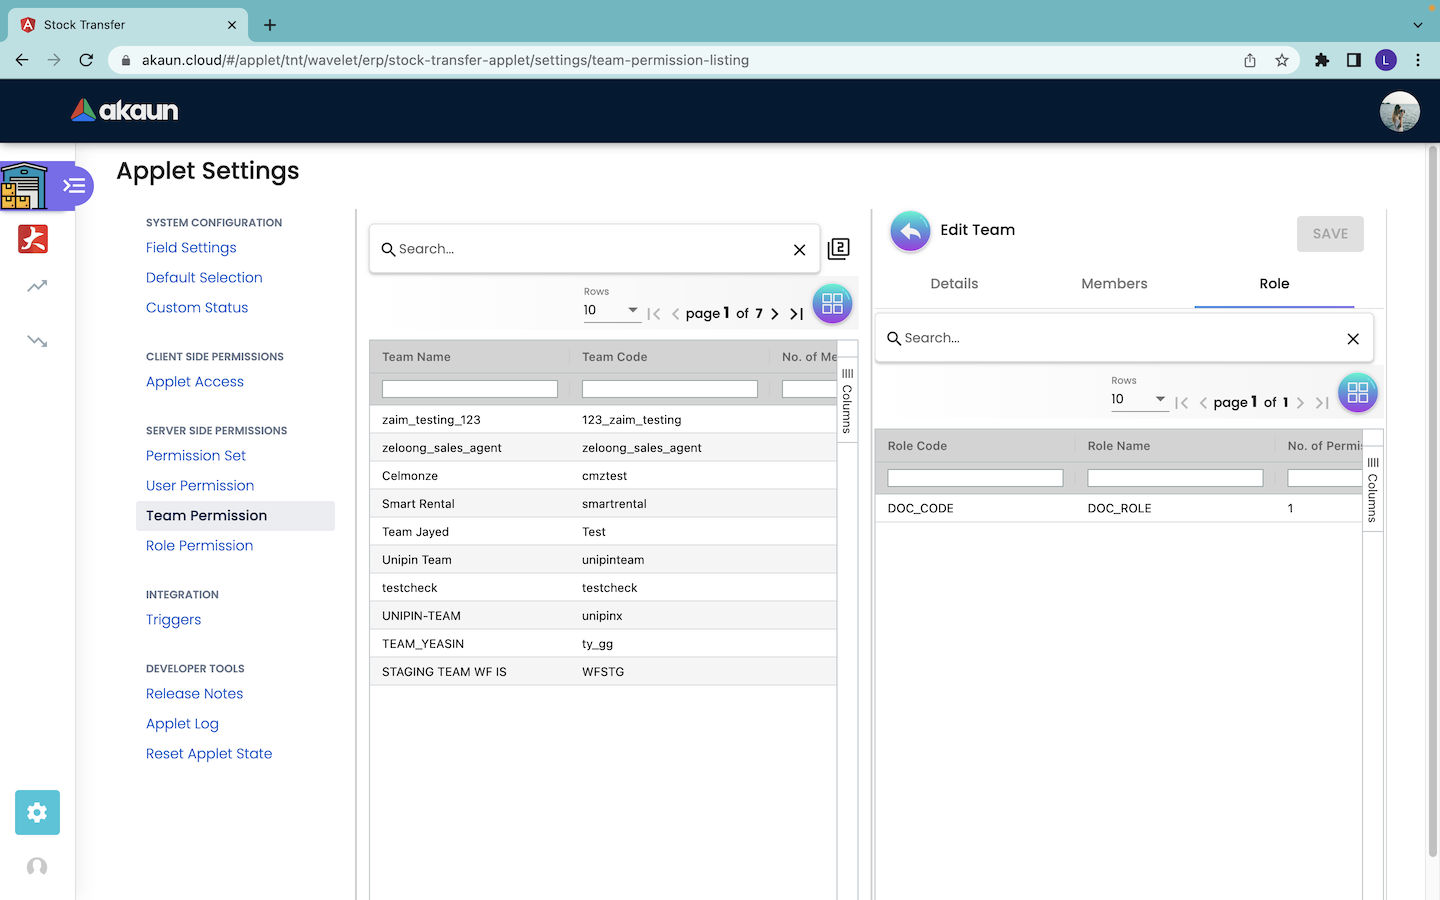
Next, under the Role tab in the Edit Team page, users can see the roles that are assigned to the team. The information of the role includes role code, role name and number of permission sets that are assigned to the role.
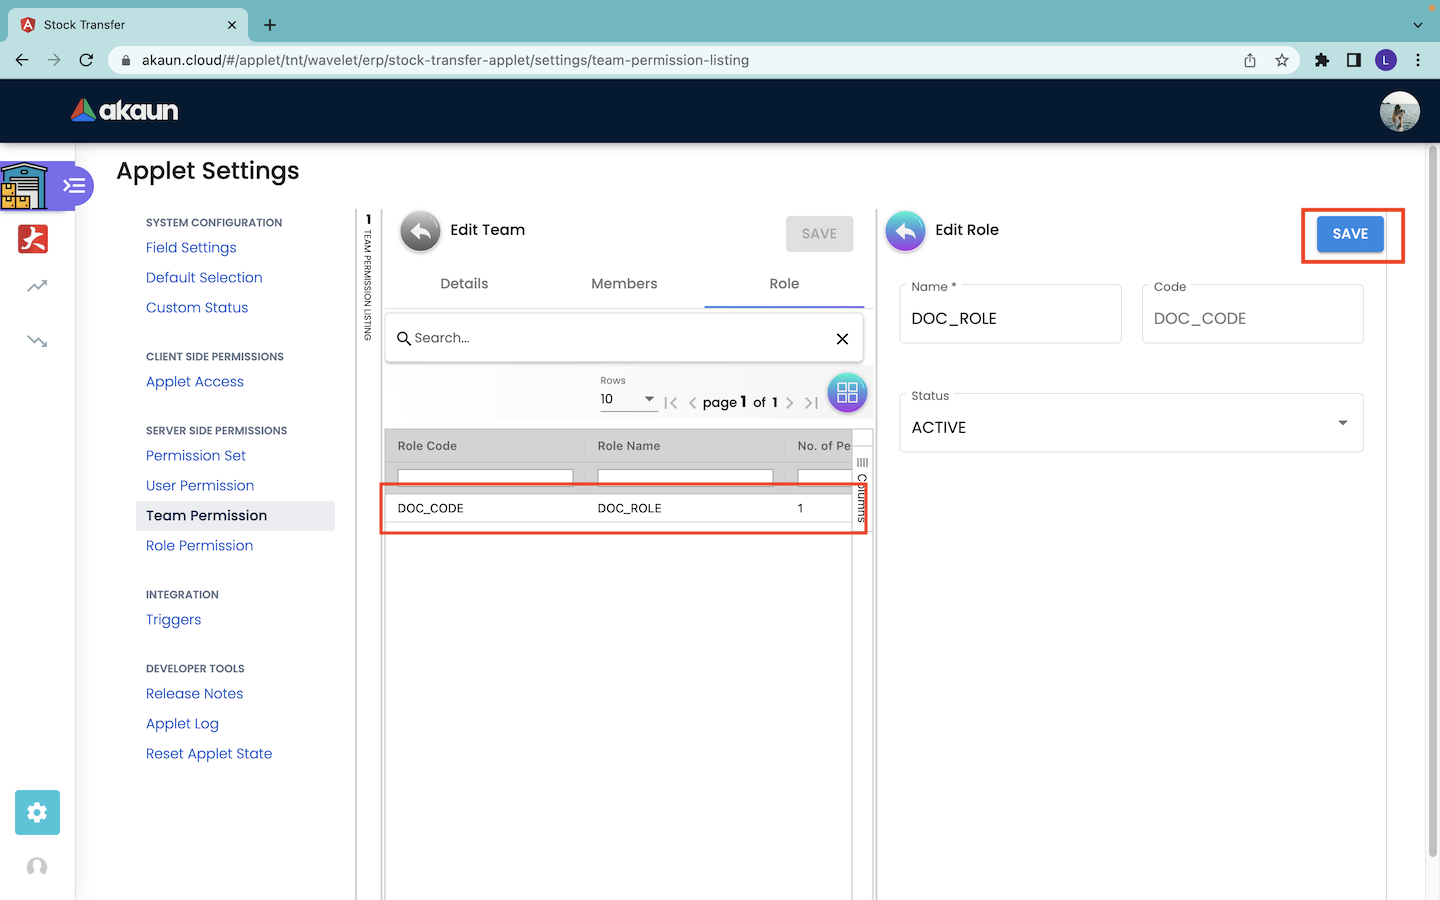
Users are allowed to edit some basic information of the role that is assigned to the team. Firstly, users click onto the role record that they want to edit under the Role tab in the Edit Team page. Then, the Edit Role page will appear from the right as shown in the screenshot above.
Users can edit the role of the team by changing the name and status of the role in the Edit Role page. Users cannot change the role code because the code value is fixed and immutable once it is set. Then, users have to click on the “SAVE” button to save the changes.
6.4 Role Permission
An organization consists of employees with different roles. For example, cashiers, managers, operators, officers and many others. Every role requires specific permissions in using an applet.
Under the Role Permission tab, the admin users can include multiple permissions to a role. Then, the users can assign the role to specific users or teams. By doing that, the admins do not have to manually assign the permission to every individual.
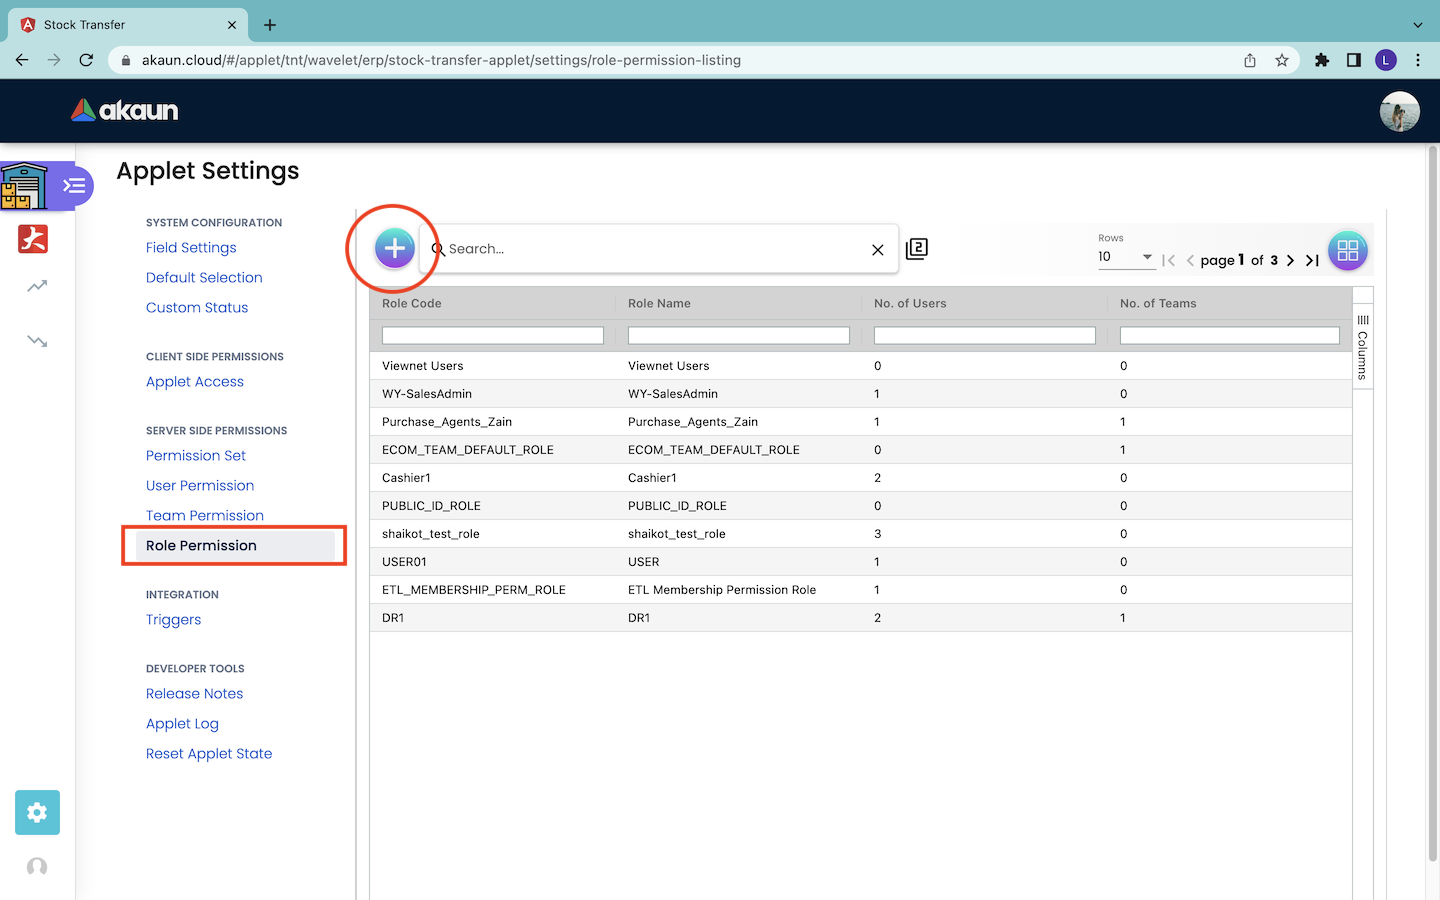
6.4.1 Create a Role
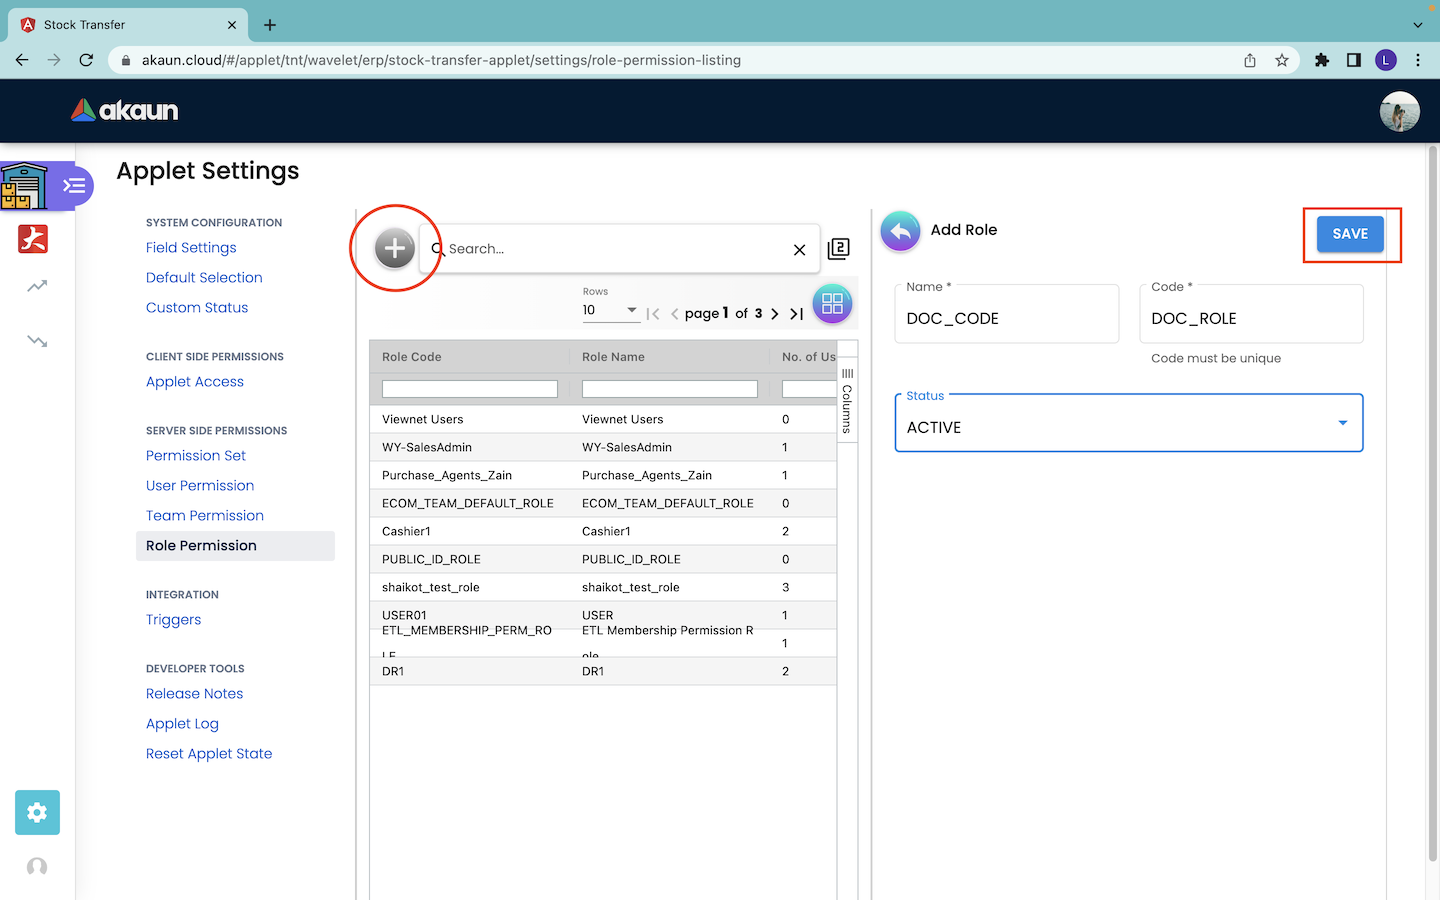
Firstly, users can click on the “+” button to create a role. Then, the users must input the following information:
-
Name of the role.
-
Code of the role. The code of the role must be unique.
-
Status of the role. Users have to set the status to “ACTIVE” in order to use the role.
Lastly, the users have to click on the “SAVE” button to save the input information for the role. The role will then appear as a new record in the Role Permission tab.
6.4.2 Edit Role Permissions
-
Details Tab: Edit and Delete Role Information
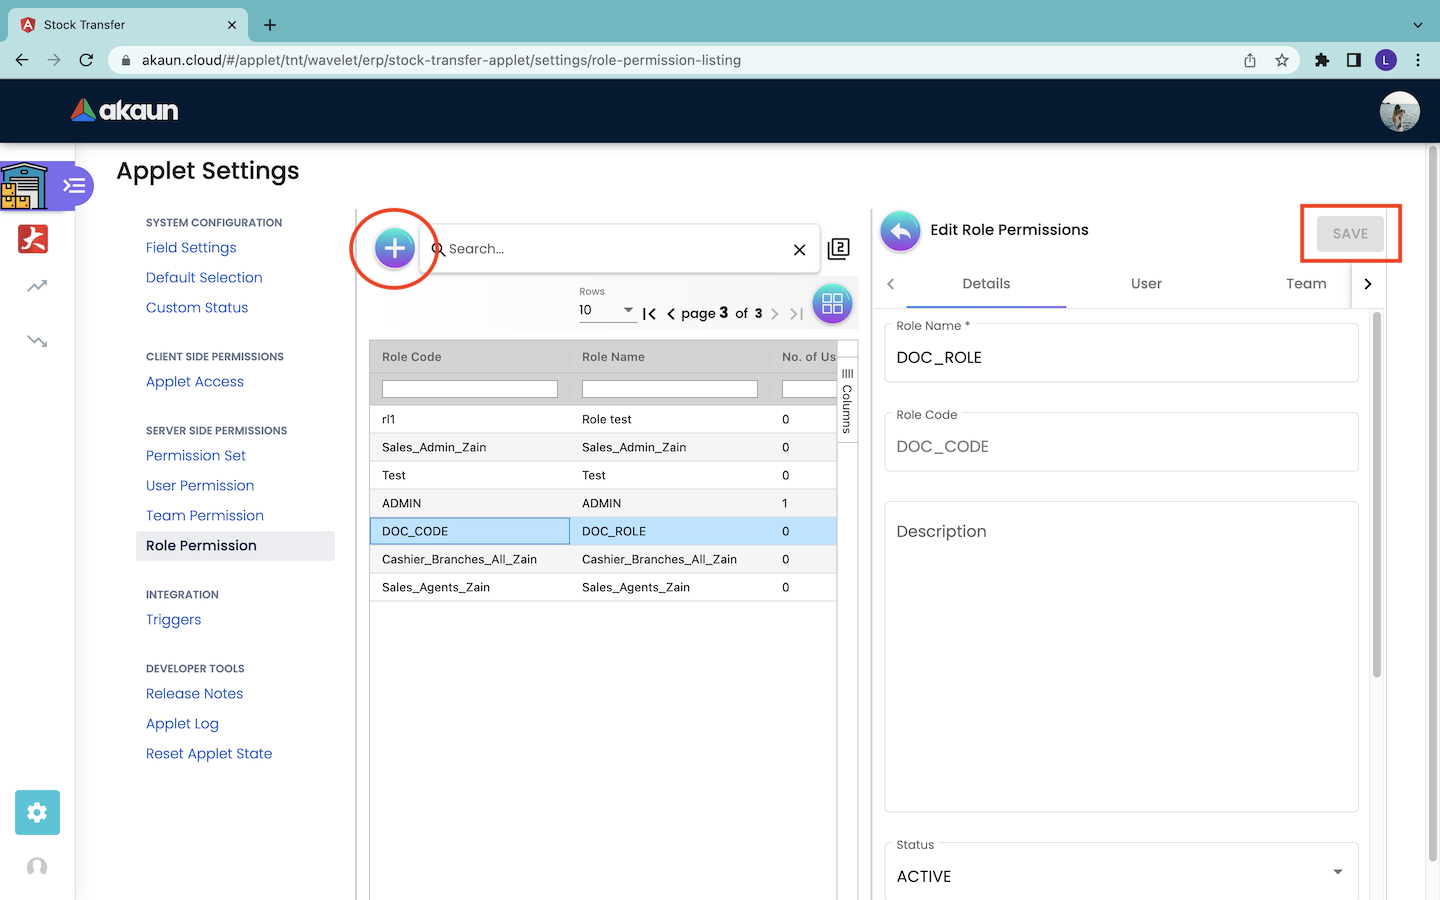
In order to edit the details of the role that is created, users have to click on that particular role record that appears in the Role Permission page. Then, the Edit Role Permissions page will pop out from the right as shown in the screenshot above. The users can then edit the role information under the Details tab of the page. However, the users cannot edit the role code because the code information is fixed and immutable.
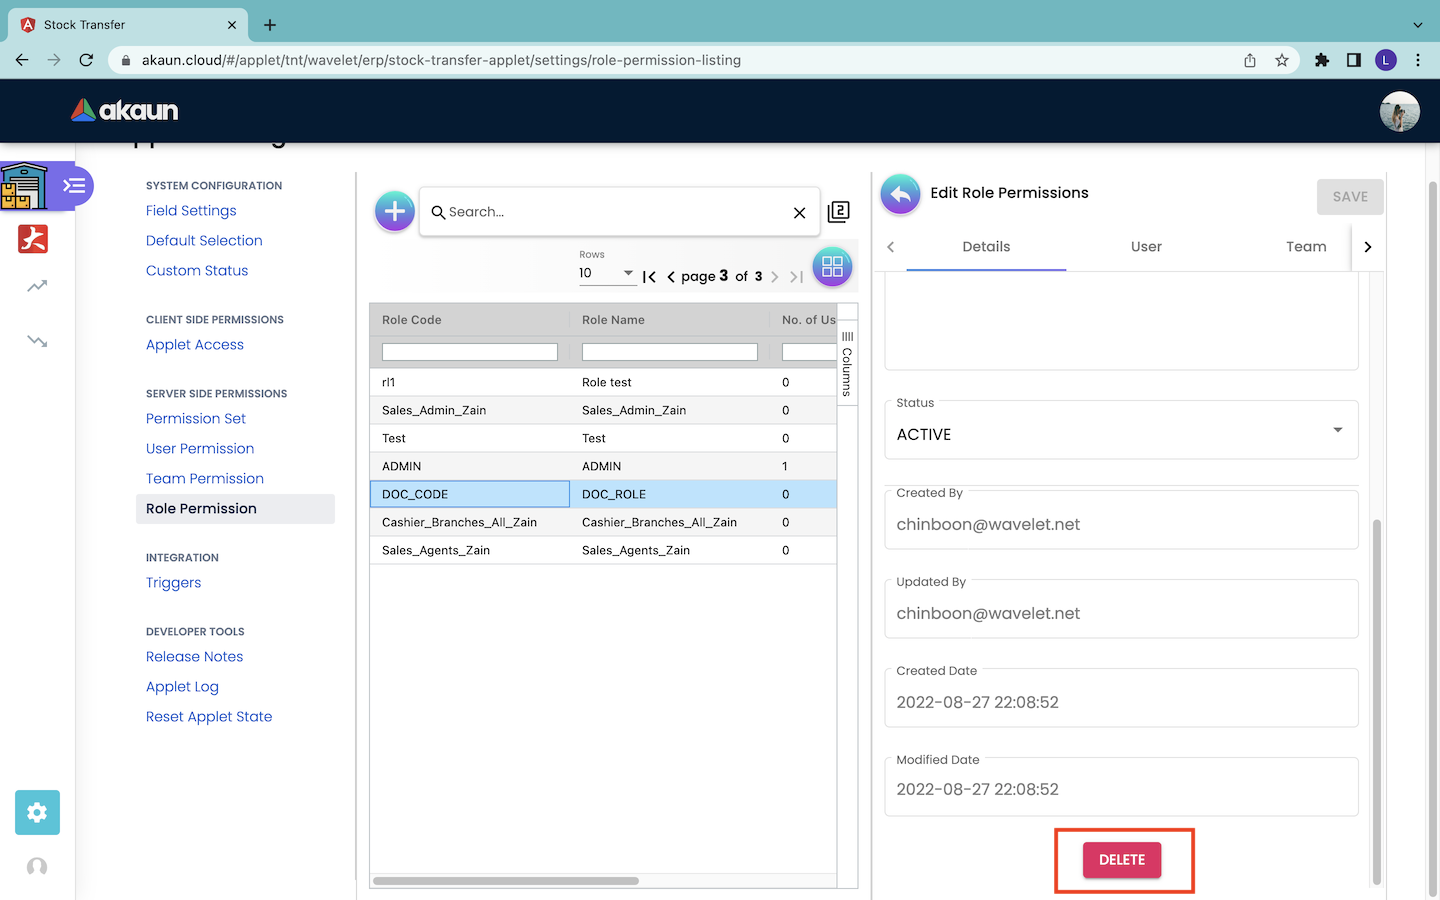
In order to delete a role, the users can click on the “DELETE” button under the Details tab to remove the row.
-
Add or Remove Role to User
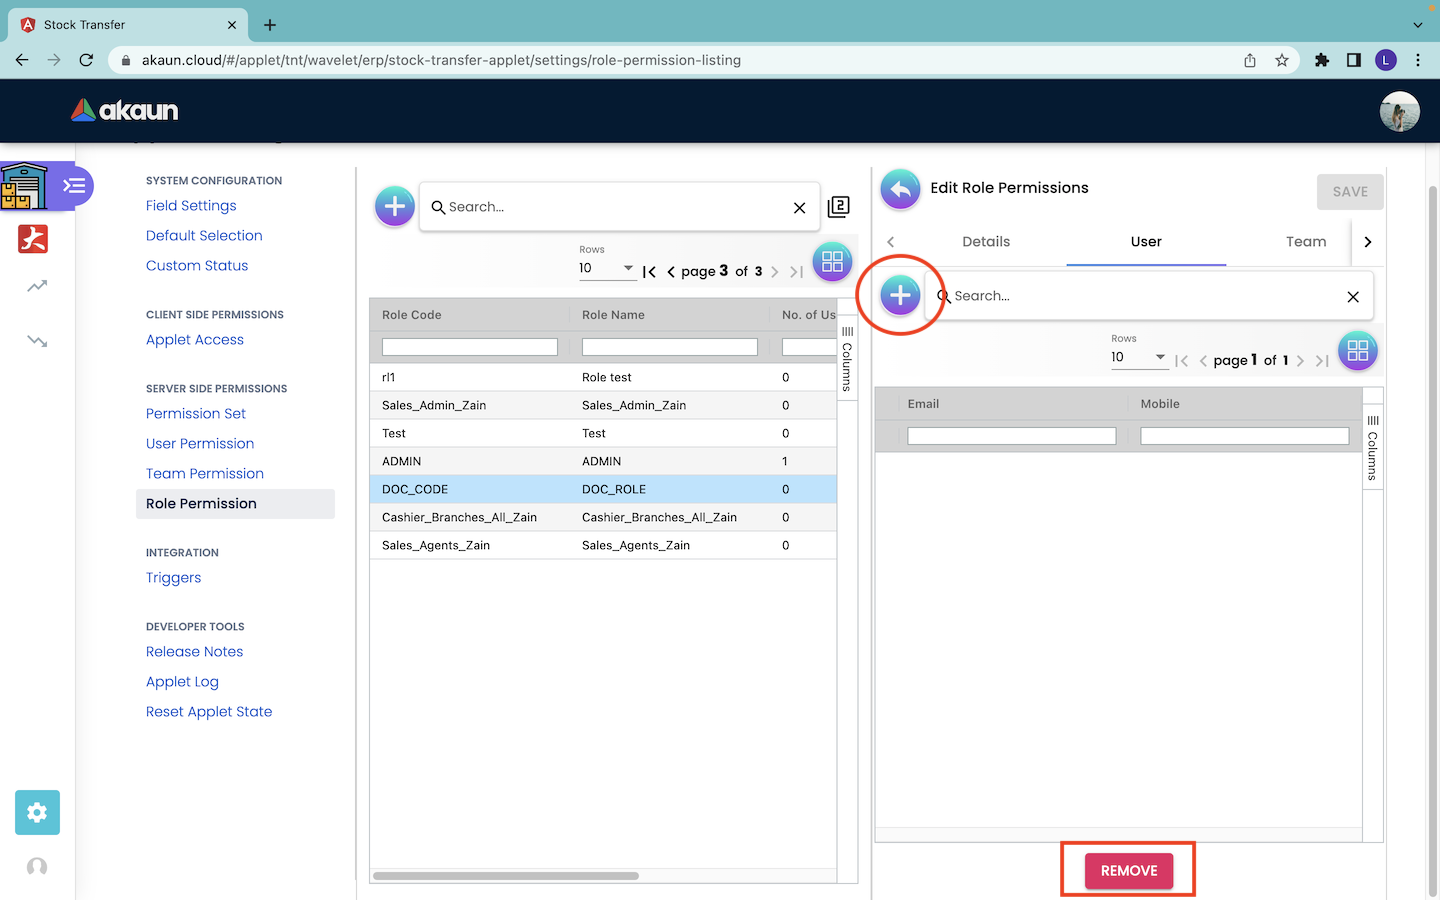
Firstly, users have to navigate to the User tab under the Edit Role Permissions page. Under the User tab, the users can see the list of users that are assigned with the selected role. In order to add new users to the role, users can click on the “+” button to load the list of available users and proceed to assign the users to the particular role.
If users want to remove the existing users from the role, users can tick on the existing users that they want to remove in the Edit Role Permissions page and click the “REMOVE” button to remove the ticked users from the role.
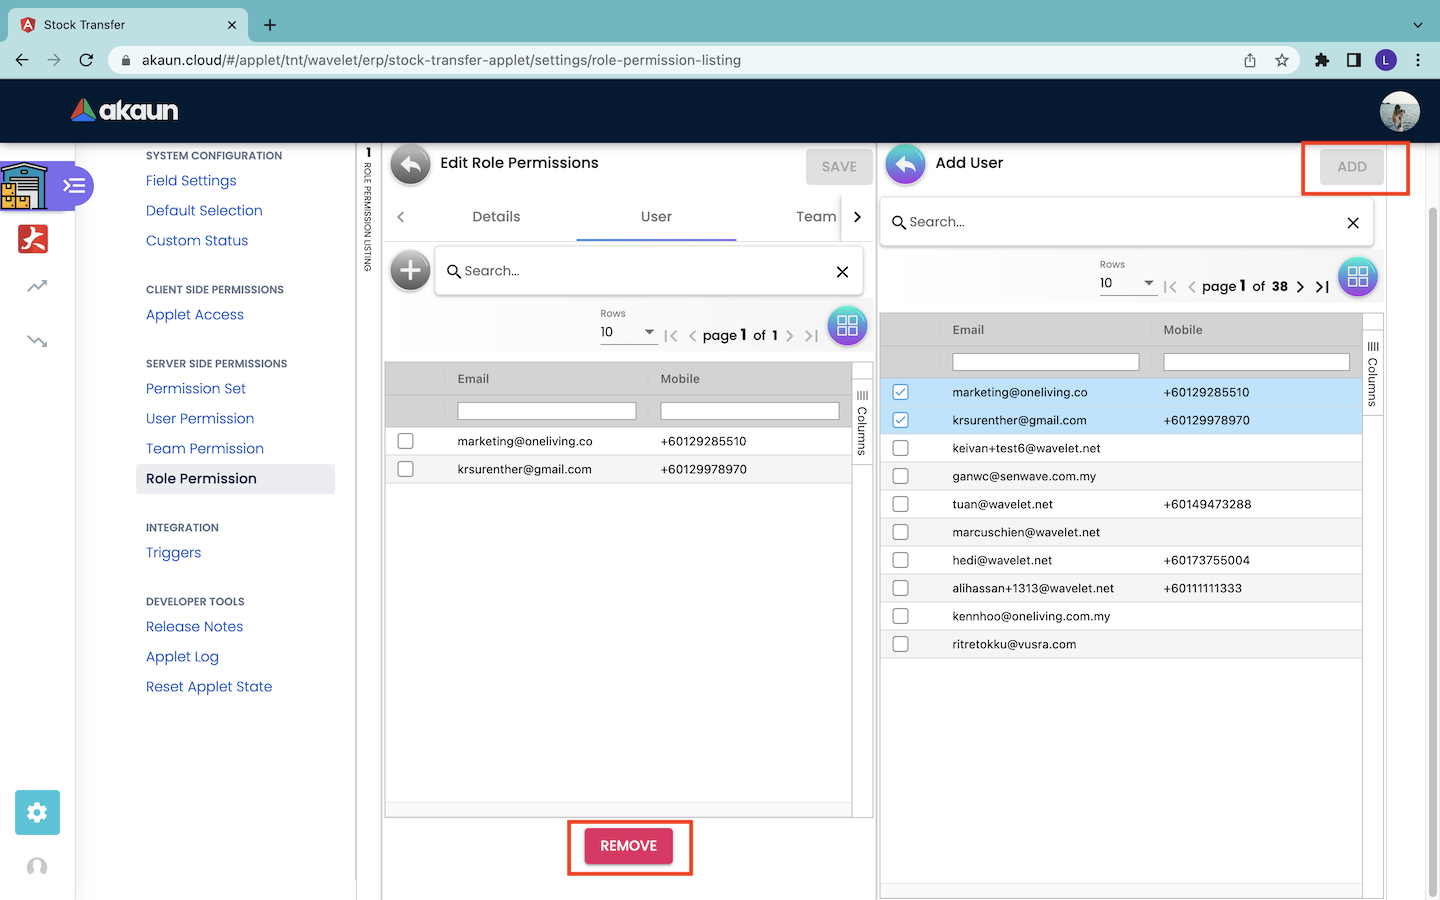
Then, they will be directed to the Add User page which shows the information of all the available users. They then tick on the users that they want to assign the role to in the Add User page. After selecting all the users, they can click on the “ADD” button to add the users to the particular role.
The users that are added successfully to the role will appear under the User Tab in the Edit Role Permissions page. If the admins want to remove the selected users from the role, they can tick on the users in the Edit Role Permissions page and click the “REMOVE” button to remove the ticked users from the role. Users can tick and remove only one user at a time.
-
Add or Remove Team to Role
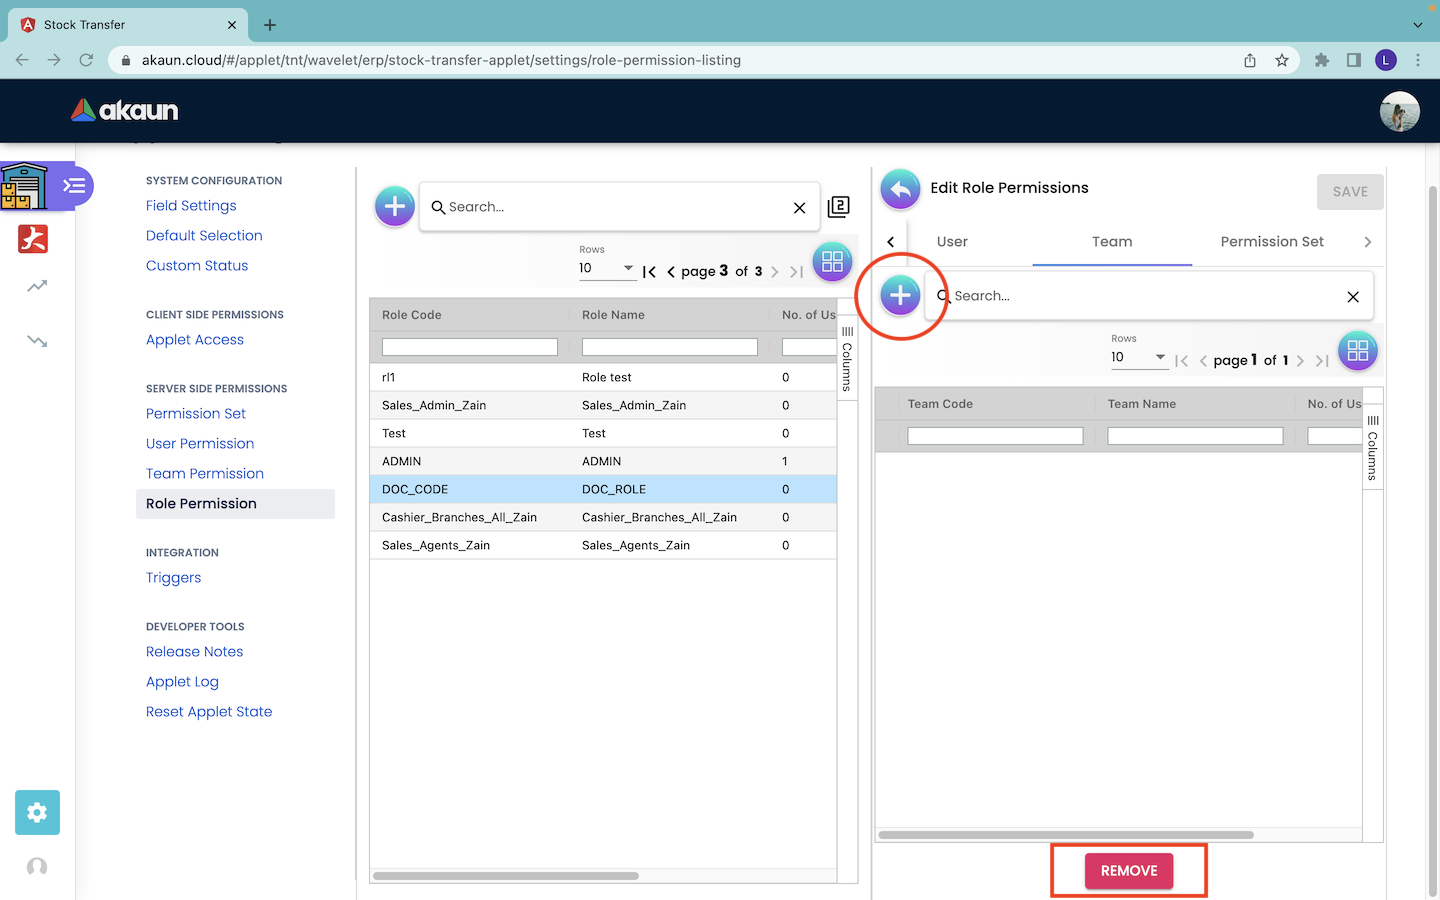
Firstly, users have to navigate to the Team tab under the Edit Role Permissions page. Under the team tab, the users can see the list of teams that are assigned with the role. In order to add new teams to the role, users can click on the “+” button to load the list of available teams and proceed to assign the teams to the particular role.
If users want to remove the existing teams from the role, users can tick on the existing teams that they want to remove in the Edit Role Permissions page and click the “REMOVE” button to remove the ticked teams from the role. Users can tick and remove only one team at a time.
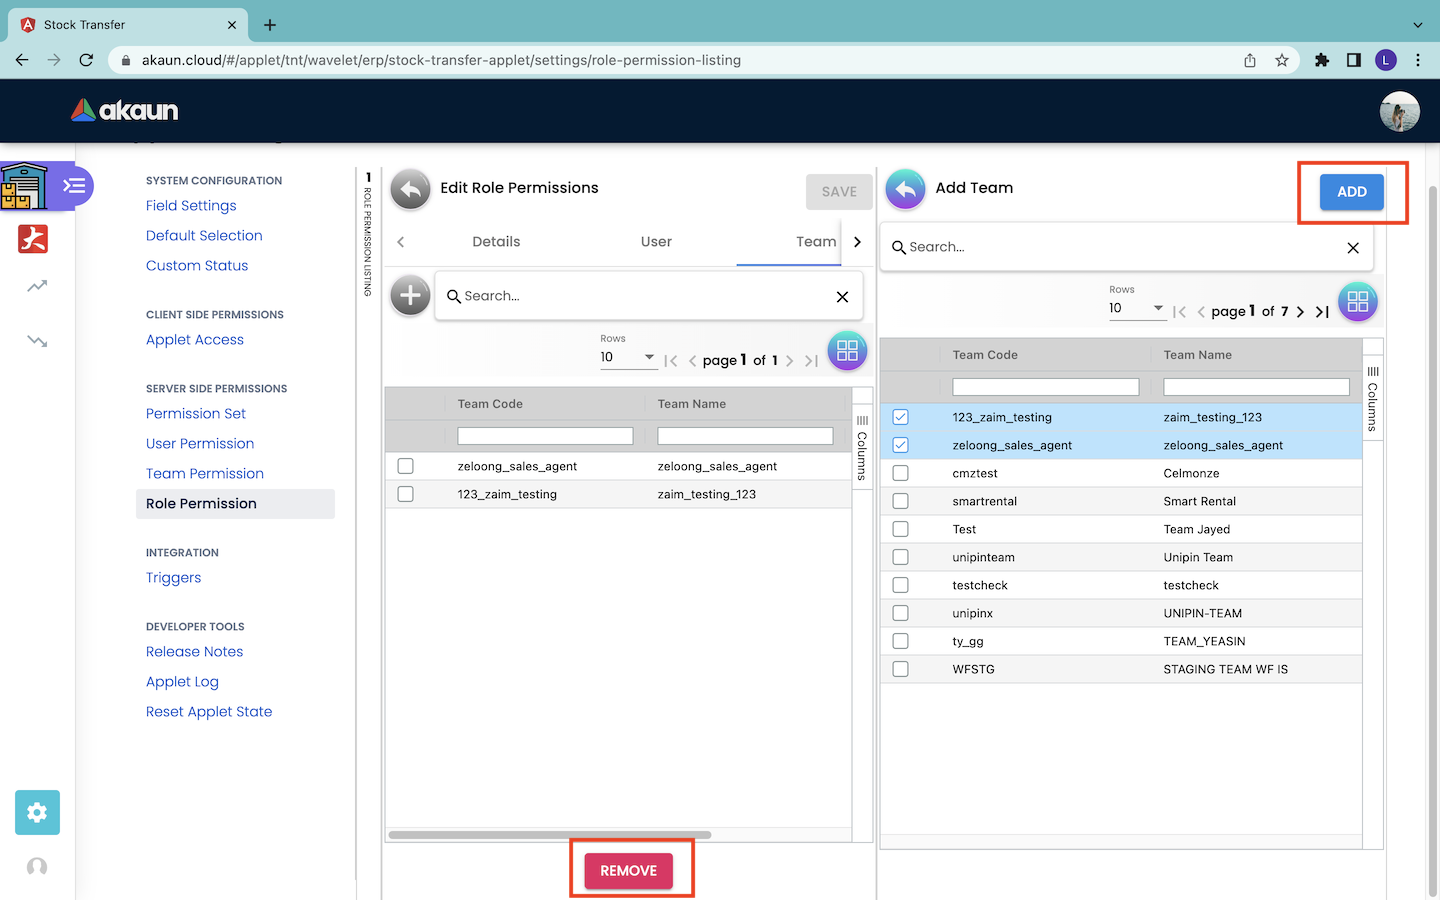
After clicking on the “+” button, users can tick on the teams that they want to assign the role in the Add Team page. After selecting the teams, they can click on the “ADD” button to add the teams to the particular role.
The teams that are added successfully to the role will appear under the Team tab in the Edit Role Permissions page. If the admins want to remove the selected teams from the role, they can tick on the teams and click the “REMOVE” button to remove the ticked teams from the role.
-
Add or Remove Permission Set to Role

Most importantly, every role has its own list of permissions. In order to assign the permission set to the created Role, users have to navigate to the Permission Set tab under the Edit Role Permissions page.
Under the Permission Set tab, the users can see the list of permission sets that are assigned with the role. In order to add new permission sets to the role, users can click on the “+” button to load the list of available permission sets and proceed to assign them to the particular role.
If users want to remove the existing permission sets from the role, users can tick on the existing permission sets that they want to remove in the Edit Role Permissions page and click the “REMOVE” button to remove the ticked permission sets from the role. Users can tick and remove only one permission set at a time.
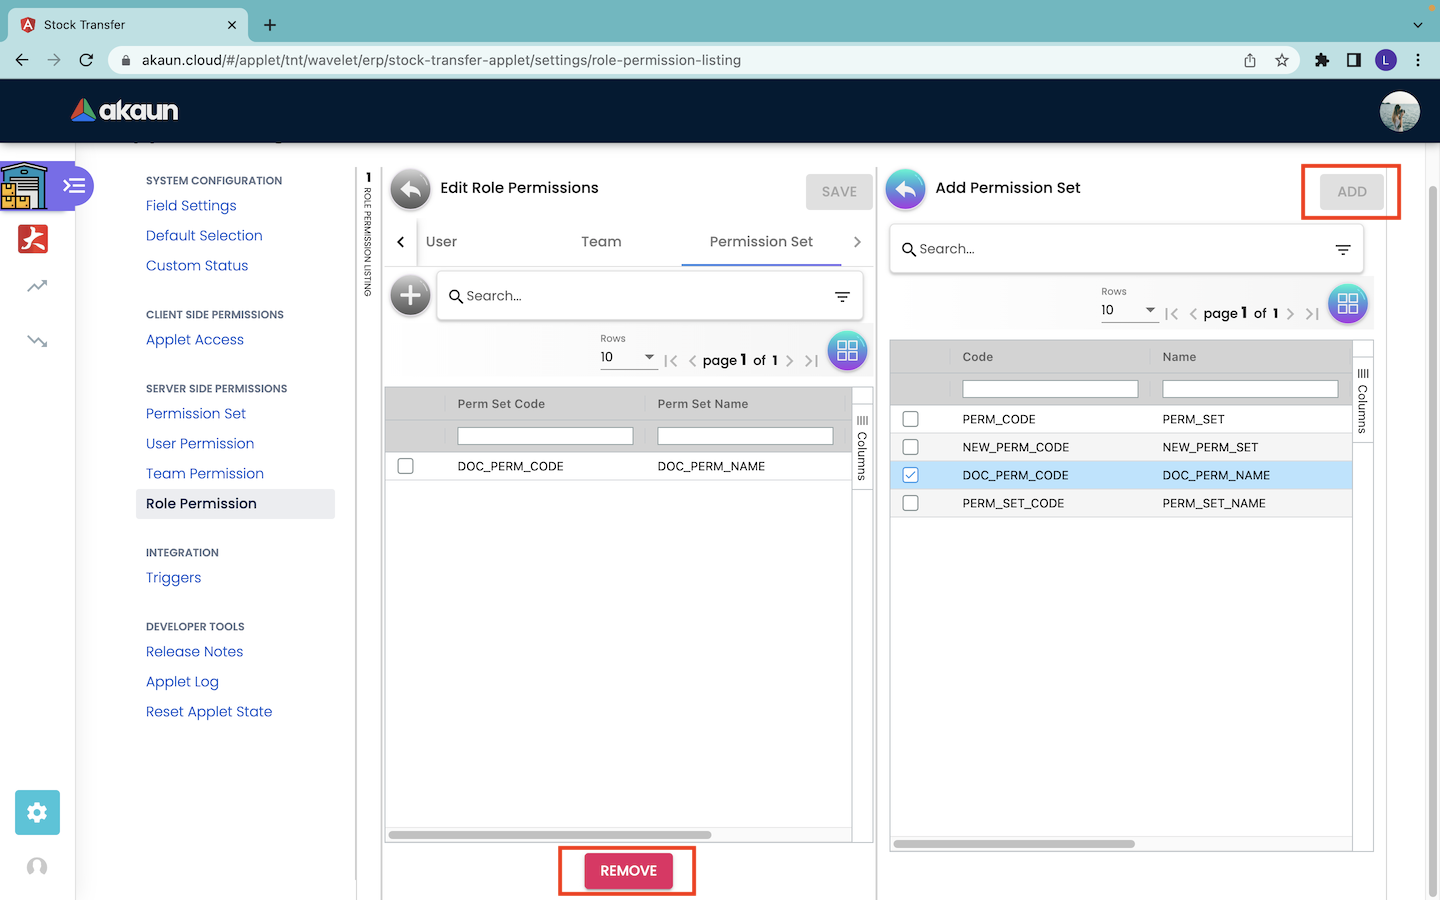
Then, they can tick on the permission sets that they want to assign to the role in the Add Permission Set page. After selecting all the permission sets, they can click on the “ADD” button to add the permission sets to the particular role.
The permission sets that are successfully added to the role will appear under the Permission Set tab in the Edit Role Permissions page. If the admins want to remove the selected permission sets from the role, they can tick on the permission sets and click the “REMOVE” button to remove the ticked permission sets from the role.