4.0 Features
4.1 Internal Purchase GRN
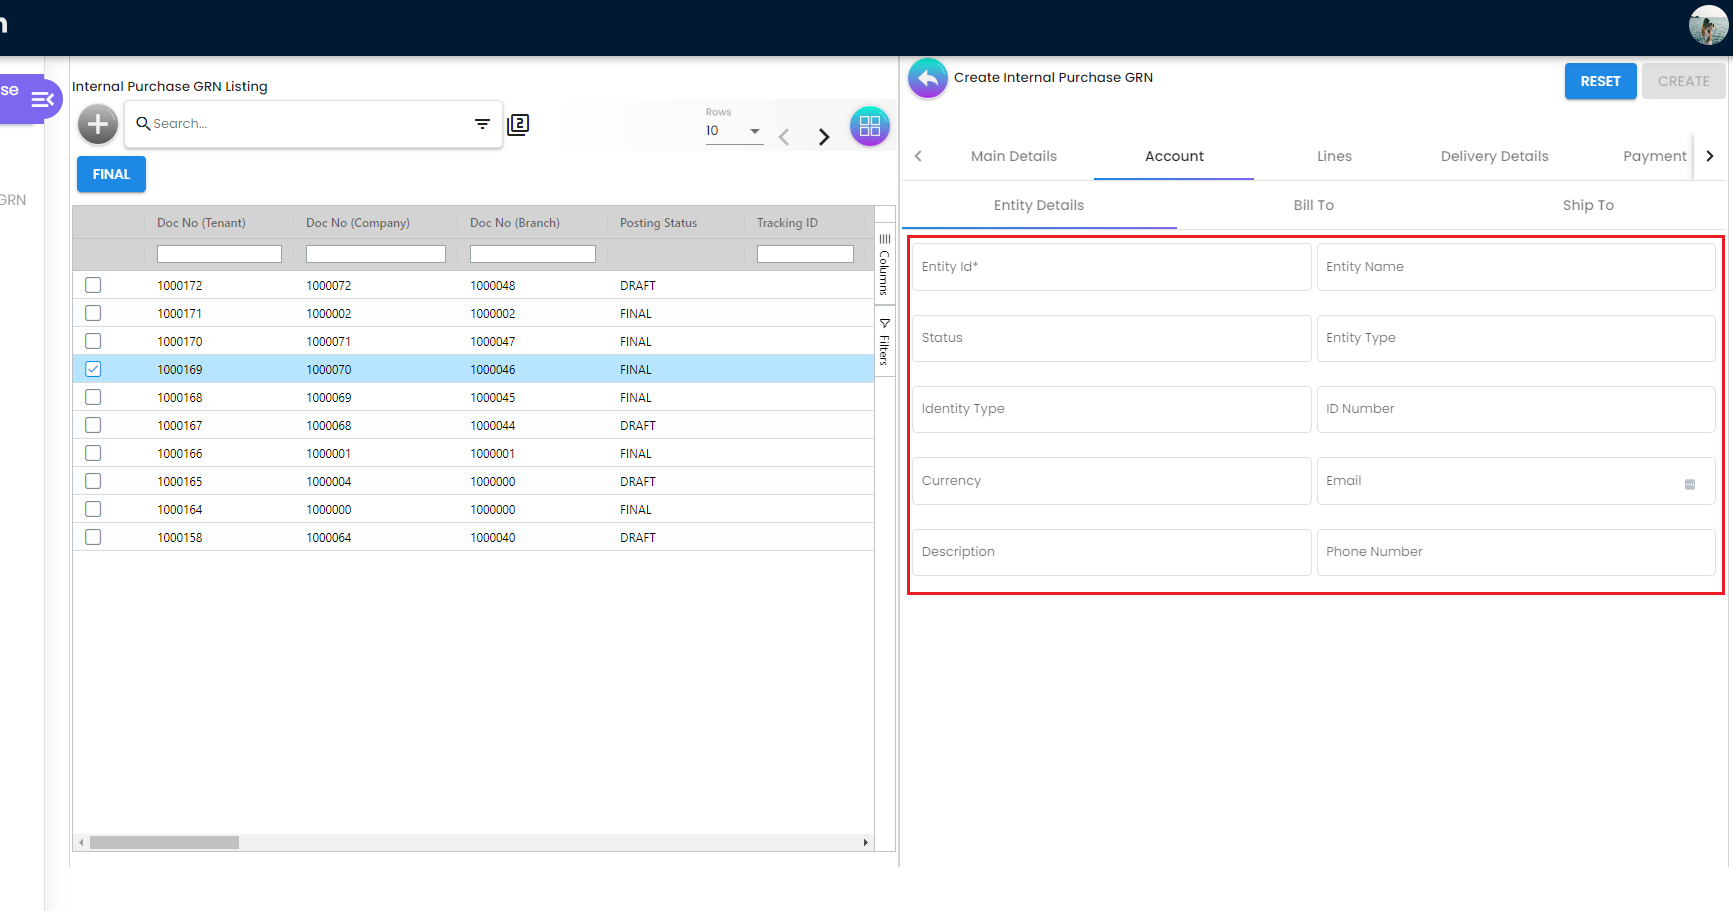
4.1.1 Internal Purchase GRN Listing
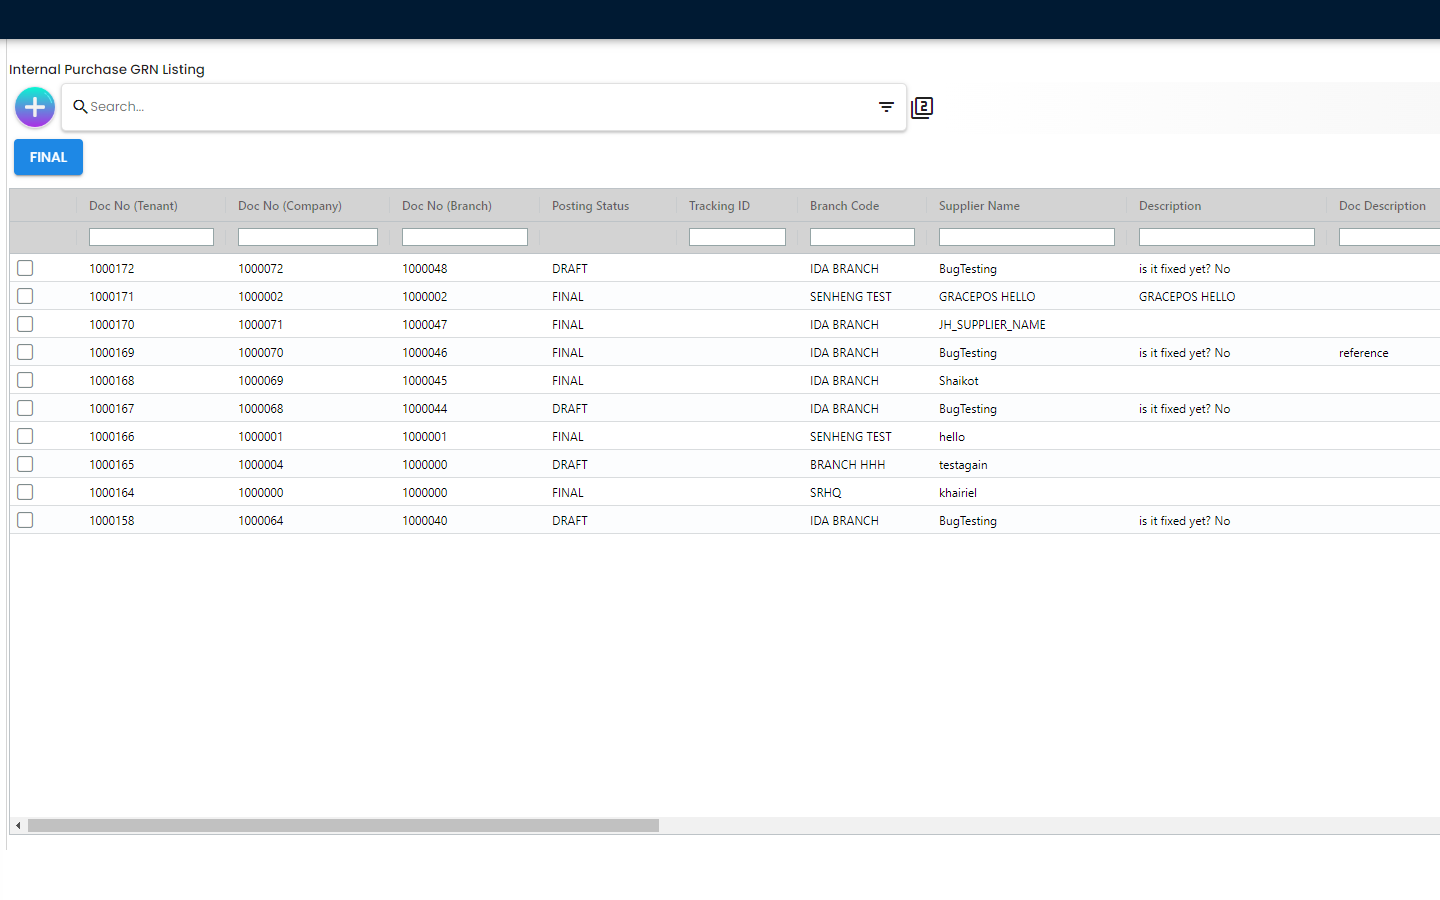
The Purchase GRN Listing Page basically displays all of the previously created Purchase GRNs with the following details
-
Doc No (Tenant)
-
Doc No (Company)
-
Doc No (Branch)
-
Posting Status [The status of the GRN]
-
Tracking ID
-
Branch Code
-
Supplier Name [Name of the Supplier from whom products * have been purchased]
-
Description
-
Doc Description
-
Purchaser [Name of the Purchaser]
-
Doc Reference
-
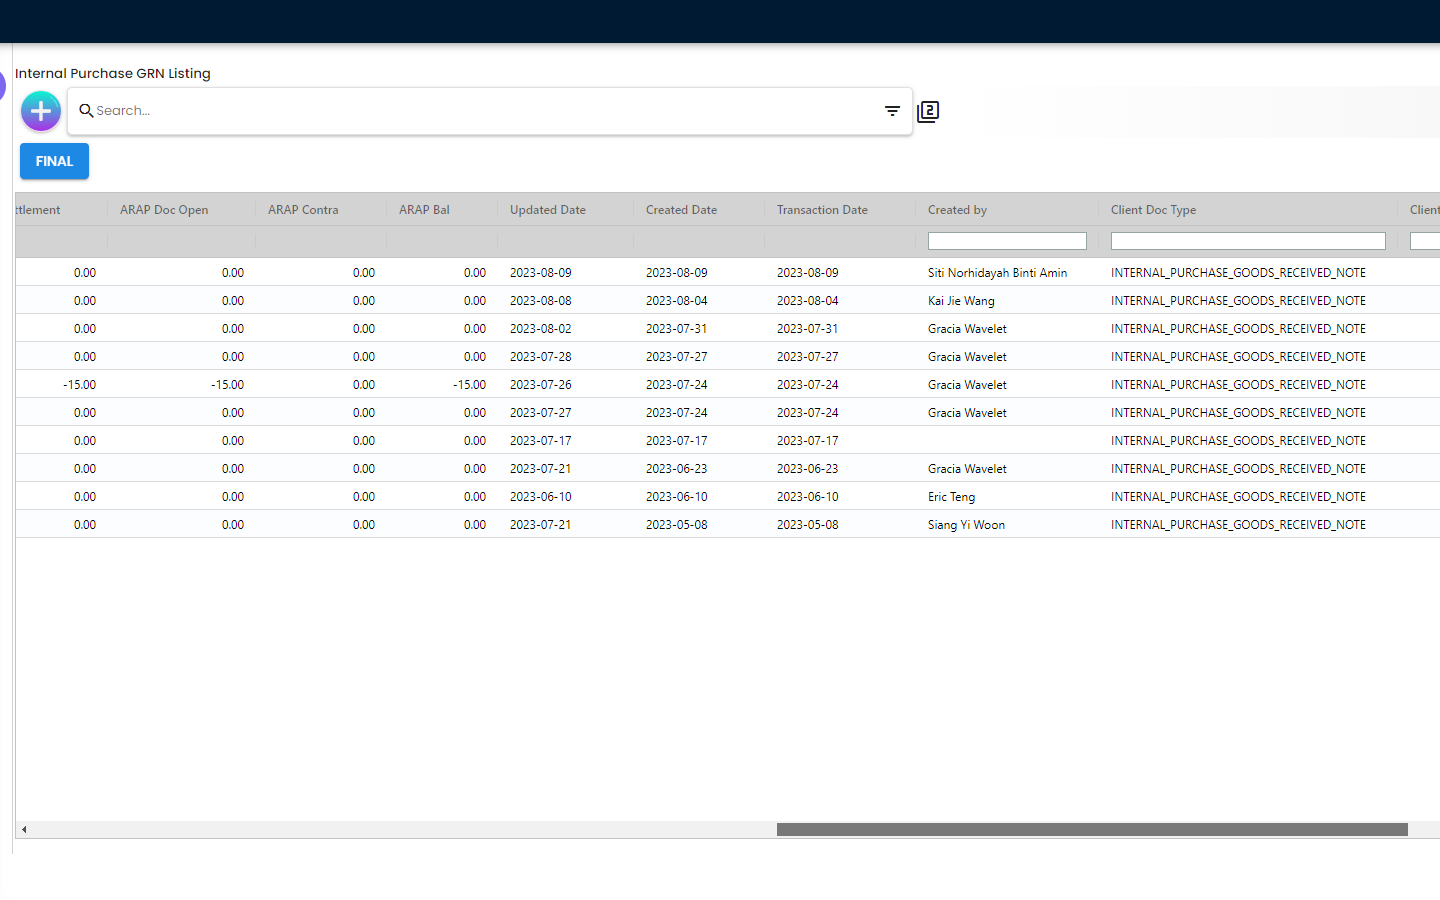
ARAP PNS [ARAP represents the account receivable and account payable. PNS stands for Products and Services. It represents what product are the customer buying, GL code and so on]
-
ARAP Settlement [Settlement basically refers to the payment method (eg. Cash, Visa Card, e-Wallet and so on]
-
ARAP Doc Open
-
ARAP Contra
-
ARAP Bal
-
Created Date
-
Updated Date
-
Transaction Date
-
Created By
-
Client Doc Type
-
Client Doc 1
-
Client Doc 2
-
Client Doc 3
-
Client Doc 4
-
Client Doc 5
-
Custom Clearance Status
Overall, Purchase GRN is not that much linked with all the items listed above. Some of the fields like ARAP PNS, ARAP Settlement, ARAP Doc Open, ARAP Contra, ARAP Bal etc. have no effect on the GRN. Thus, these fields can be hidden using the seetings configuration if required
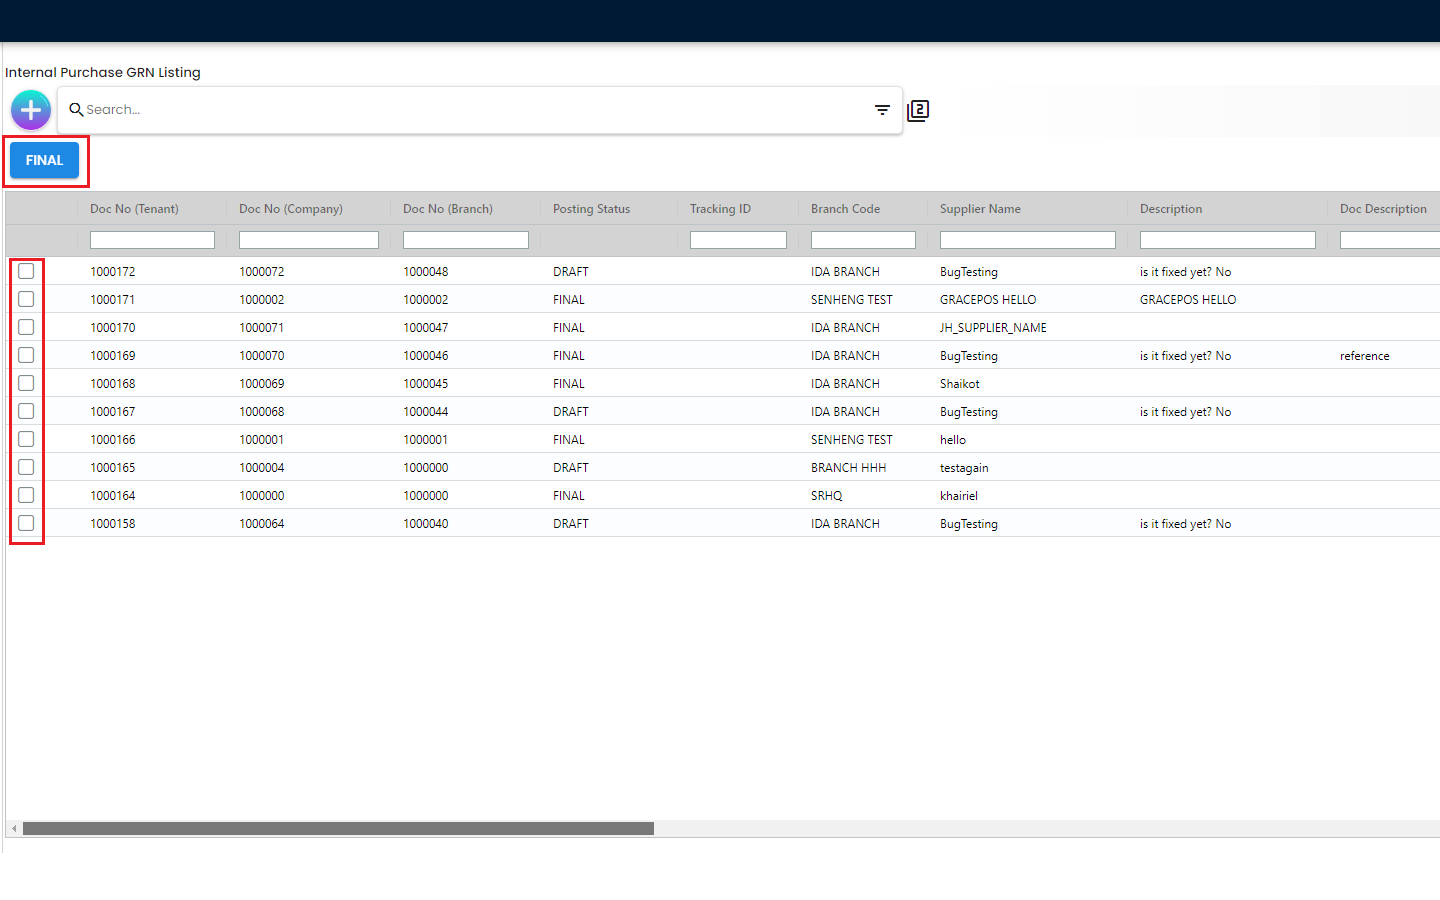
The users are able to select any previously created Purchase GRN and change the status to “FINAL” once everything is finalized for that particular Purchase GRN. Once the Posting Staus has been changed to FINAL, the Supplier and some of the other main details are not editable anymore. We will discuss these things in more details in the later sections of this document.
4.1.2 Create Purchase GRN
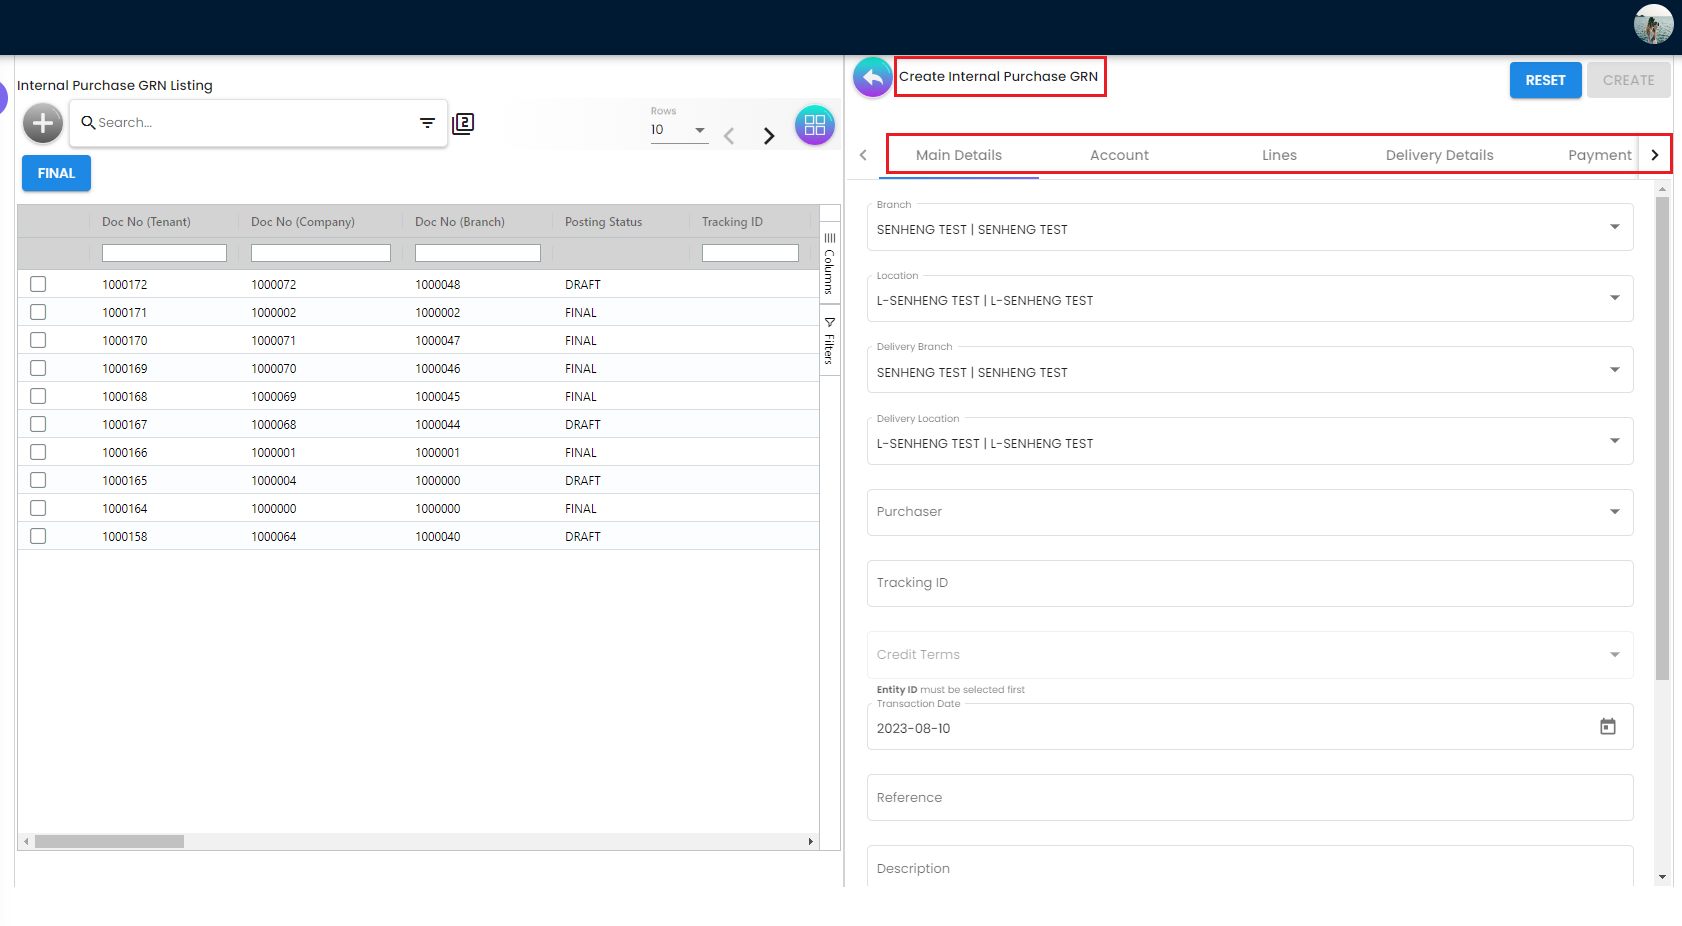
In order to create a Purchase GRN, the users need to click on the “+” icon and they will be redirected to the “Create Internal Purchase GRN” Page. Then the users need to fill in the required information in different tabs for creating a new Purchase GRN. While filling in the information, the users can Save those or click on the Reset if there’s any mistakes. The users need to go through the following tabs while creating a new Purchase GRN
-
Main Details
-
Account
-
Lines
-
Delivery Details
-
Payment
-
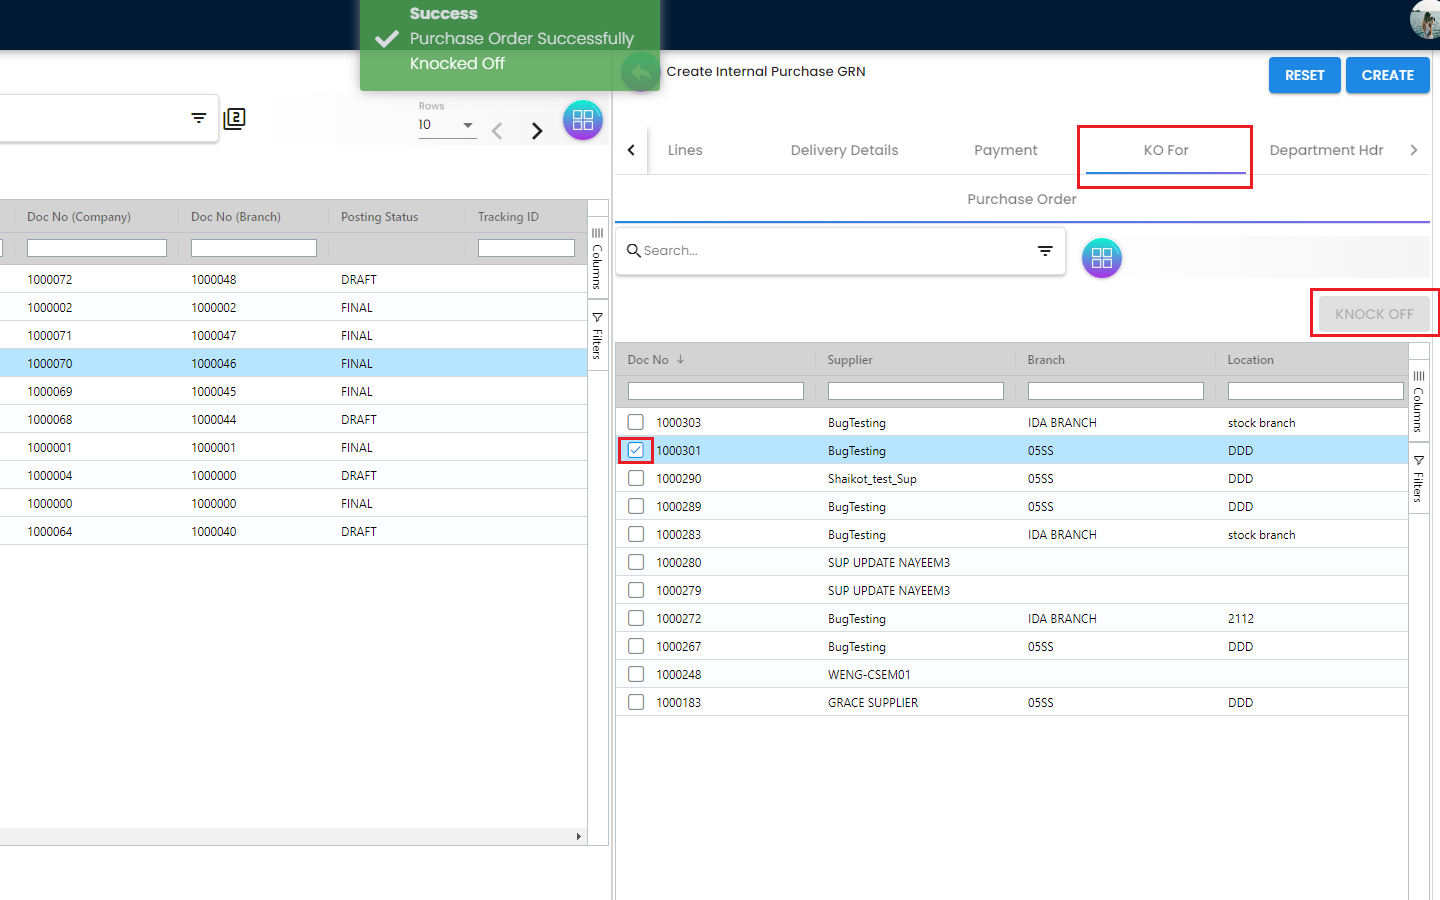
KO For
-
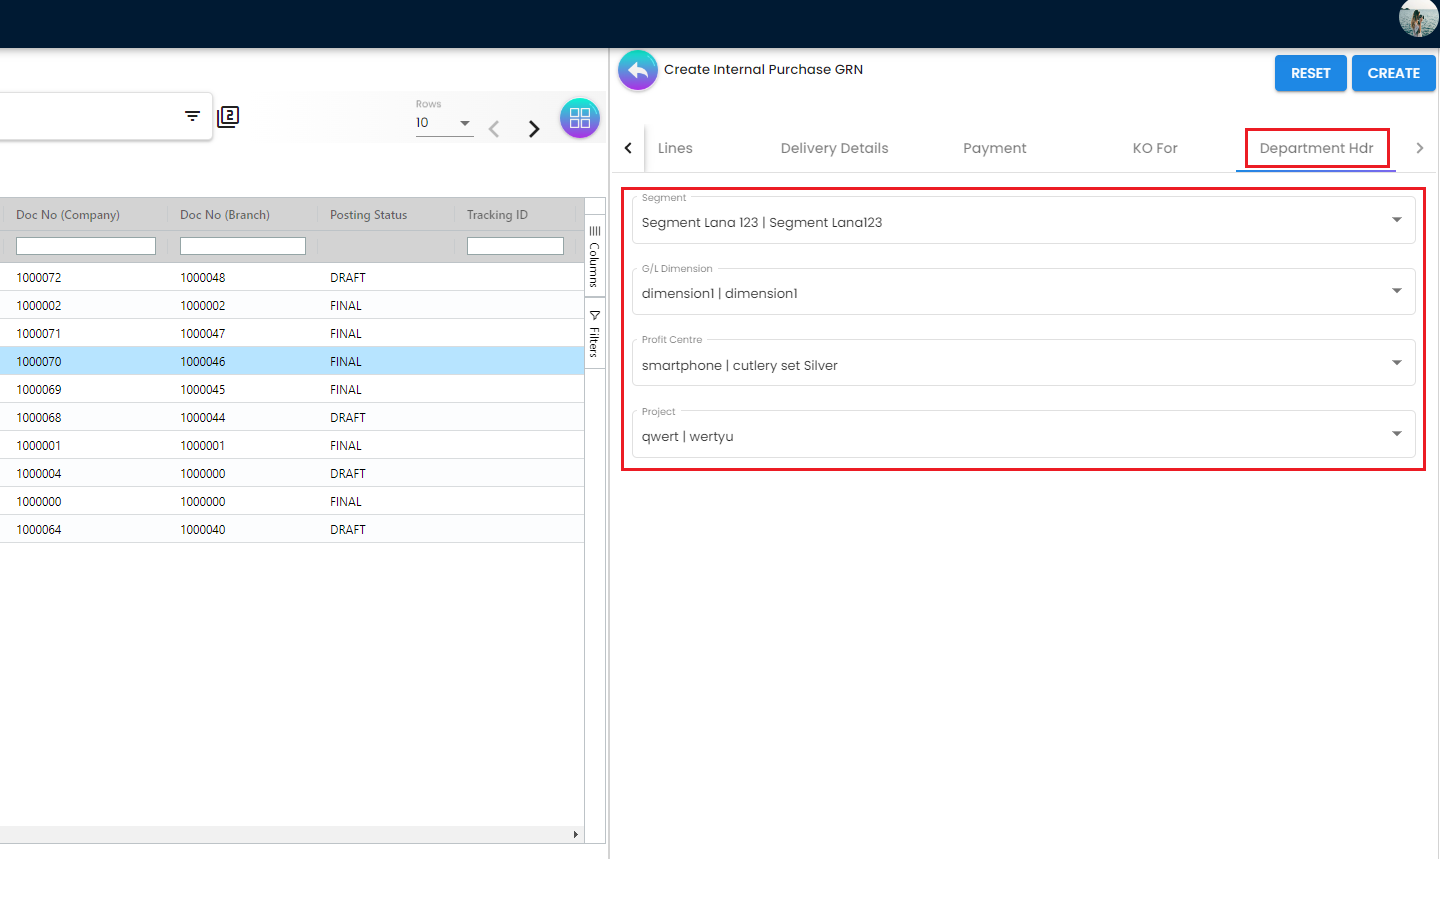
Department Hdr
4.1.2.1 Create Purchase GRN - Main Details Tab
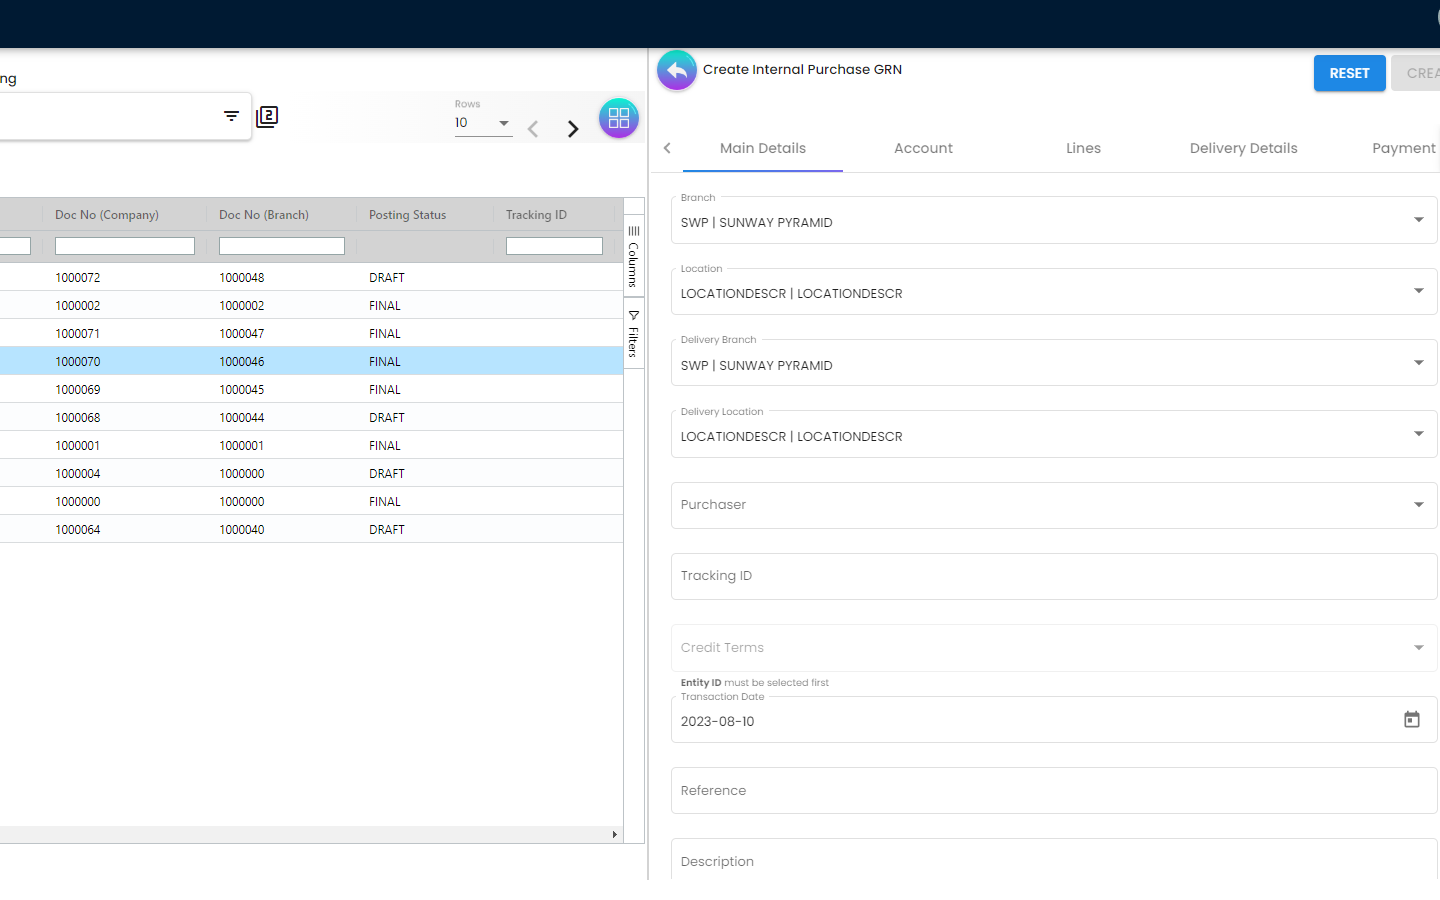
There are several fields in the Main Details Tab and all these fields are having 1 to 1 relationship with the Purchase GRN. The required fields are as follows
-
Branch - Will populate default branch according to the branch selected in the setting
-
Location - Will populate default location if branch according to the branch selected in the setting
-
Delivery Branch
-
Delivery Location
-
Purchaser - Add new purchaser in Customer Maintenance * Applet
-
Tracking ID
-
Credit Terms
-
Date - Default to the current date
-
Reference
-
Description
-
Remarks
-
Permit No
-
Currency [Dropdown]
Once the users choose the Branch, the Location will be followed by the Branch selection and it will follow the overall settings in the Organization Applet. The Purchaser dropdown list is coming from the Employee Applet
4.1.2.2 Create Purchase GRN - Account Tab
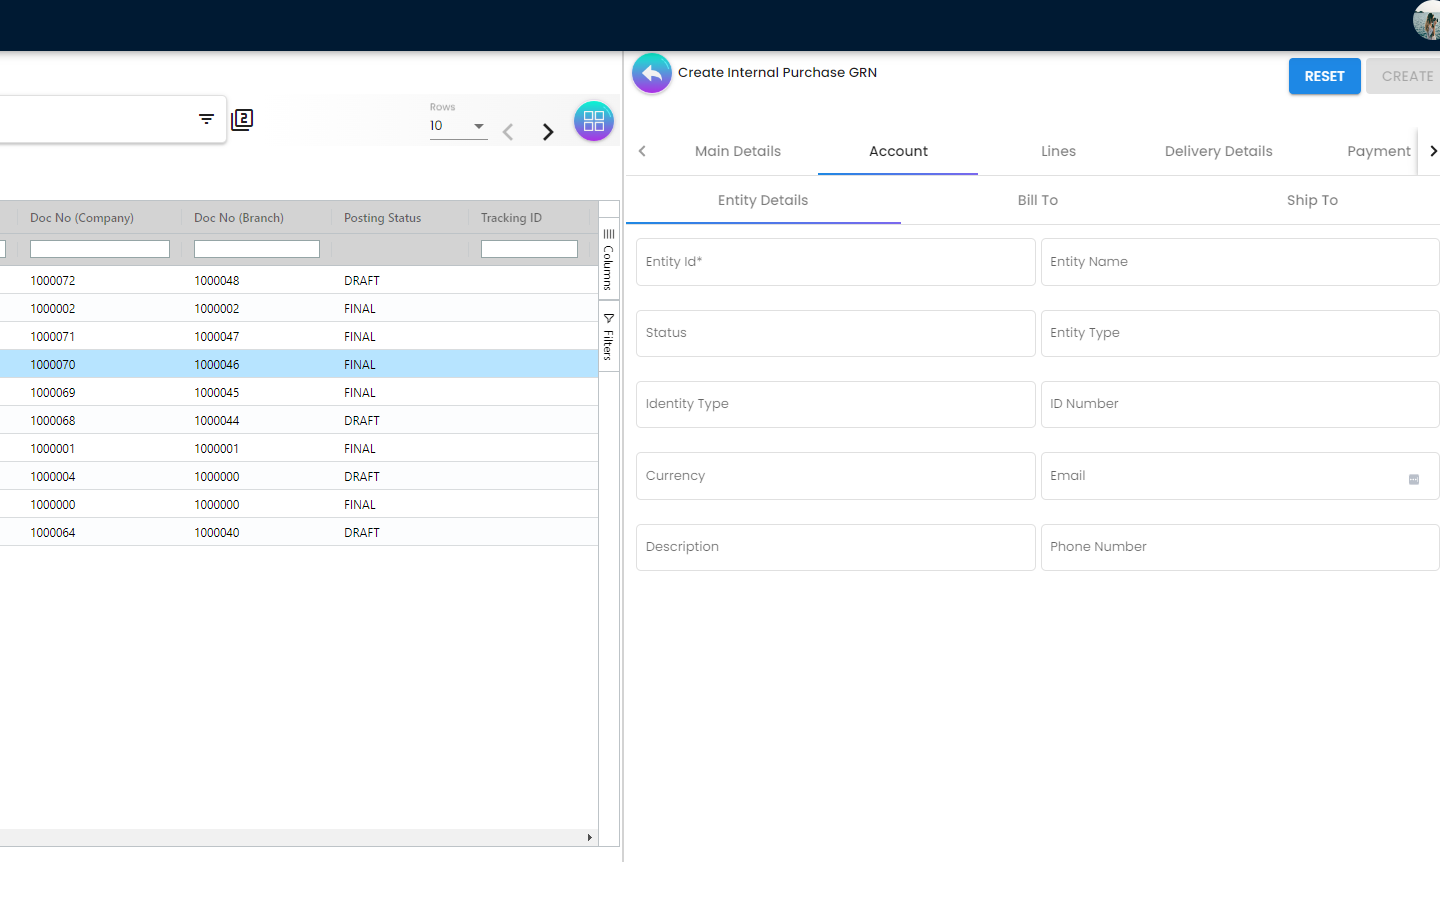
The Account Tab is basically where a user can link the Purchase GRN with a Supplier. The Accounts tab has the following Sub Tabs
-
Entity Details
-
Entity ID: Supplier Code, auto-filled when a Supplier entity is selected.
-
Entity Name: Supplier Name, auto-filled when a Supplier entity is selected.
-
Status: Active or Inactive. Auto-filled when a Supplier entity is selected.
-
Entity Type: Corporate or Individual. Auto-filled when a Supplier entity is selected.
-
Identity Type: IC or Passport, auto-filled when Supplier entity is selected.
-
ID Number: IC or Passport number, auto-filled when a Supplier entity is selected.
-
Currency: To determine based on the pricing condition what you are maintaining. Auto-filled when a Supplier entity is selected.
-
Email: A central email through which Supplier want to communicate. Auto-filled when a Supplier entity is selected.
-
Description: Additional notes. Auto-filled when a Supplier entity is selected.
-
Phone Number: A central phone number through which Supplier want to communicate. Auto-filled when a Supplier entity is selected.
-
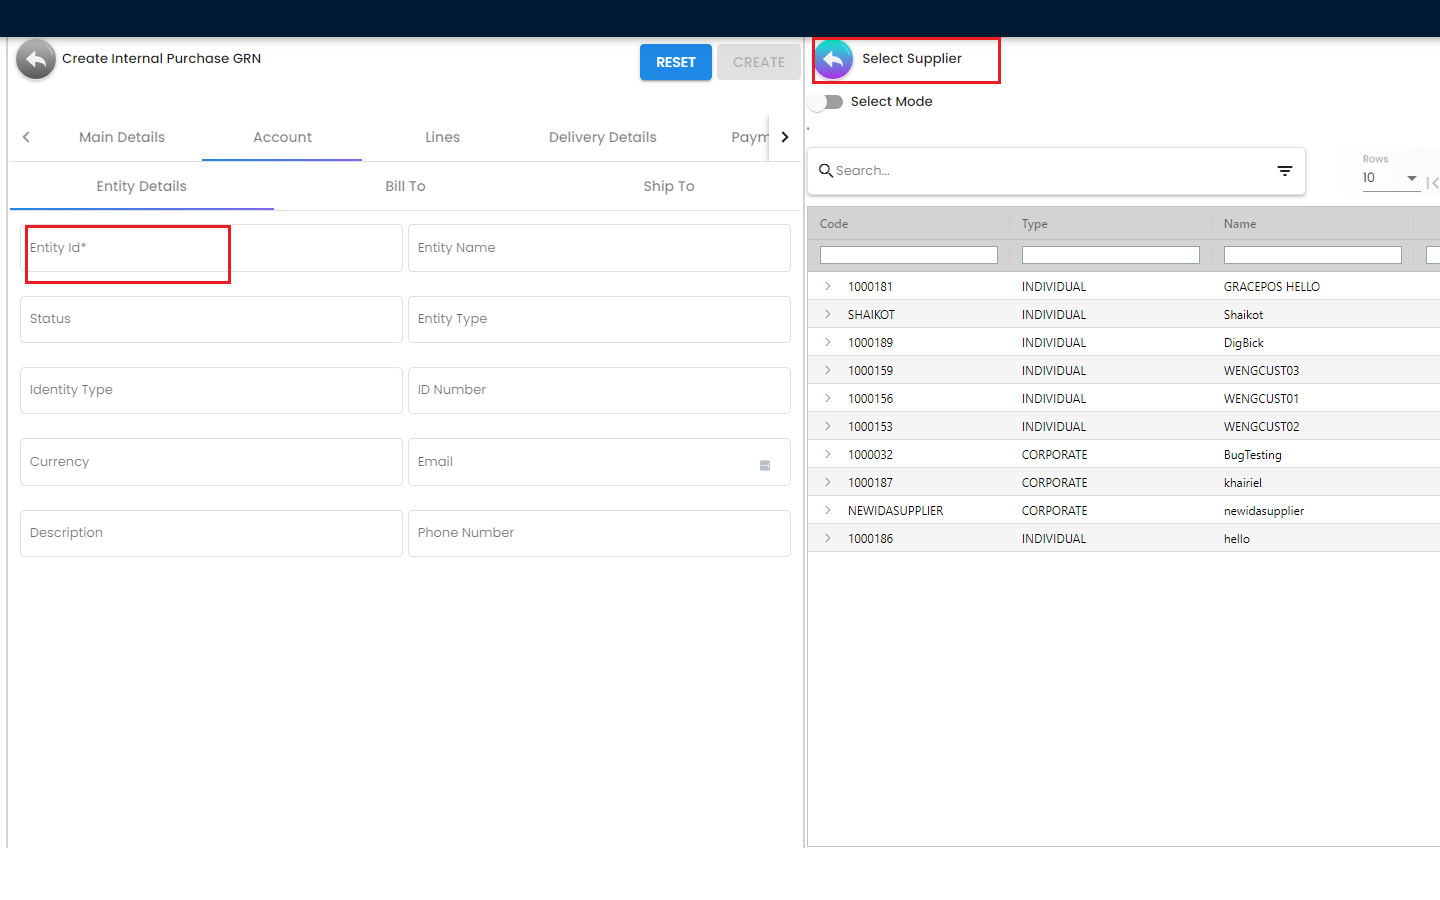
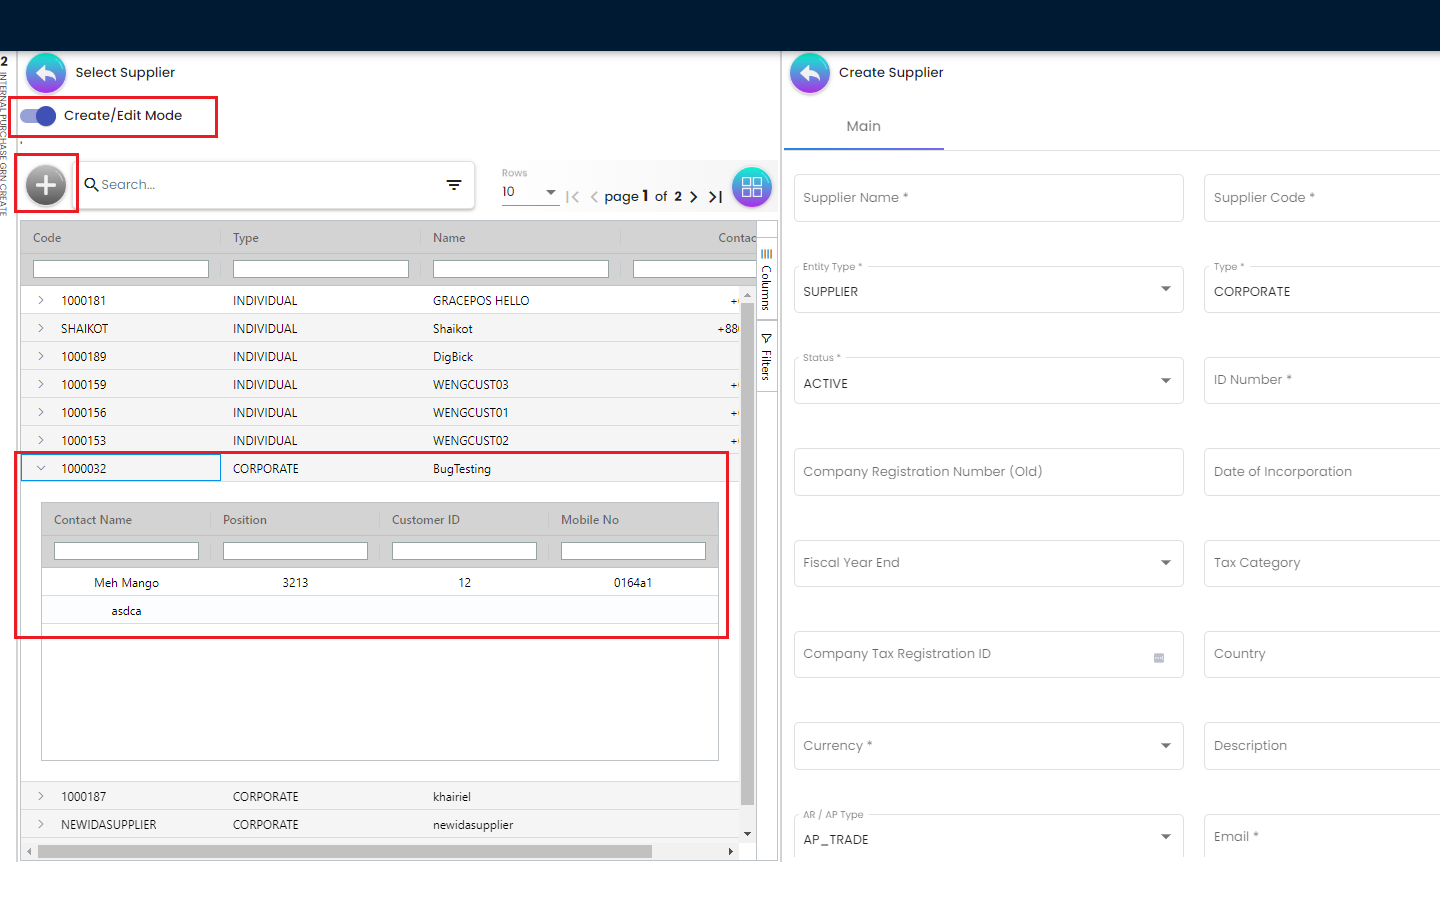
Once the users click on the “Entity Id” field, they will be able to see the list of the existing Suppliers. From the “Select Supplier” page the users can select an existing supplier or else they can create a new Supplier by toggling the ‘Select Mode”. Each of the Supllier got different Contacts in a Tree Structure and the Supplier list is basically coming from the Supplier Maintenance Applet. If the users create a new Supplier from the “Select Mode”, it will sync back to the Supplier Maintenance Applet. Once the Supplier has been selected, the fields from the “Entity Details” Tab will be automatically filled in accordingly. The users will also be able to view the other credible attributes about the Supplier by clicking on the Supplier details row
Bill To
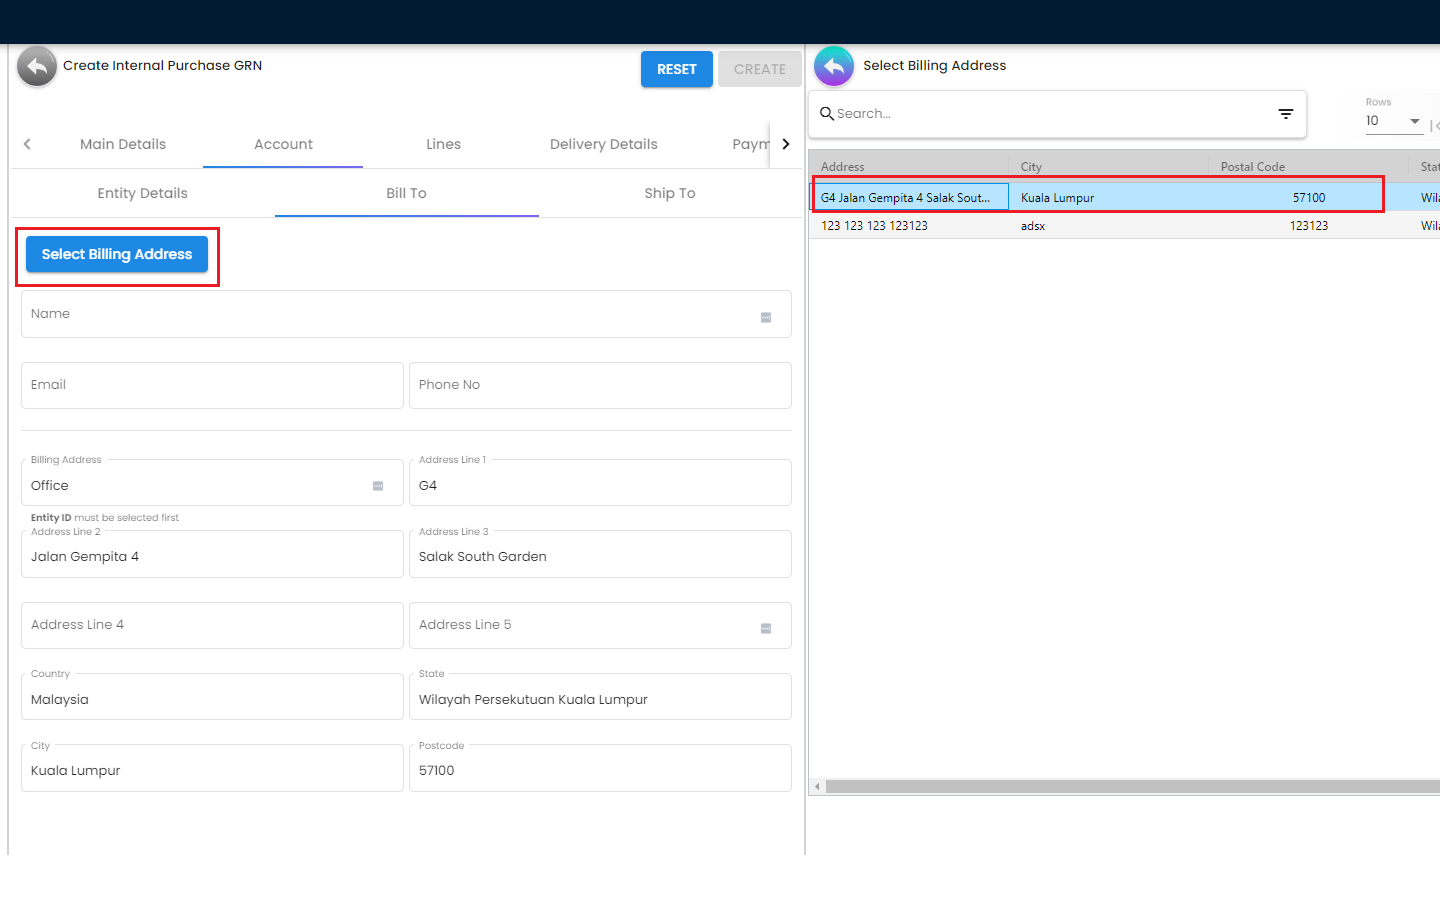
The Bill To Tab represents the Billing details and the subsequent fields will be automatically filled in once a Supplier/Billing Address has been selected. Name, Email and Phone No will be Autofill after users have selected the Entity ID. If only 1 Billing Address exists in that Entity ID, the Billing Address will auto-populate after selecting the Entity ID. List of Billing Addresses will be displayed on the right side for selection after clicking on the Billing Address.
-
Name
-
Email
-
Phone No
-
Billing Address
-
Address Line 1
-
Address Line 2
-
Address Line 3
-
Address Line 4
-
Address Line 5
-
Country
-
State
-
City
-
Postcode
Ship To
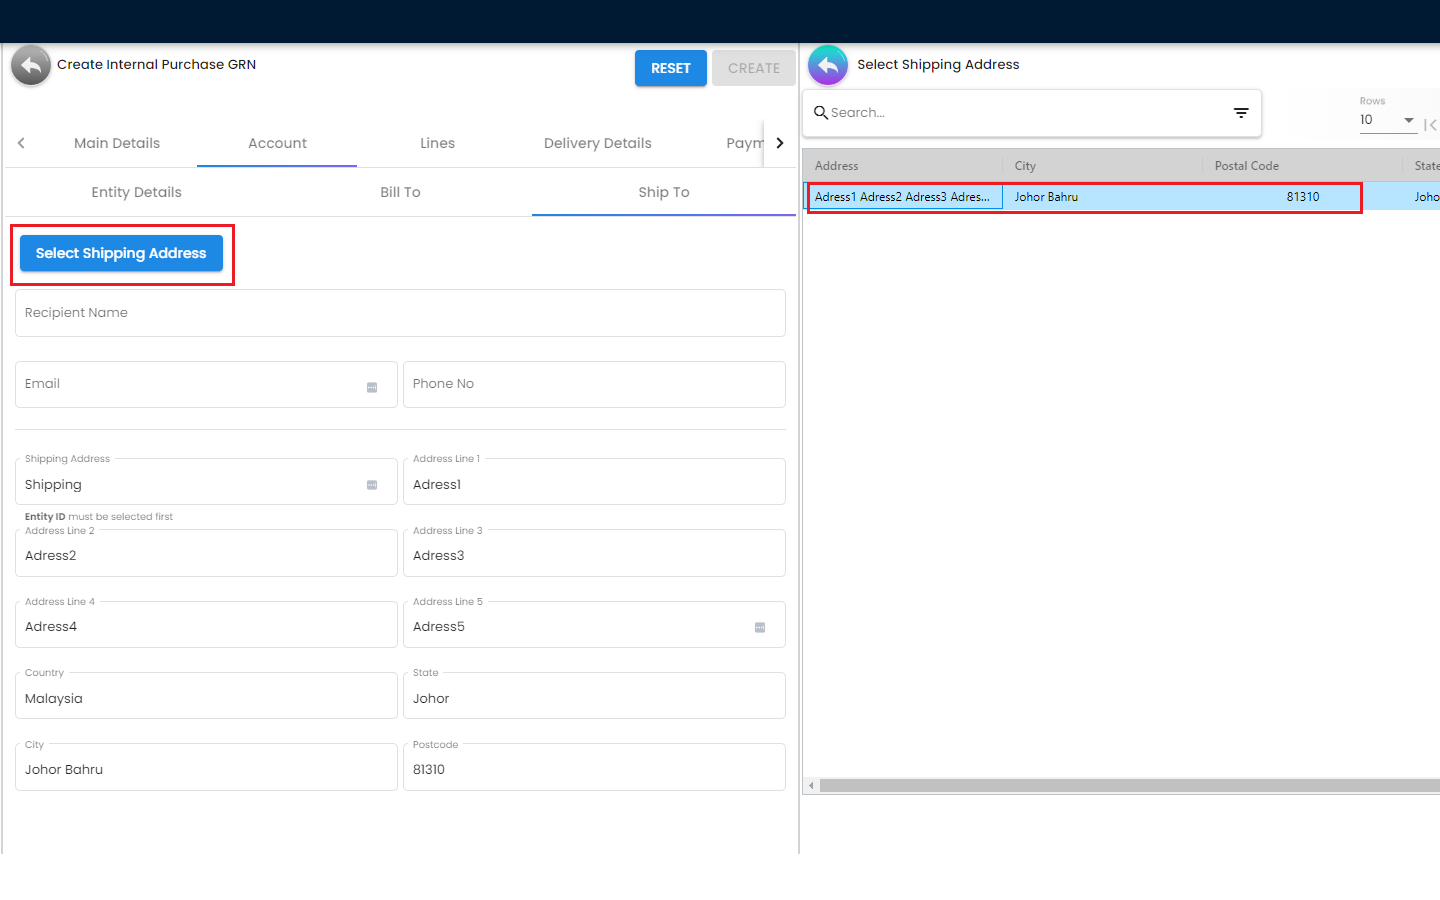
Similar to the “Bill To” Tab, the “Ship To” Tab will be also automatically filled in accordingly. If only 1 Shipping Address exists in that Entity ID, the Shipping Address will auto-populate after selecting the Entity ID. List of Shipping Addresses will be displayed on the right side for selection after clicking on the Select Shipping Address.
-
Recipient Name
-
Email
-
Phone No
-
Shipping Address
-
Address Line 1
-
Address Line 2
-
Address Line 3
-
Address Line 4
-
Address Line 5
-
Country
-
State
-
City
-
Postcode
4.1.2.3 Create Purchase GRN - Lines Tab
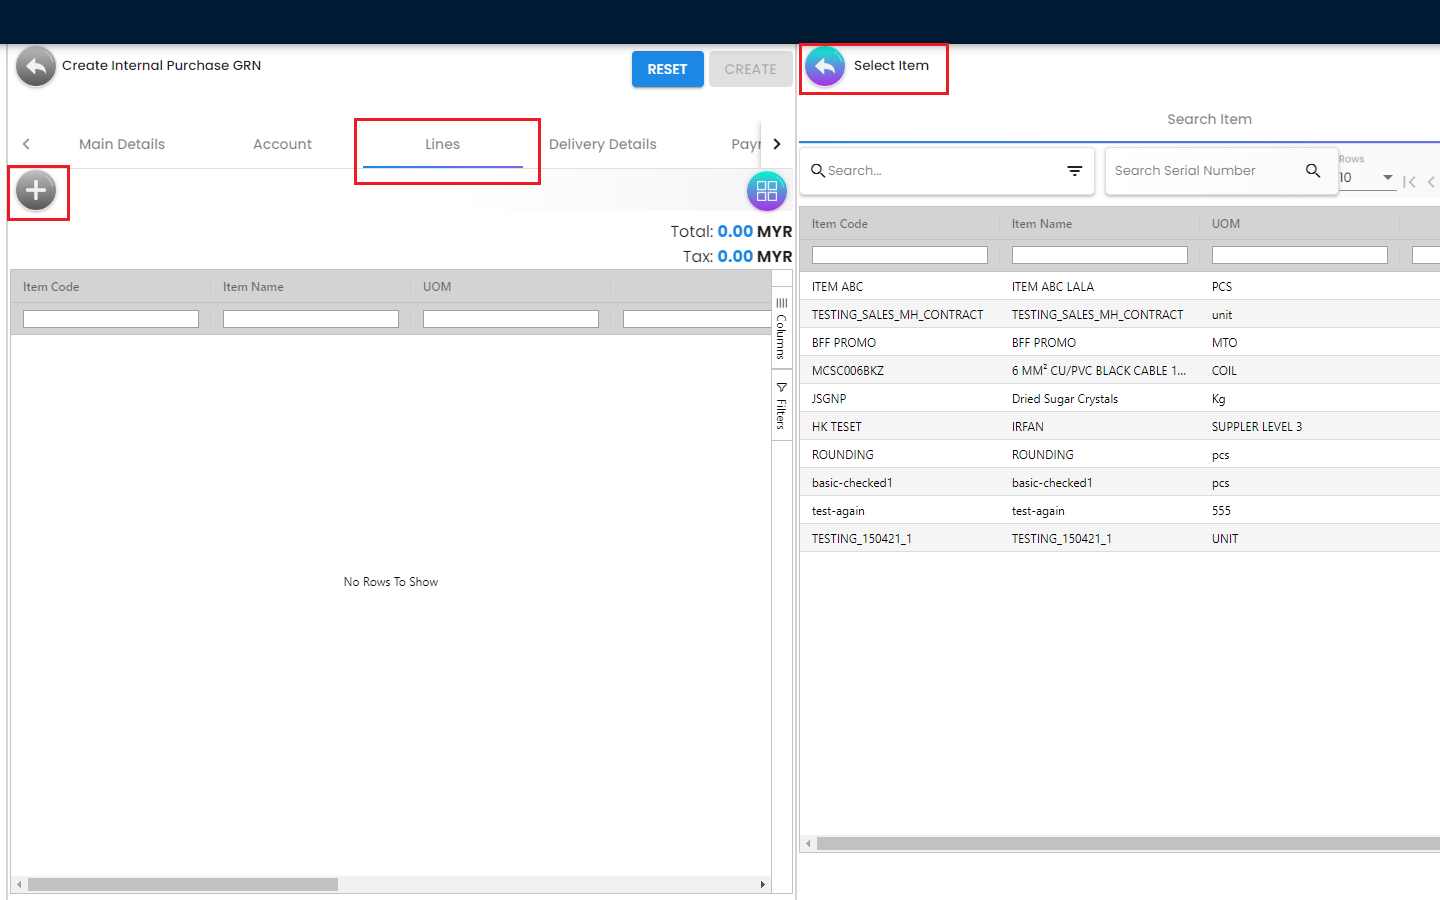
From the Lines Tab, the users can select the items that they wanna mark as received under a particular Purchase GRN. The users need to click on the “+” icon to see the item listing. These items are coming from the Doc Item Maintenance Applet. There’s another sub tab under the Lines Tab.
Search Item
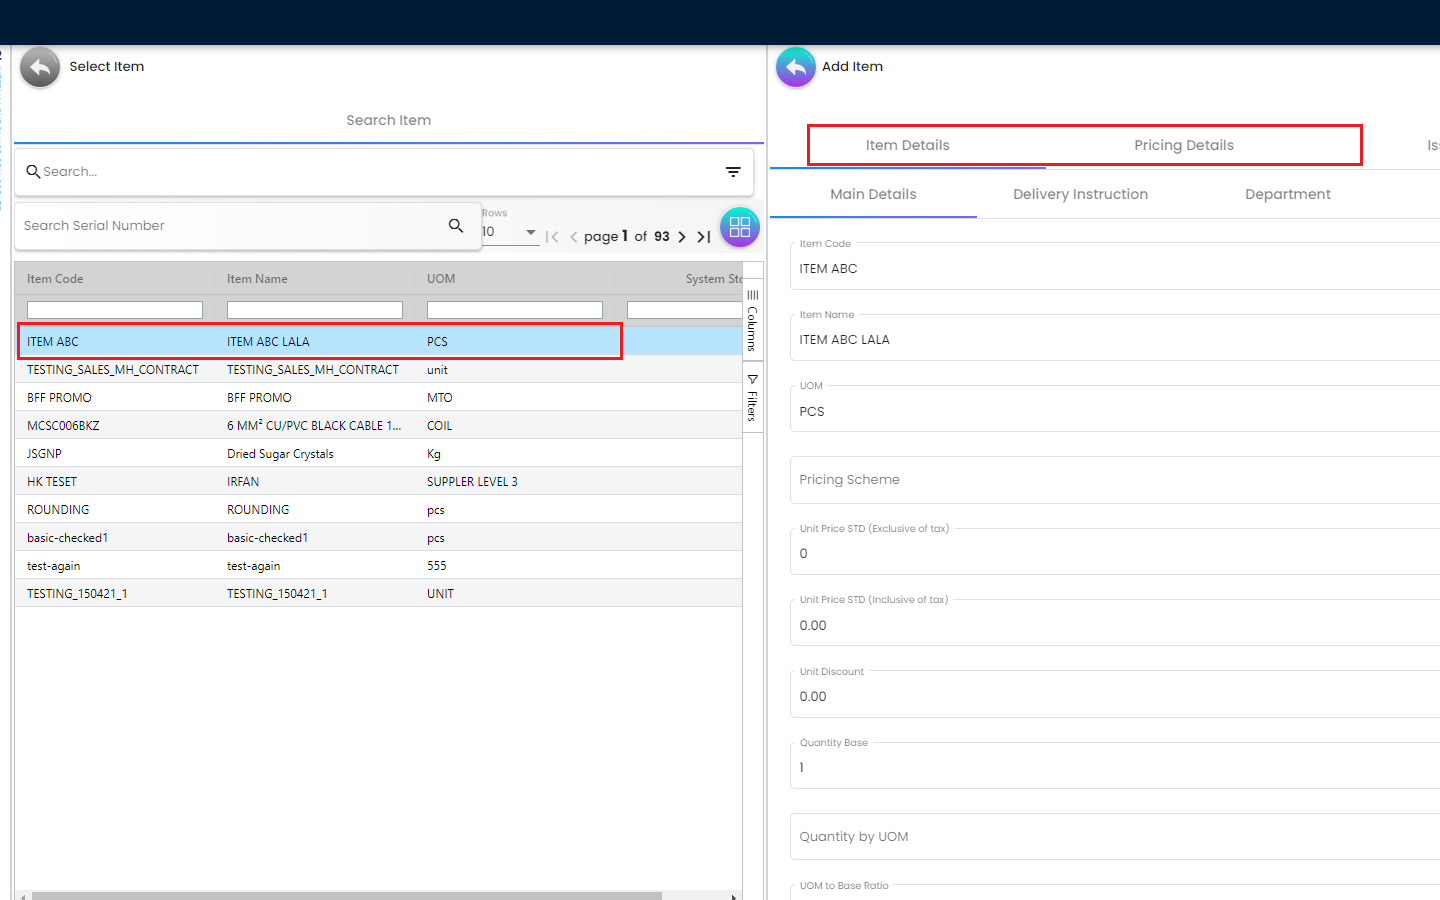
In the Search Item Sub Tab, once the users click on any particular item, the users will be able to see the following tabs under the Search Item Tab Item details Pricing Details ** Issue Link
The price details are coming from the Purchase Order reference No. Purchase GRN is linked with Purchase Order. Purchase GRN can be knocked off with another document for example Purchase Order. Purchase Order and GRN Knock off configuration can be estbalished using the Organization Applet for any particular company. Same goes to the Knock off from GRN to Purchase Invoice configuration.
More details regarding the “Lines Tab” will be discussed in the next section of this document [4.2 Line Items]
4.1.2.4 Create Purchase GRN - Delivery Details Tab
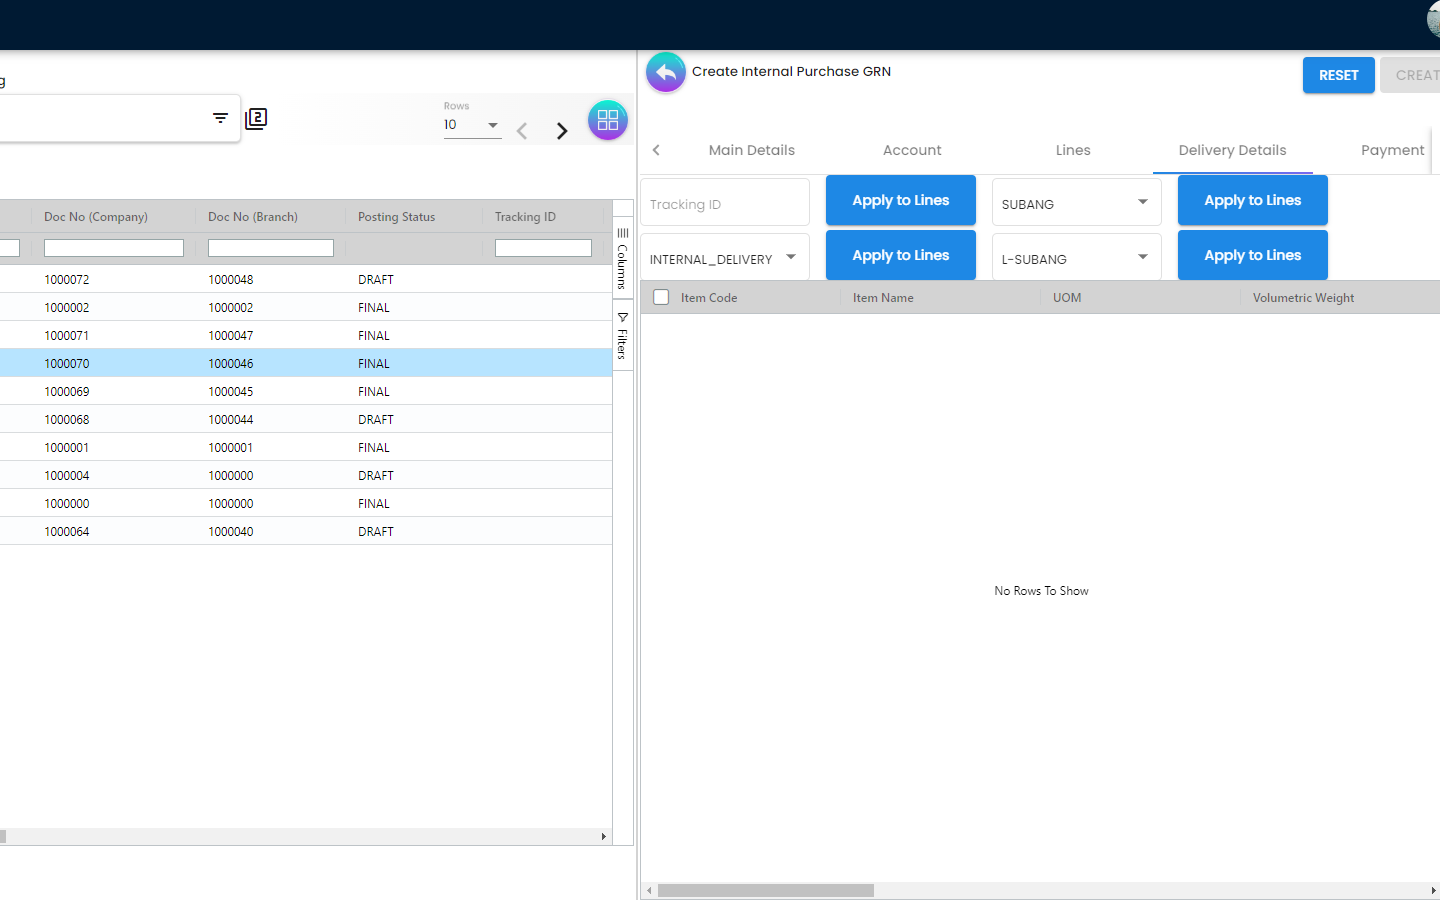
The Delivery Details Tab basically represents the delivery information with the following details and any Delivery created under the Delivery Installation Applet for this particular Purchase GRN will be dsiaplyed as below
-
Item Code
-
Item Name
-
UOM
-
Volumetric Weight
-
Weight
-
Requested Delivery Date
-
Require Delivery
-
Delivery Type
-
Base Quantity
-
Tracking ID
-
Delivery Branch
-
Delivery Location
-
Delivery Region
-
Delivery Remarks
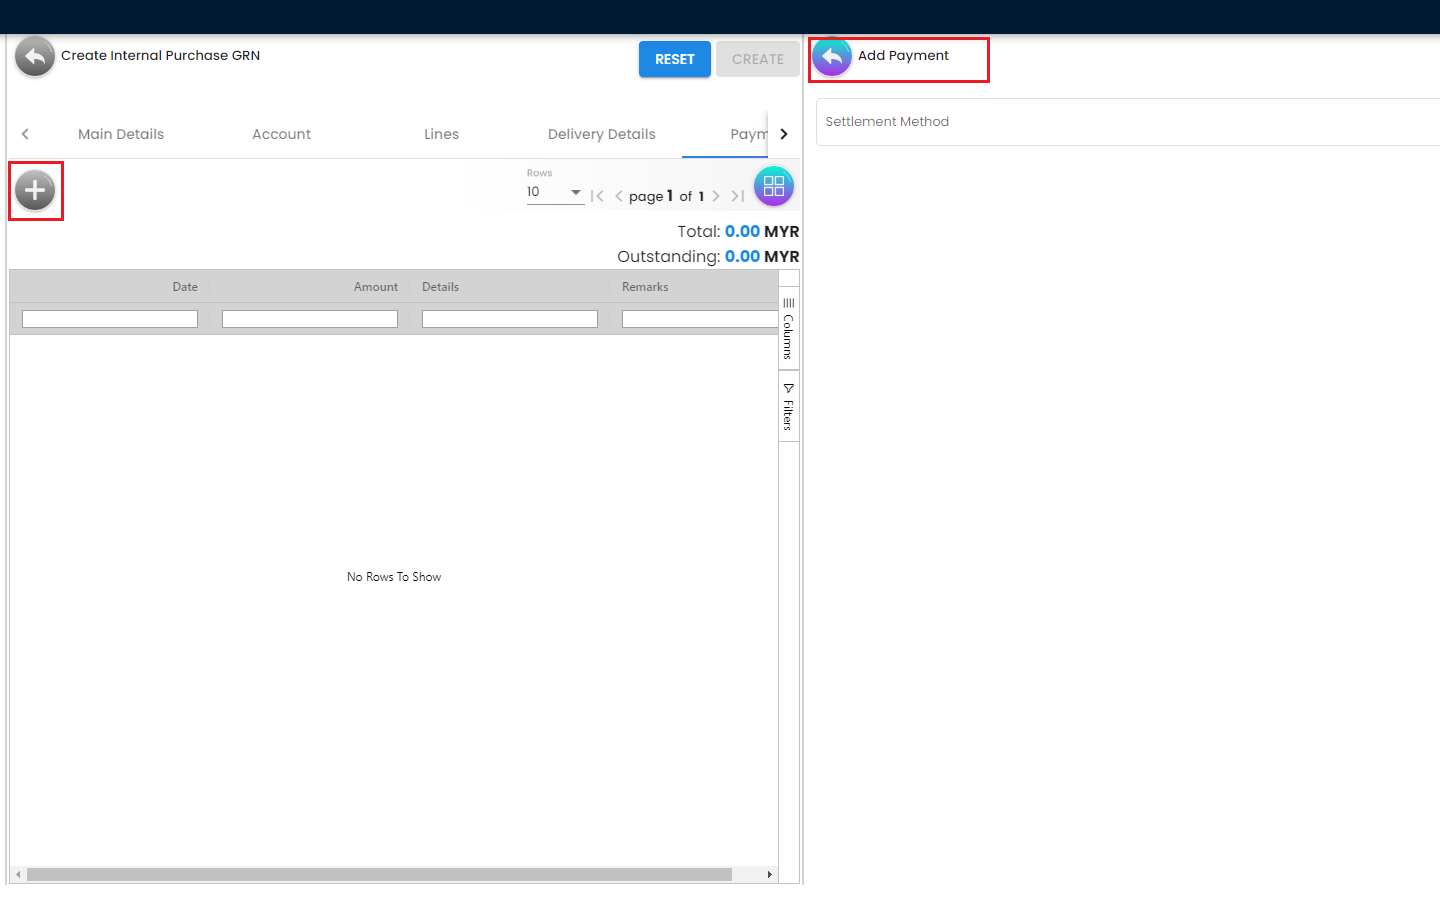
4.1.2.5 Create Purchase GRN - Payment Tab
The Payment Tab can be used for making a payment for any particular Purchase GRN. The users can click on the “+” icon to Add Payment and then the users will be able to select the Settlement Method from the dropdown list. The required fields will be dynamic based on the selection made by the users for the Settlement Method. The Users can choose different settlement method such as Cash, Credit Card, Grab Payment, Voucher, Online Transfer, Cheque etc. Users will also be able to add a new settlement method in the Cashbook Applet