4.0 Purchase Order
4.1 Purchase Order Listing
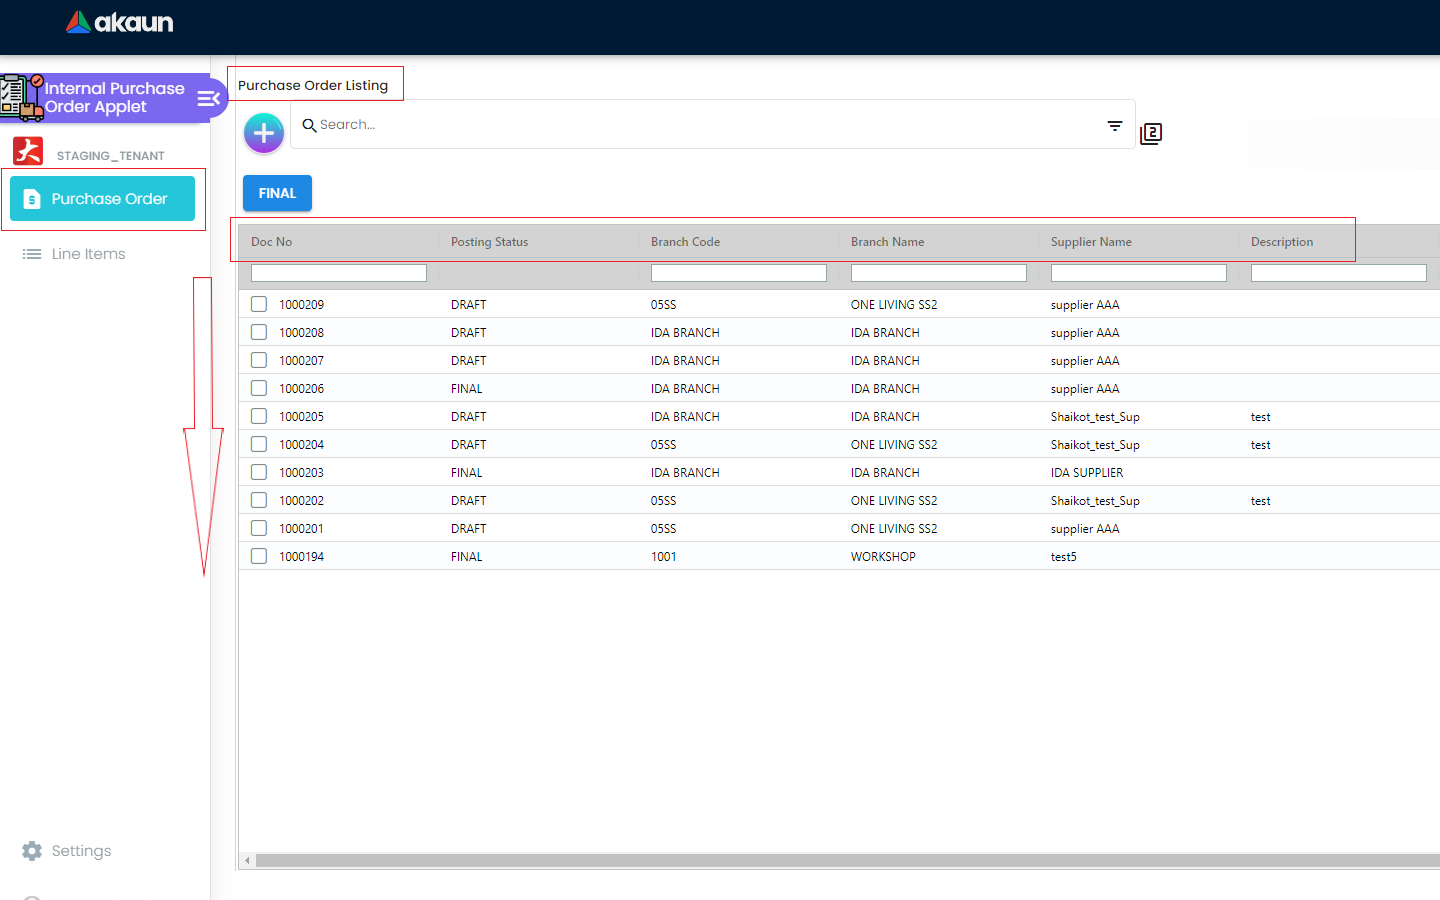
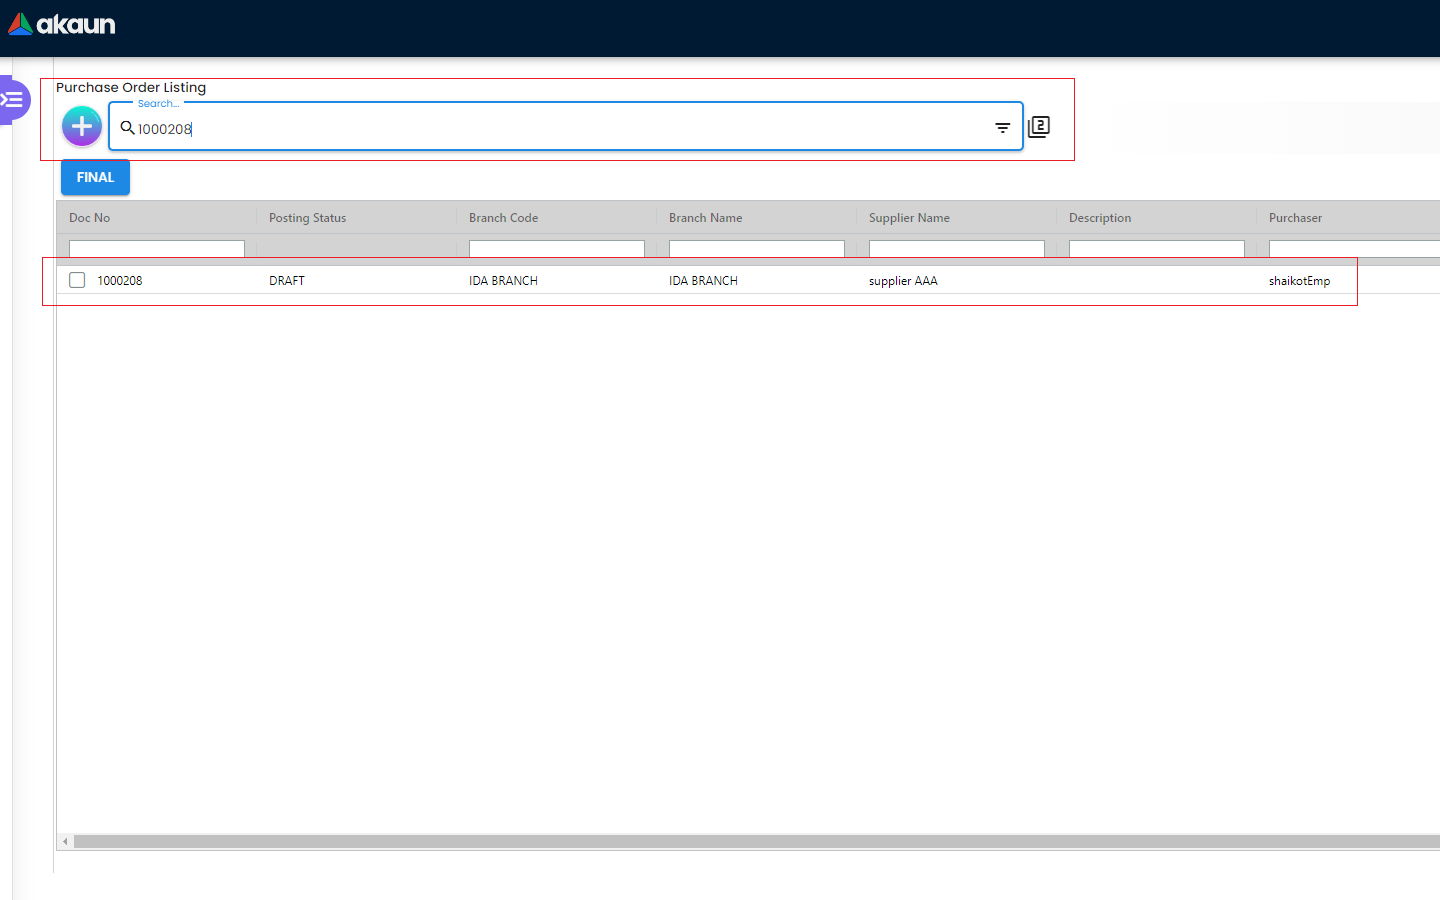
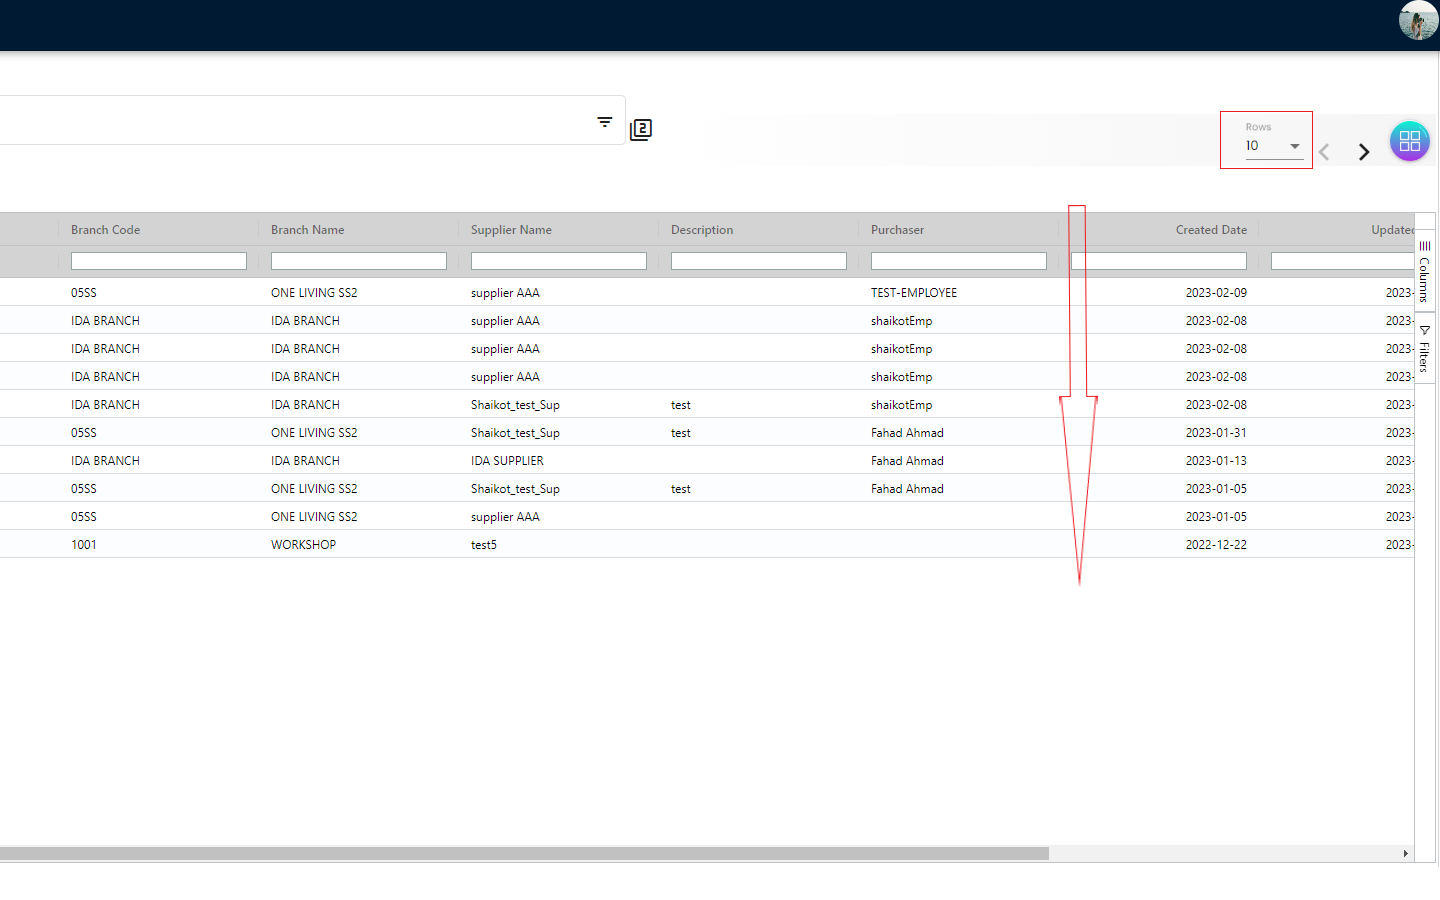
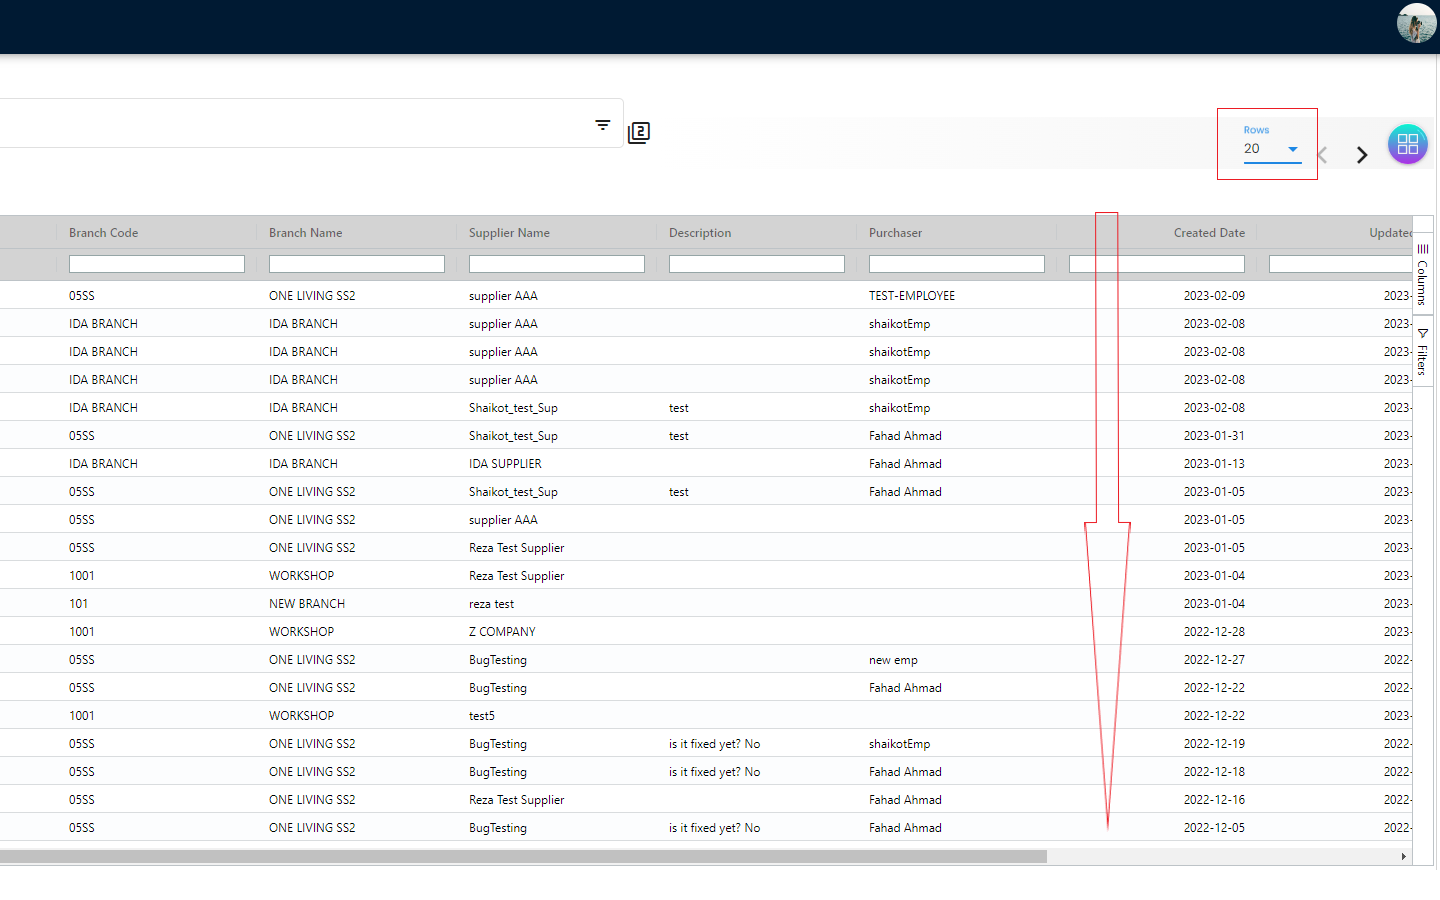
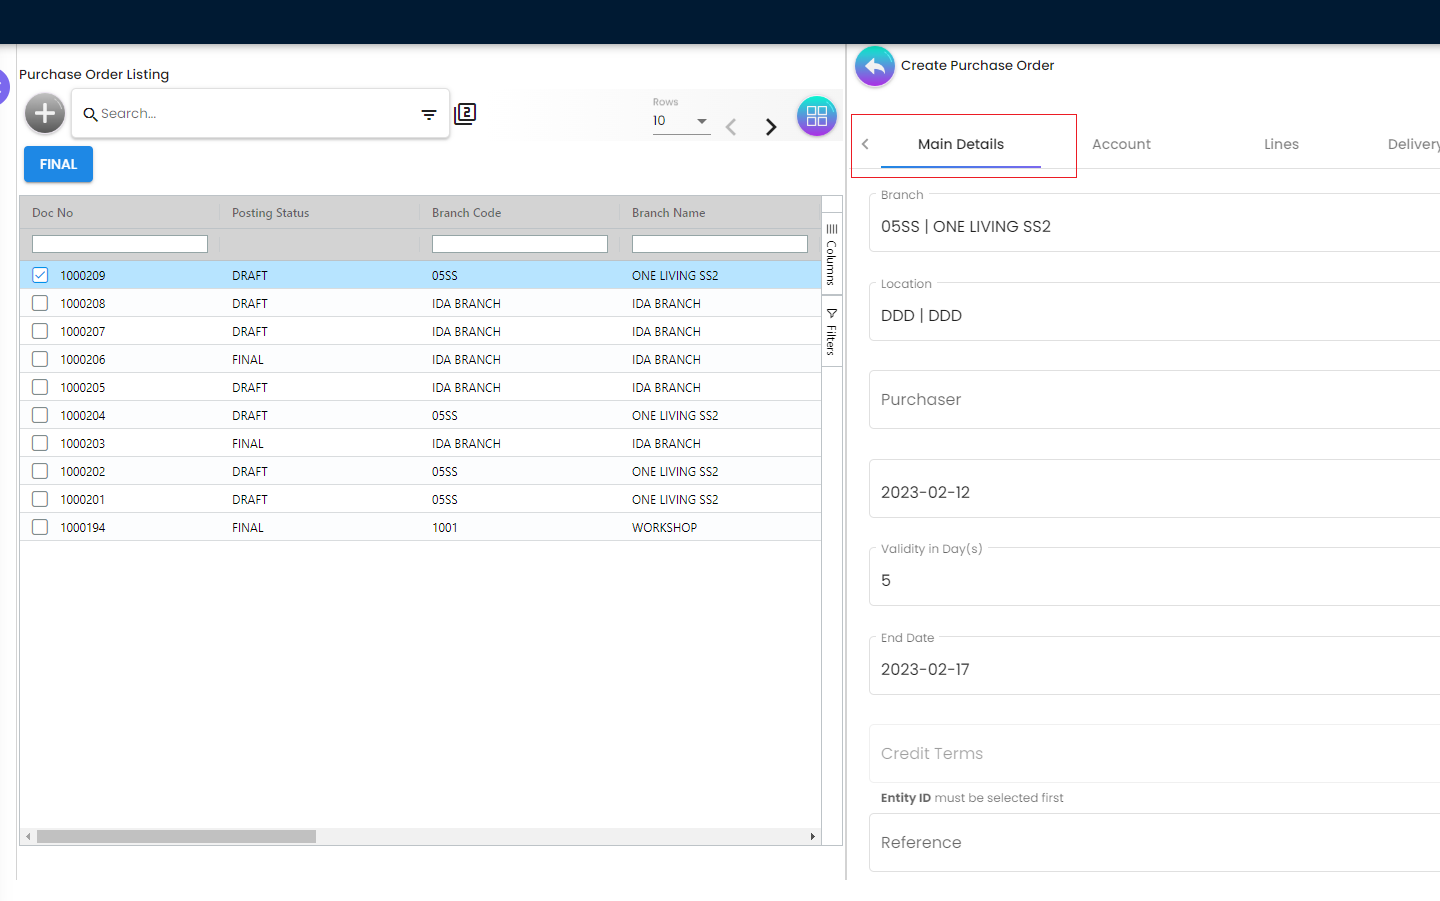
The Purchase Order is used for an entity to order items from their suppliers. The Purchase Order Listing Page basically displays all of the previously created Purchase Orders with the following details
-
Doc No [Document number/PO number]
-
Posting Status [The status of the PO]
-
Branch Code
-
Branch Name
-
Supplier Name
-
Description
-
Purchaser [Name of the Purchaser]
-
Created Date
-
Updated Date
-
Transaction Date
-
Created By
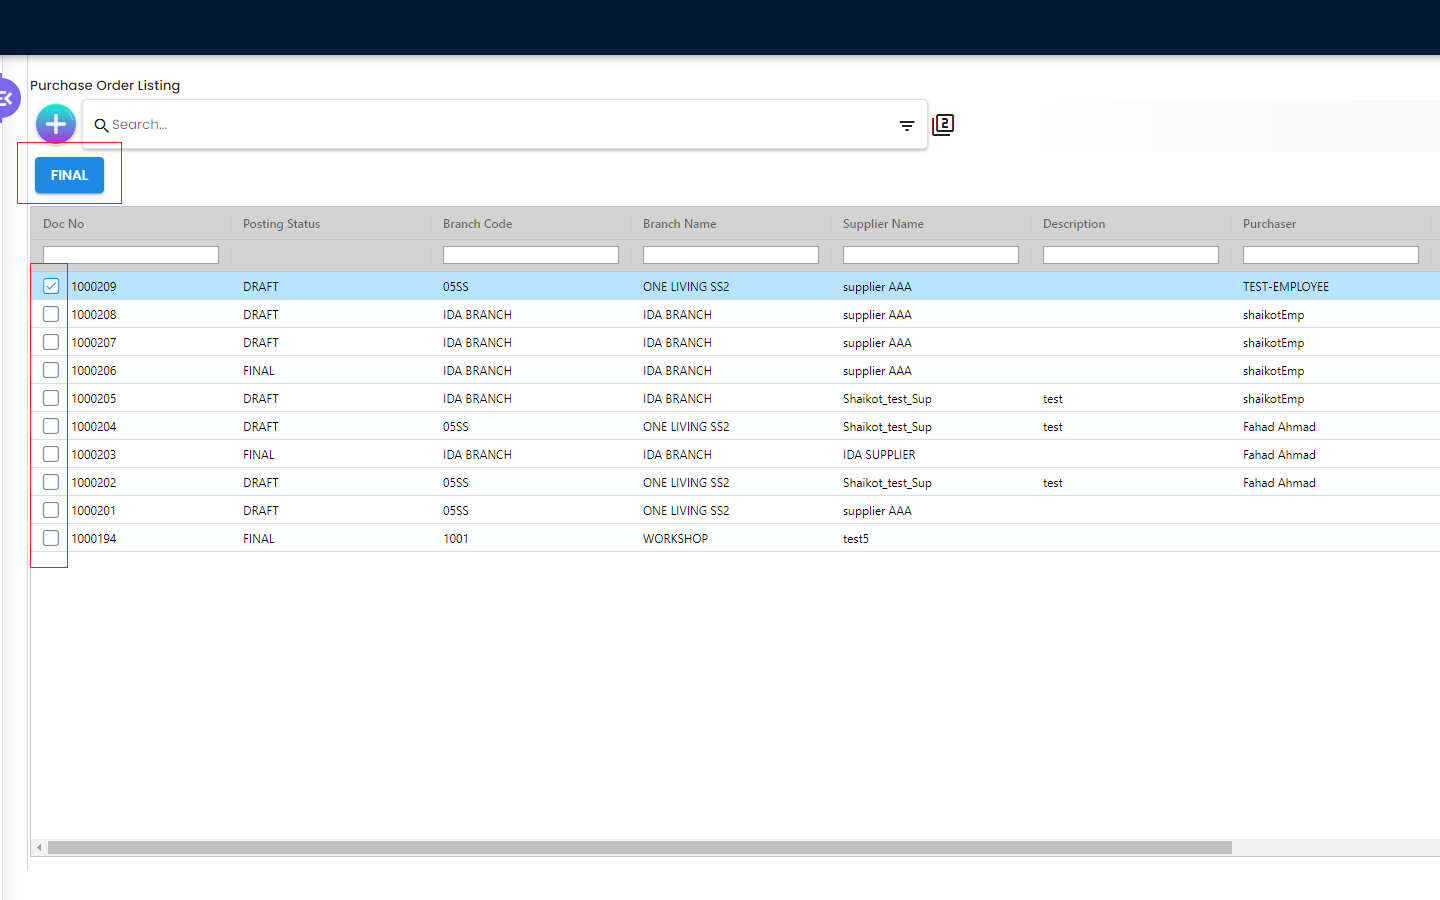
The users are able to select any previously created Purchase Order and change the status to “FINAL” once everything is finalized for that particular Purchase Order. Once the Posting Staus has been changed to FINAL, the Supplier and some of the other main details are not editable anymore. We will discuss these things in more details in the later sections of this document.
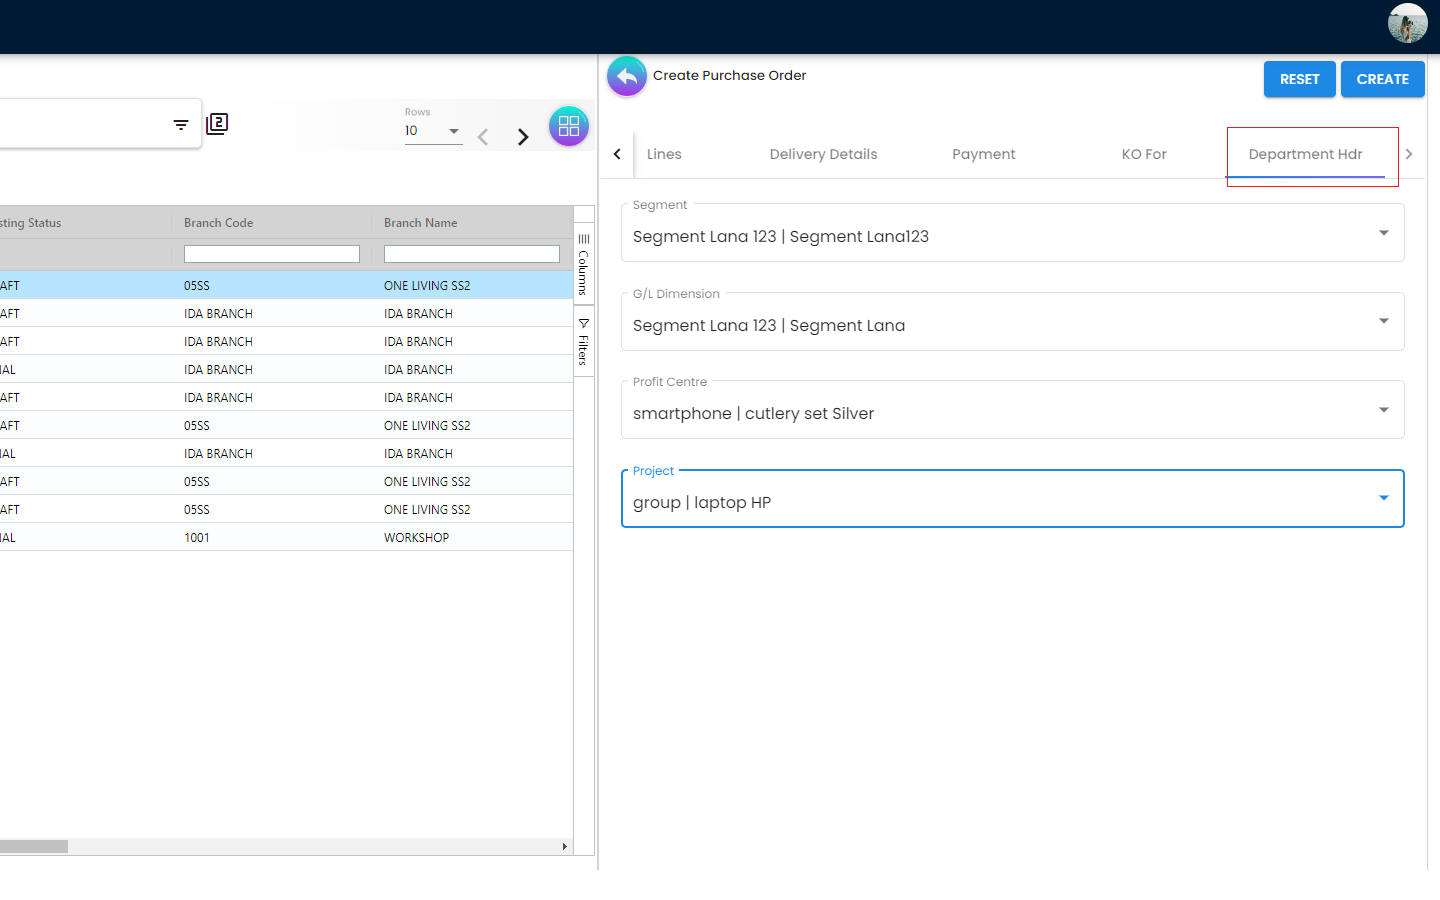
4.2 Create Purchase Order
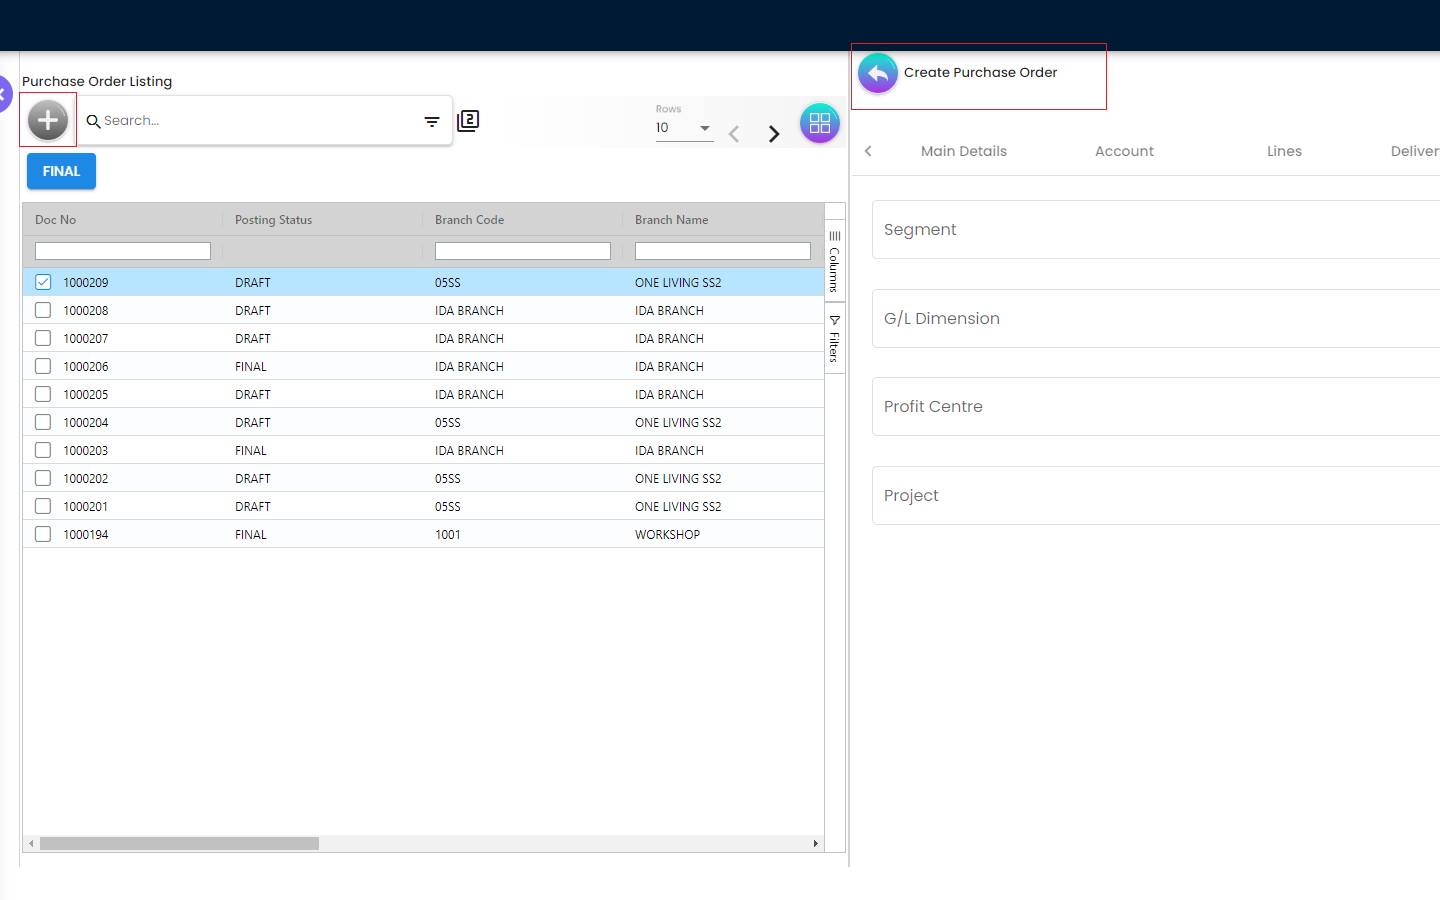
In order to create a Purchase Order, the users need to click on the “+” icon and they will be redirected to the “Create Purchase Order” Page. Then the users need to fill in the required information in different tabs for creating a Purchase Order. While filling in the information, the users can Save those or click on the Reset if there’s any mistakes. The users need to go through the following tabs while creating a new Purchase Order
-
Main Details
-
Account
-
Lines
-
Delivery Details
-
Payment
-
KO For
-
Department Hdr
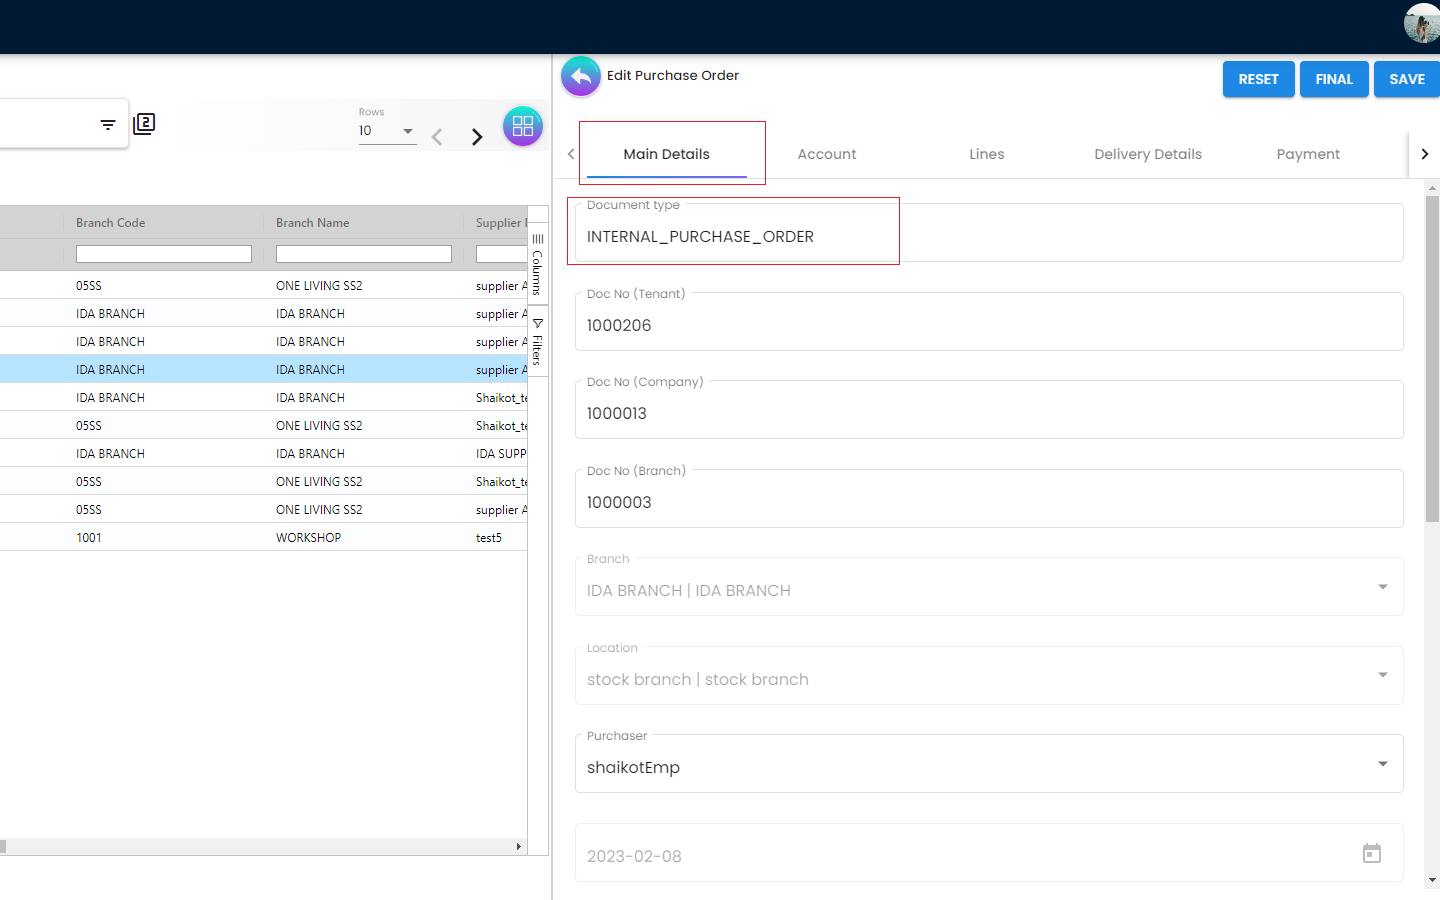
4.2.1 Create Purchase Order - Main Details Tab
There are several fields in the Main Details Tab and all these fields are having 1 to 1 relationship with the Purchase Order. The required fields are as follows
-
Branch - Will populate default branch according to the branch selected in the setting
-
Location - Will populate default location if branch according to the branch selected in the setting
-
Purchaser - Add new purchaser in Customer Maintenance Applet
-
Date - Default to the current date Validity in Day(s) [Numeric]
-
End Date
-
Credit Terms [Dropdown and Entity ID must be selected first]
-
Reference [Free text]
-
Remarks [Free text]
-
Permit No
-
Currency [Dropdown]
-
Tracking ID
Once the users choose the Branch, the Location will be followed by the Branch selection and it will follow the overall settings in the Organization Applet. The Purchaser dropdown list is coming from the Employee Applet
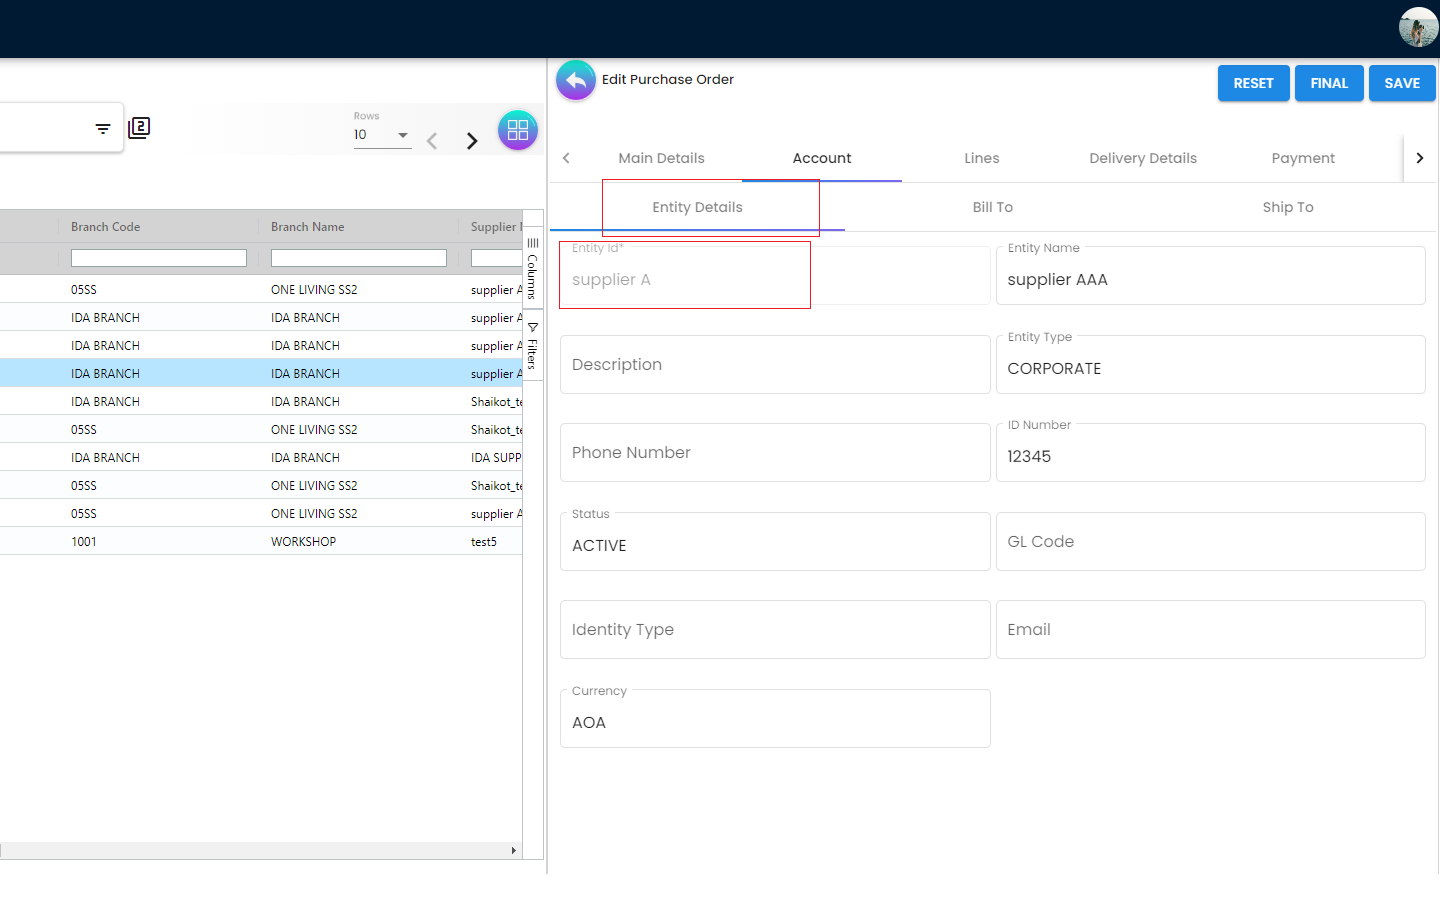
4.2.2 Create Purchase Order - Account Tab

The Account Tab is basically where a user can link the Purchase Order with a Supplier. The Accounts tab has the following Sub Tabs
Entity Details
-
Entity ID: Supplier Code, auto-filled when a Supplier entity is selected.
-
Entity Name: Supplier Name, auto-filled when a Supplier entity is selected.
-
Description: Additional notes. Auto-filled when a Supplier entity is selected.
-
Entity Type: Corporate or Individual. Auto-filled when a Supplier entity is selected.
-
Phone Number: A central phone number through which Supplier want to communicate. Auto-filled when a Supplier entity is selected.
-
ID Number: IC or Passport number, auto-filled when a Supplier entity is selected.
-
Status: Active or Inactive. Auto-filled when a Supplier entity is selected.
-
GL Code: A number used to record business transactions in the general ledger. Auto-filled when a Supplier entity is selected.
-
Identity Type: IC or Passport, auto-filled when Supplier entity is selected.
-
Email: A central email through which Supplier want to communicate. Auto-filled when a Supplier entity is selected.
-
Currency: To determine based on the pricing condition what you are maintaining. Auto-filled when a Supplier entity is selected.
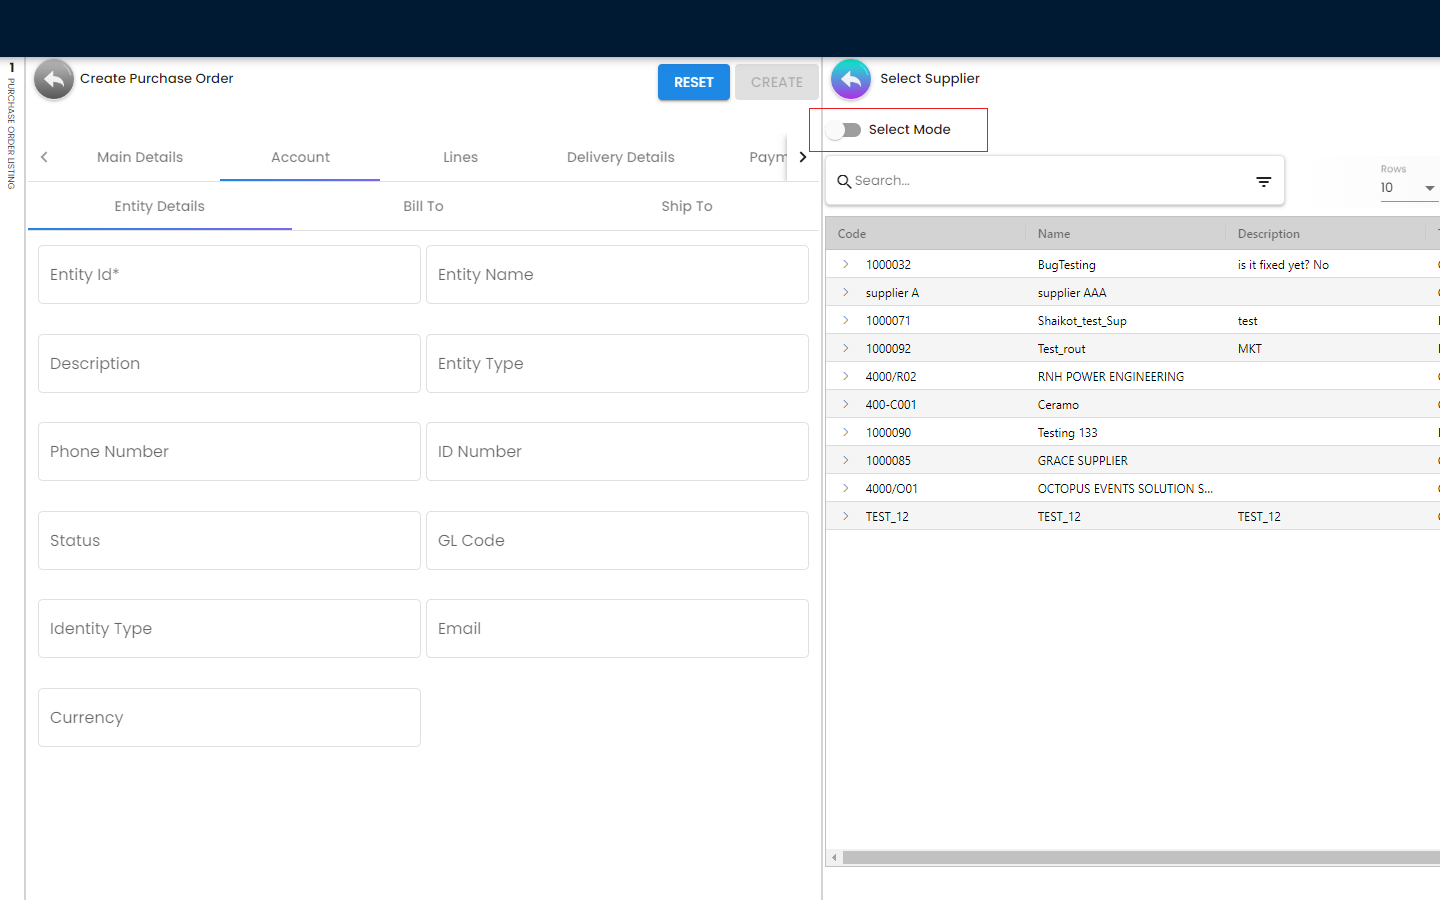
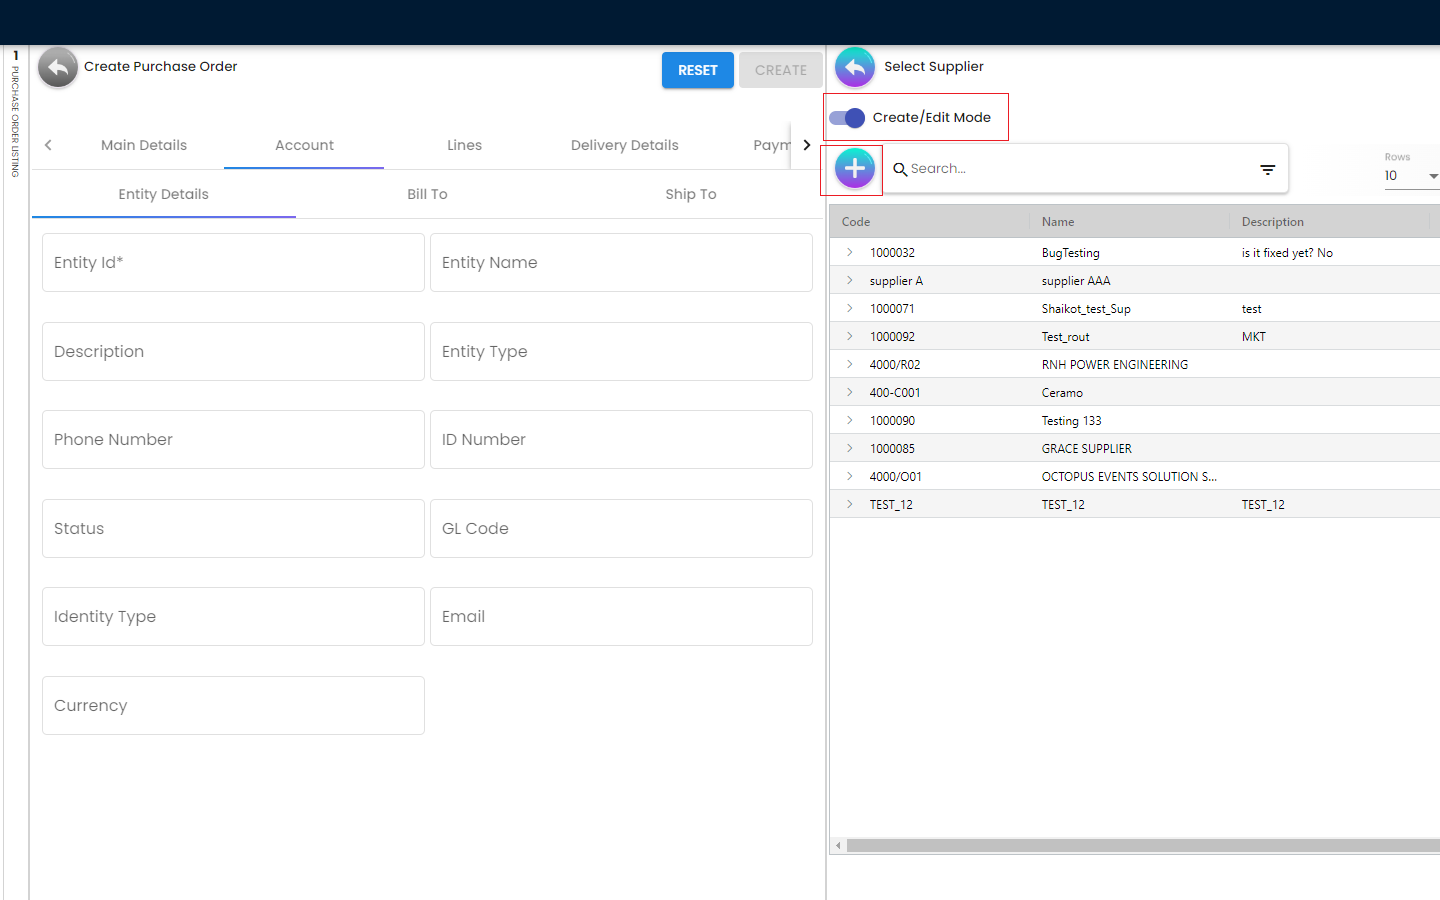
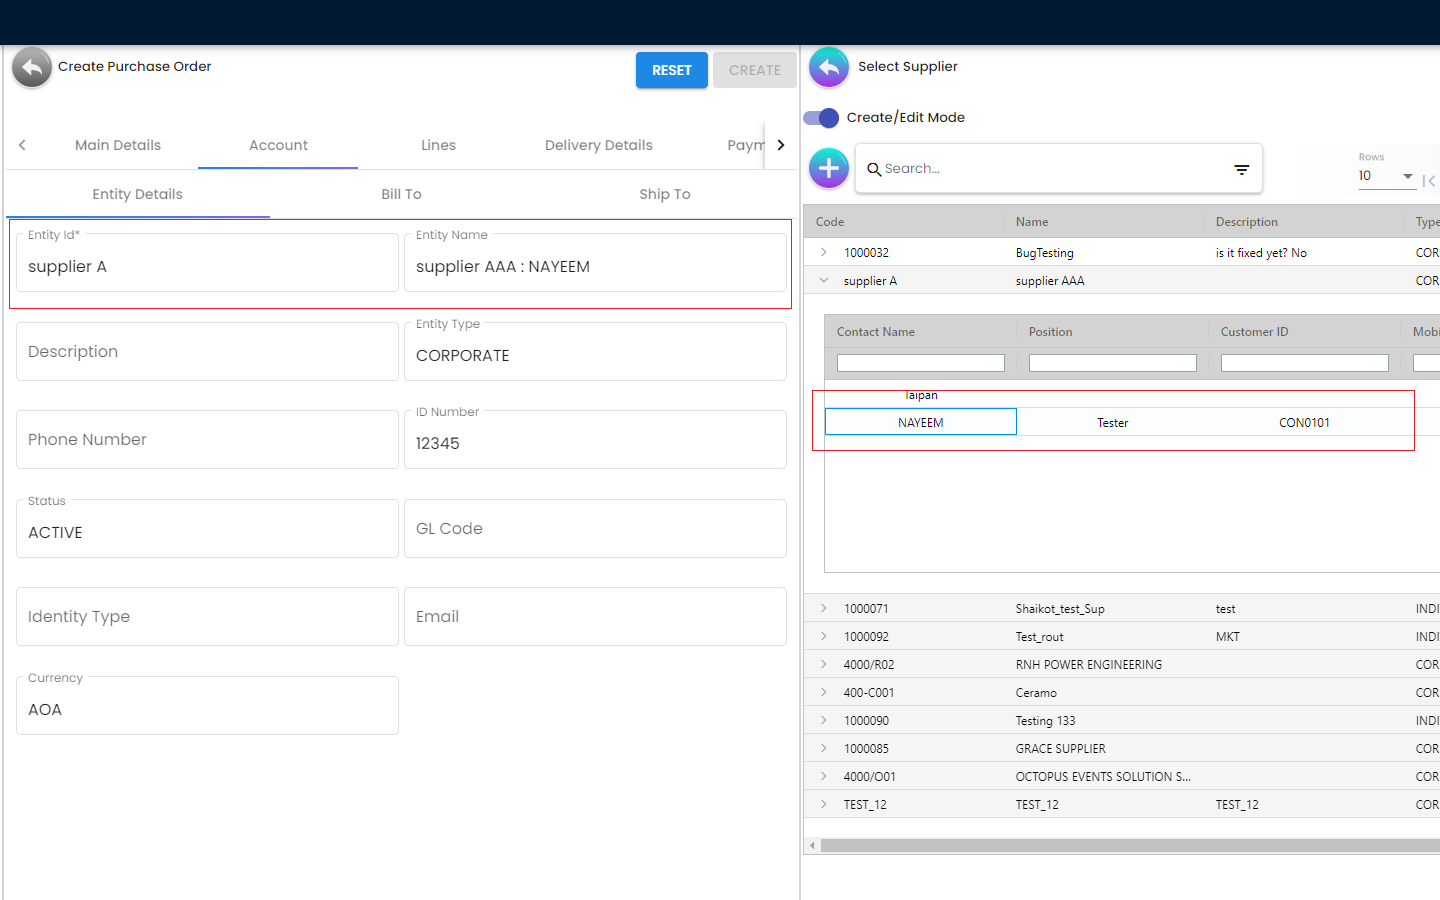
Once the users click on the “Entity Id” field, they will be able to see the list of the existing Suppliers. From the “Select Supplier” page the users can select an existing supplier or else they can create a new Supplier by toggling the ‘Select Mode”. Each of the Supllier got different Contacts in a Tree Structure and the Supplier list is basically coming from the Supplier Maintenance Applet. If the users create a new Supplier from the “Select Mode”, it will sync back to the Supplier Maintenance Applet. Once the Supplier has been selected, the fields from the “Entity Details” Tab will be automatically filled in accordingly. The users will also be able to view the other credible attributes about the Supplier by clicking on the Supplier details row
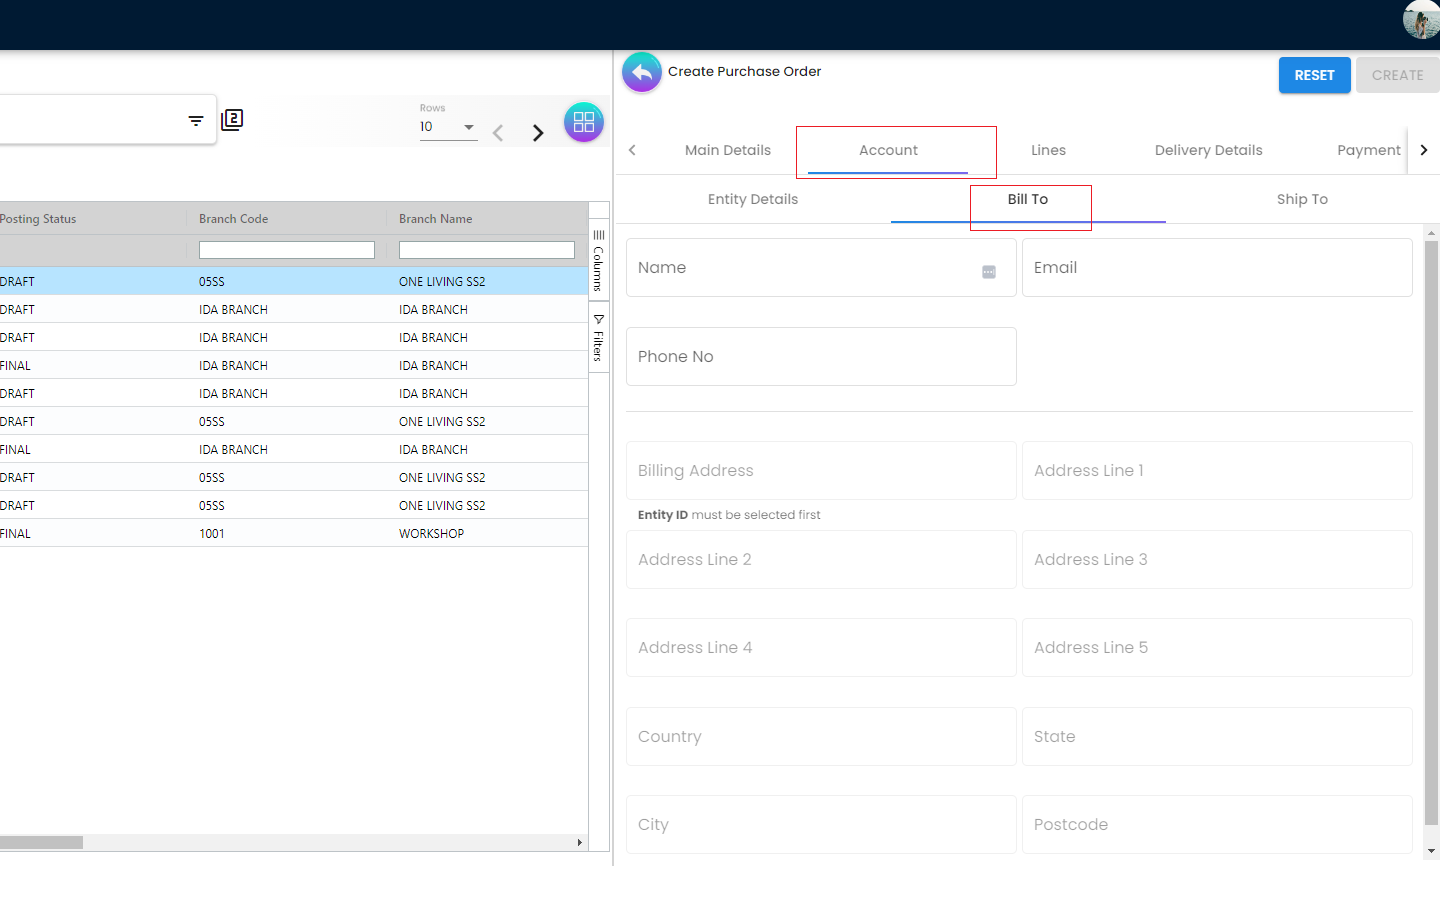
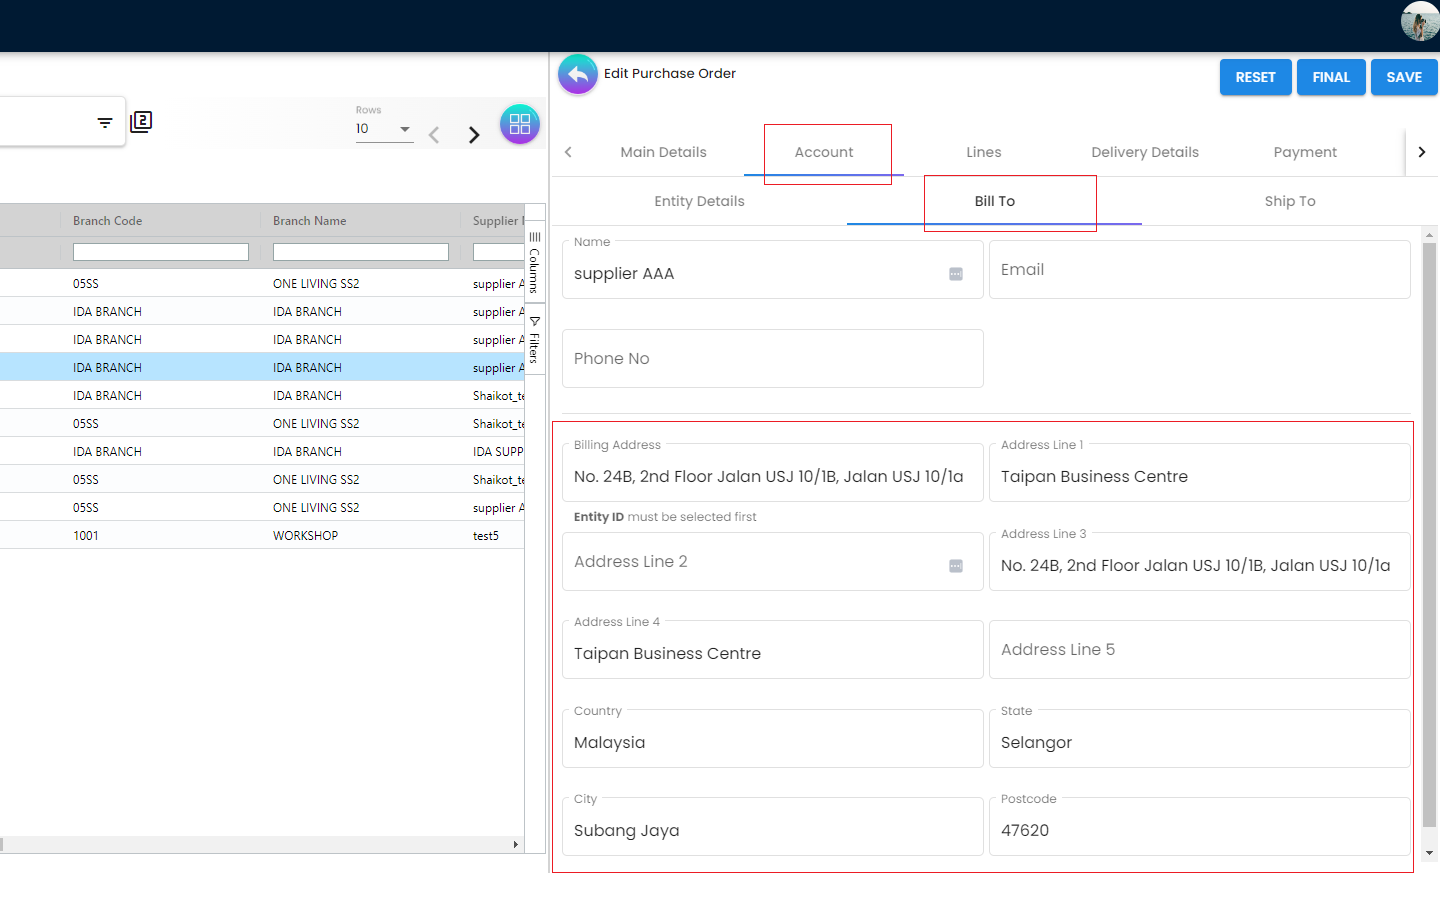
Bill To
The Bill to Tab represents the Billing details and the subsequent fields will be automatically filled in once a Supplier has been selected. Name, Email and Phone No will be Autofill after users have selected the Entity ID. If only 1 Billing Address exists in that Entity ID, the Billing Address will auto-populate after selecting the Entity ID. List of Billing Addresses will be displayed on the right side for selection after clicking on the Billing Address.
-
Name
-
Email
-
Phone No
-
Billing Address
-
Address Line 1
-
Address Line 2
-
Address Line 3
-
Address Line 4
-
Address Line 5
-
Country
-
State
-
City
-
Postcode
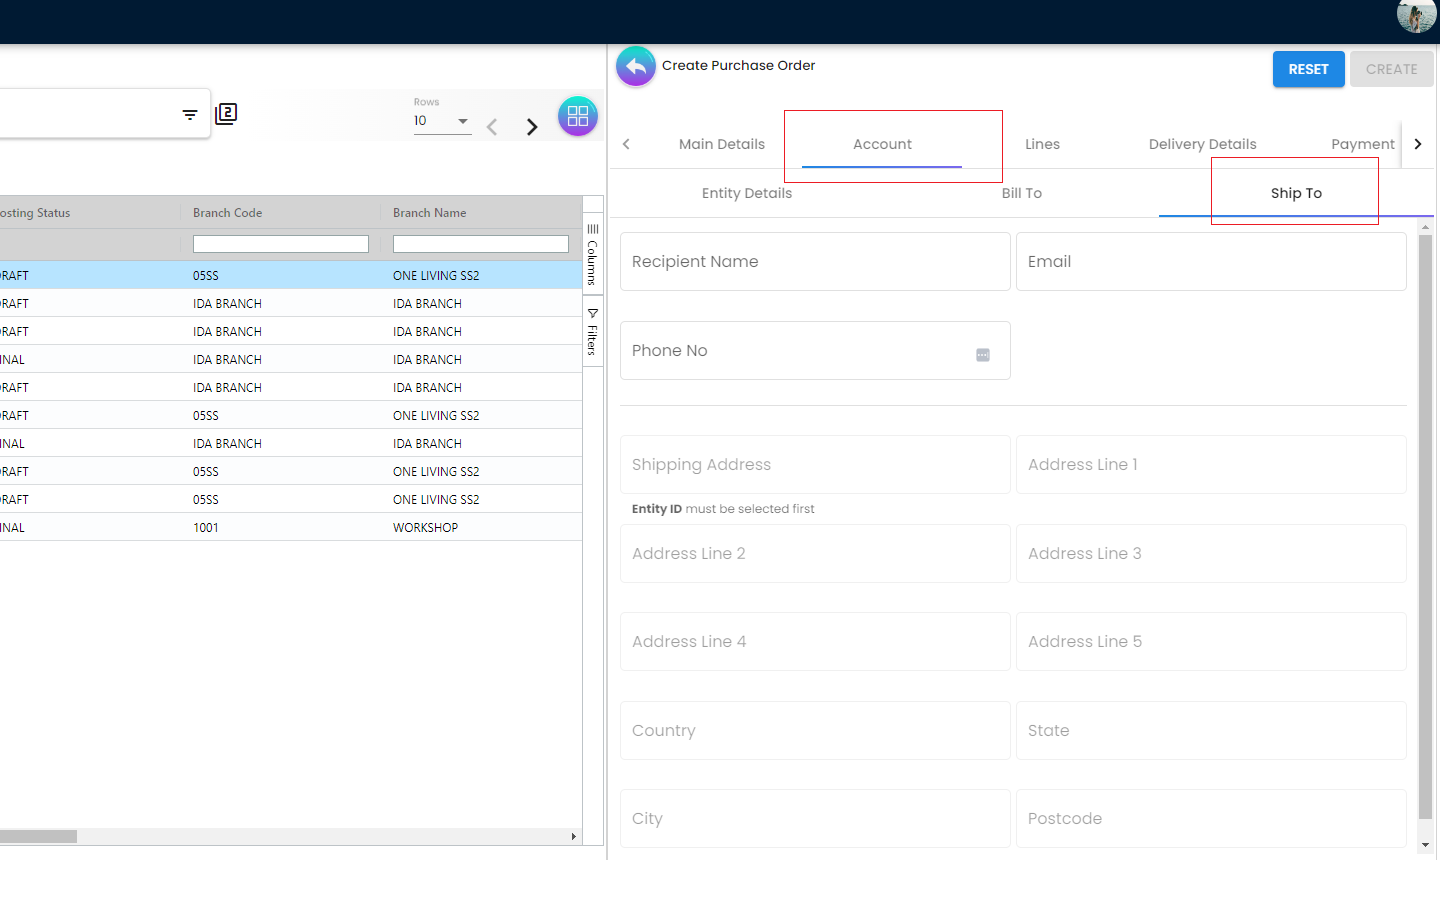
Ship To
Similar to the “Bill To” Tab, the “Ship To” Tab will be also automatically filled in accordingly.If only 1 Shipping Address exists in that Entity ID, the Shipping Address will auto-populate after selecting the Entity ID. List of Shipping Addresses will be displayed on the right side for selection after clicking on the Shipping Address.
-
Recipient Name
-
Email
-
Phone No
-
Shipping Address
-
Address Line 1
-
Address Line 2
-
Address Line 3
-
Address Line 4
-
Address Line 5
-
Country
-
State
-
City
-
Postcode
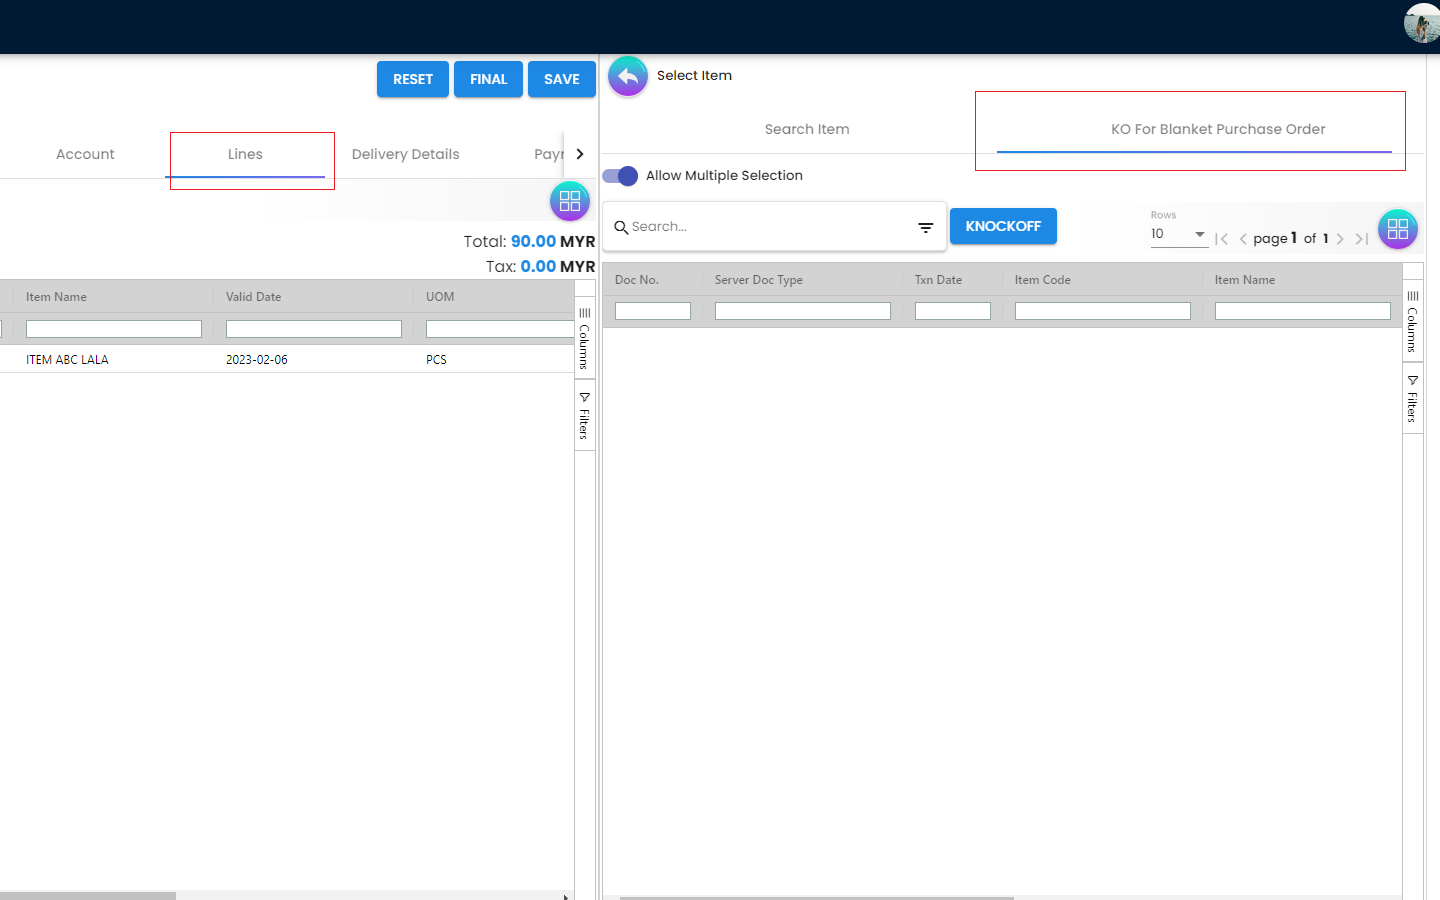
4.2.3 Create Purchase Order - Lines Tab
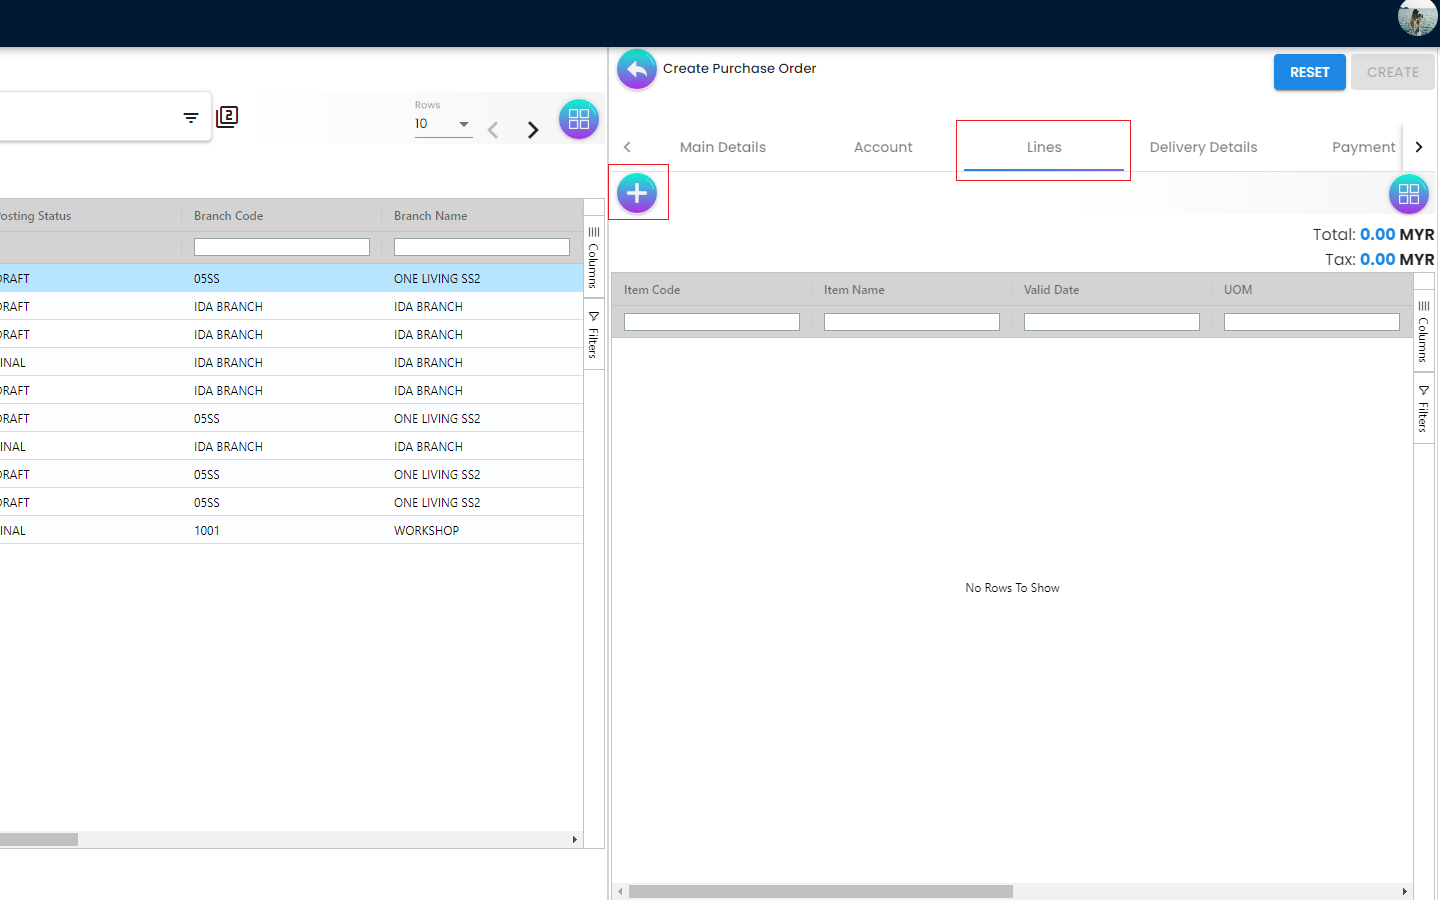

From the Lines Tab, the users can select the items that they wanna order under a particular Purchase Order. The users need to click on the “+” icon to see the items. These items are coming from the Doc Item Maintenance Applet. There are 2 main sub tabs under the Lines Tab.
-
Search Item
-
Item details
-
Costing Details
-
Pricing Details
-
Issue Link
-
-
KO For Blanket Purchase Order
In the Search Item Sub Tab, once the users click on any particular item, the users will be able to see the following tabs under the Search Item Tab.
The users are also able to Knock Off for a blanket Purchase Order. More details regarding the “Lines Tab” will be discussed in the next section of this document.
4.2.4 Create Purchase Order - Delivery Details Tab
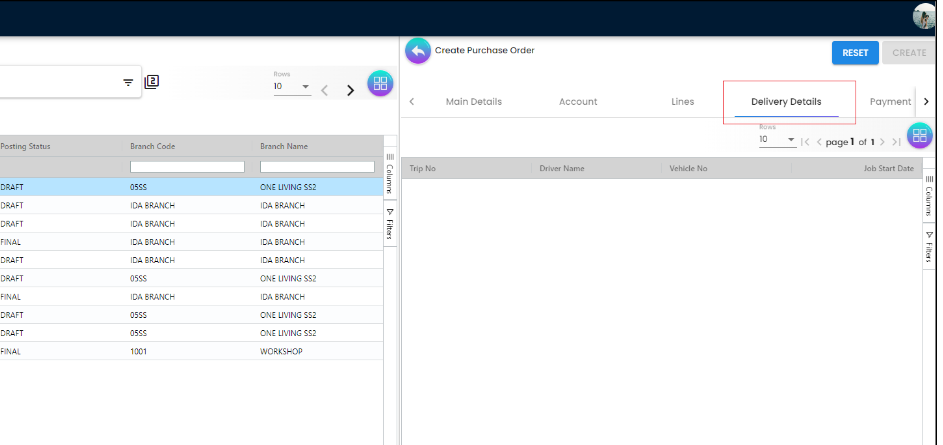
The Delivery Details Tab basically represents the delivery information with the following details and any Delivery created under the Delivery Installation Applet for this particular purchase order will be dsiaplyed as below
-
Trip No
-
Driver Name
-
Vehicle No
-
Jon Start Date
-
Job End Date
-
Delivery Status
-
Recipient Name
The above information can be configured using the Delivery Installation Applet
4.2.5 Create Purchase Order - Payment Tab
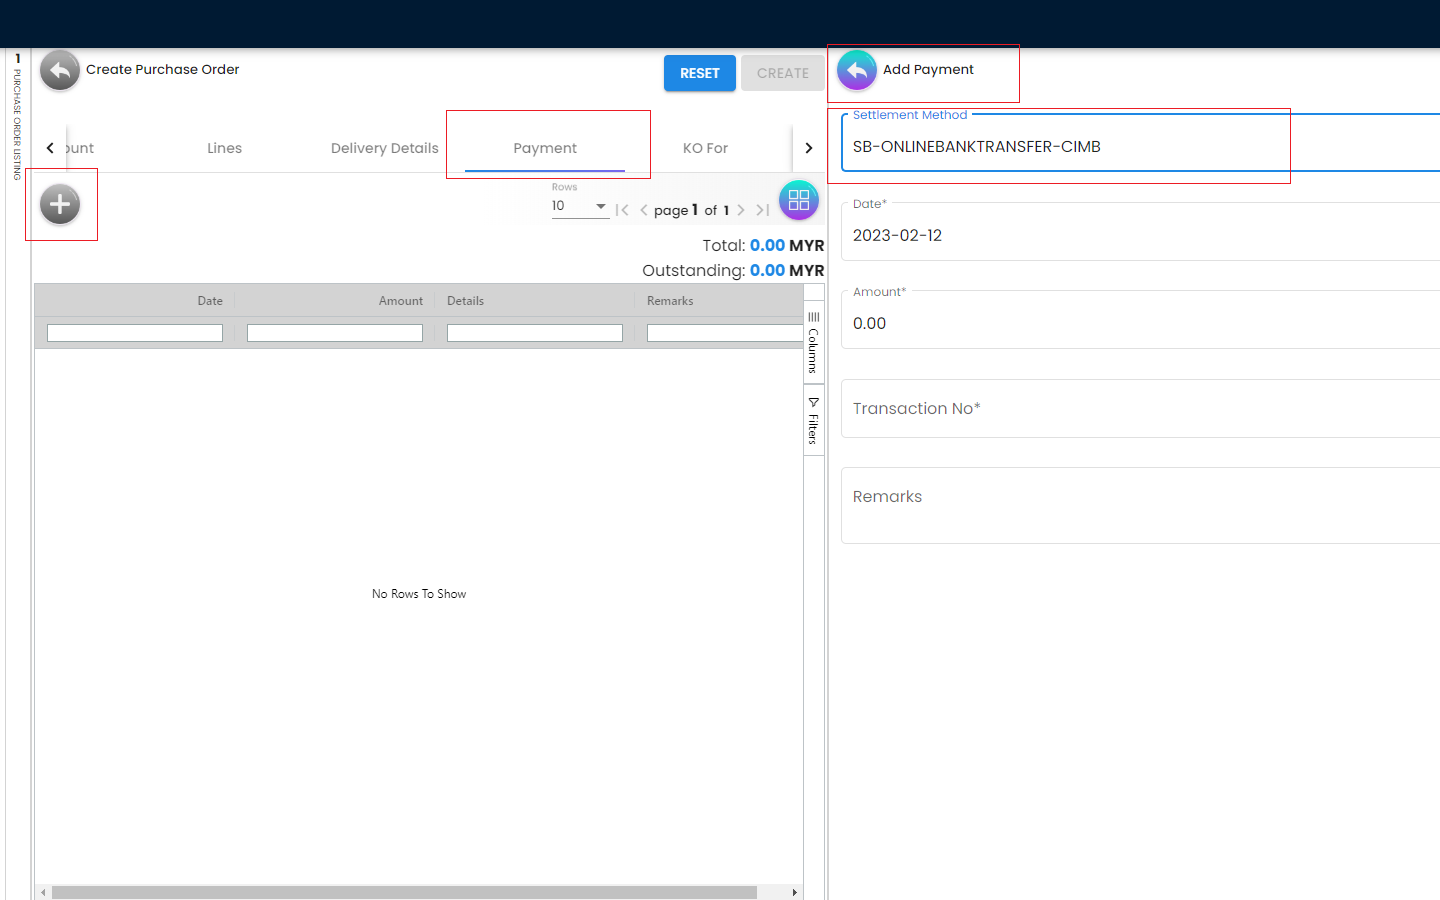
The Payment Tab can be used for making a payment for any particular Purchase Order. The users can click on the “+” icon to Add Payment and then the users will be able to select the Settlement Method from the dropdown list. The required fields will be dynamic based on the selection made by the users for the Settlement Method. The Users can choose different settlement method such as Cash, Credit Card, Grab Payment, Voucher, Online Transfer, Cheque etc. Users will also be able to add a new settlement method in the Cashbook Applet
4.2.6 Create Purchase Order - KO For Tab
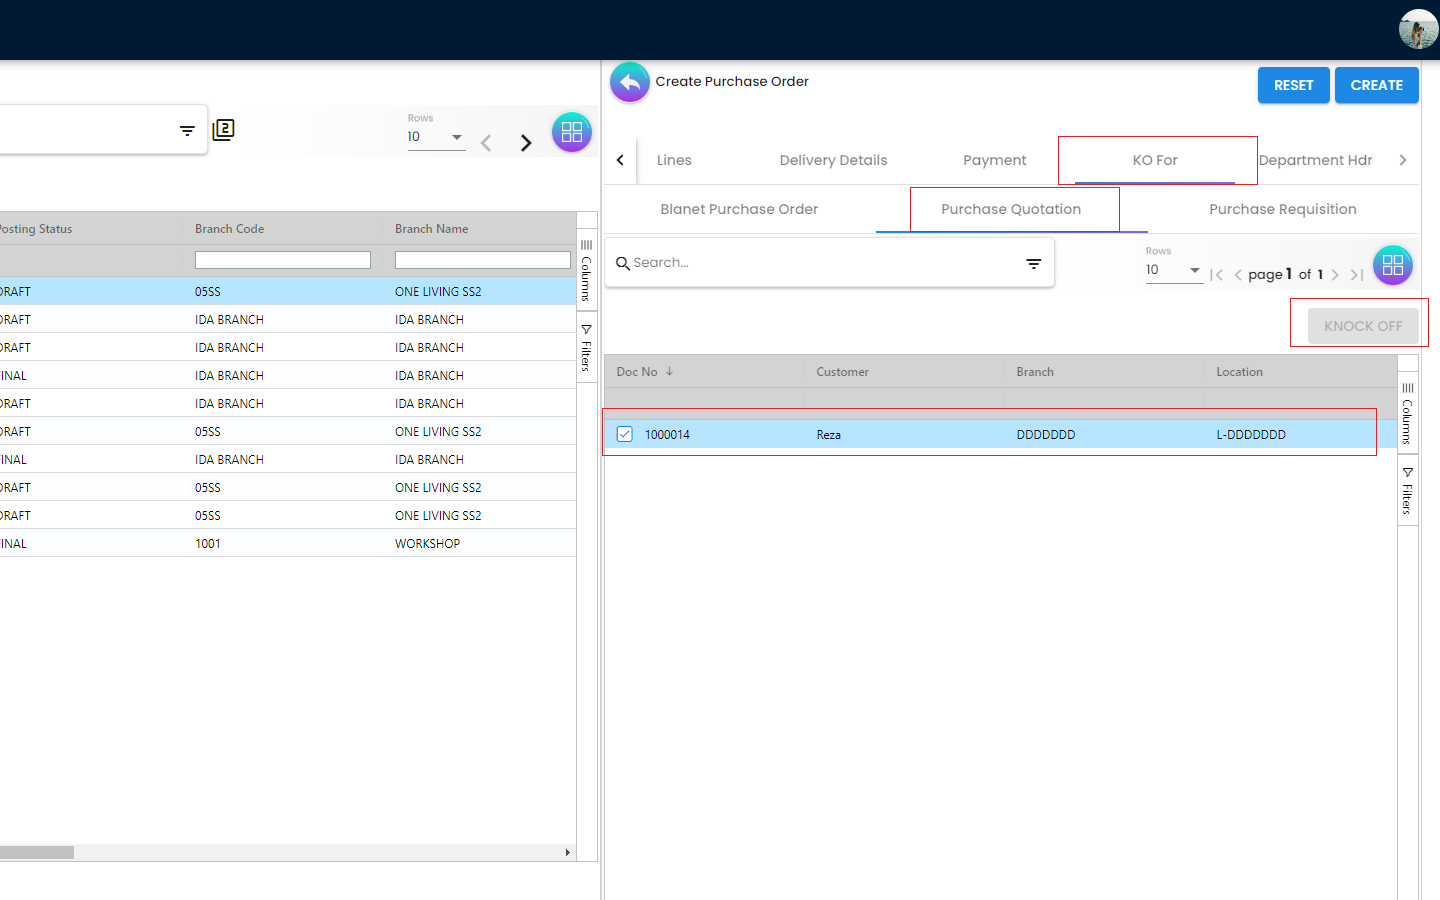
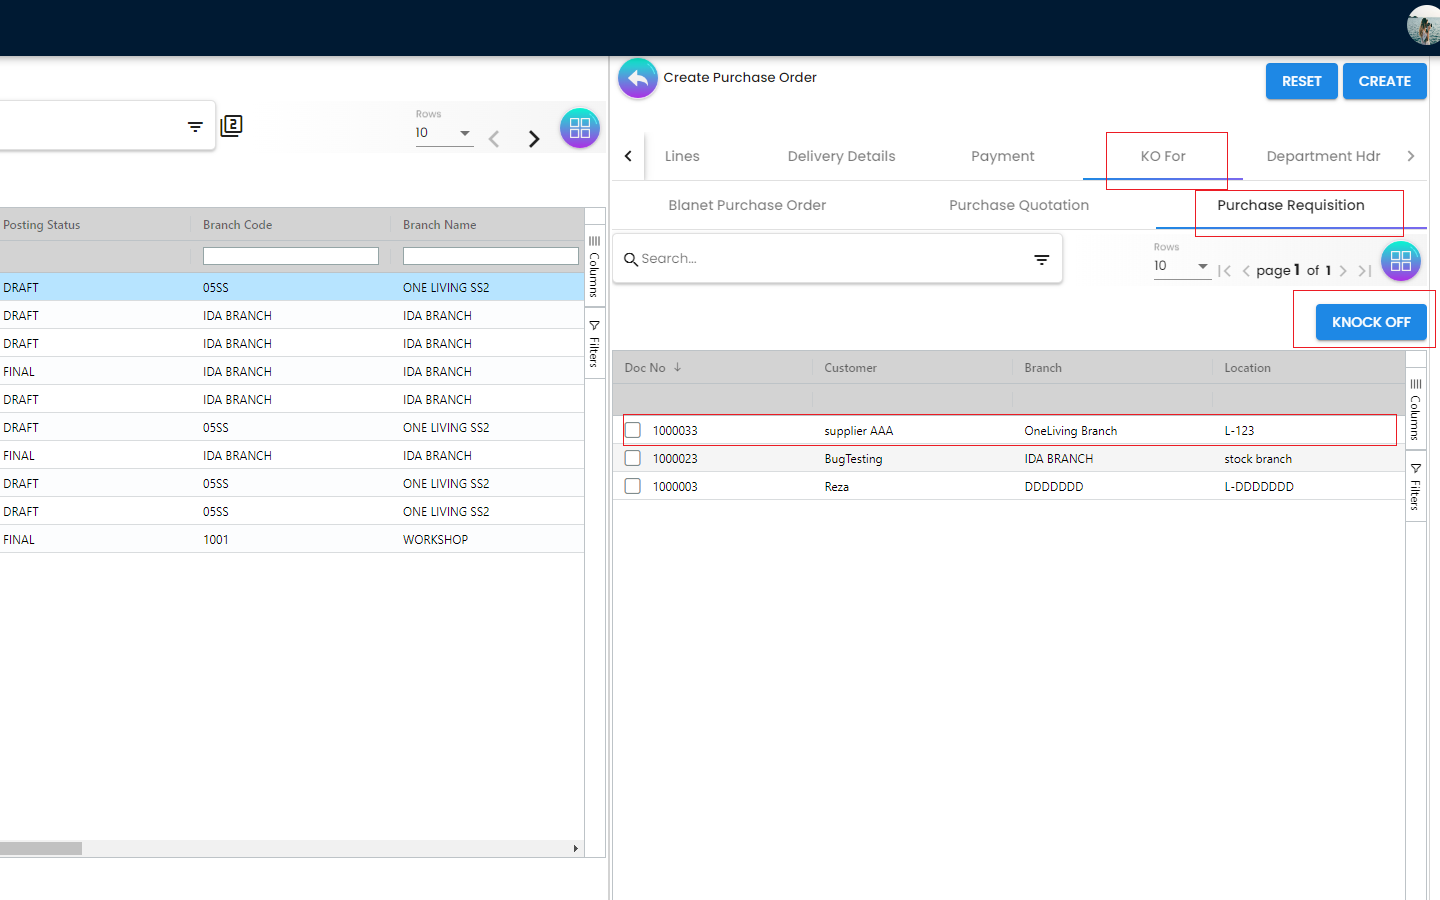
KO stands for Knock Off. Purchasers can make online payment for any particular purchase order, or they can knock it off with other documents like Purchase return. For Blanket Purchase order, multiple Purchase Order can be created under single Blanket Purchase Order to the Supplier and then knock off funtions can be used to knock off accoridngly, depending on the organizational workflow
-
Blanket Purchase Order
-
Purchase Quotation
-
Purchase Requisition
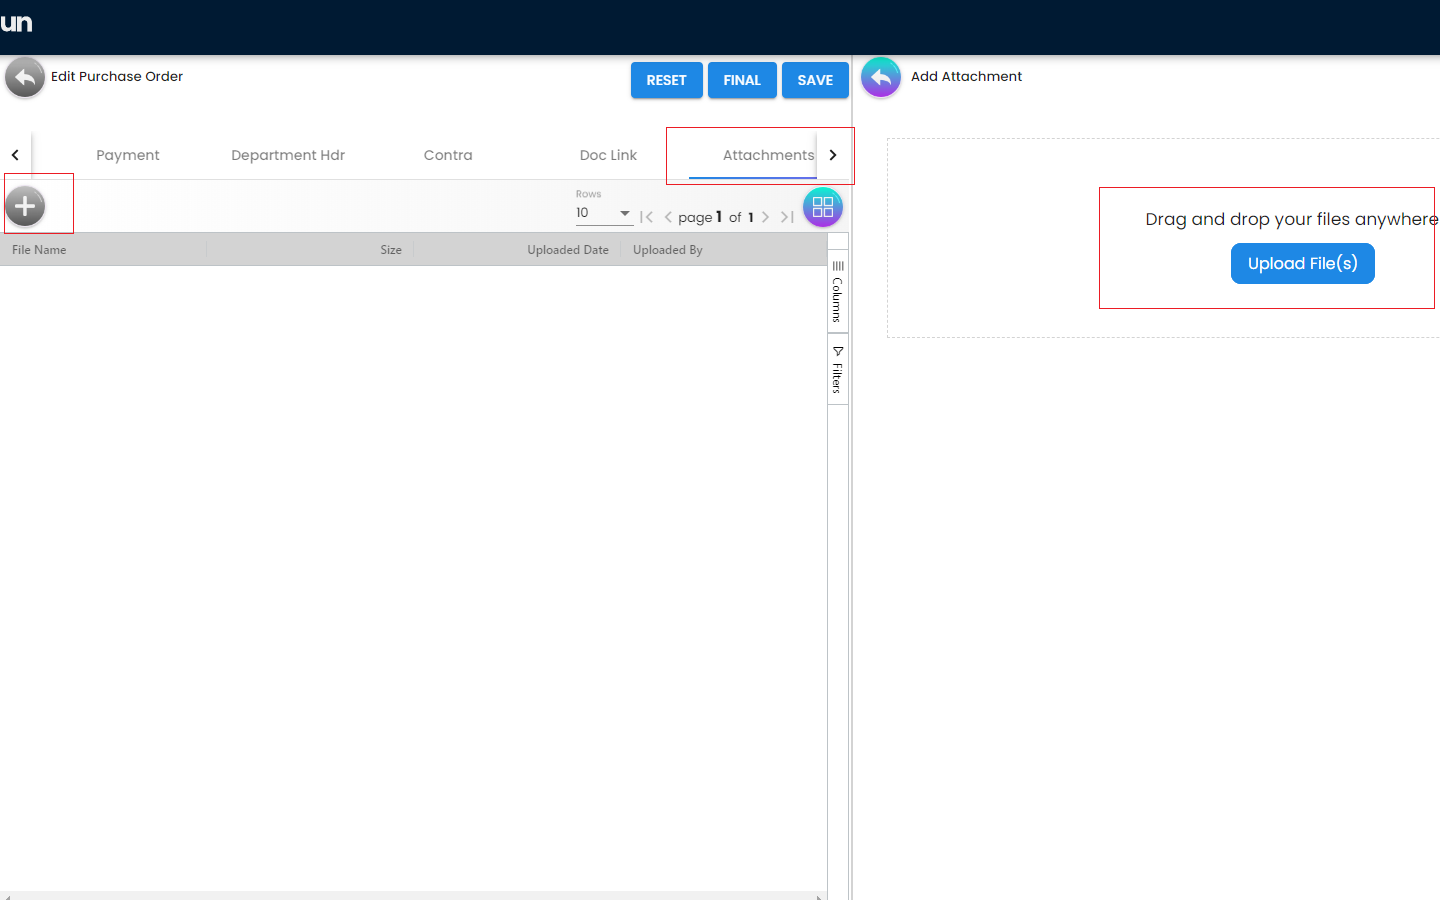
4.3 Edit Purchase Order

Purchase Order has link with items and once the Purchase Order is set to FINAL, meaning the stock availability has already affected and the number of ordered items have been increased in available stock balance. Therefore, before marking a Purchase Order as final, the purchaser can make some necessary adjustments if required.
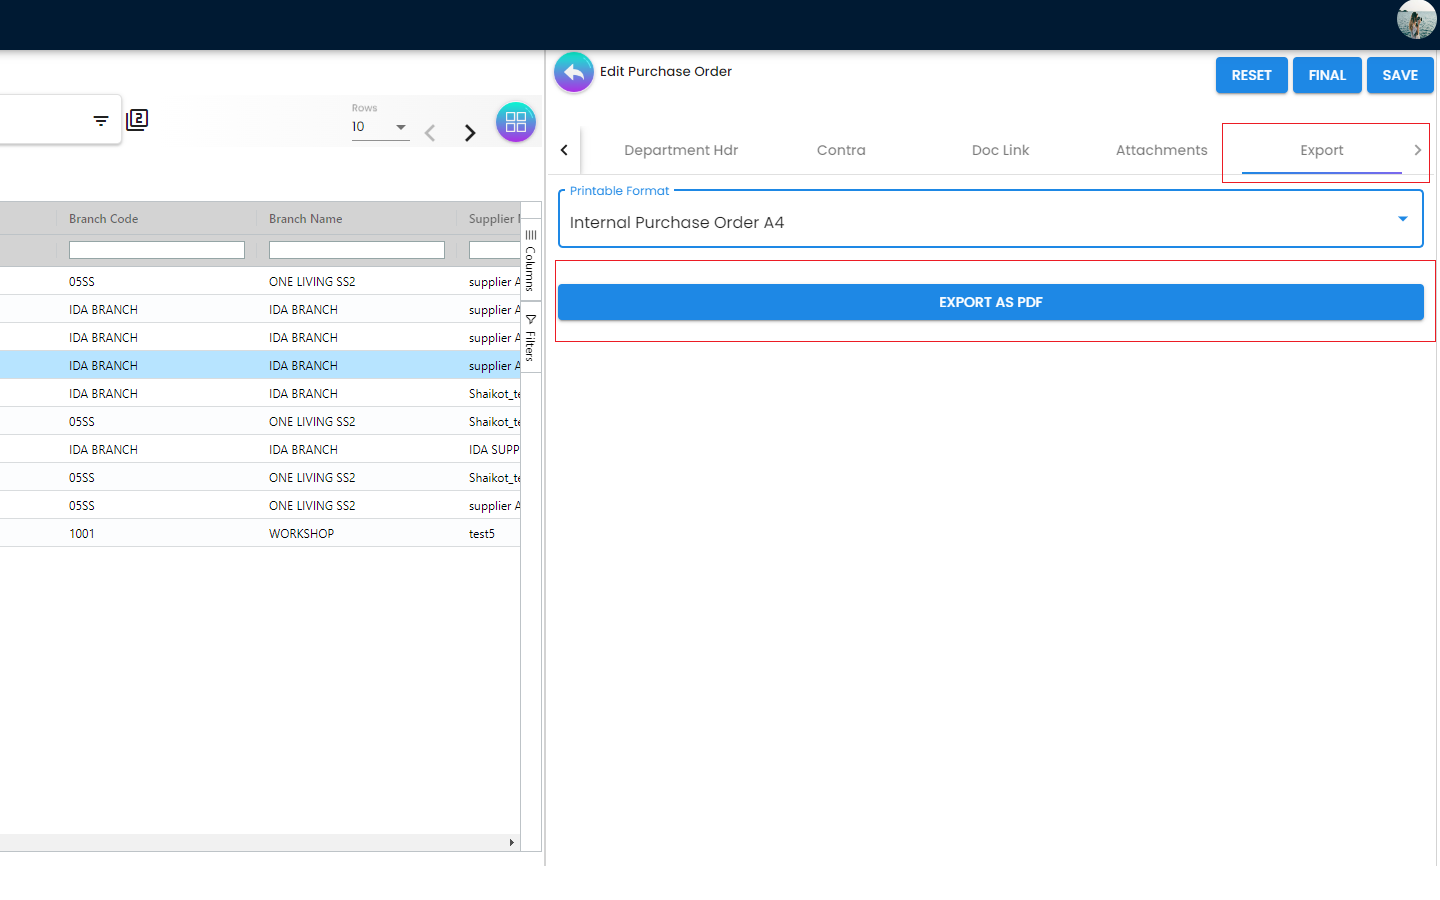
In order to Edit the Purchase Order, the users need to click on the row of a particular Purchase Order and then the users will be able to view the following Tabs as mentioned below
4.3.3 Edit Purchase Order - Lines Tab
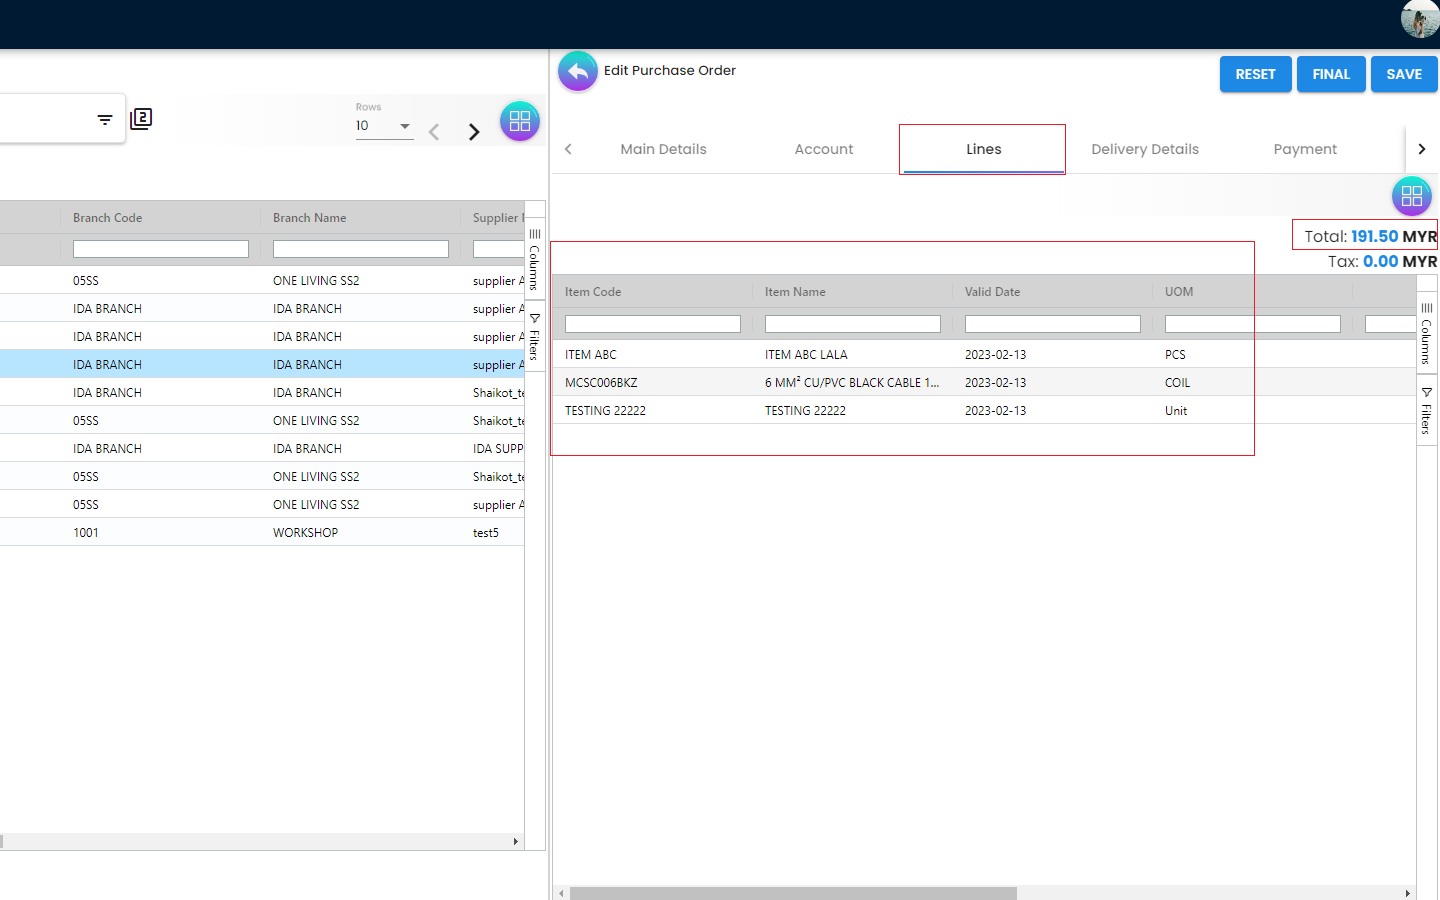

Under the Lines Tab, users can update the Pricing Scheme, Quantity Base and continue adding more items. The total value will be adjusted automatically based on the items quantity and price.
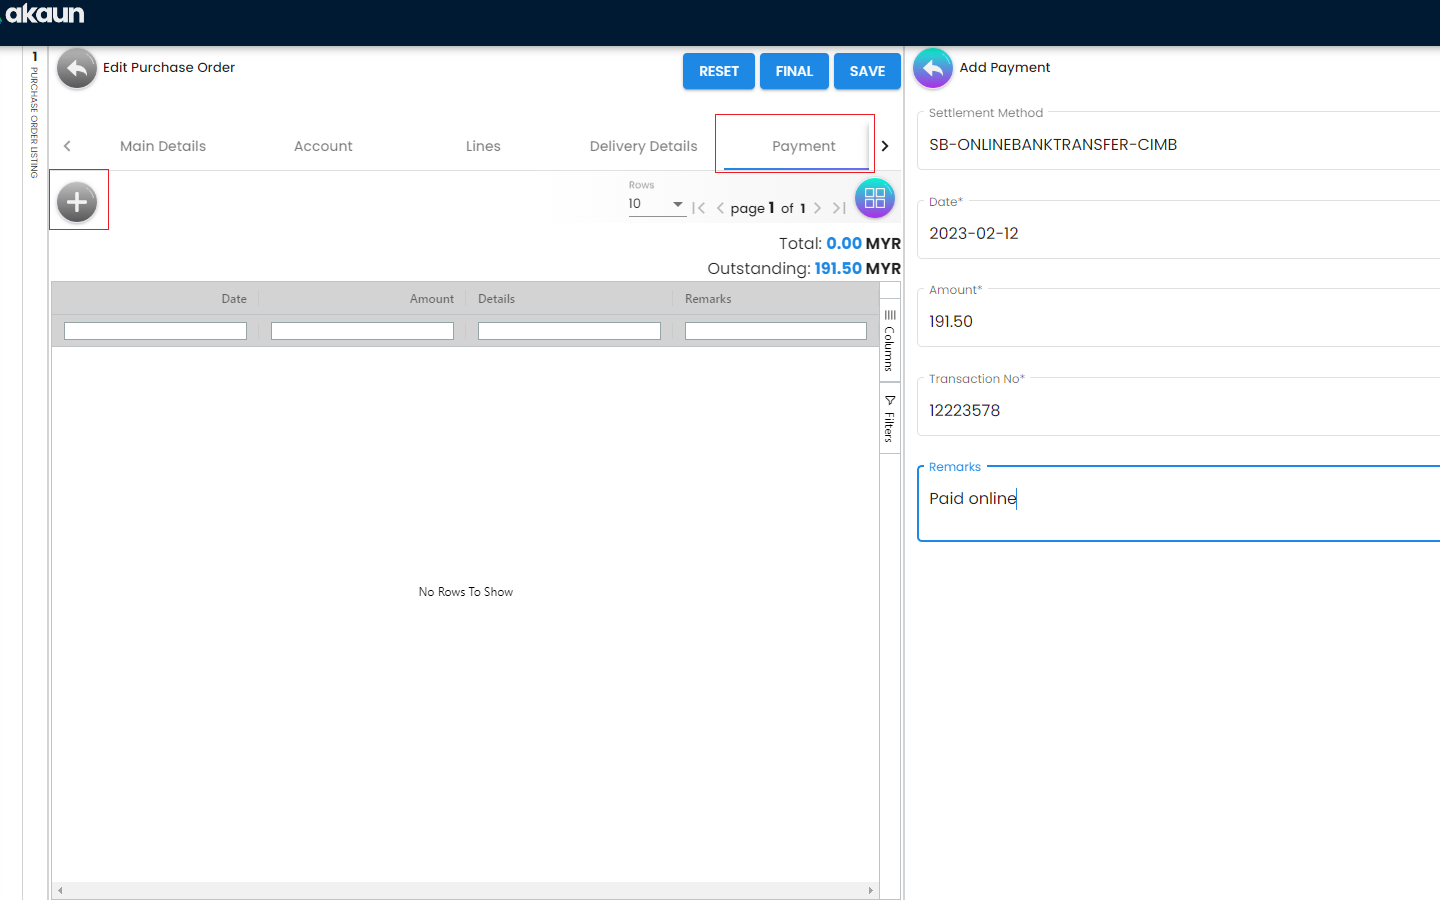
4.3.4 Edit Purchase Order - Payment Tab
inmage::Edit-Purchase-Order-Payment-Tab_1.png[1440 x 900]
The users will be able to make the payments and it’s not required to make a full payment at this point. The users can pay any amount they want and total will be updated accordingly.
4.3.6 Edit Purchase Order - Contra Tab
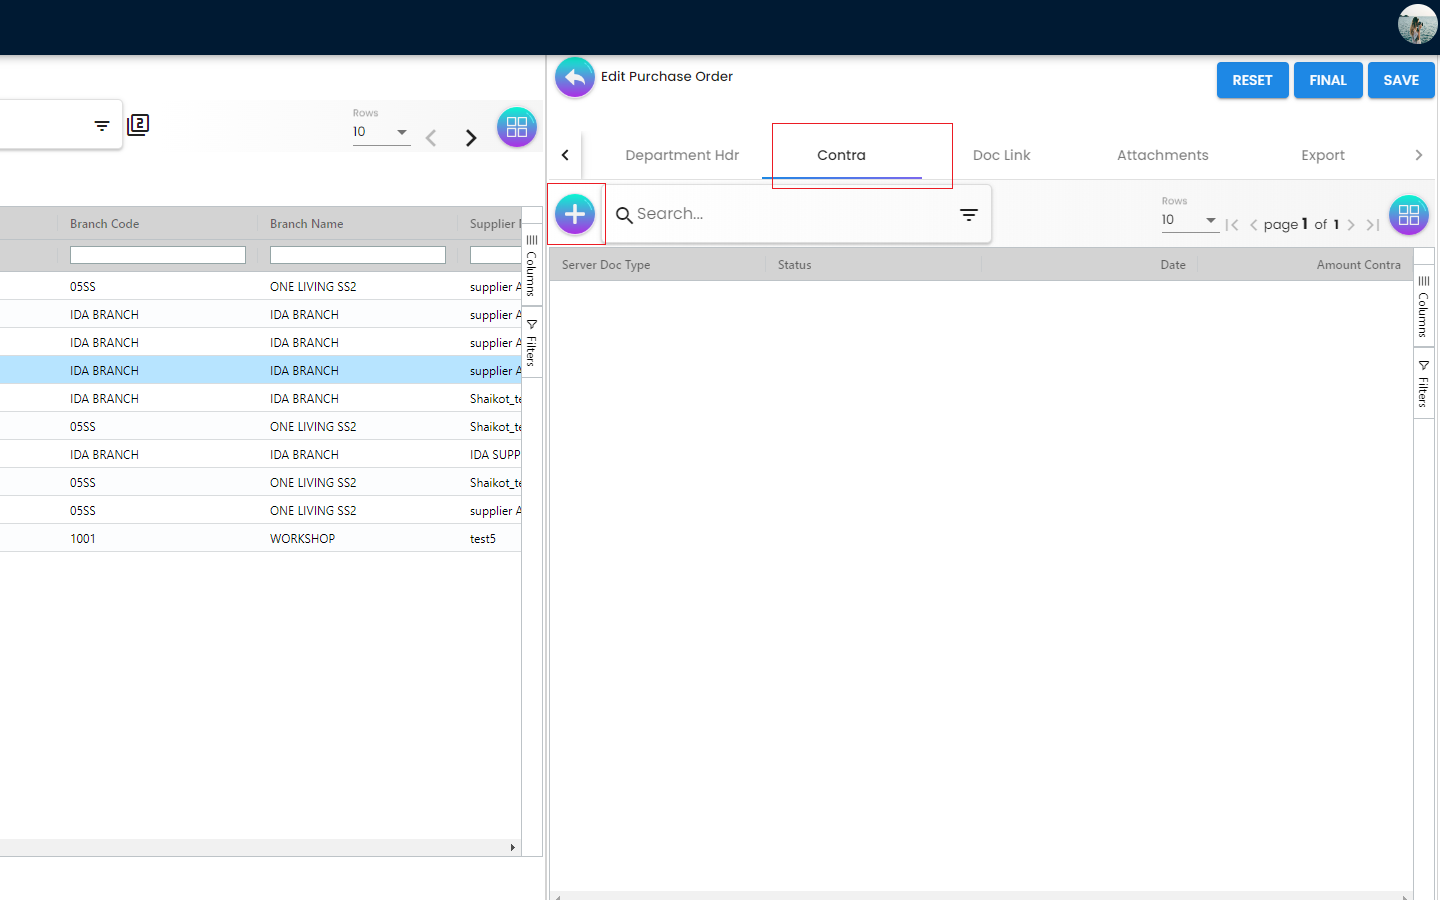
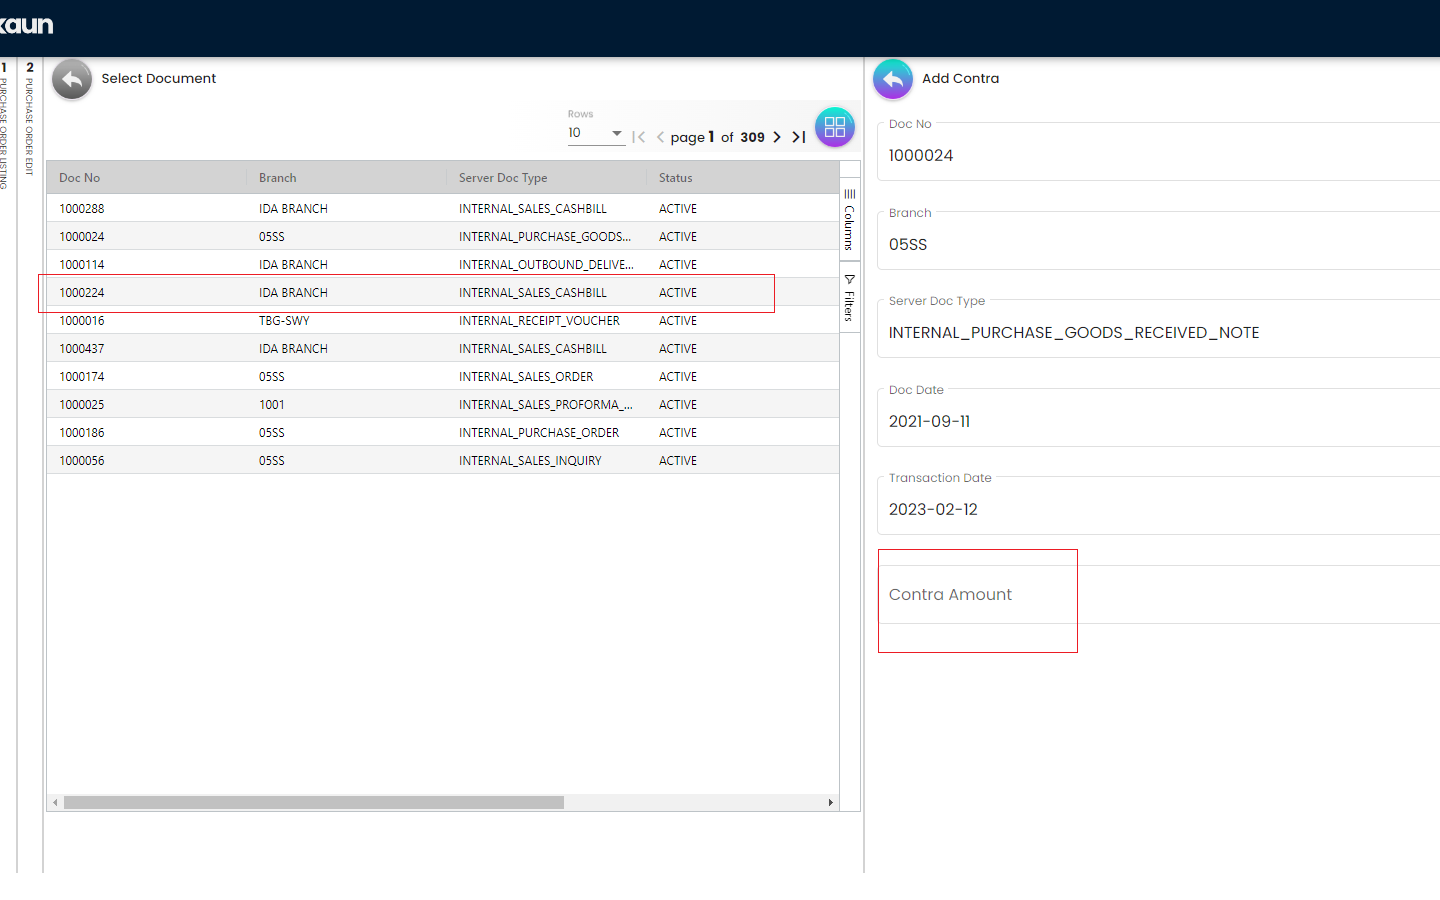
From the Contra Tab, the users will be able to Contra the selected Purchase order with any other document. The users just need to key in the Contra Amount and click save
4.3.7 Edit Purchase Order - Doc Link Tab

The Doc Link Tab displays more information related to the Knock Off. It displays from where this Purchase Order document has been Copied From for example: Purchase Requisition, Purchase Quotation etc. and where this Purchase Order has been used after creation for example: Purchase Invoice. Basically the Doc Link Tab visualize the Purchase Order Document flow to other systems
-
Copied From
-
Copied To