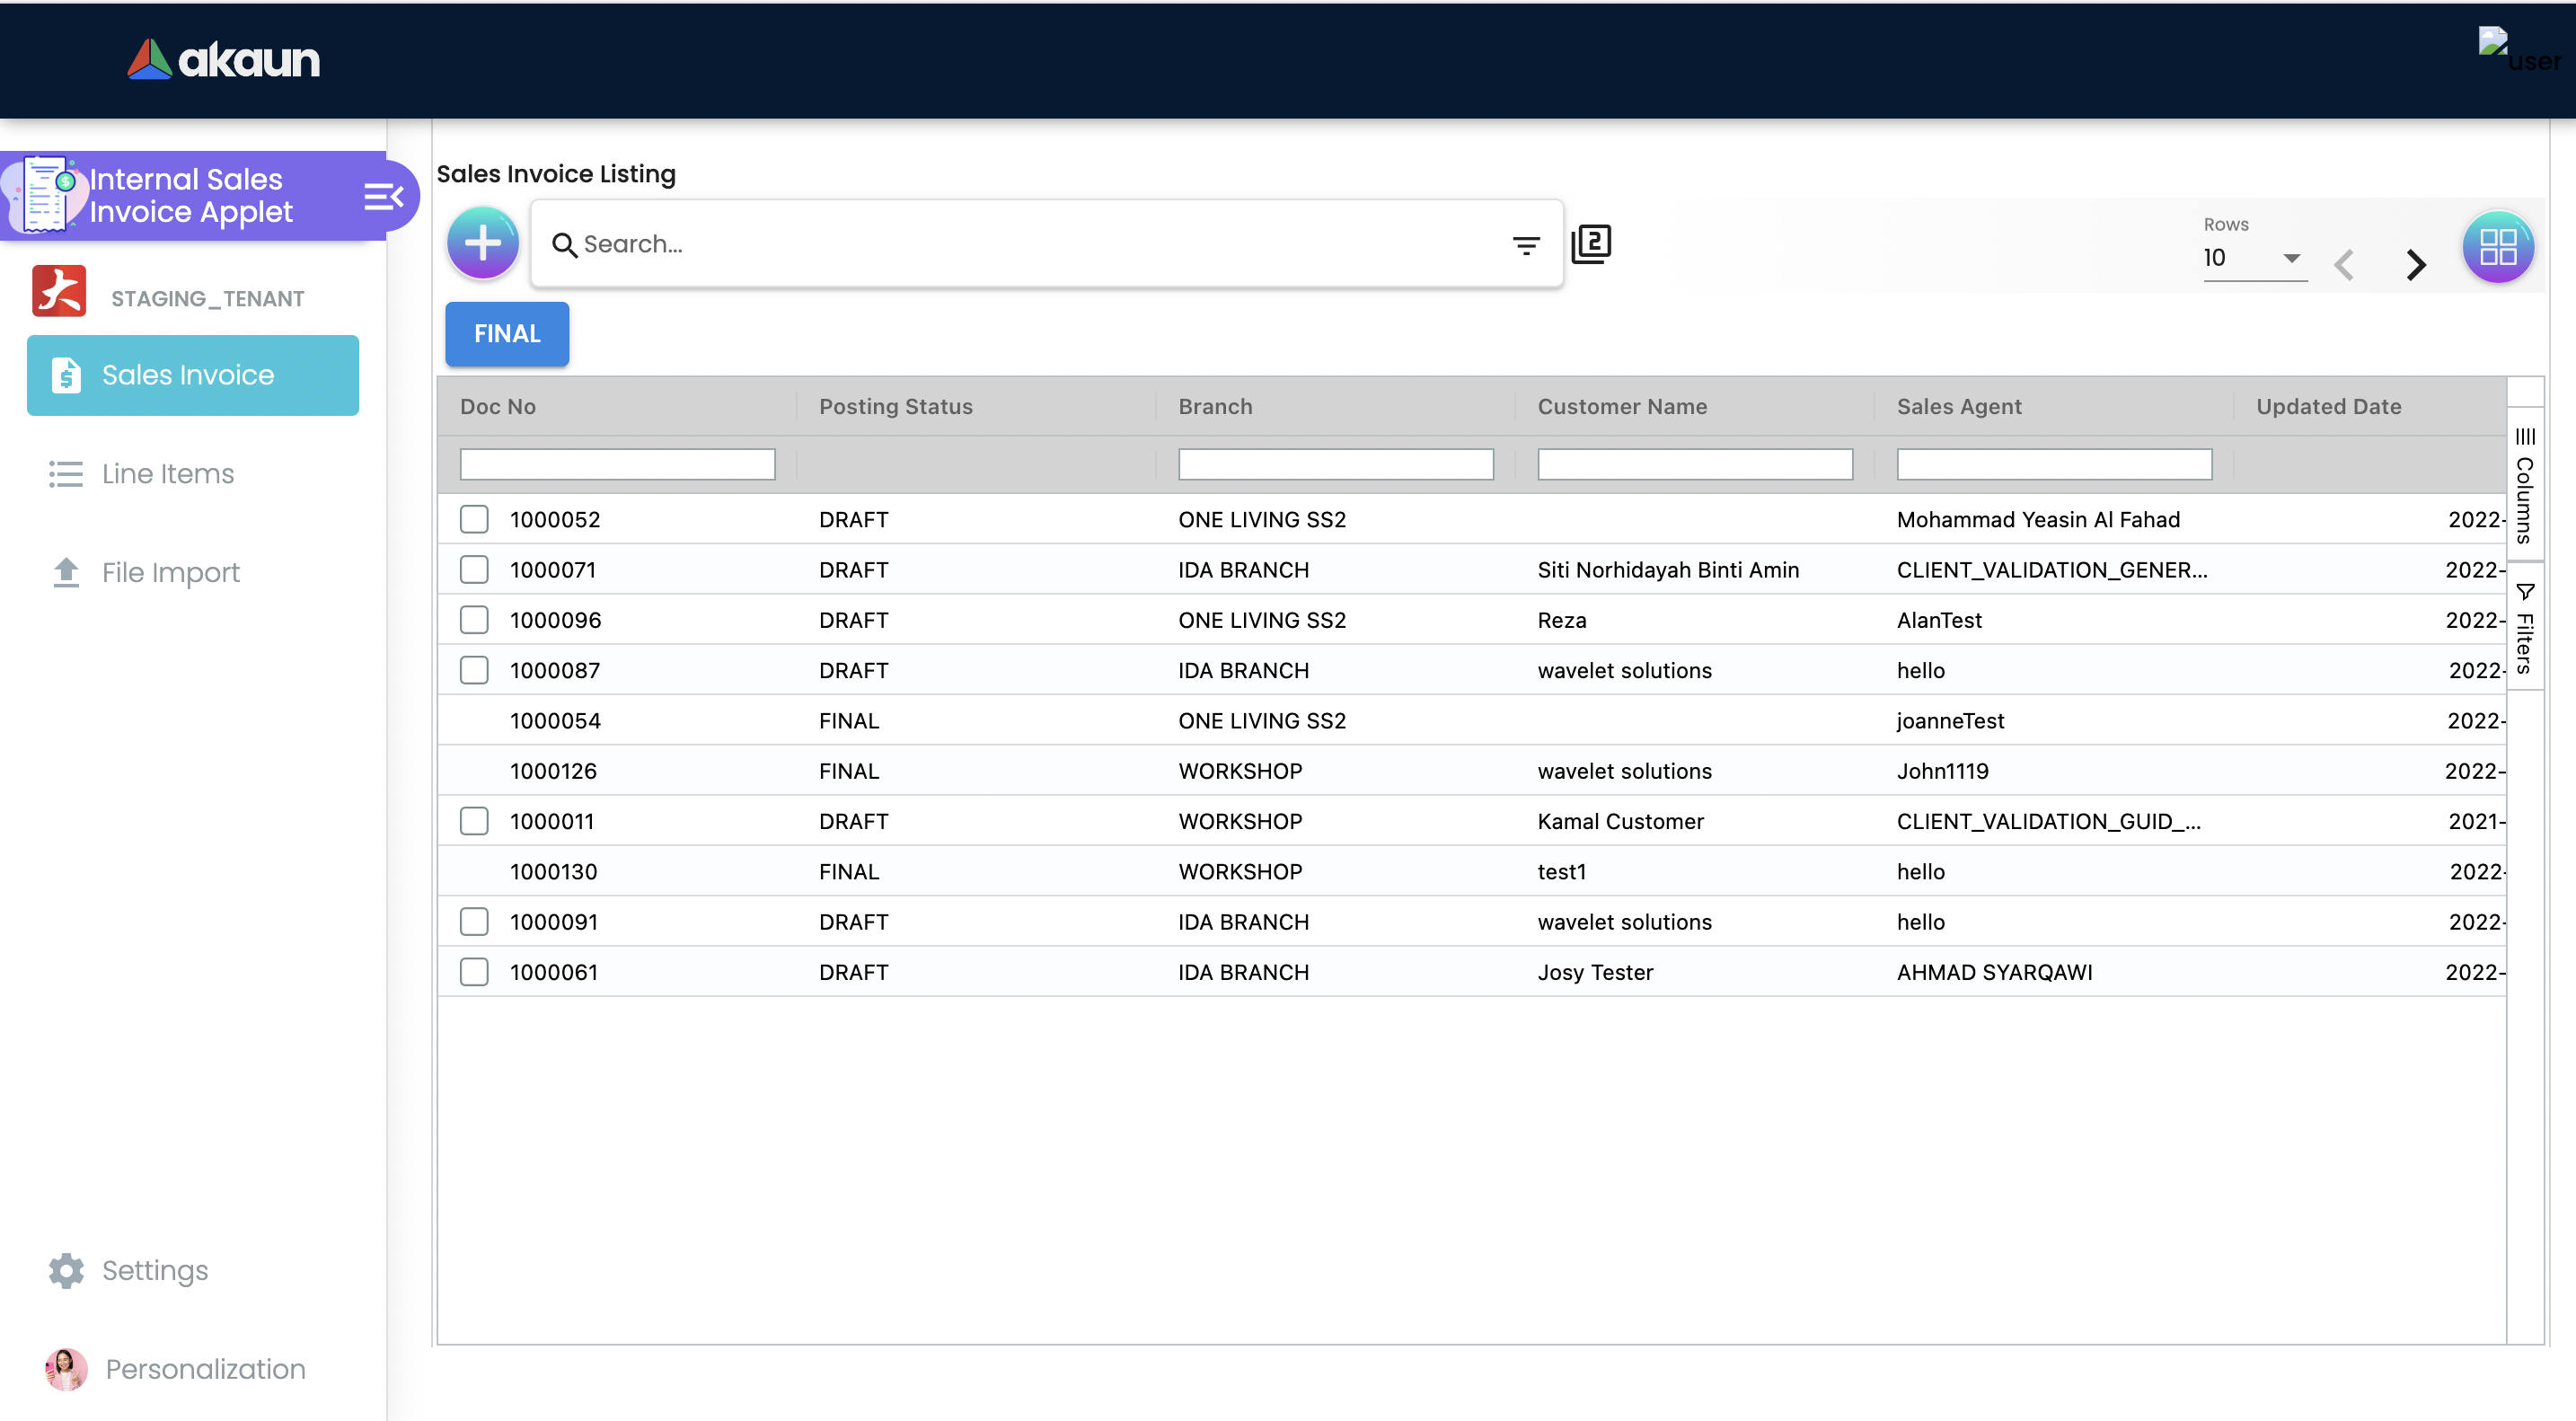
2.0 Sales Invoice
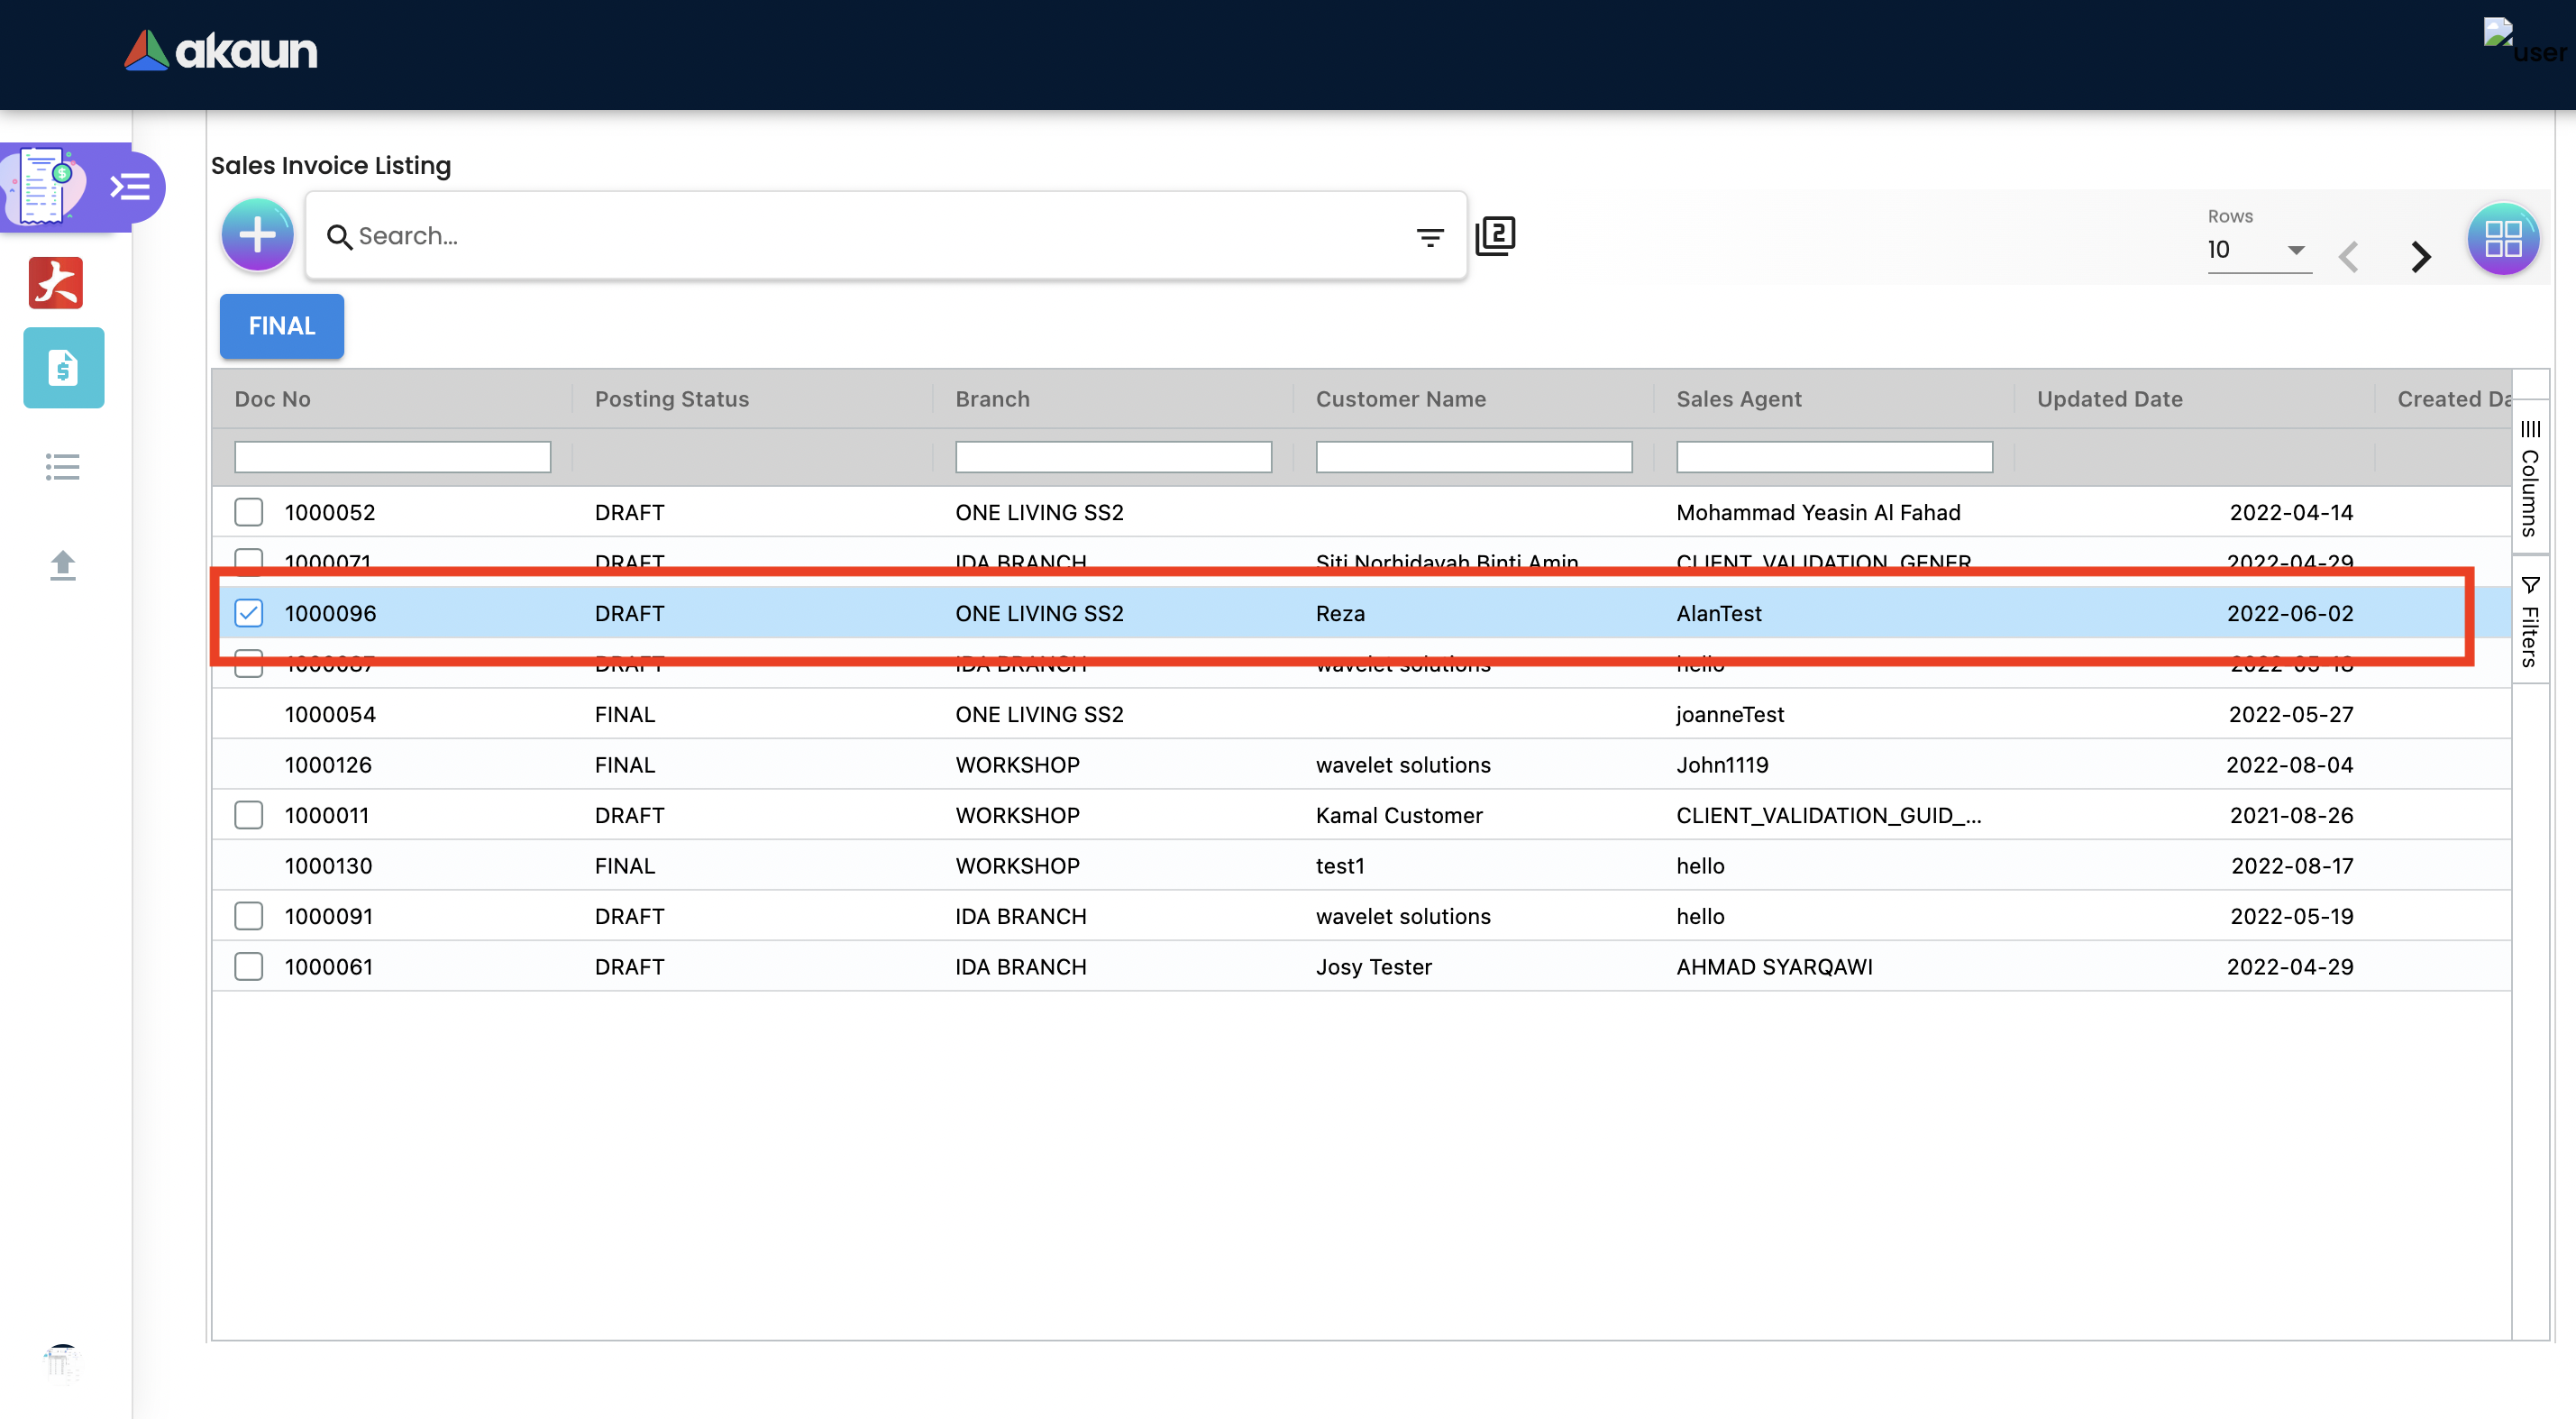
All the sales invoice are listed here after they have been created. Users may click on the desired sales invoice to view the main, customer account, line items, delivery and other details to view and edit.
-
Doc No: Invoice Number
-
Posting Status: Status of the sales invoice: Draft or Final
-
Branch: A branch office is an outlet for a company.
-
Customer Name: Name of the Customer
-
Sales Agent: Sales agent name
-
Updated date: Sales invoices updated date
-
Transaction Date: Sales invoices transaction date
-
Created by: Person who created sales invoice
2.1 Advanced Search
The advanced search box below helps refine the search and allows the user to specify requirements by branch, customer, date, status, and marketplaces when searching from the list of sales orders.
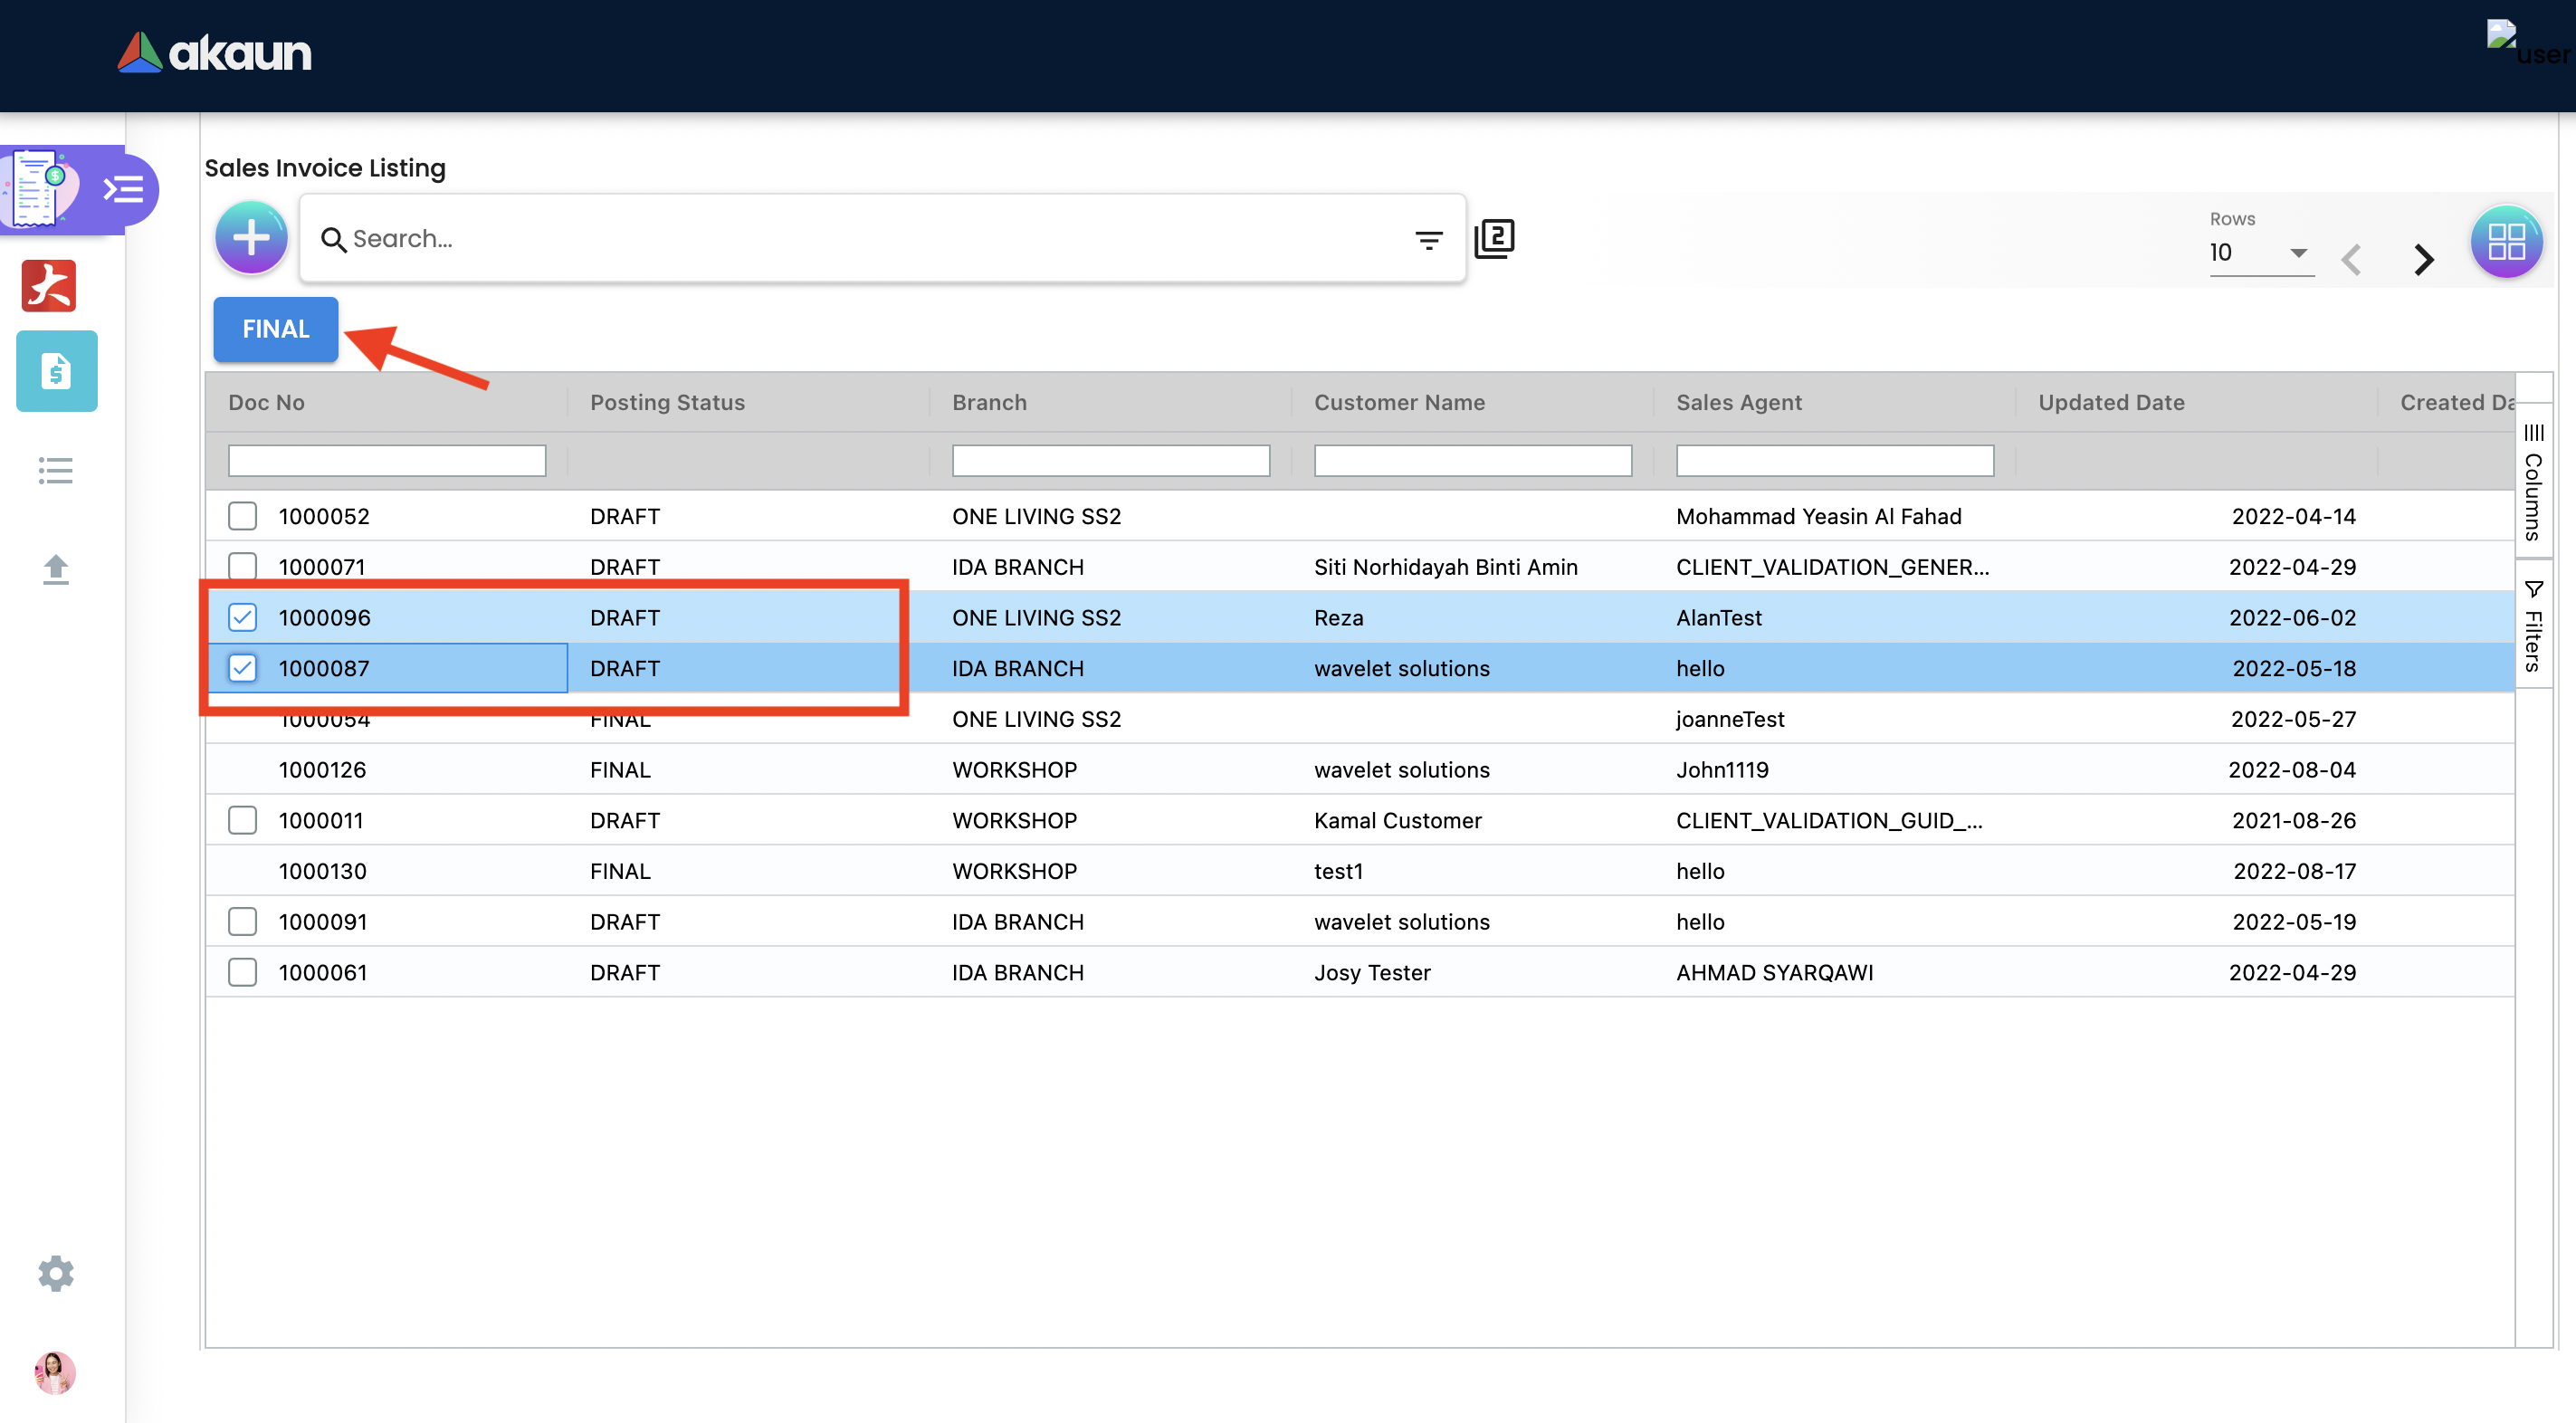
2.2 Final Posting
Upon creation, the posting status of the sales invoice document is ‘DRAFT'.
Users can post the document(s) to ‘FINAL’ status once the sales invoice is confirmed. As shown in the screen below, the user selected the provided checkboxes from the listing and clicked on the FINAL button to bulk post the desired sales invoice to 'FINAL’ Status.
2.3 Create Sales Invoice
2.3.1 Main Details Tab
Go to the Sales Order menu, and click on the '+' button to Create a New Sales Order.
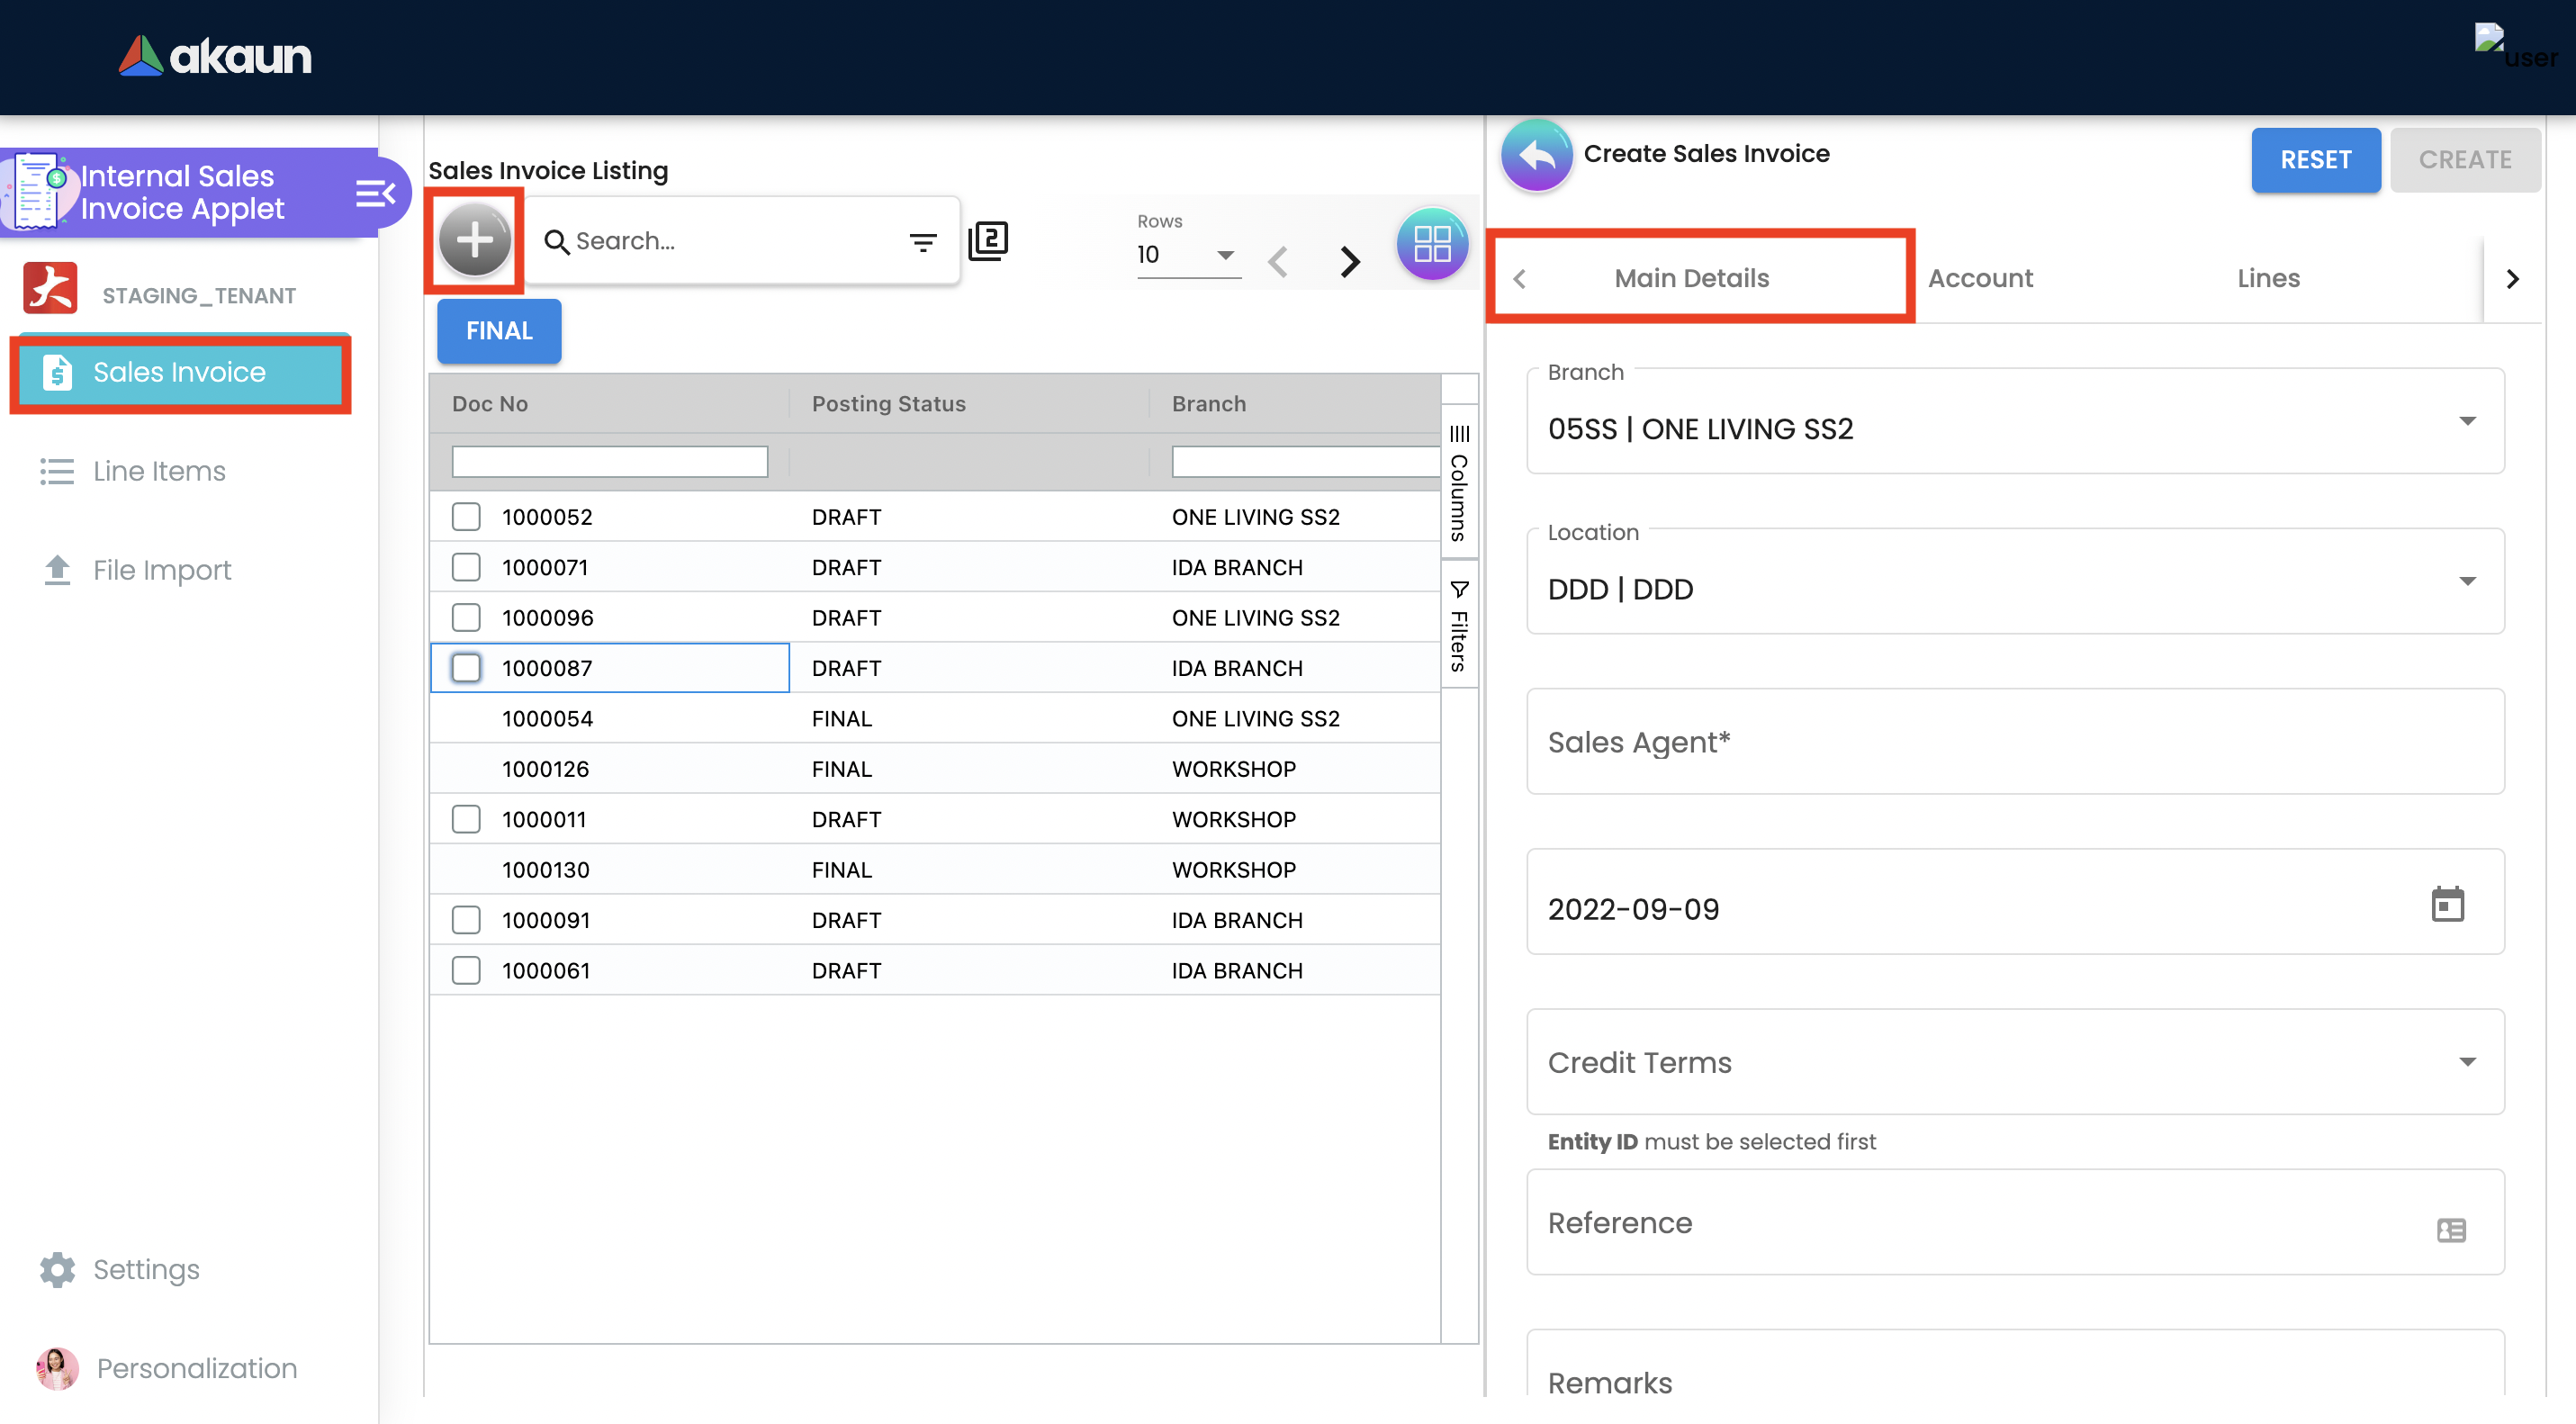
Users may key in the main details of the new document OR copy/Knock Off from other documents.
It is, however, advisable to use 'Knock Off from other documents' because it can be traced and the outstanding reports will be meaningful.
-
In order to proceed and start on Sales Order Applet, kindly make sure that you have created company, branch, Location details in Organization Applet.
-
Branch: A branch office is an outlet for a company.
-
Location: A place to store physical inventory for sale or distribution.
-
Sales Agent - choose the employee with clicking "Sales Agent" Field, where it will direct to the next pages.
-
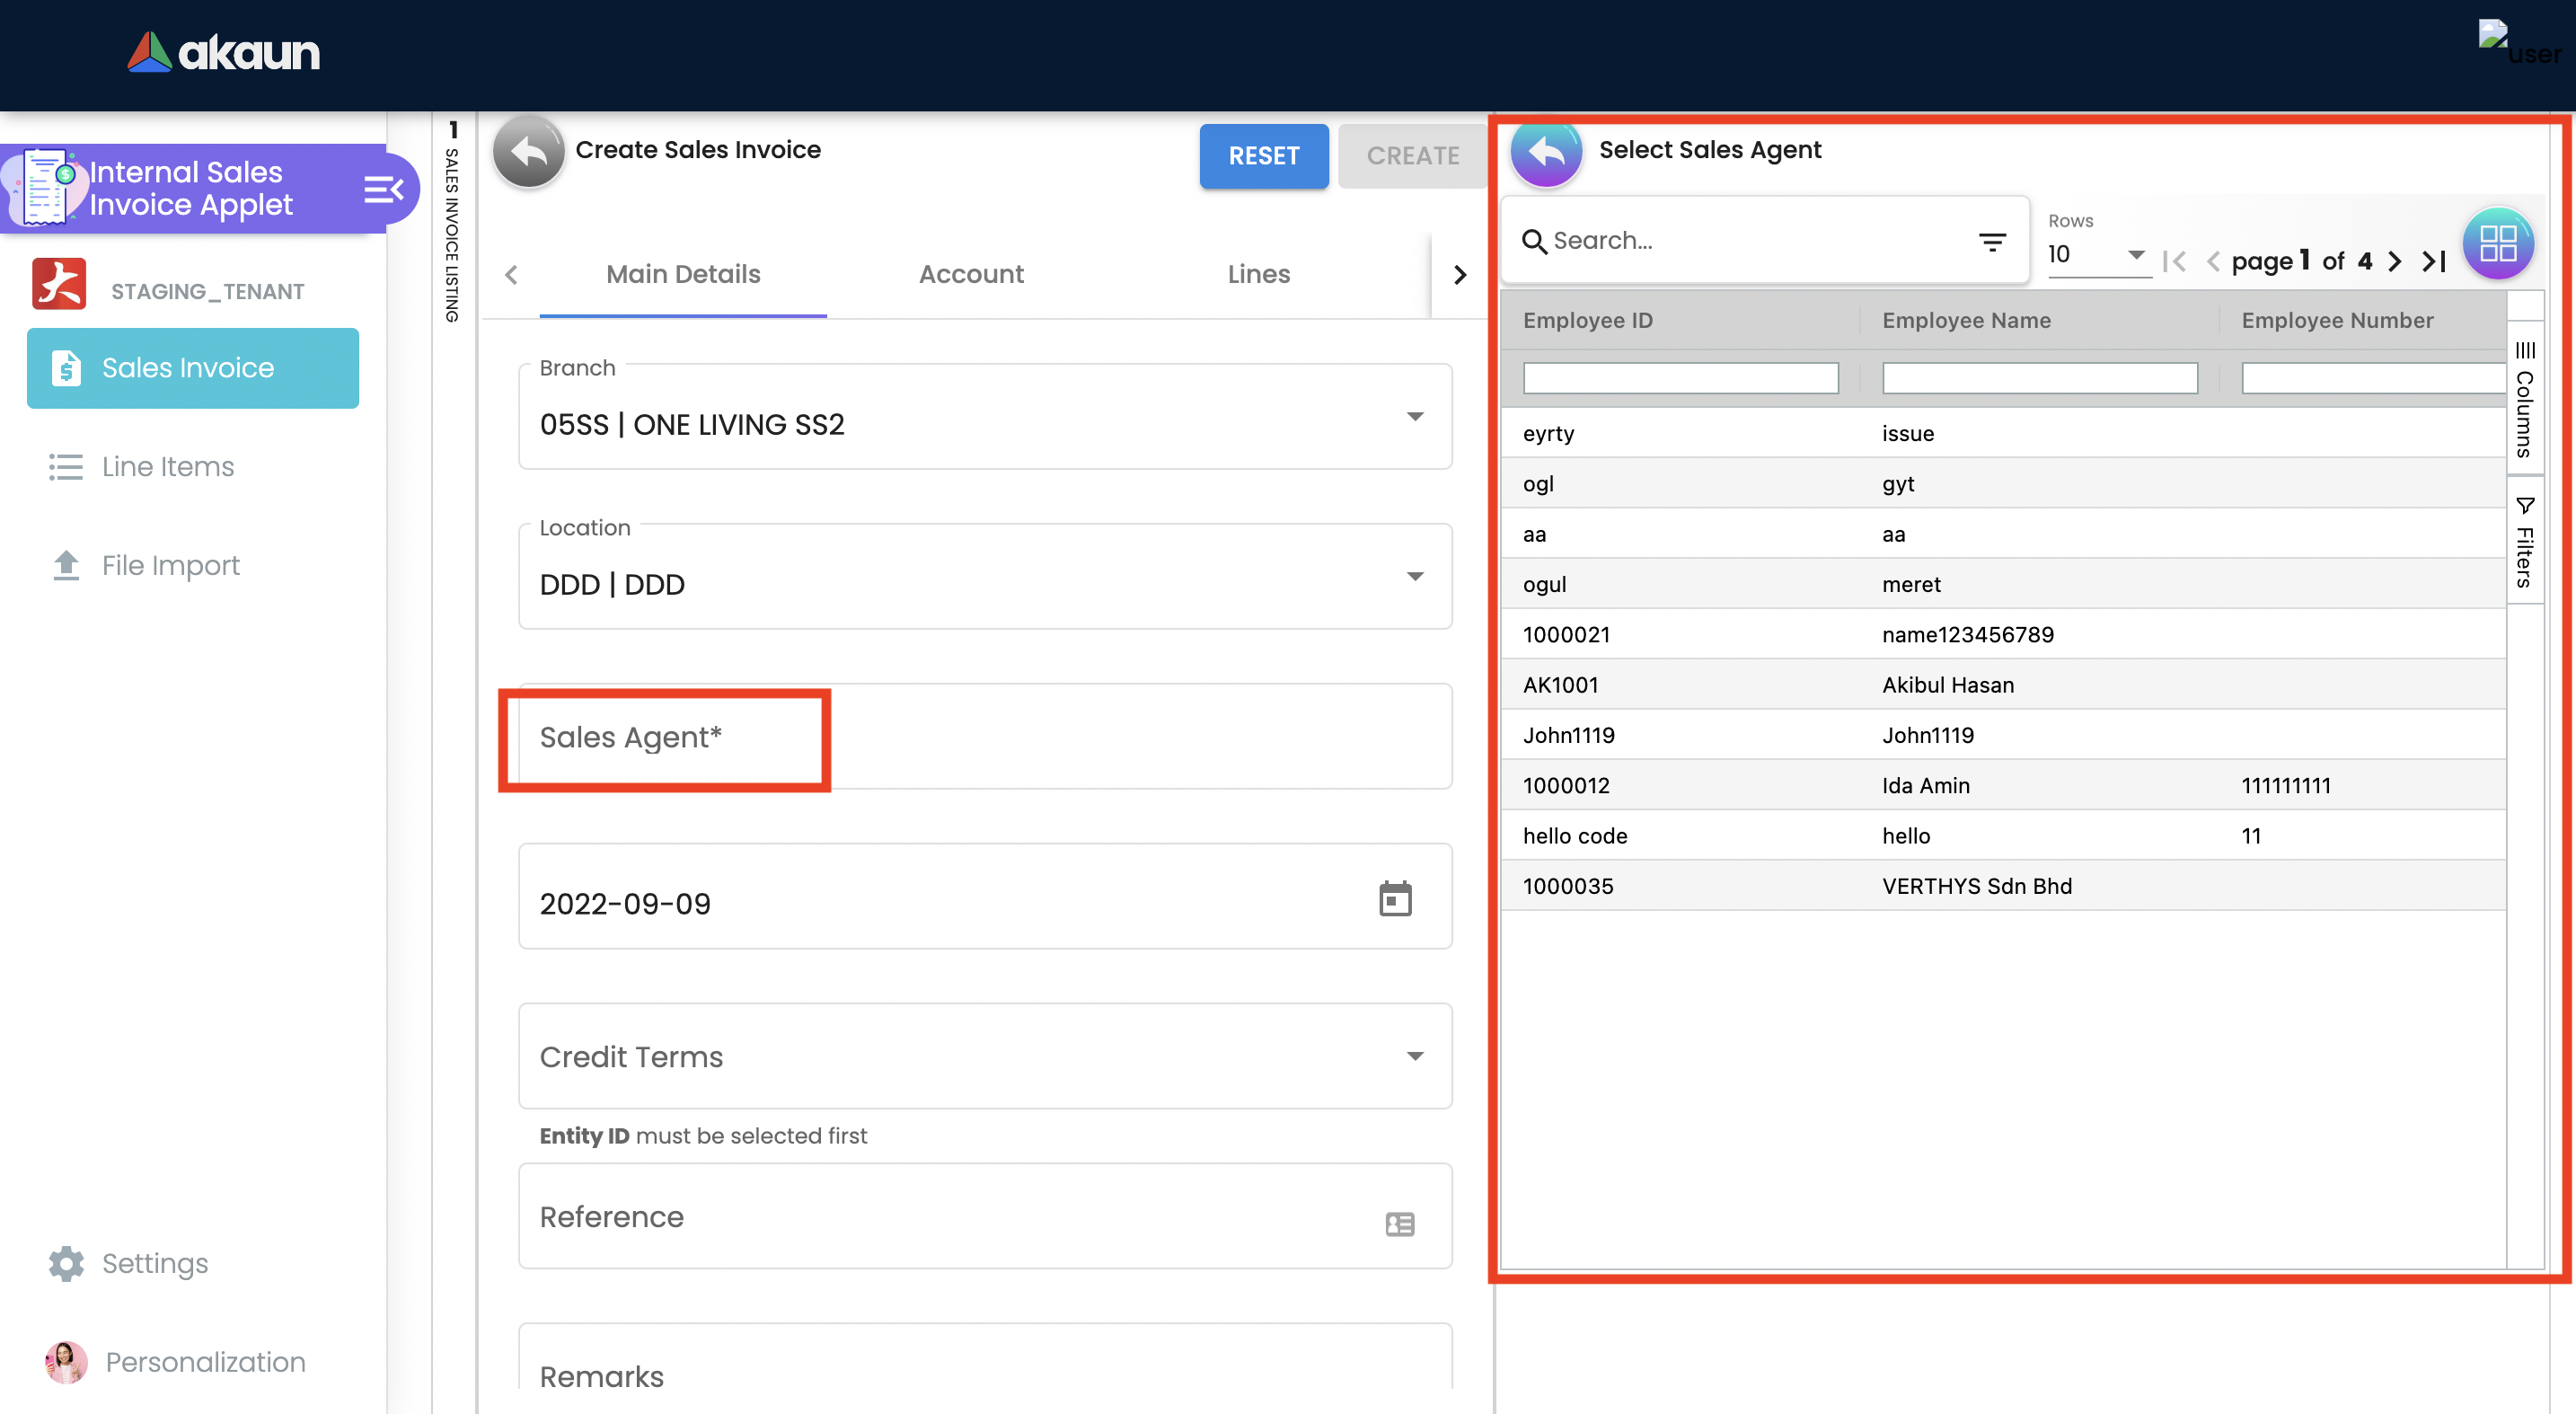
-
Transaction Date: The date when the transaction or dealing occurs.
-
Credit Terms: An agreement between the buyer and seller about the timings and payment to be made for the goods bought on credit.
-
Reference: For sales orders, it’s very common to reference a customer’s incoming purchase order number.
-
Remarks: Add extra information to accounts, customers cards, or sales orders to communicate agreements, such as a special price or delivery method, to other users.
-
Permit No: Sellers permit number.
-
CRM Contact: Specify the contact for whom the sales order is being created.
-
Currency: To determined based on the pricing condition what you are maintaining.
-
Sales Lead: The retail sales worker who is responsible for coordinating and ensuring the sales invoice are reached to the customer.
-
Membercard: A card issued by your company to the customer to indicate membership of a membership scheme.
-
Tracking ID: An ID or code is assigned to the sales order to typically print on the shipping label.
2.3.2 Account Tab
As the user is creating a contract between organization and a Customer for the supply of specified goods and/or services, a link is configured here between the sales order and the customer.
In order to proceed and start on Sales Order Applet, kindly make sure that you have created Customer details in the Customer Maintenance Applet.

Entity ID: Customer Code, auto-filled when customer entity is selected.
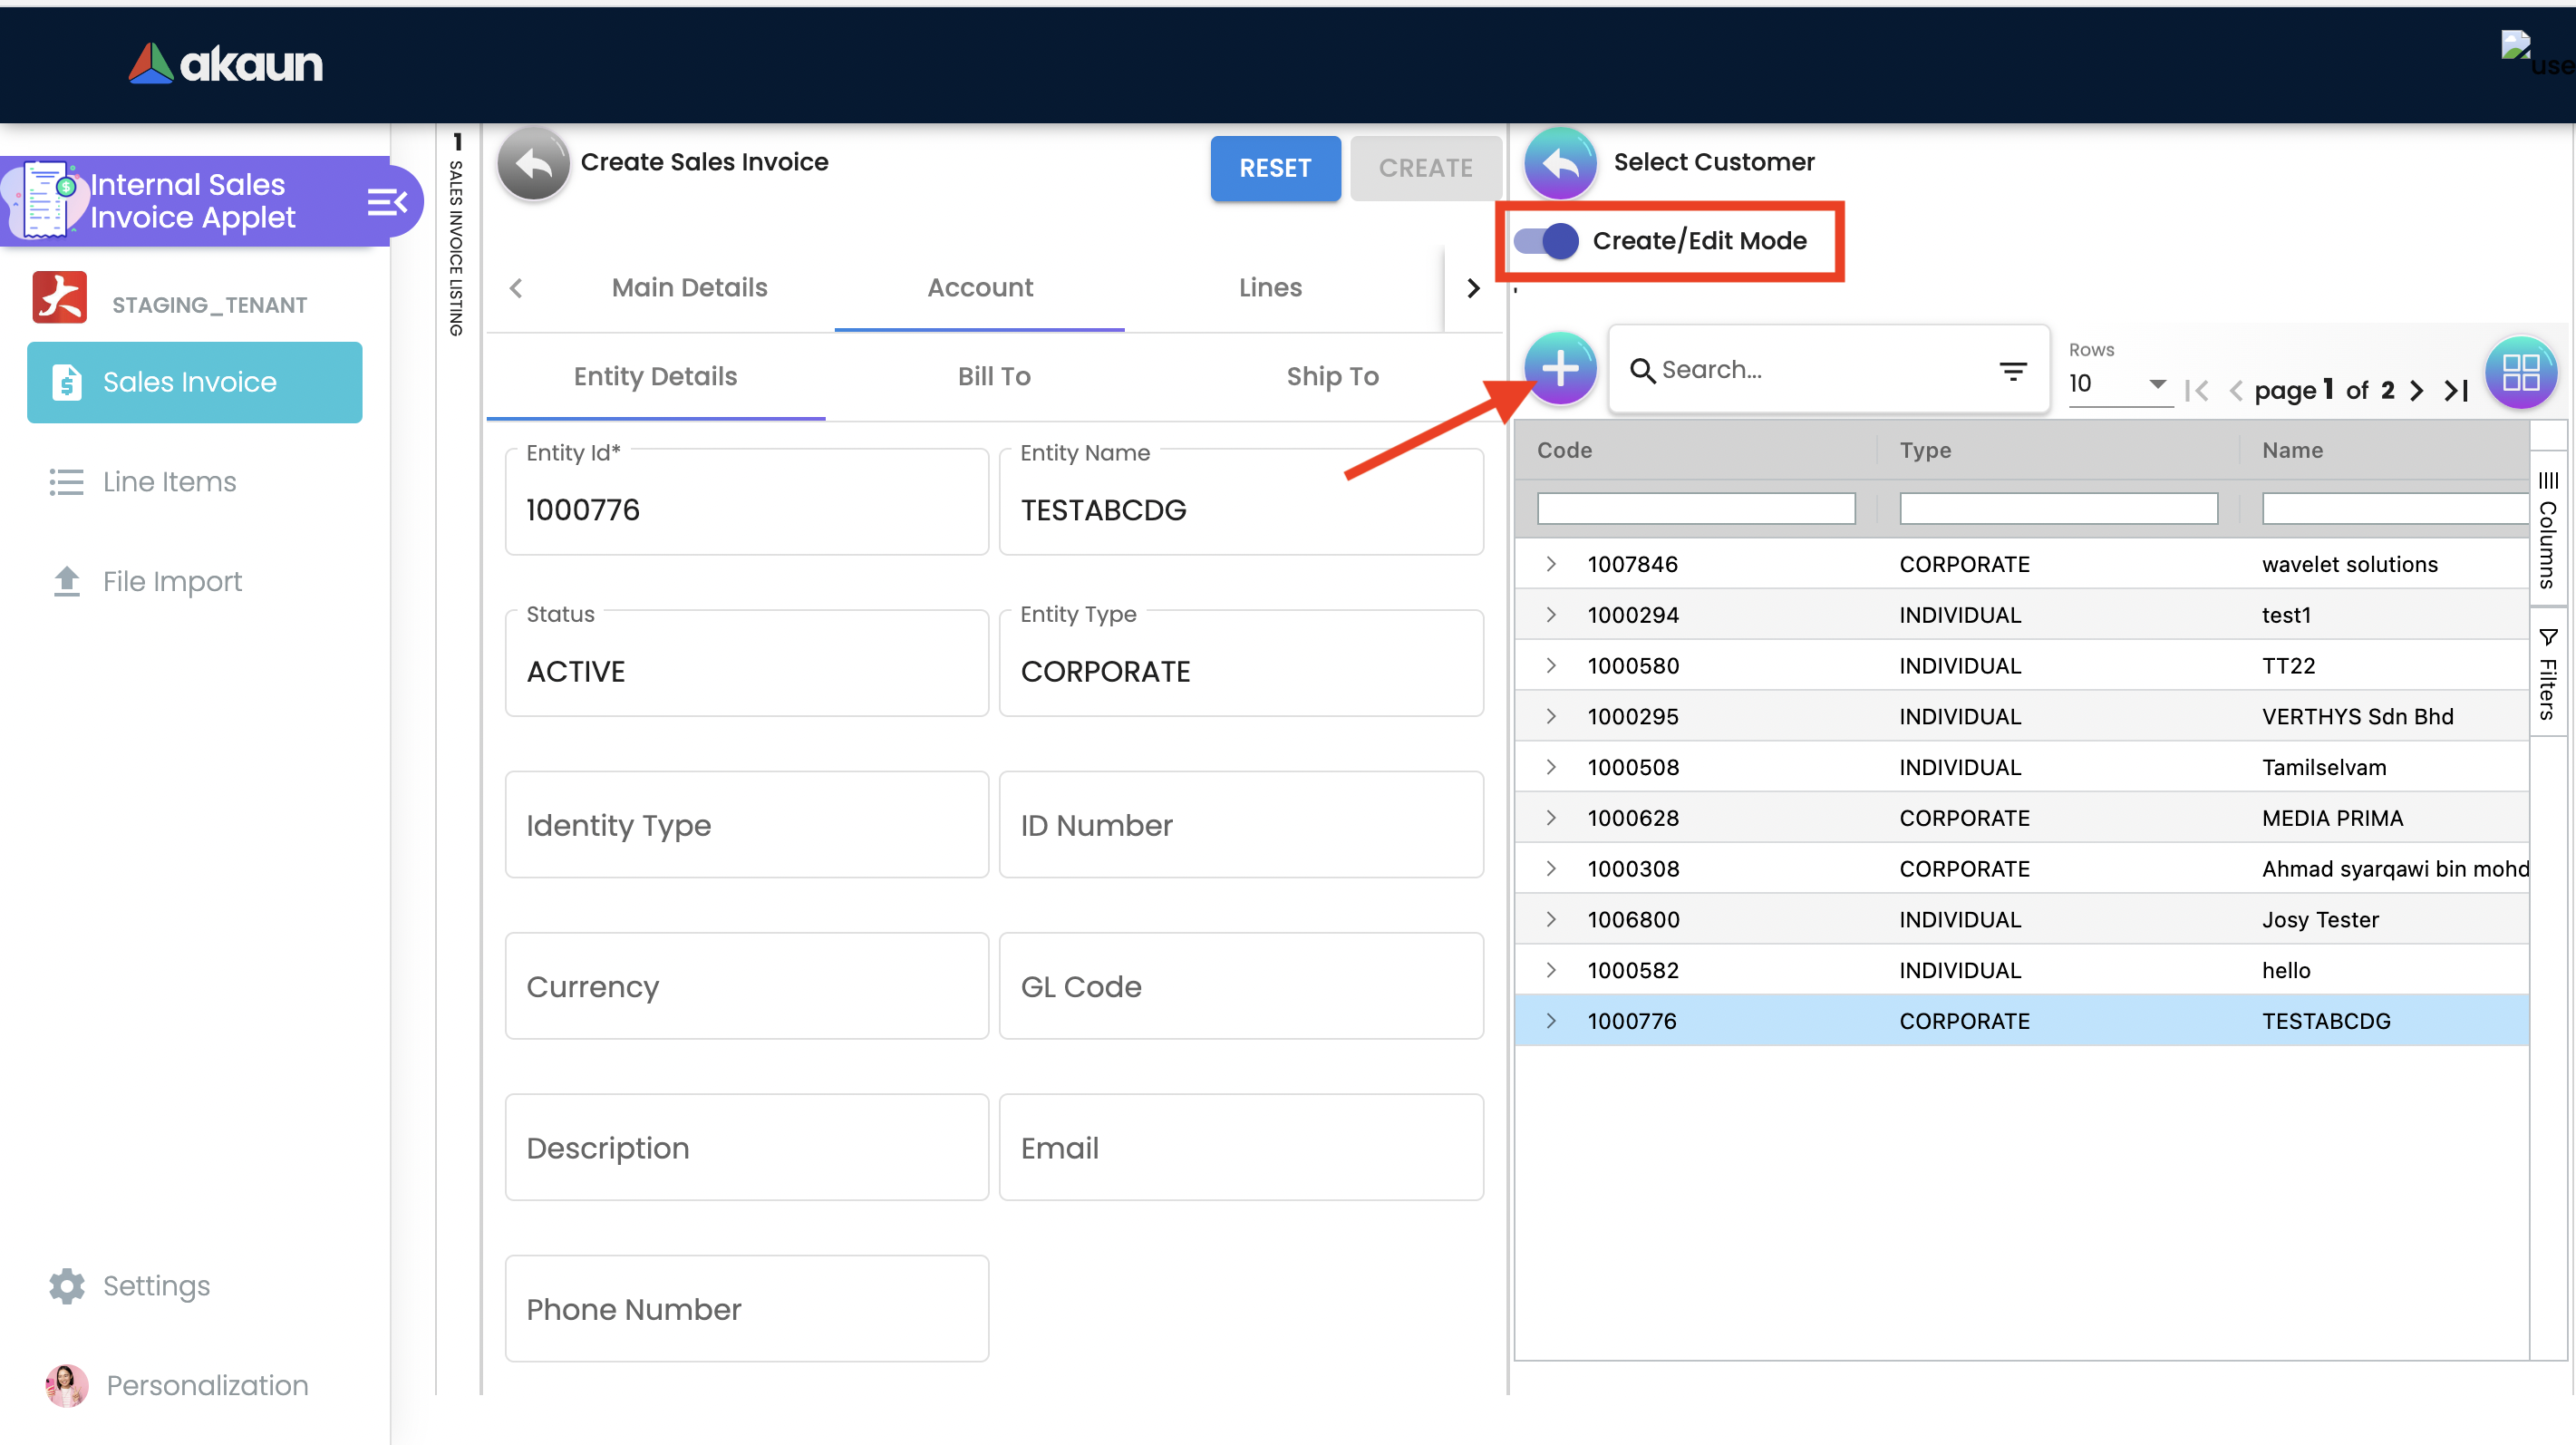
2.3.2.1 Entity Details
All relevant information from the Customer master record will be copied from here to the sales order.
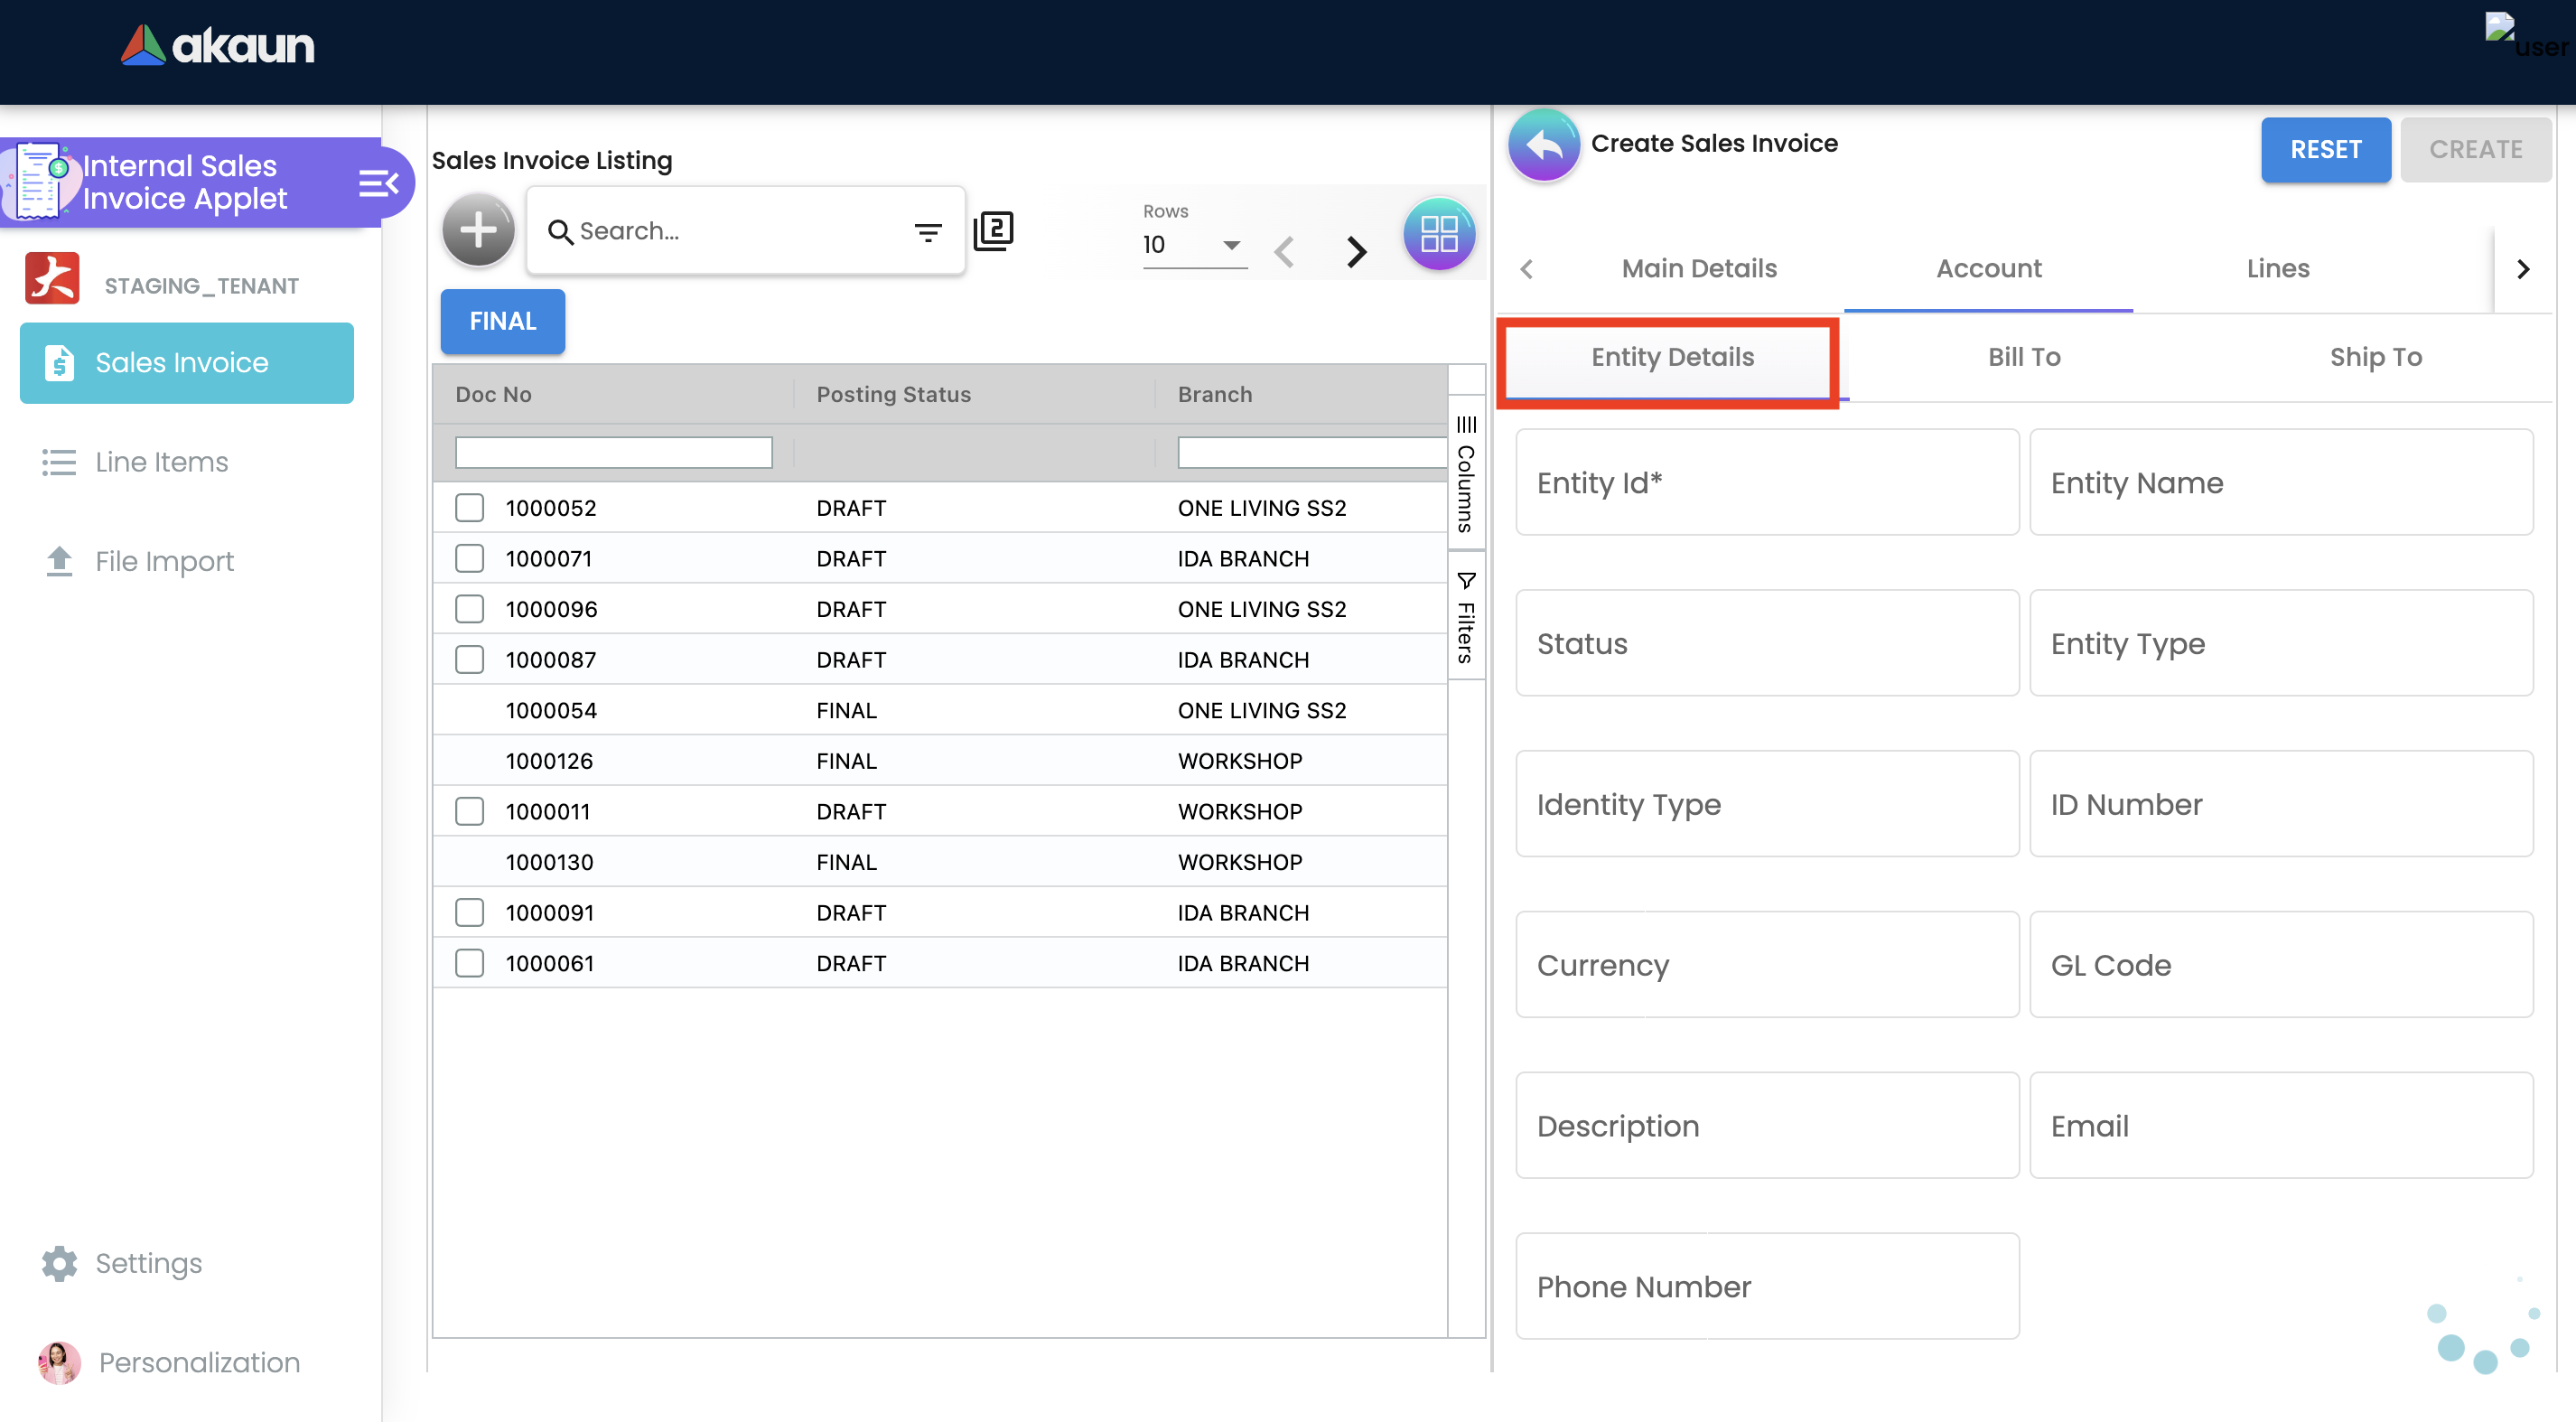
Click on the Entity ID.
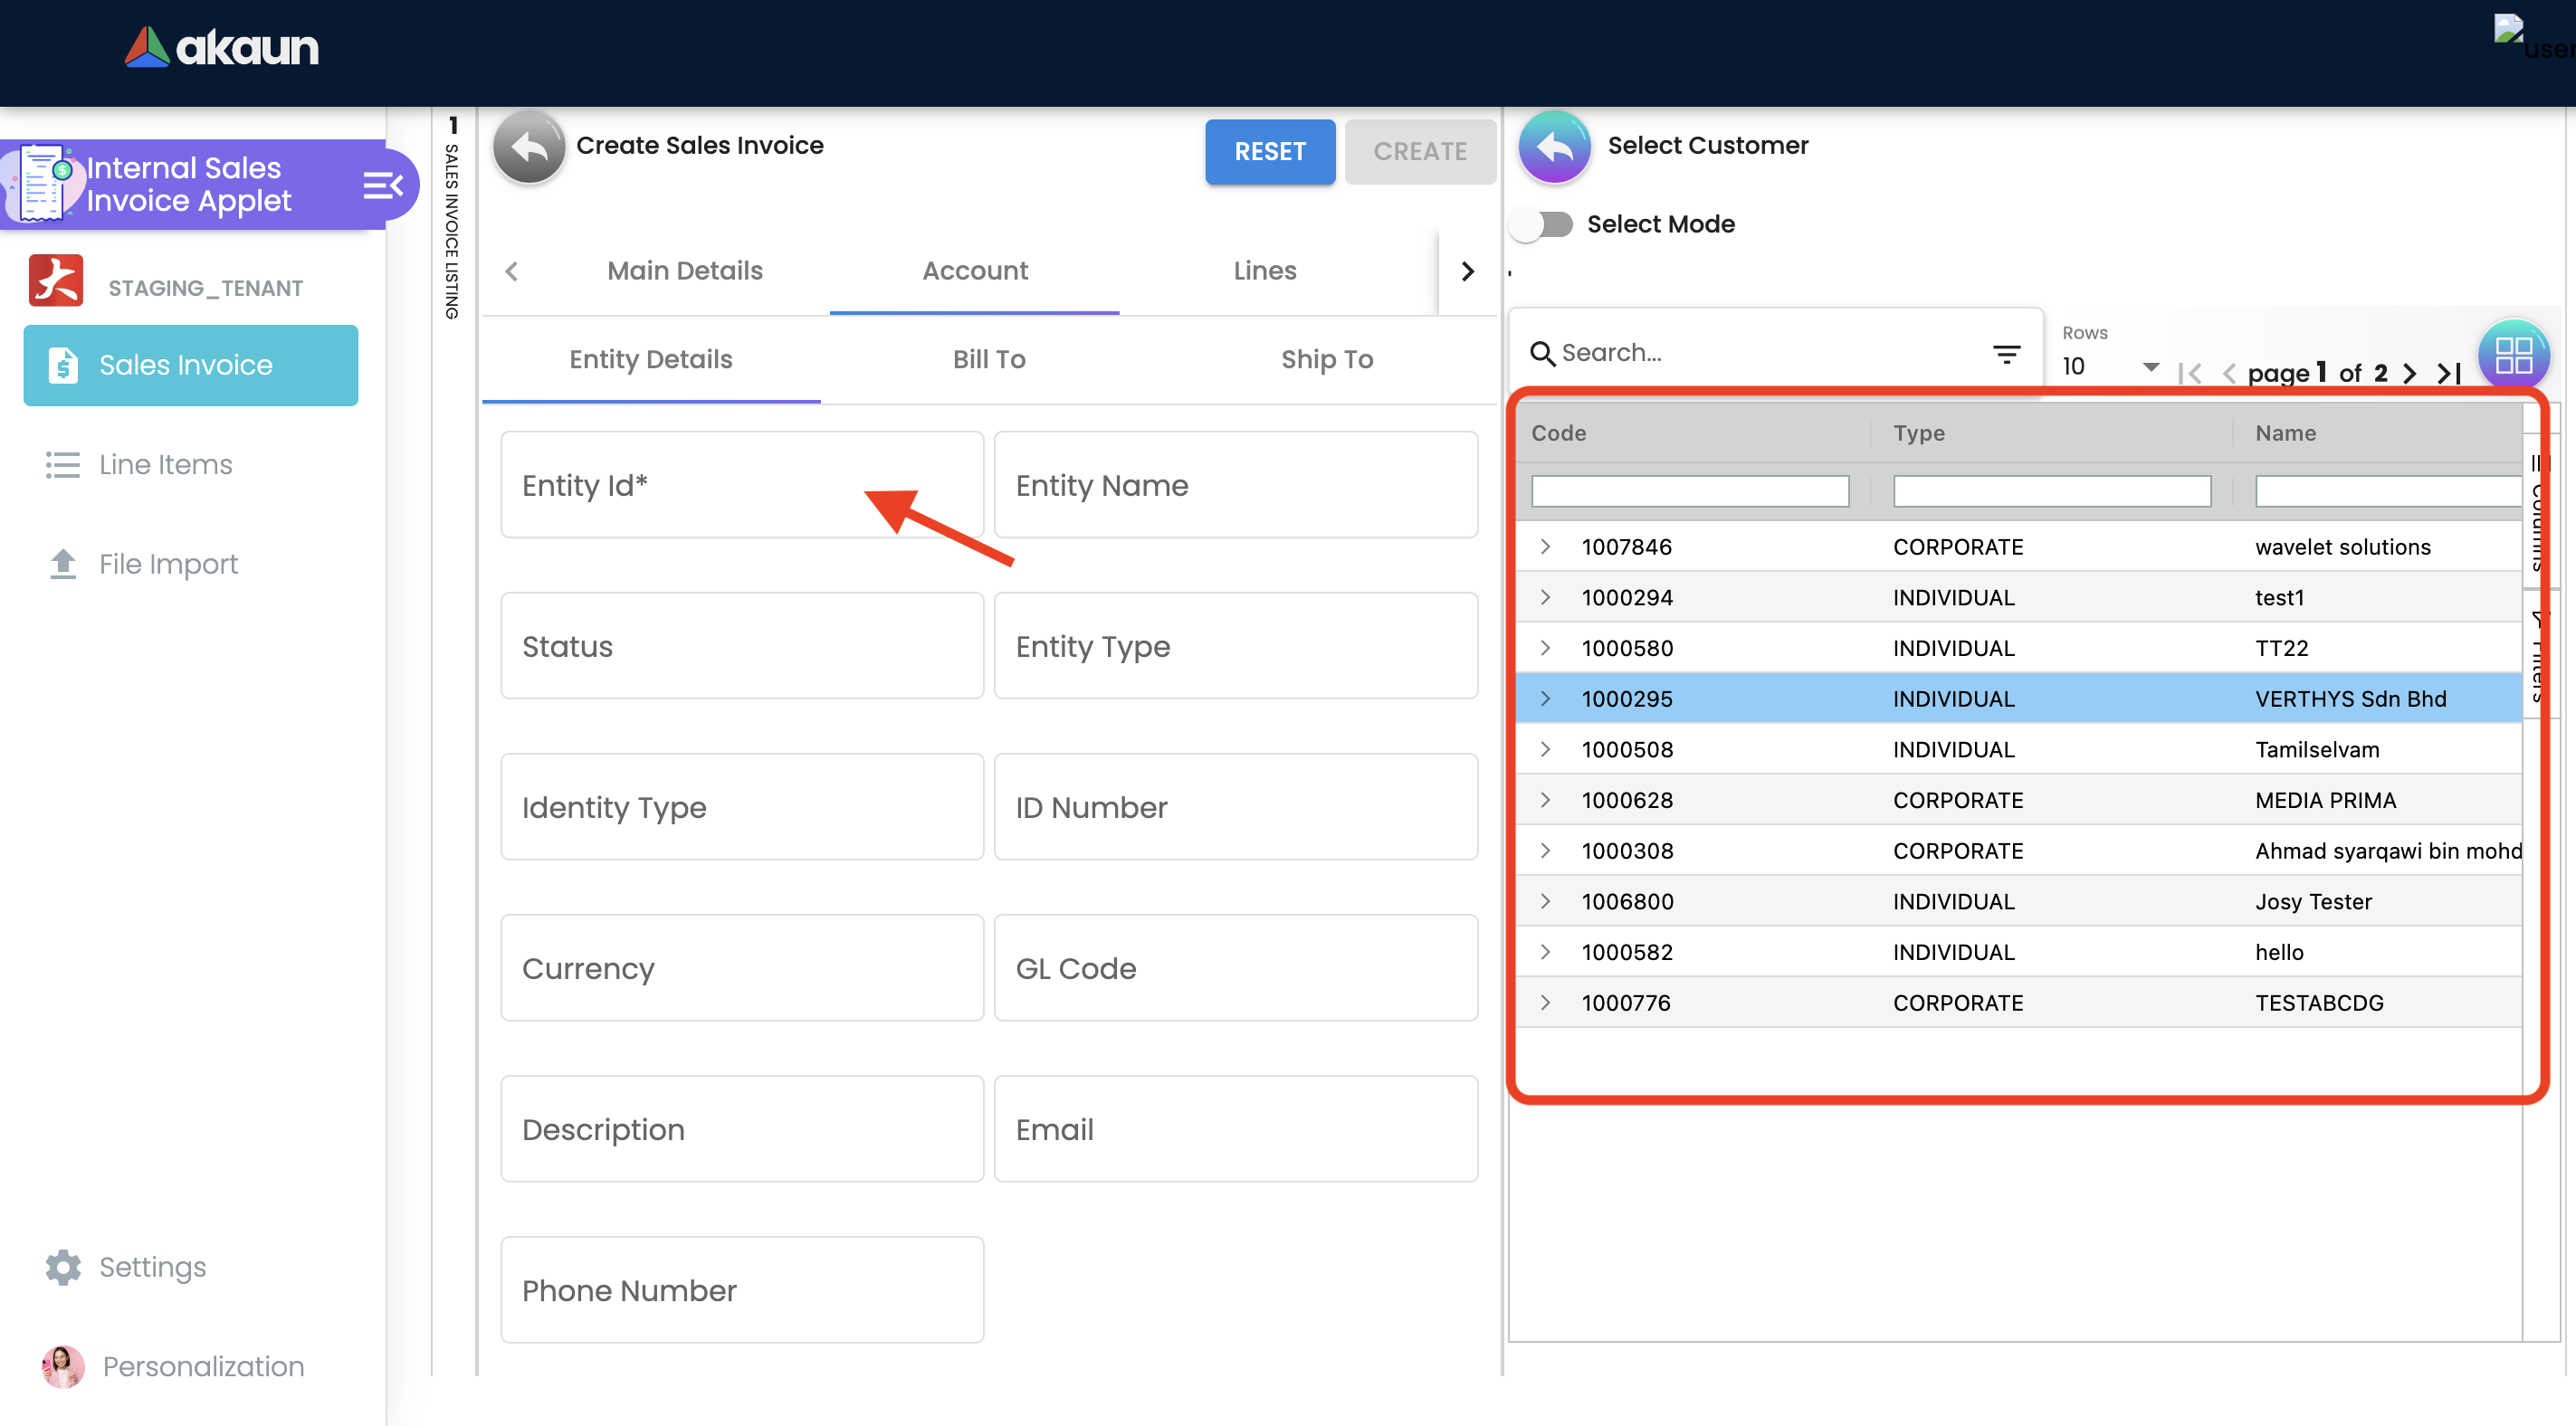
Seach Customers from the list.
Upon selecting the customer, master record details will be auto-filled. As shown in the screen below.
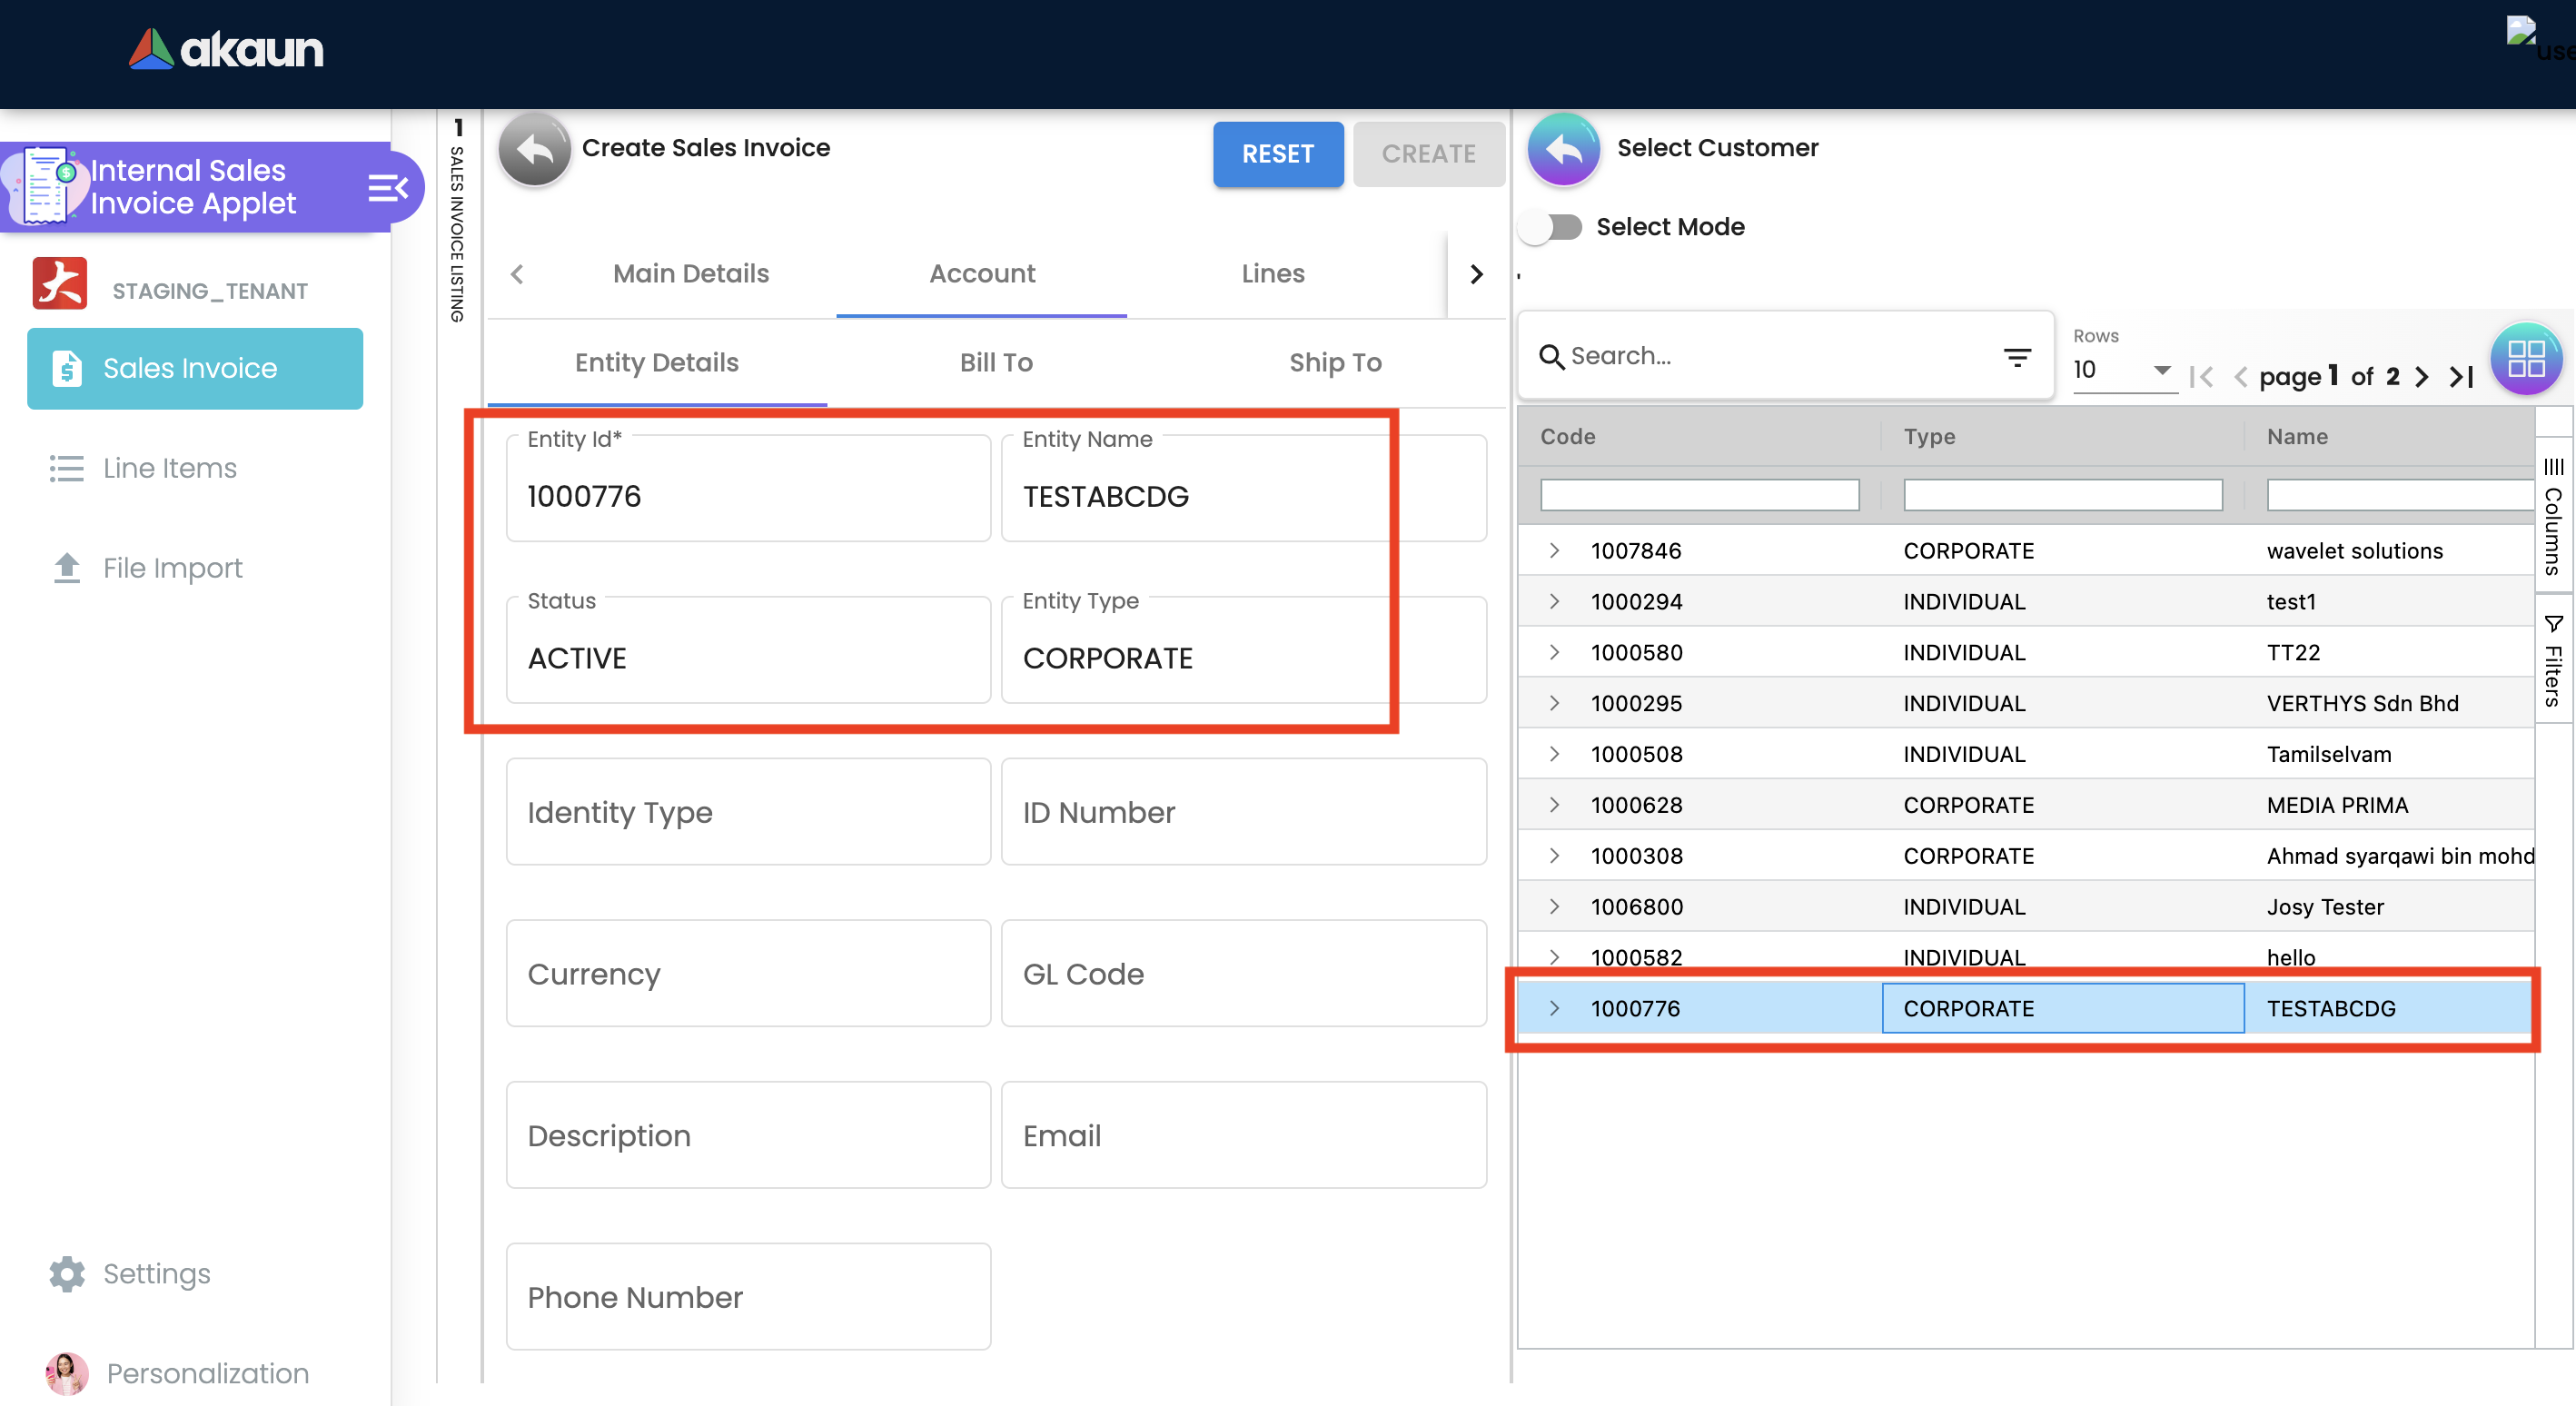
User can create and edit the Customer.
-
Entity Name: Customer Name, auto-filled when customer entity is selected.
-
Status: Active or Inactive. Auto-filled when customer entity is selected.
-
Entity Type: Corporate or Individual. Auto-filled when customer entity is selected.
-
Identity Type: IC or Passport, auto-filled when customer entity is selected. ** ID Number: IC or Passport number, auto-filled when customer entity is selected.
-
Currency: To determined based on the pricing condition what you are maintaining. Auto-filled when customer entity is selected.
-
GL Code: A number used to record business transactions in the general ledger. Auto-filled when customer entity is selected.
-
Description: Additional notes. Auto-filled when customer entity is selected.
-
Email: A central email through which customers want to communicate. Auto-filled when customer entity is selected.
-
Phone Number: A central phone number through which customers want to communicate. Auto-filled when customer entity is selected.
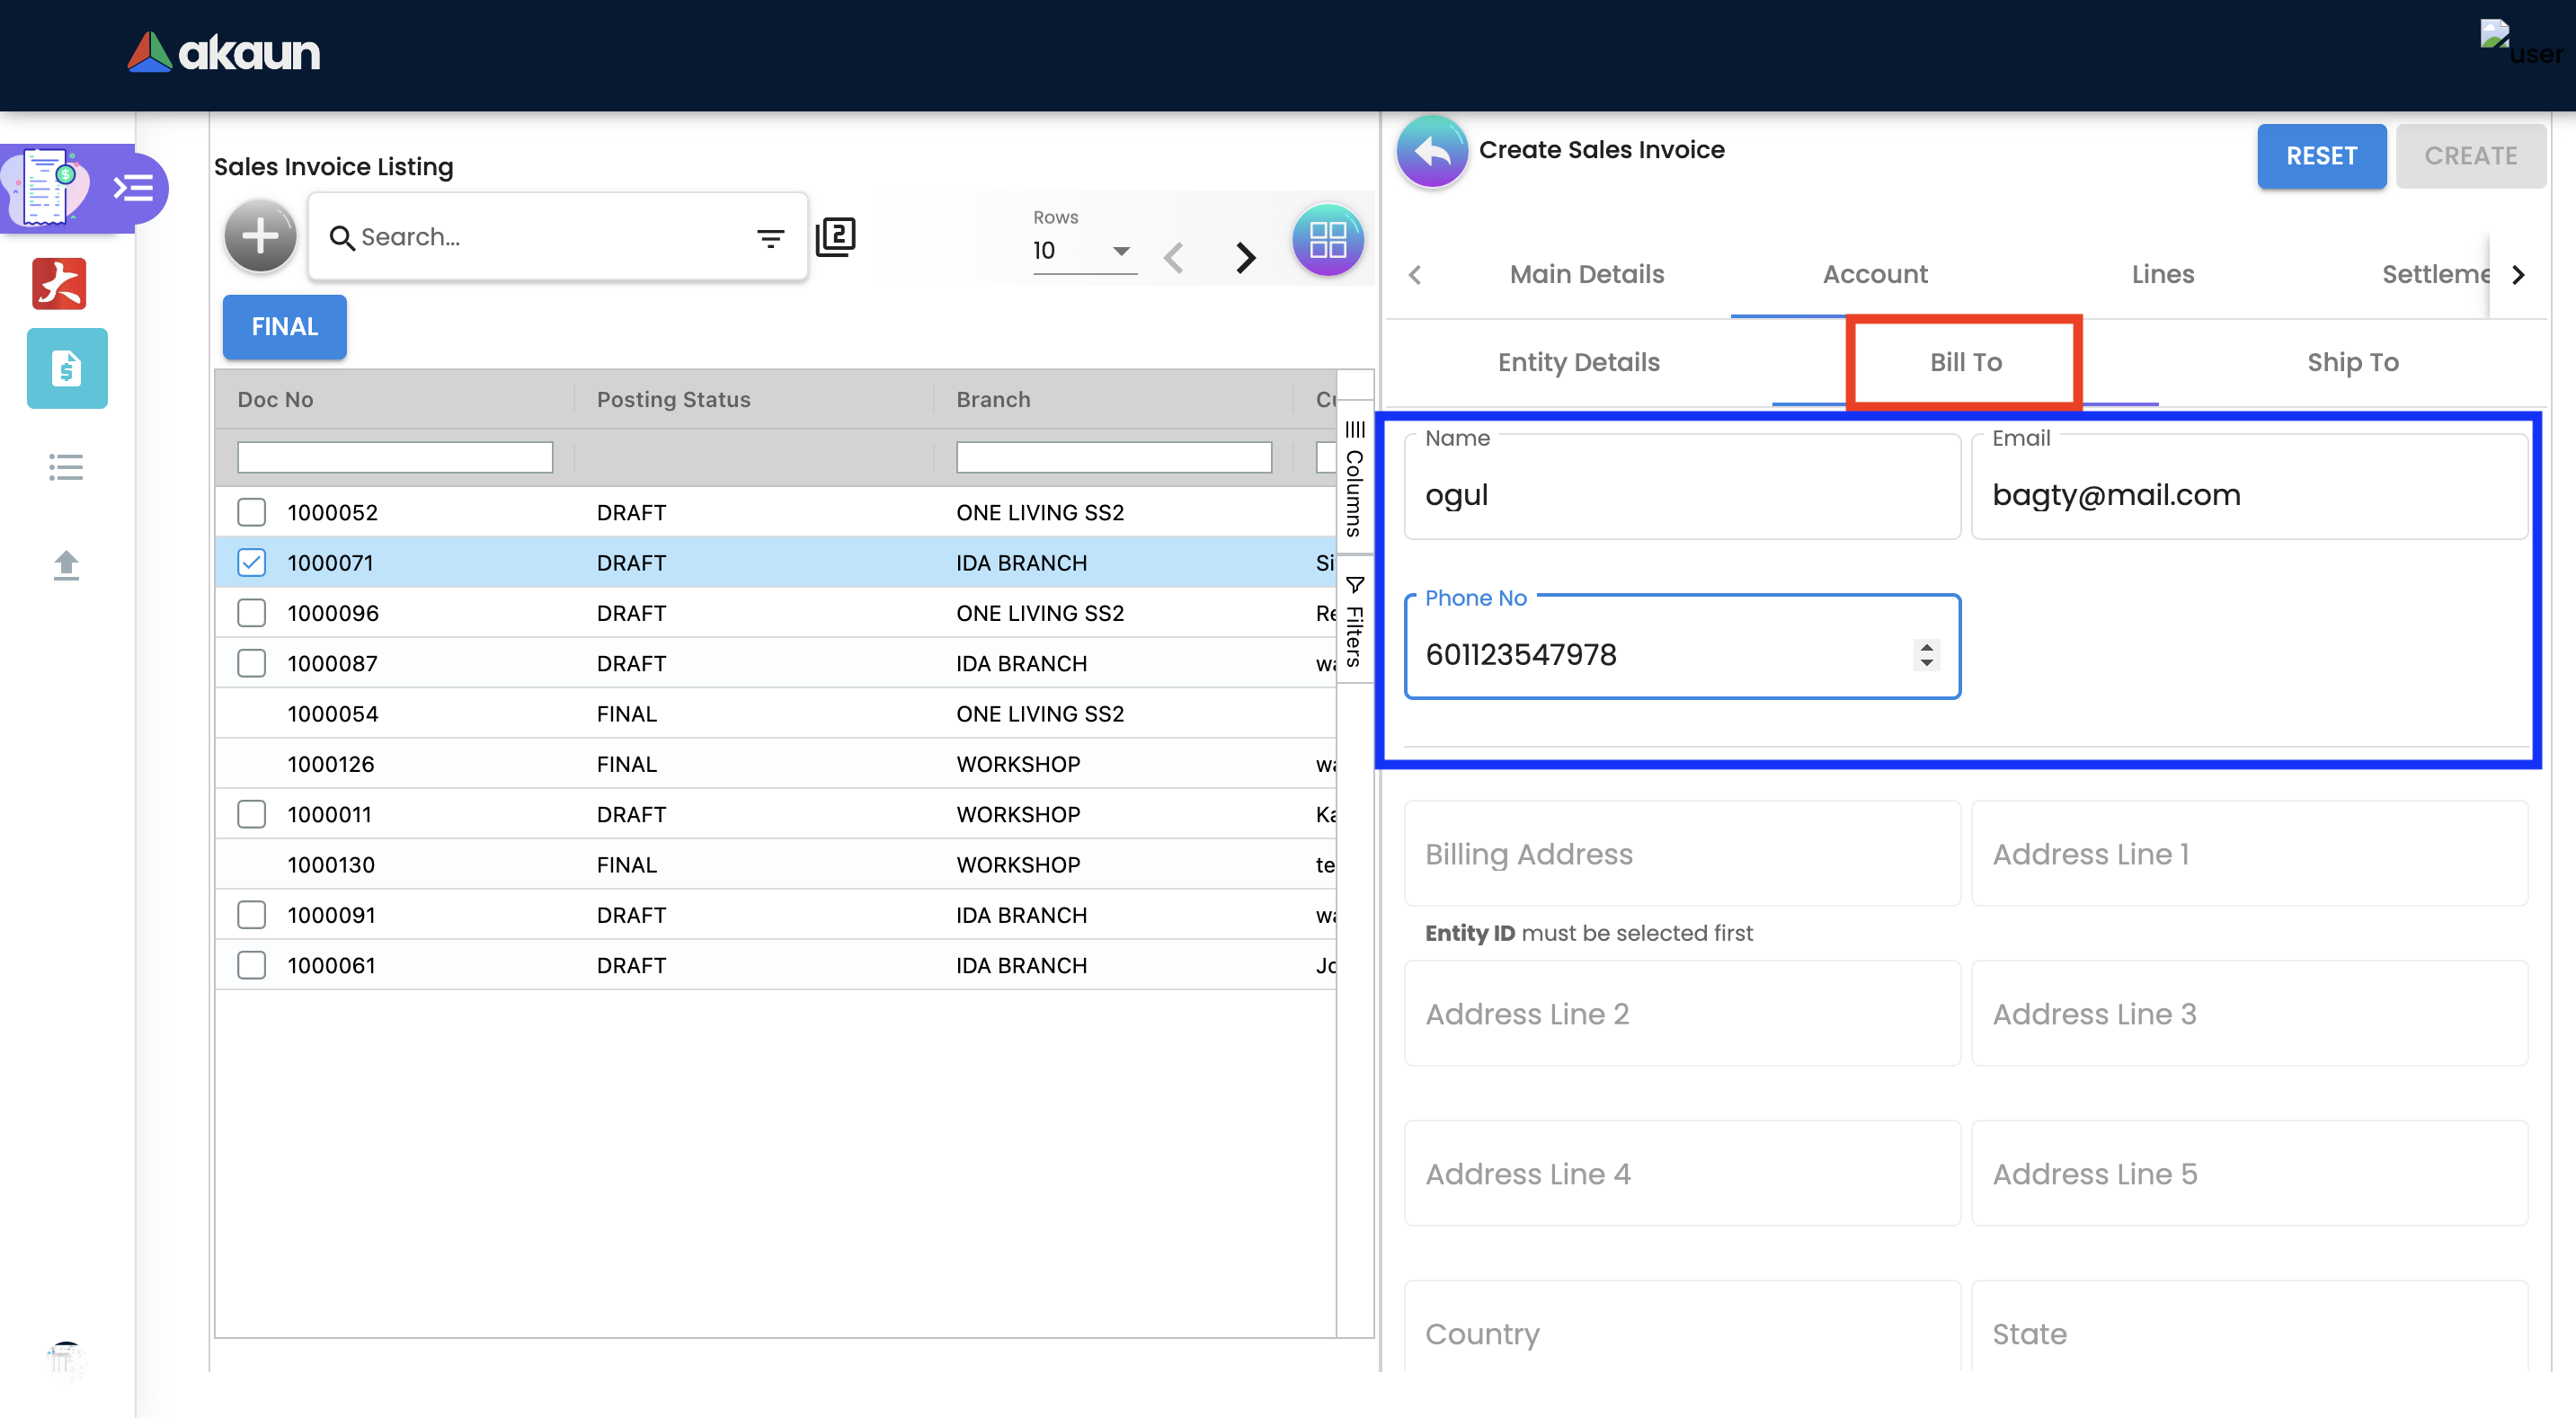
2.3.2.2 Bill To
A bill to is the customer who pays for the sales order. It can be different than the sold-to customer.
In order to proceed, kindly make sure the addresses are defined in the customer maintenance applet.
Based on the entity selected, the bill to details gets auto-filled and are editable.
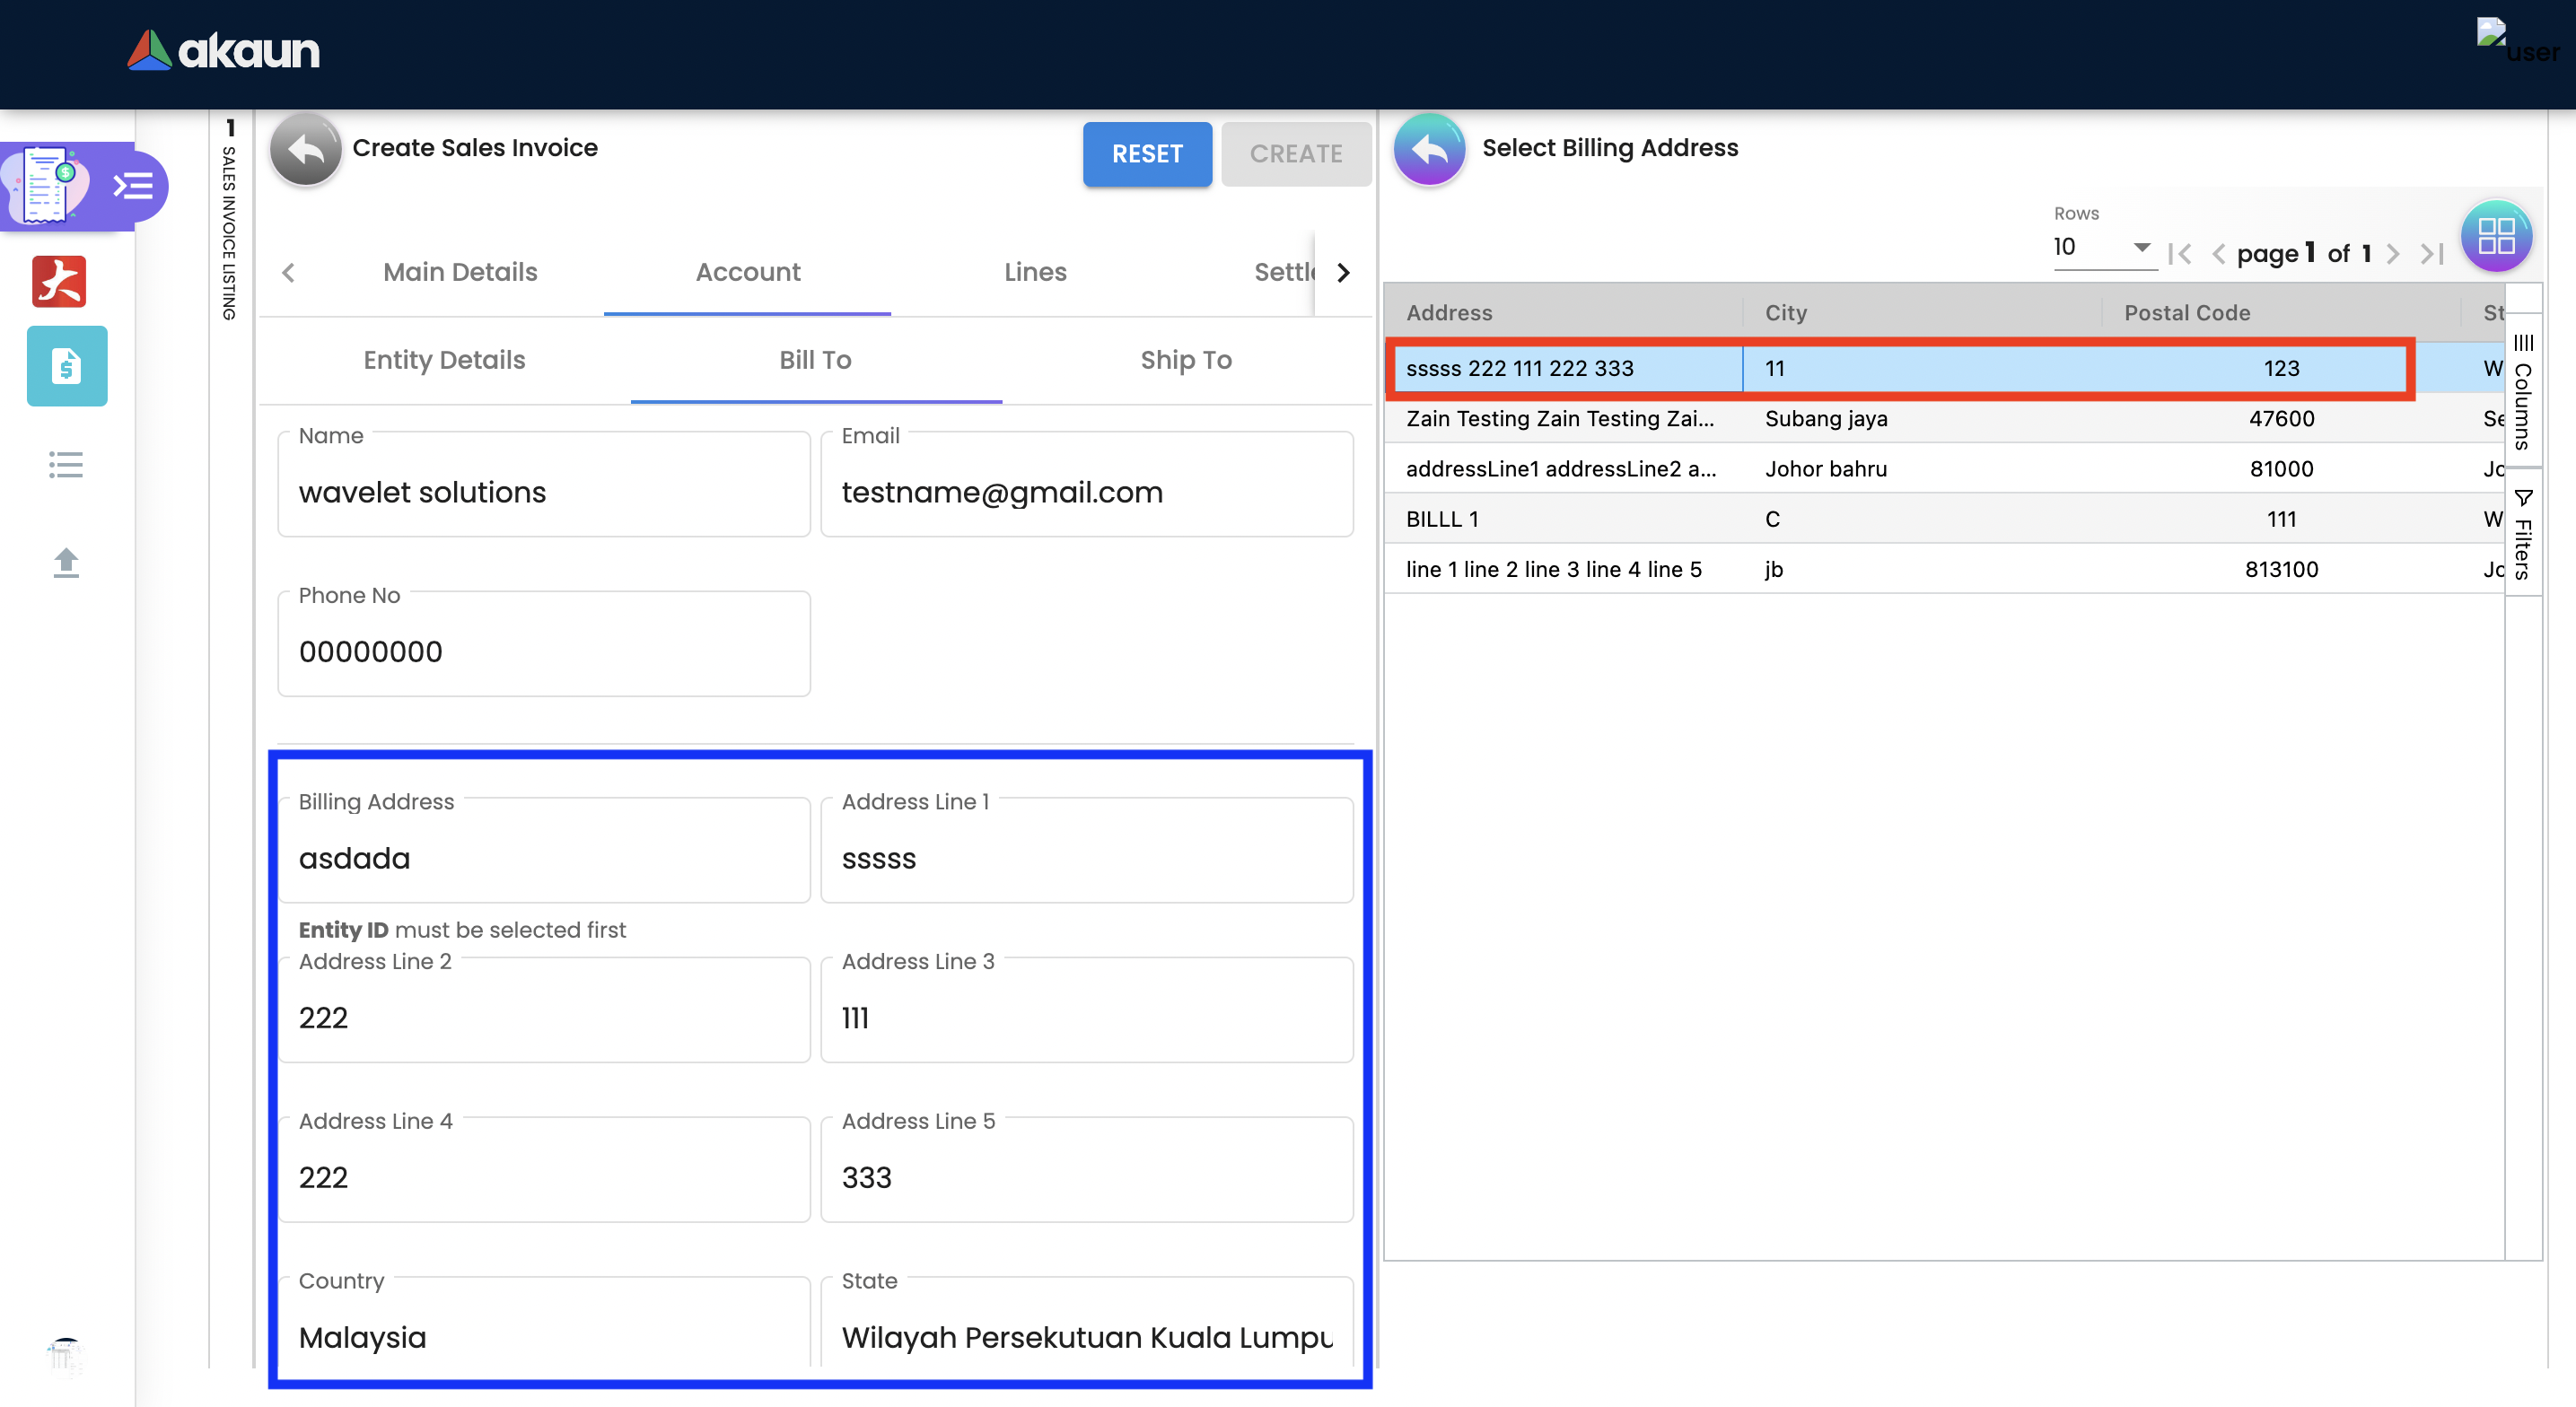
Click on the billing address.

Upon selecting the address, the billing address details get auto-filled and are editable.
2.3.2.3 Ship To
A ship to is the customer who receives the specified goods and/or services in the sales order. It can be different than the sold-to customer.
In order to proceed, kindly make sure the addresses are defined in the customer maintenance applet.
Based on the entity selected, the bill to details gets auto-filled and are editable.
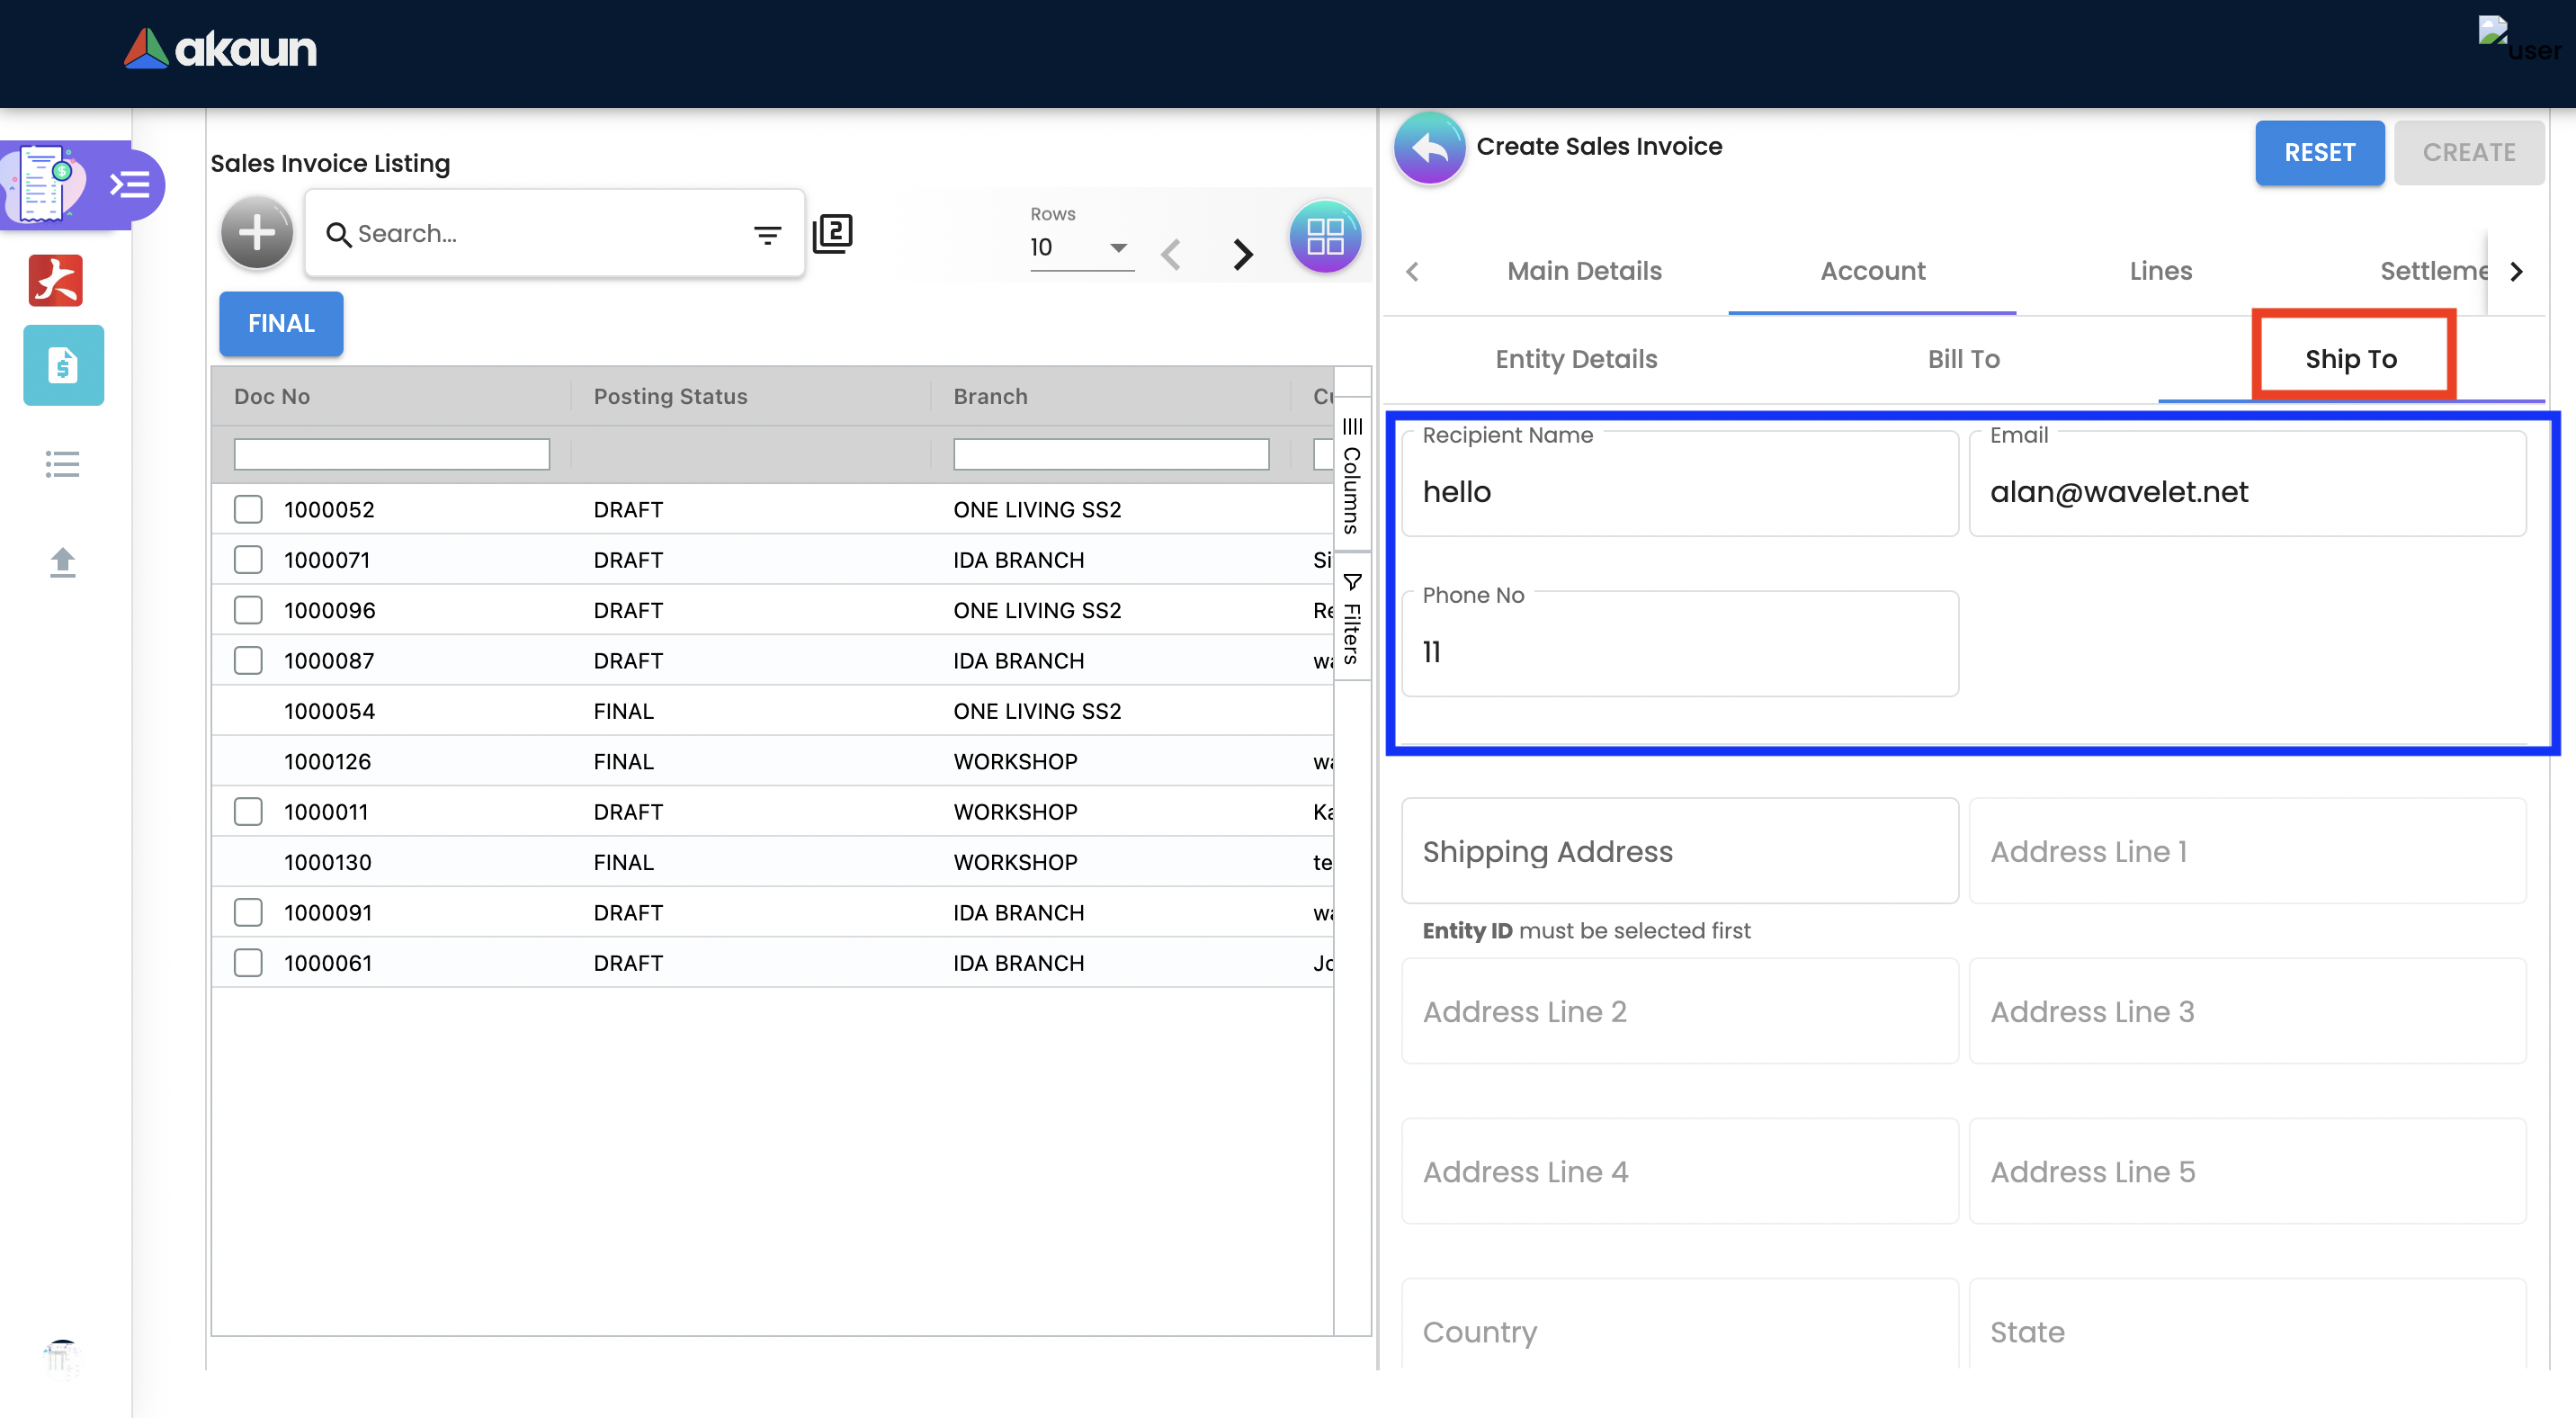
Click on the shipping address.
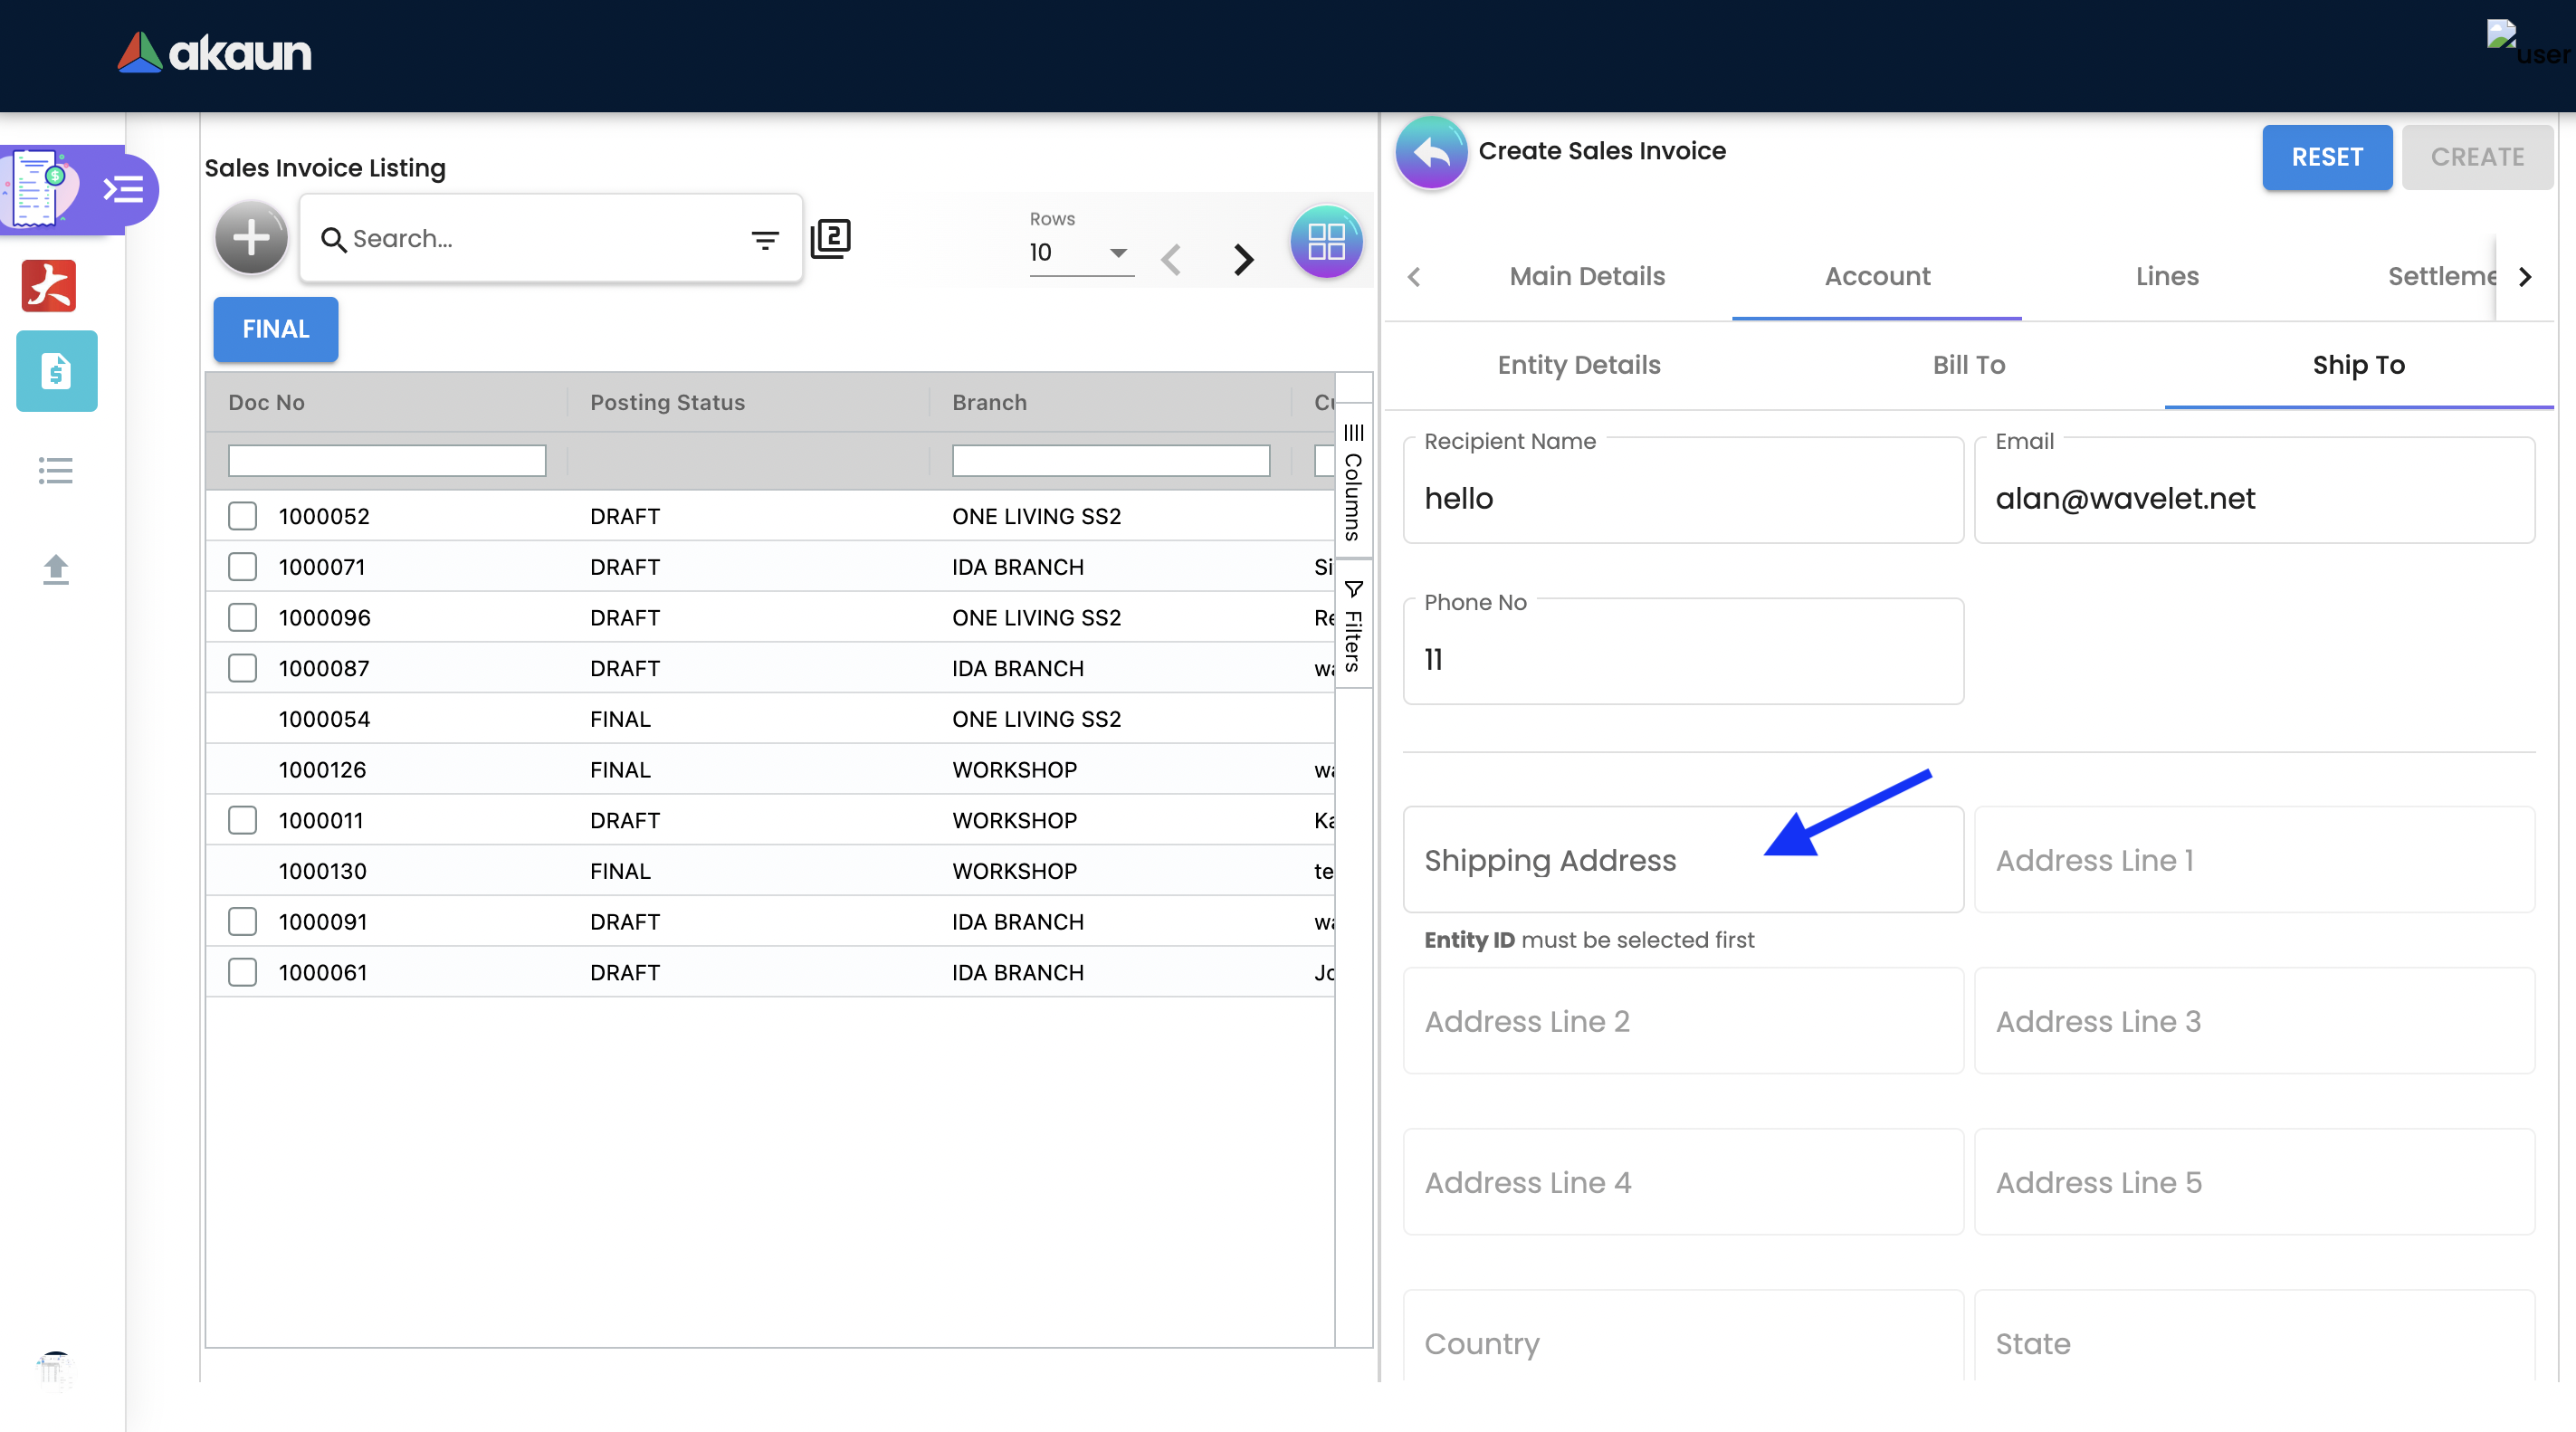
Upon selecting the address, the shipping address details get auto-filled and are editable.

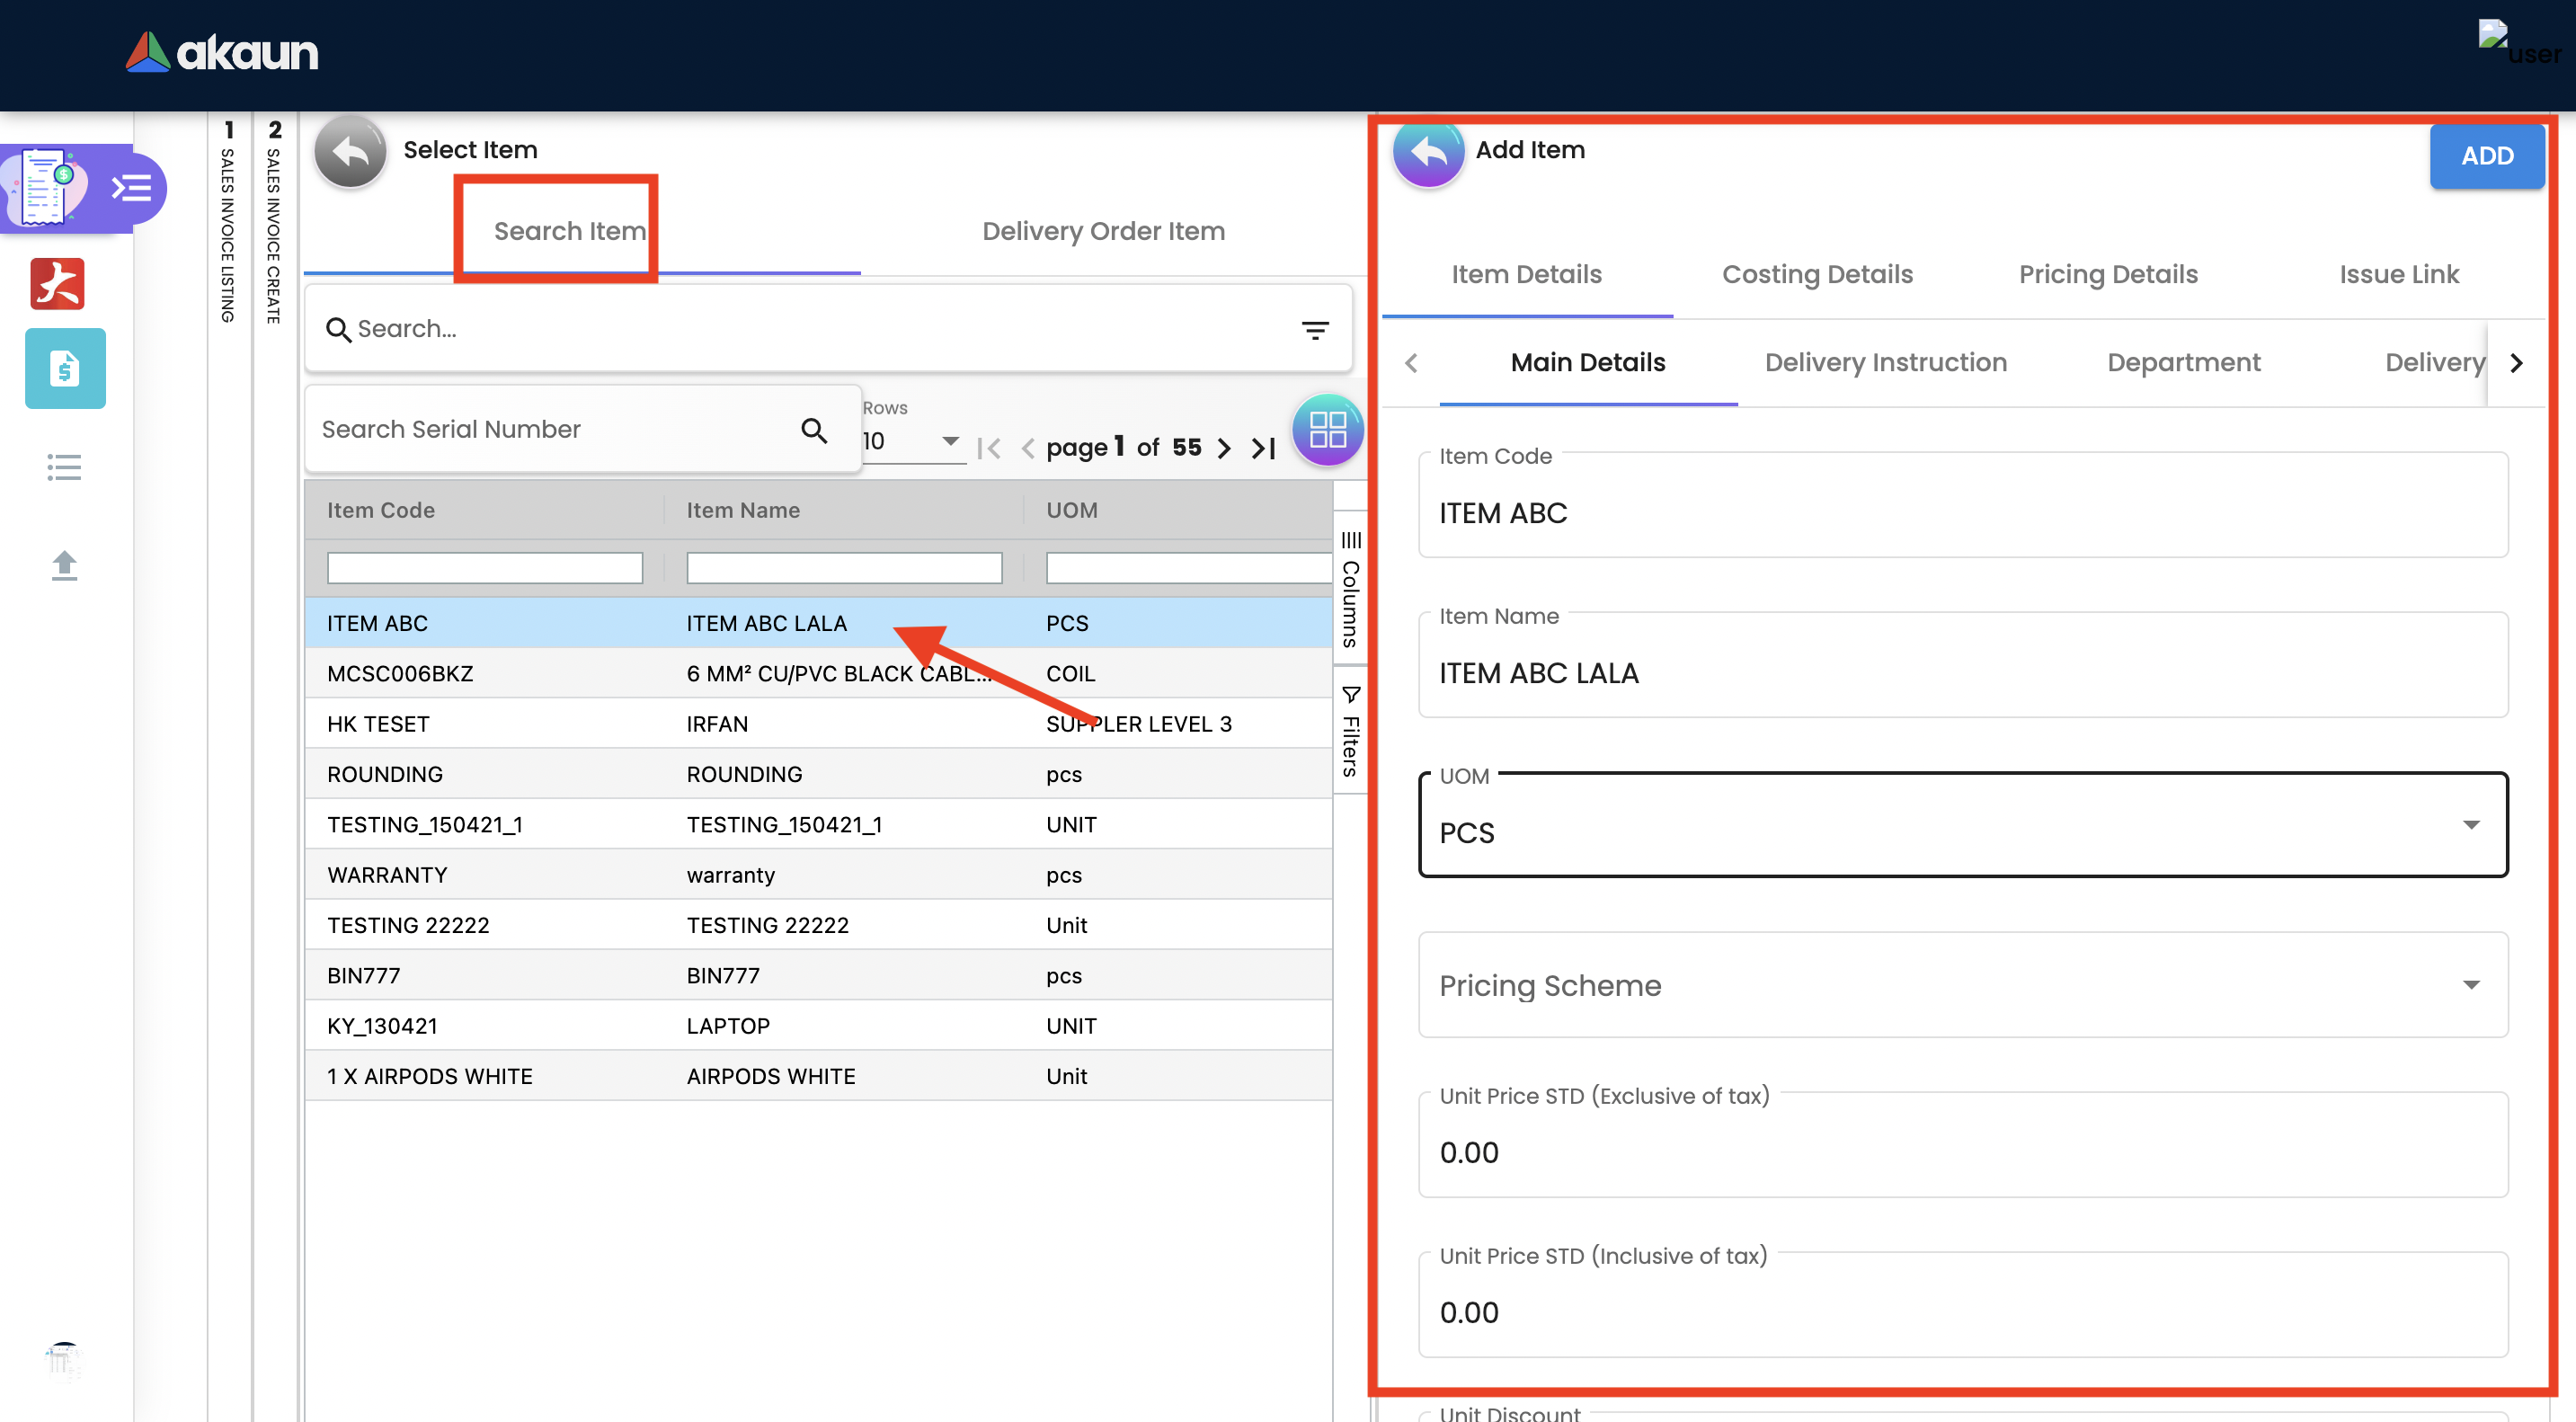
2.3.3 Lines Tab
Lines tab is used to select the line to be knocked off. This is for knocking off at the line level.
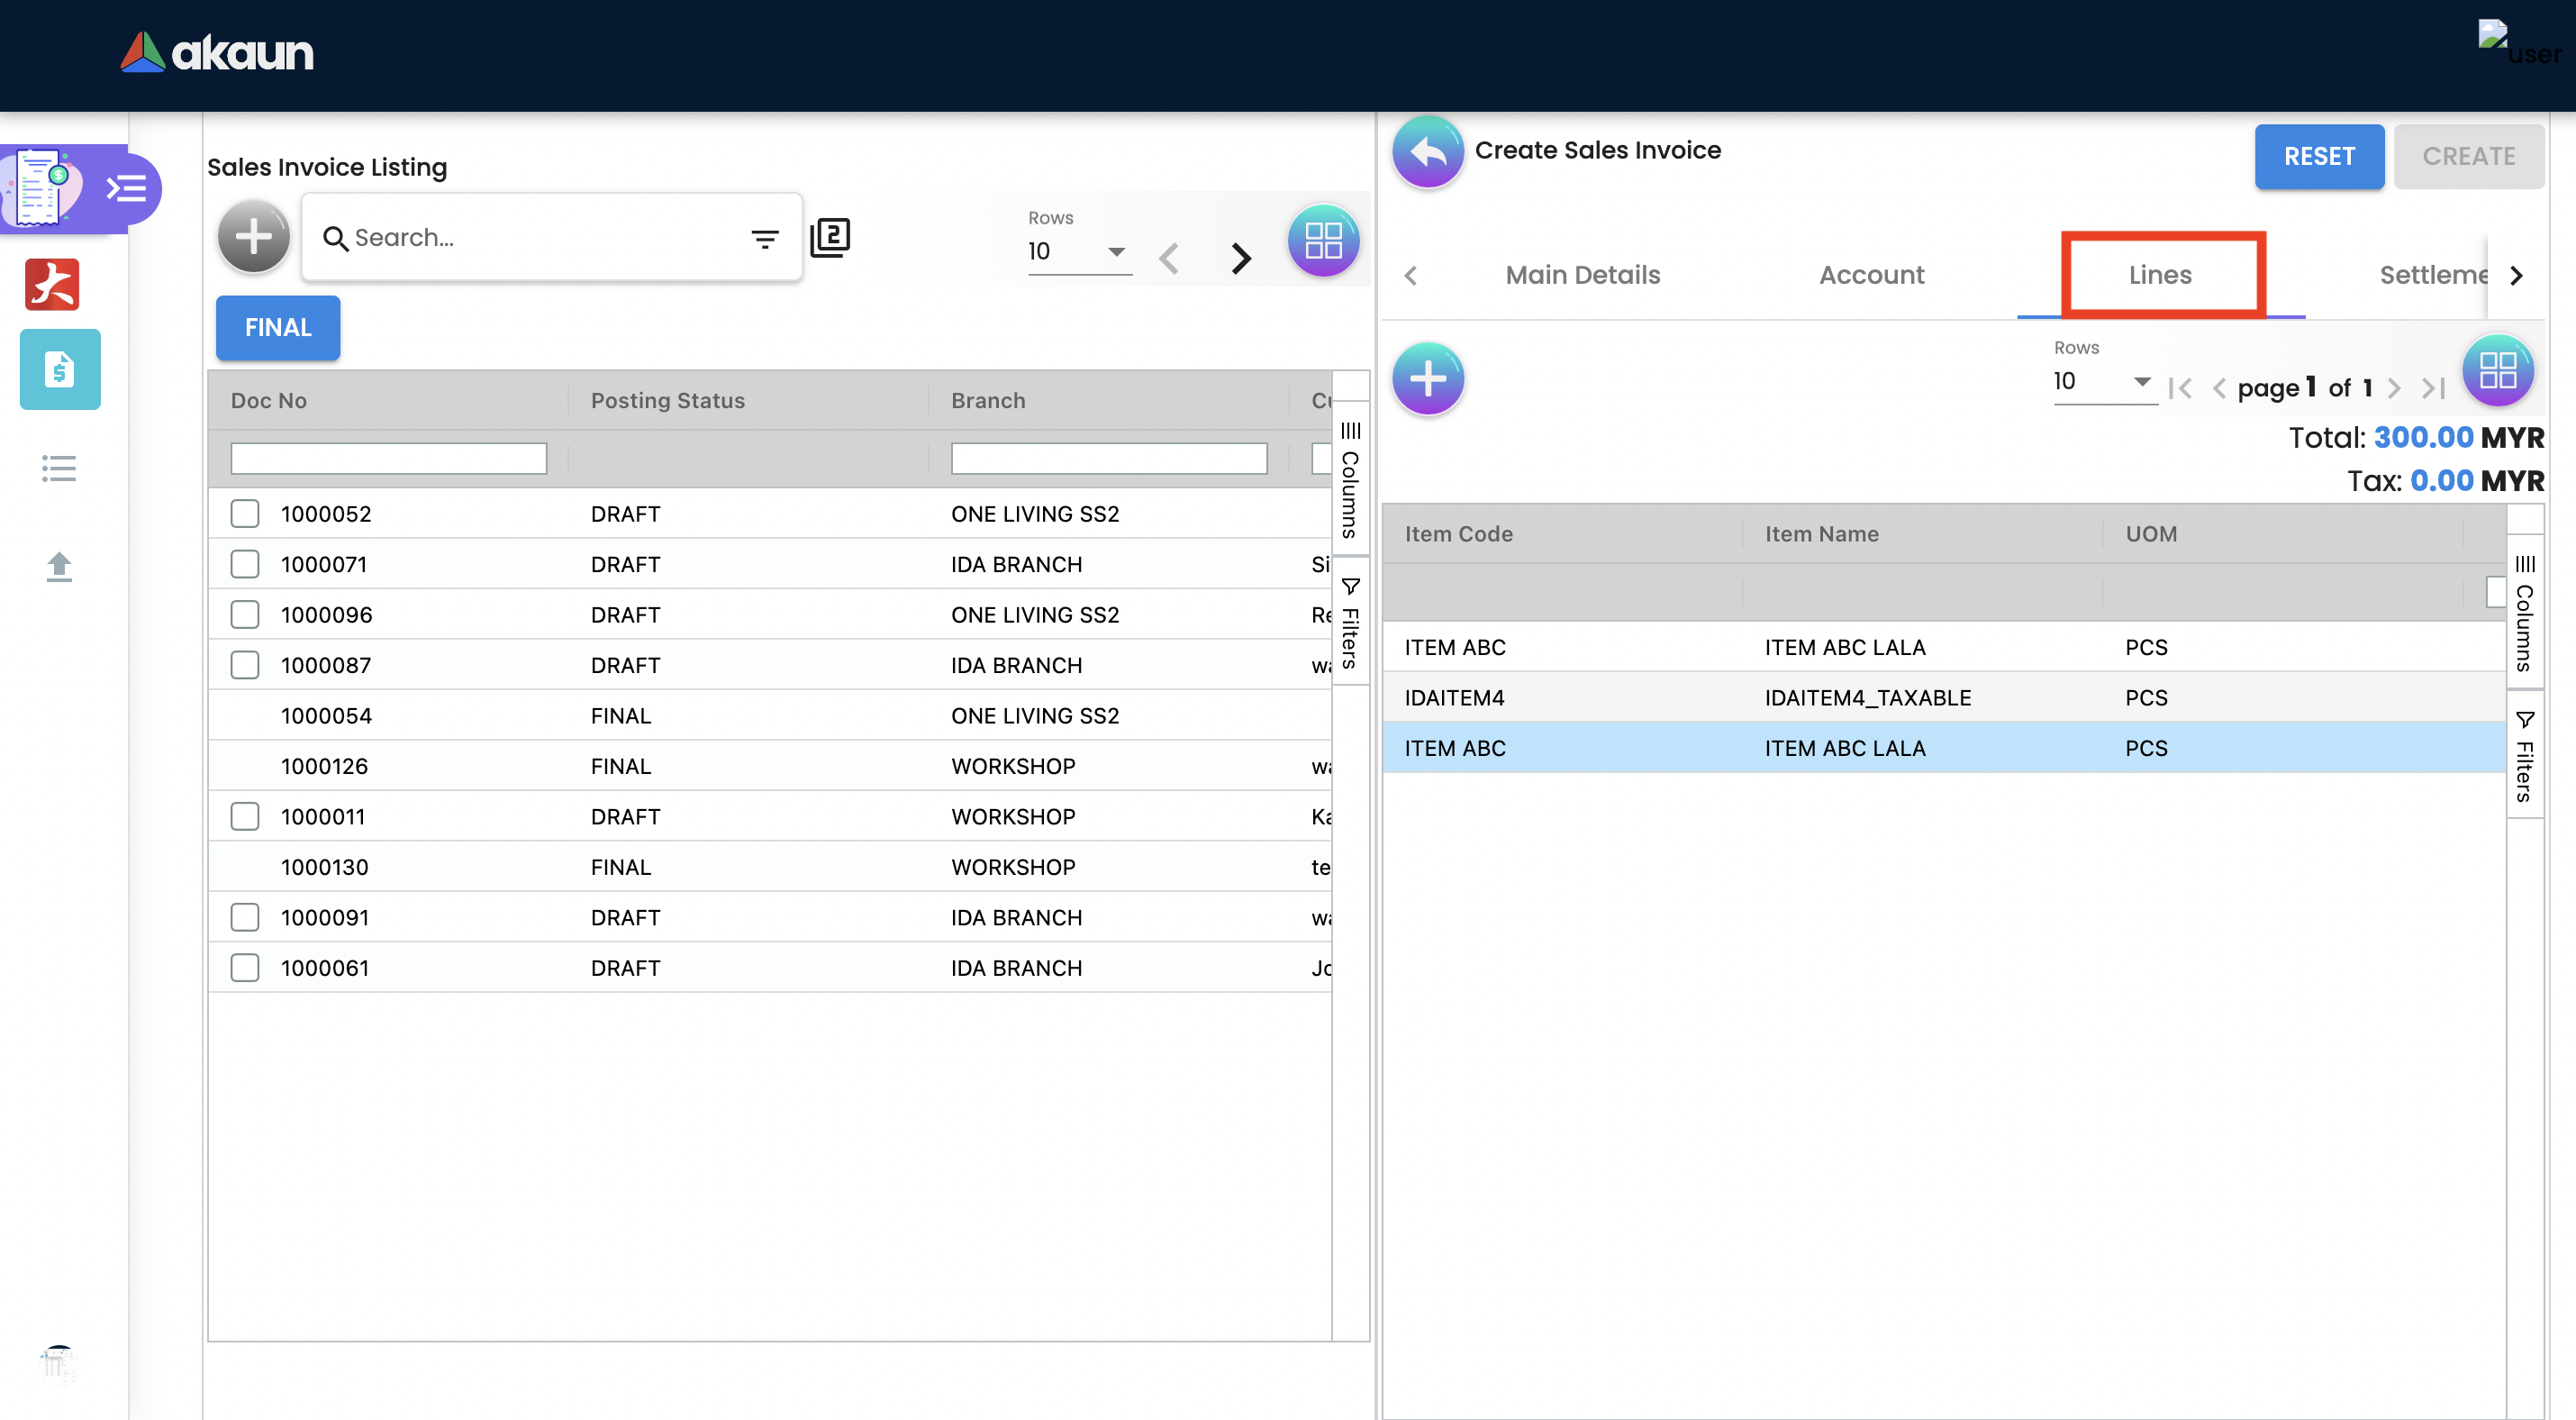
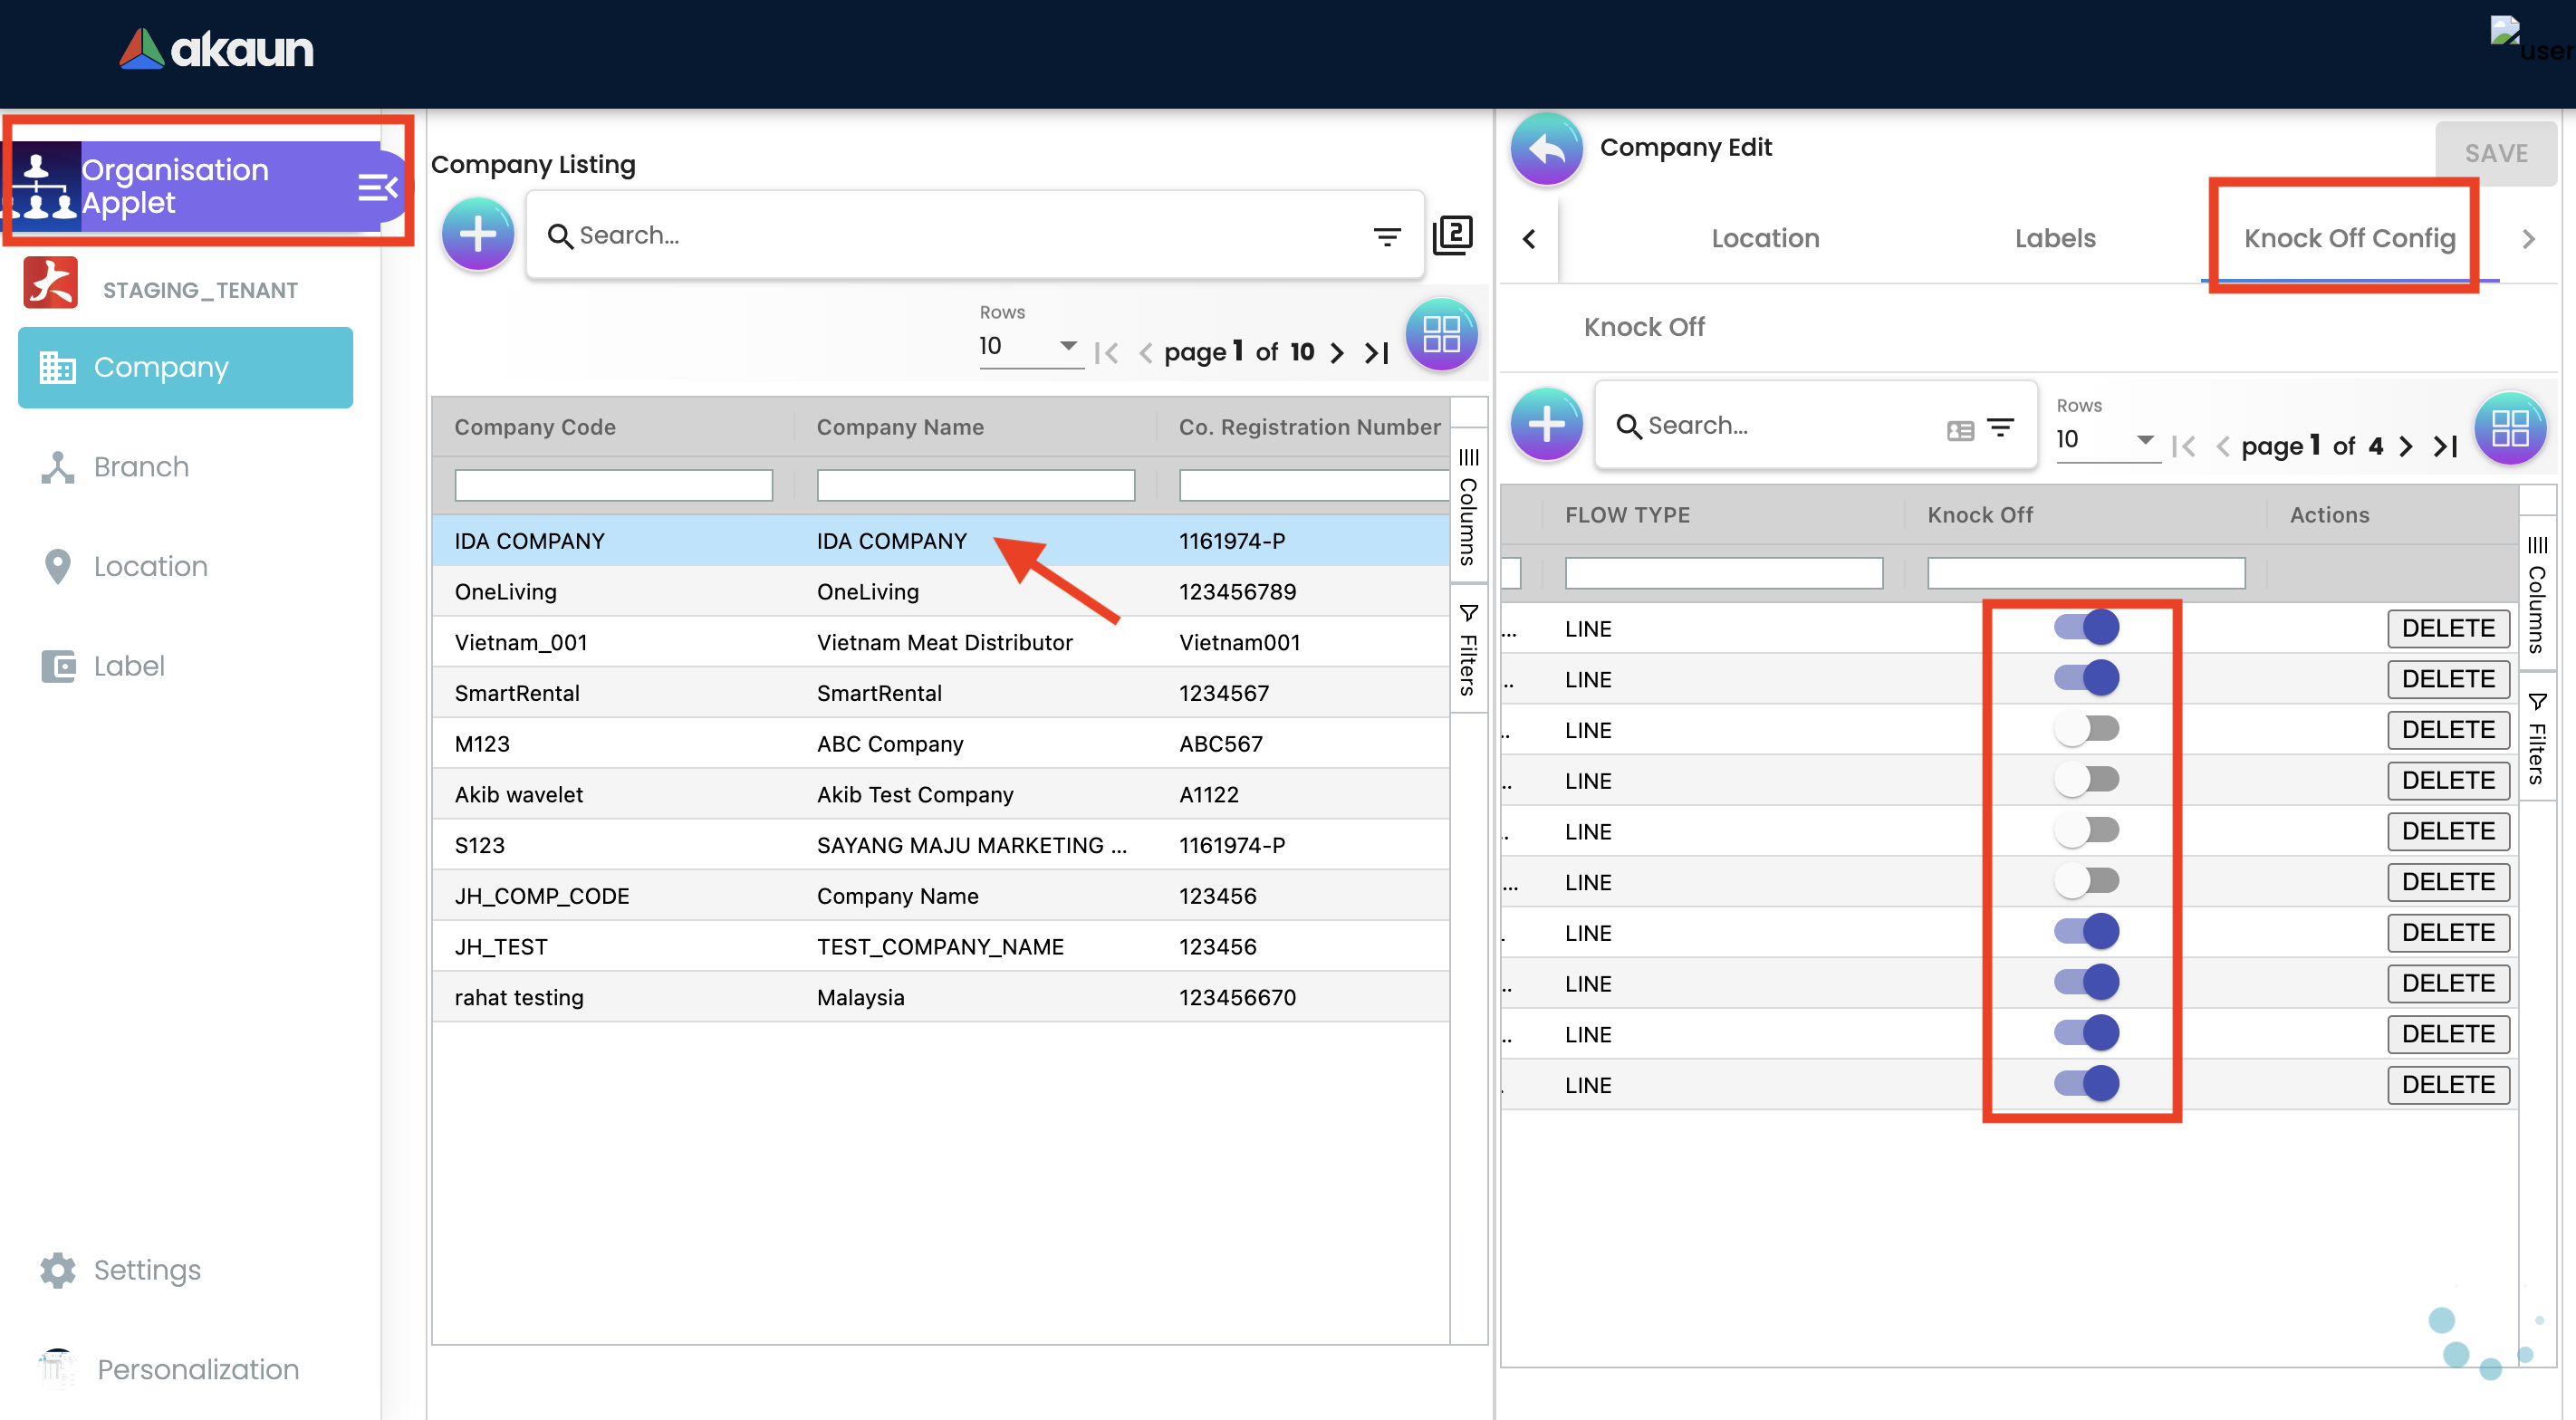
Before using Line tab, user need to go to Organization applet to enable the settings.
The documents are only visible if configured in the organisation applet and on finalising a document.
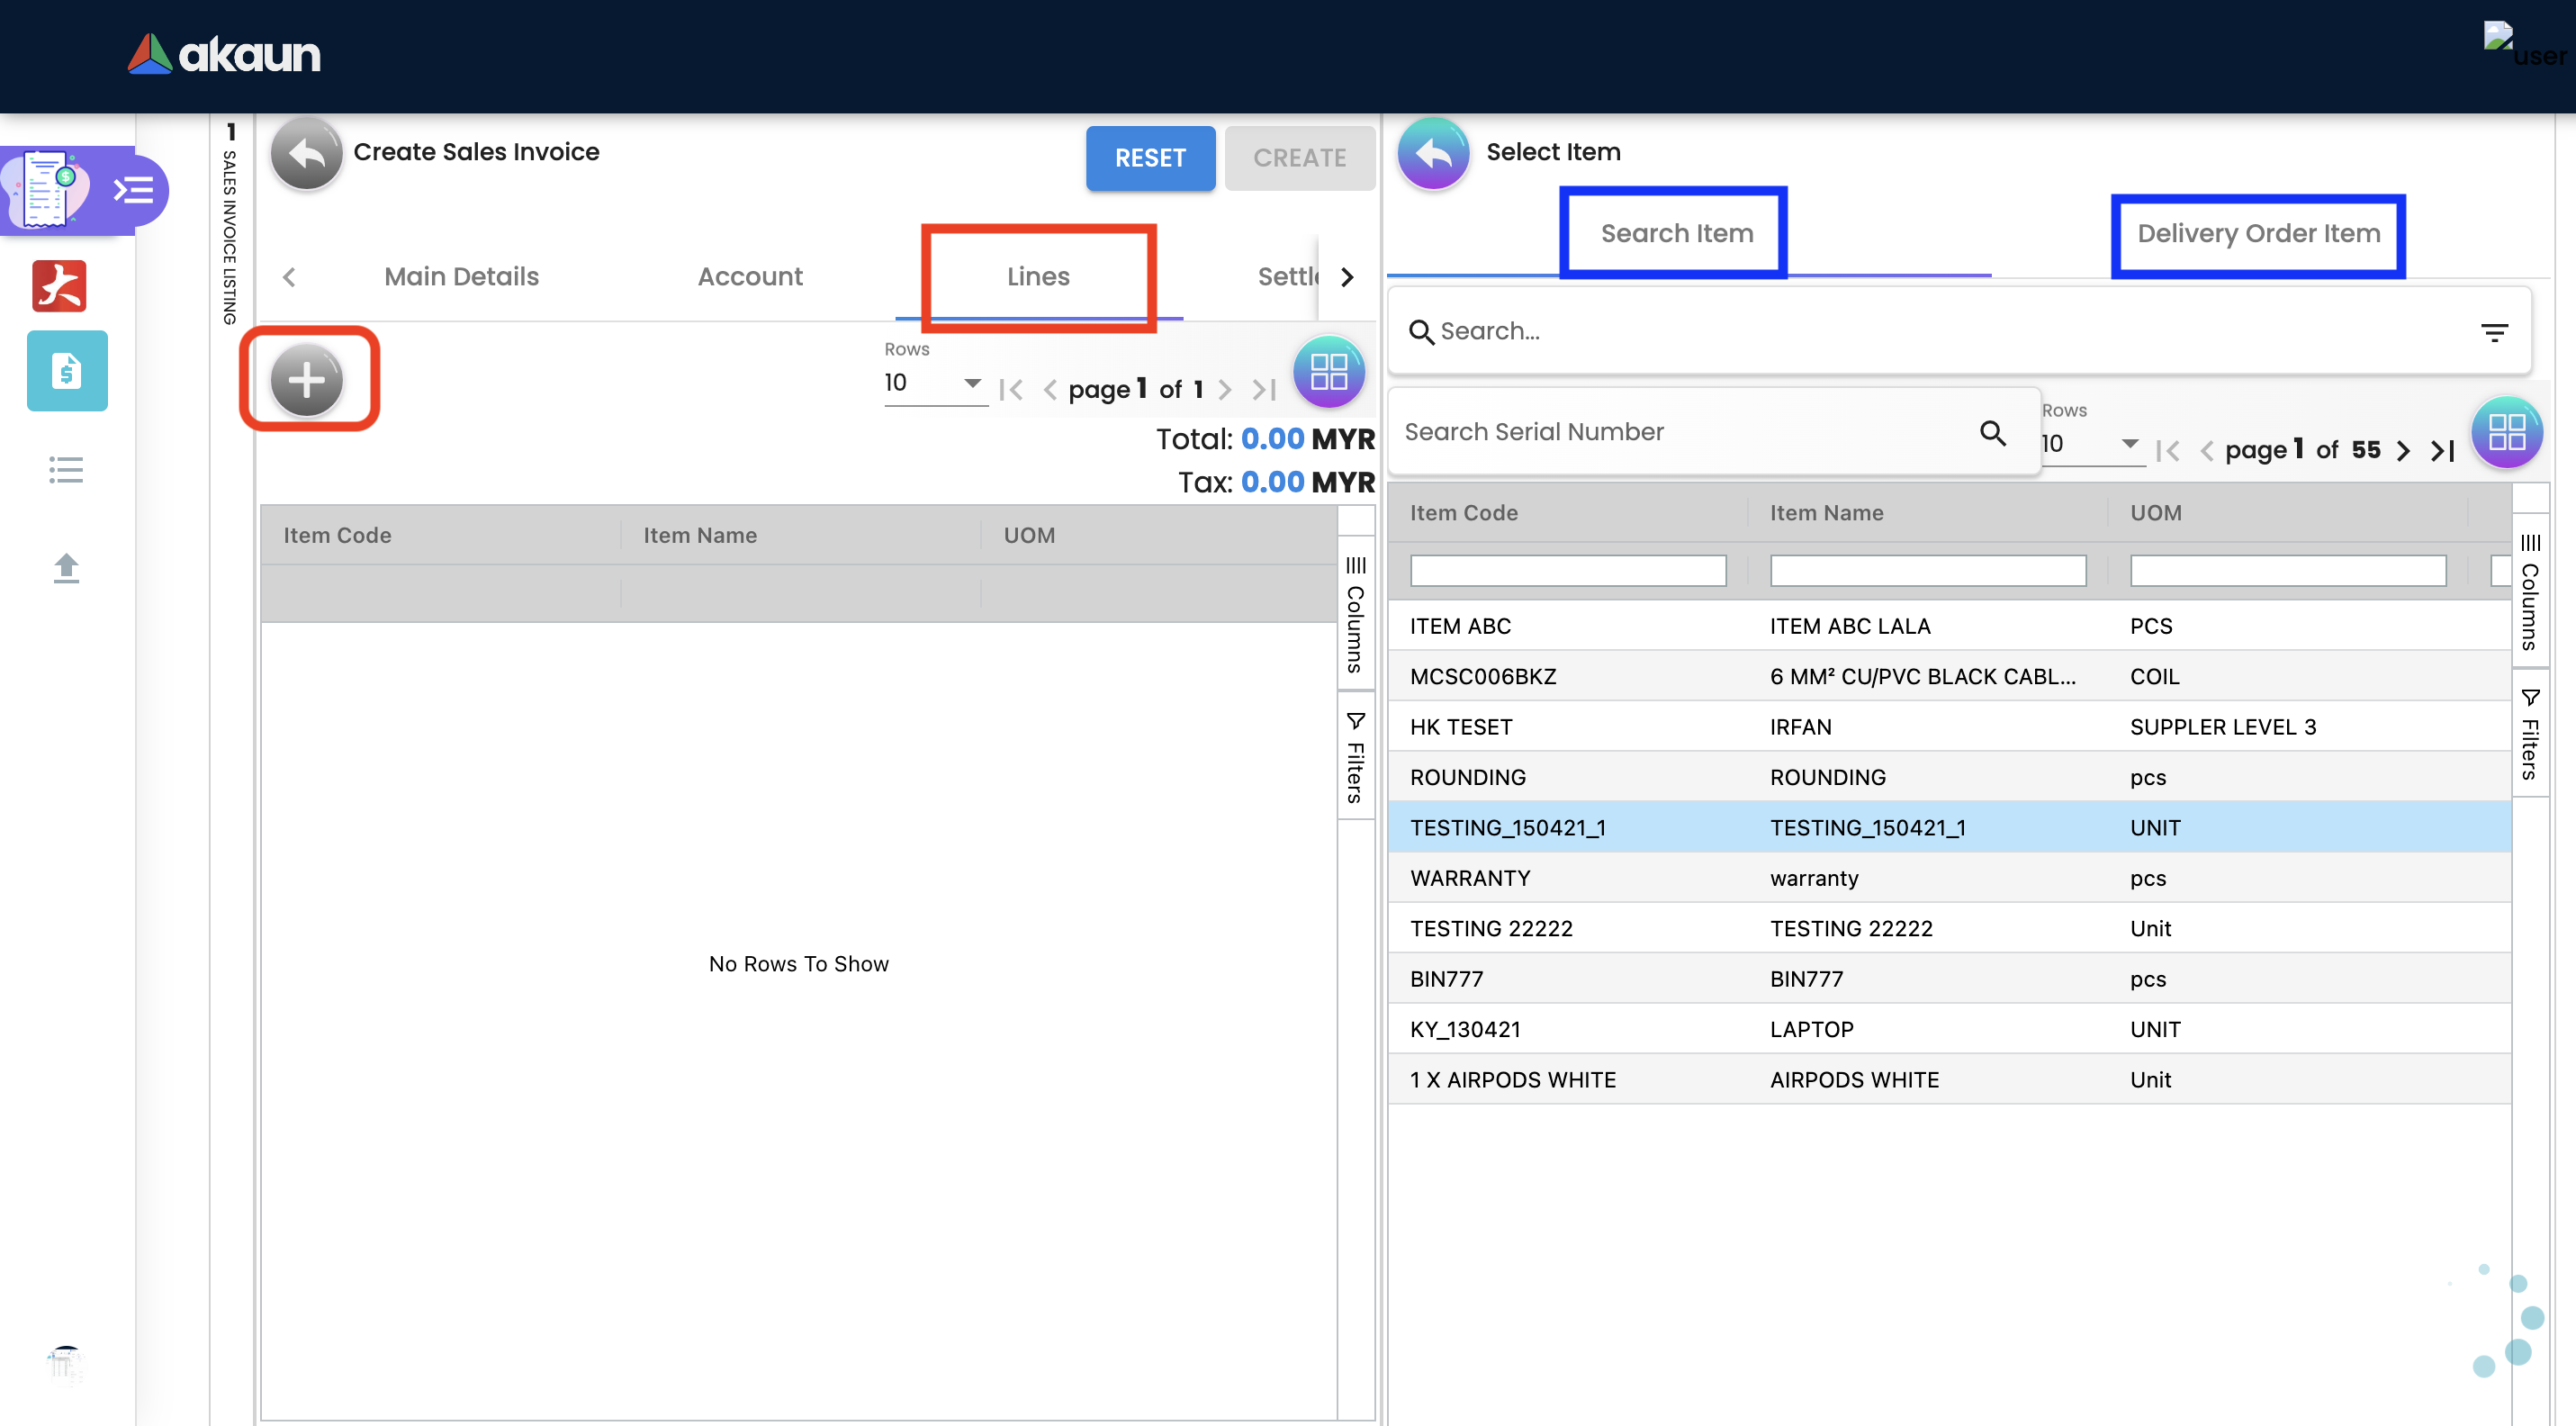
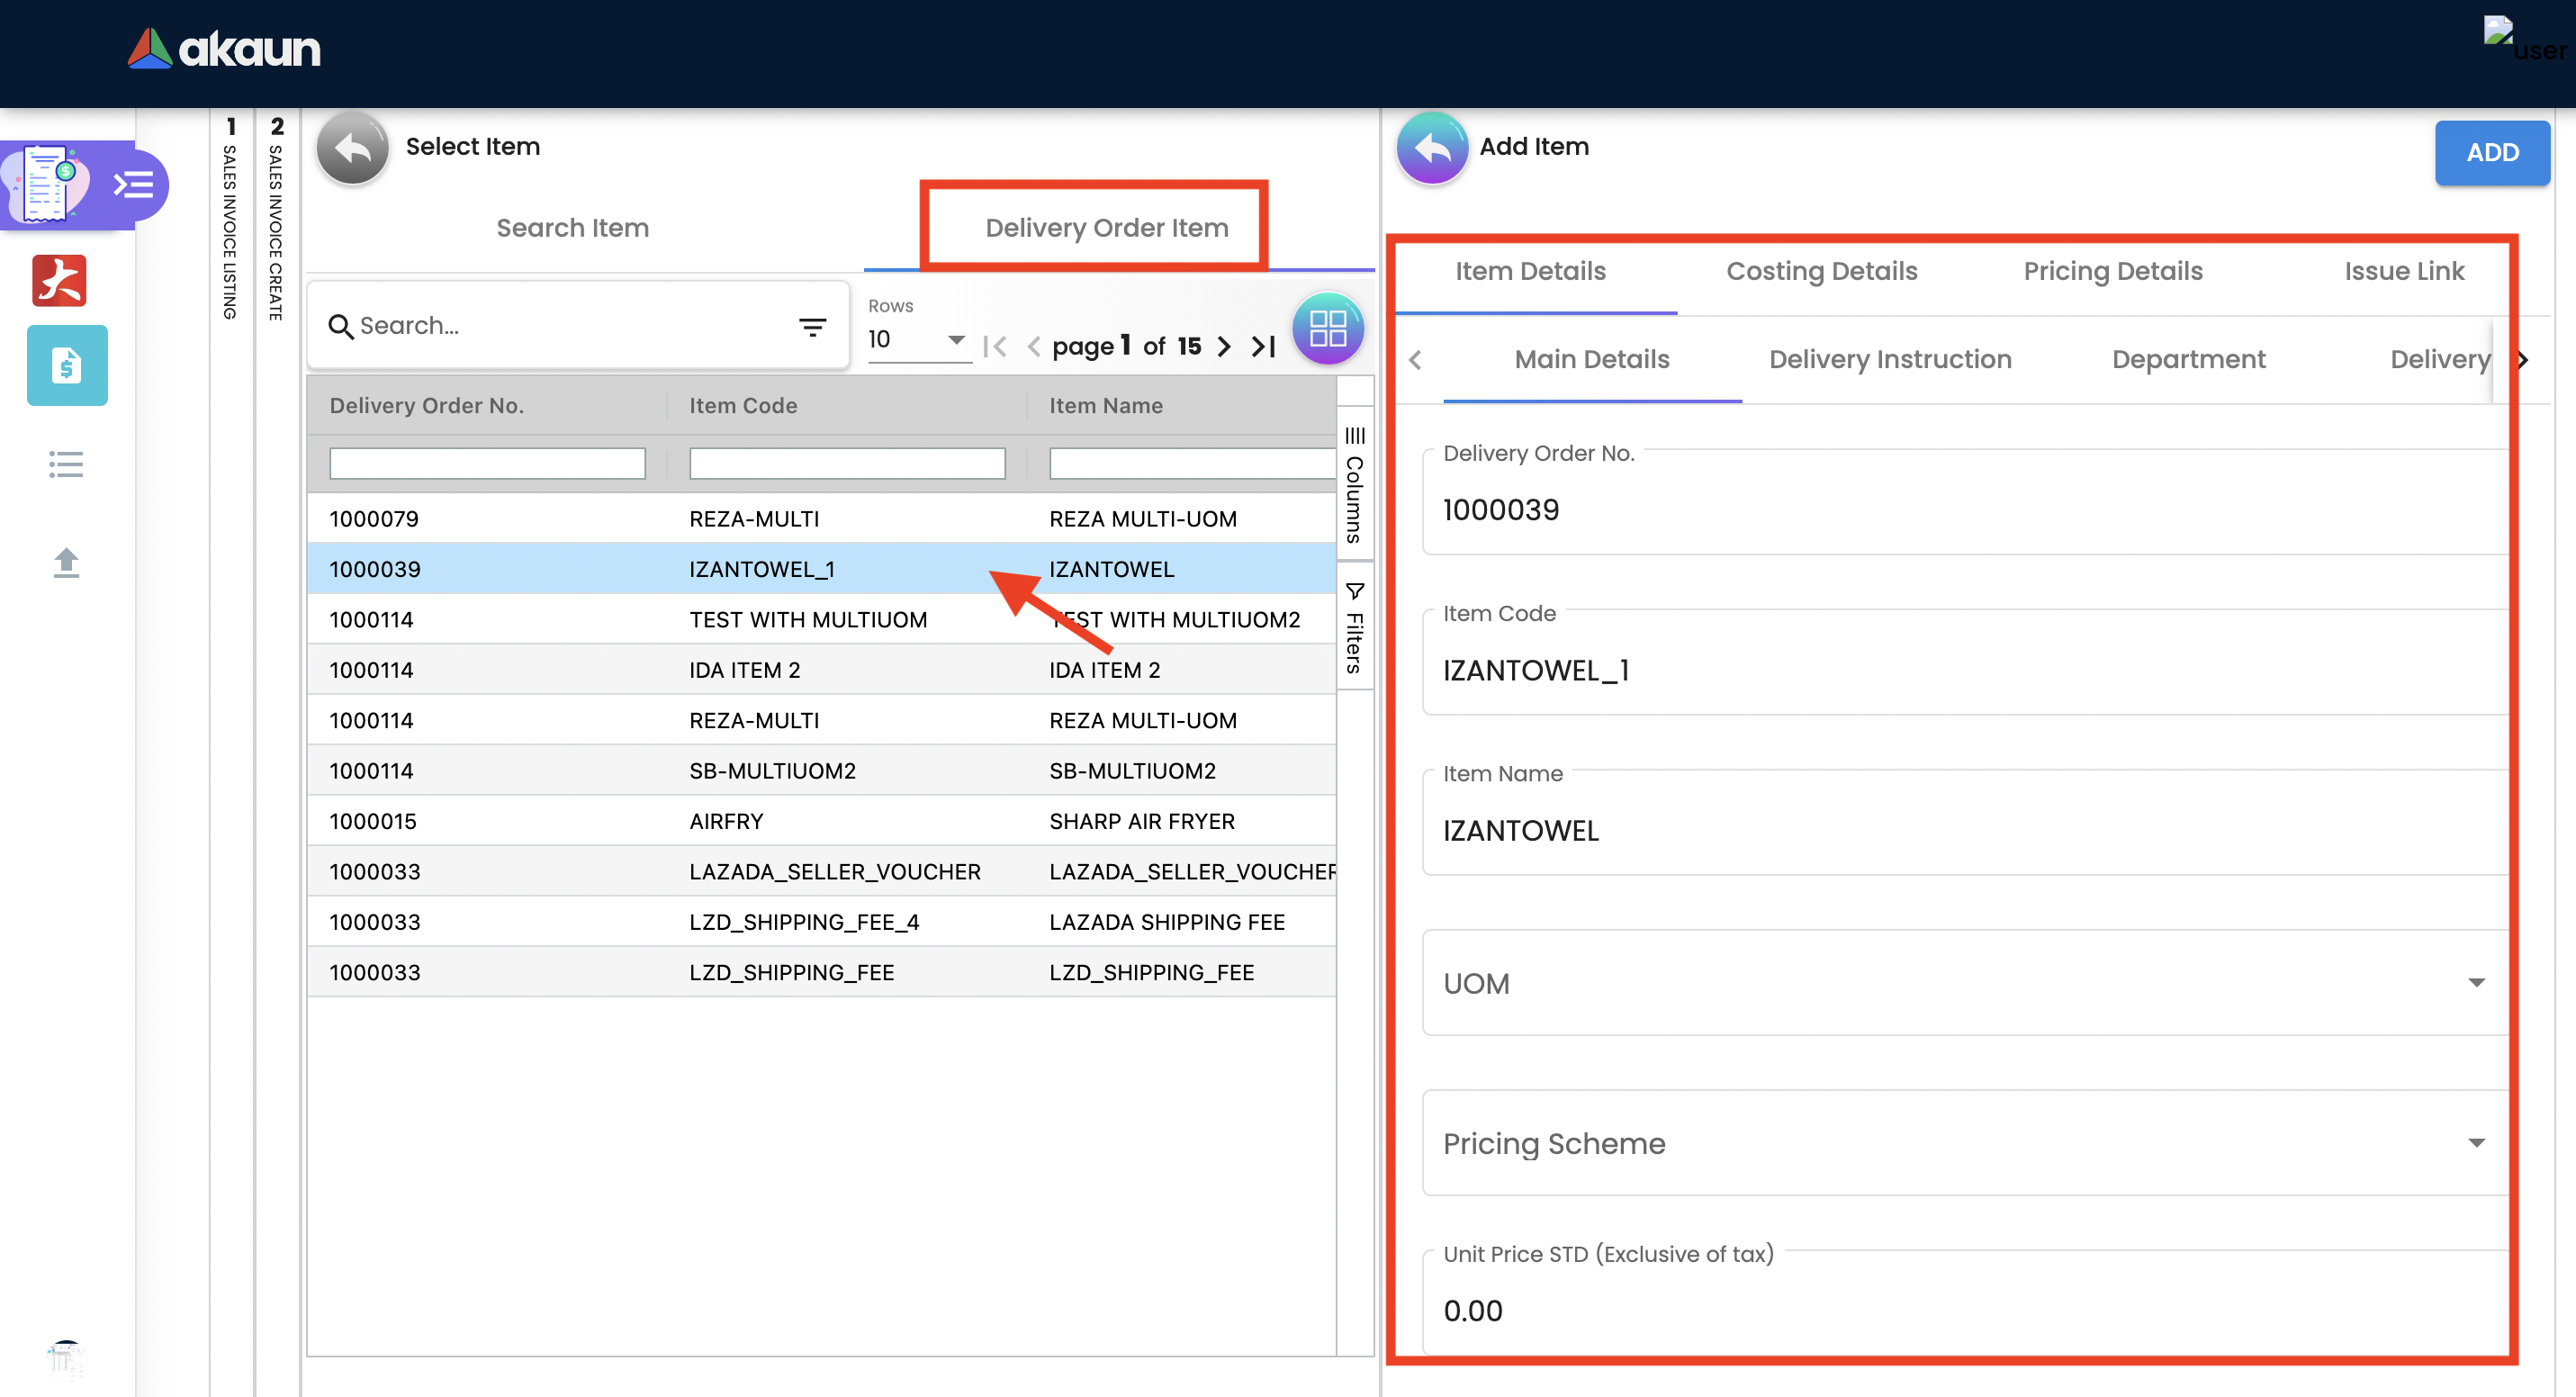
After enabling settings, go to the Sales Invoice Applet to add the Lines. There user will see two tabs:
-
Search Item
-
Delivery Order Item
2.3.4 Settlement Tab
Transaction in which the sales order is fully or partially settled.
Click on the '+' button to Add a New Settlement.

Select the Settlement method.
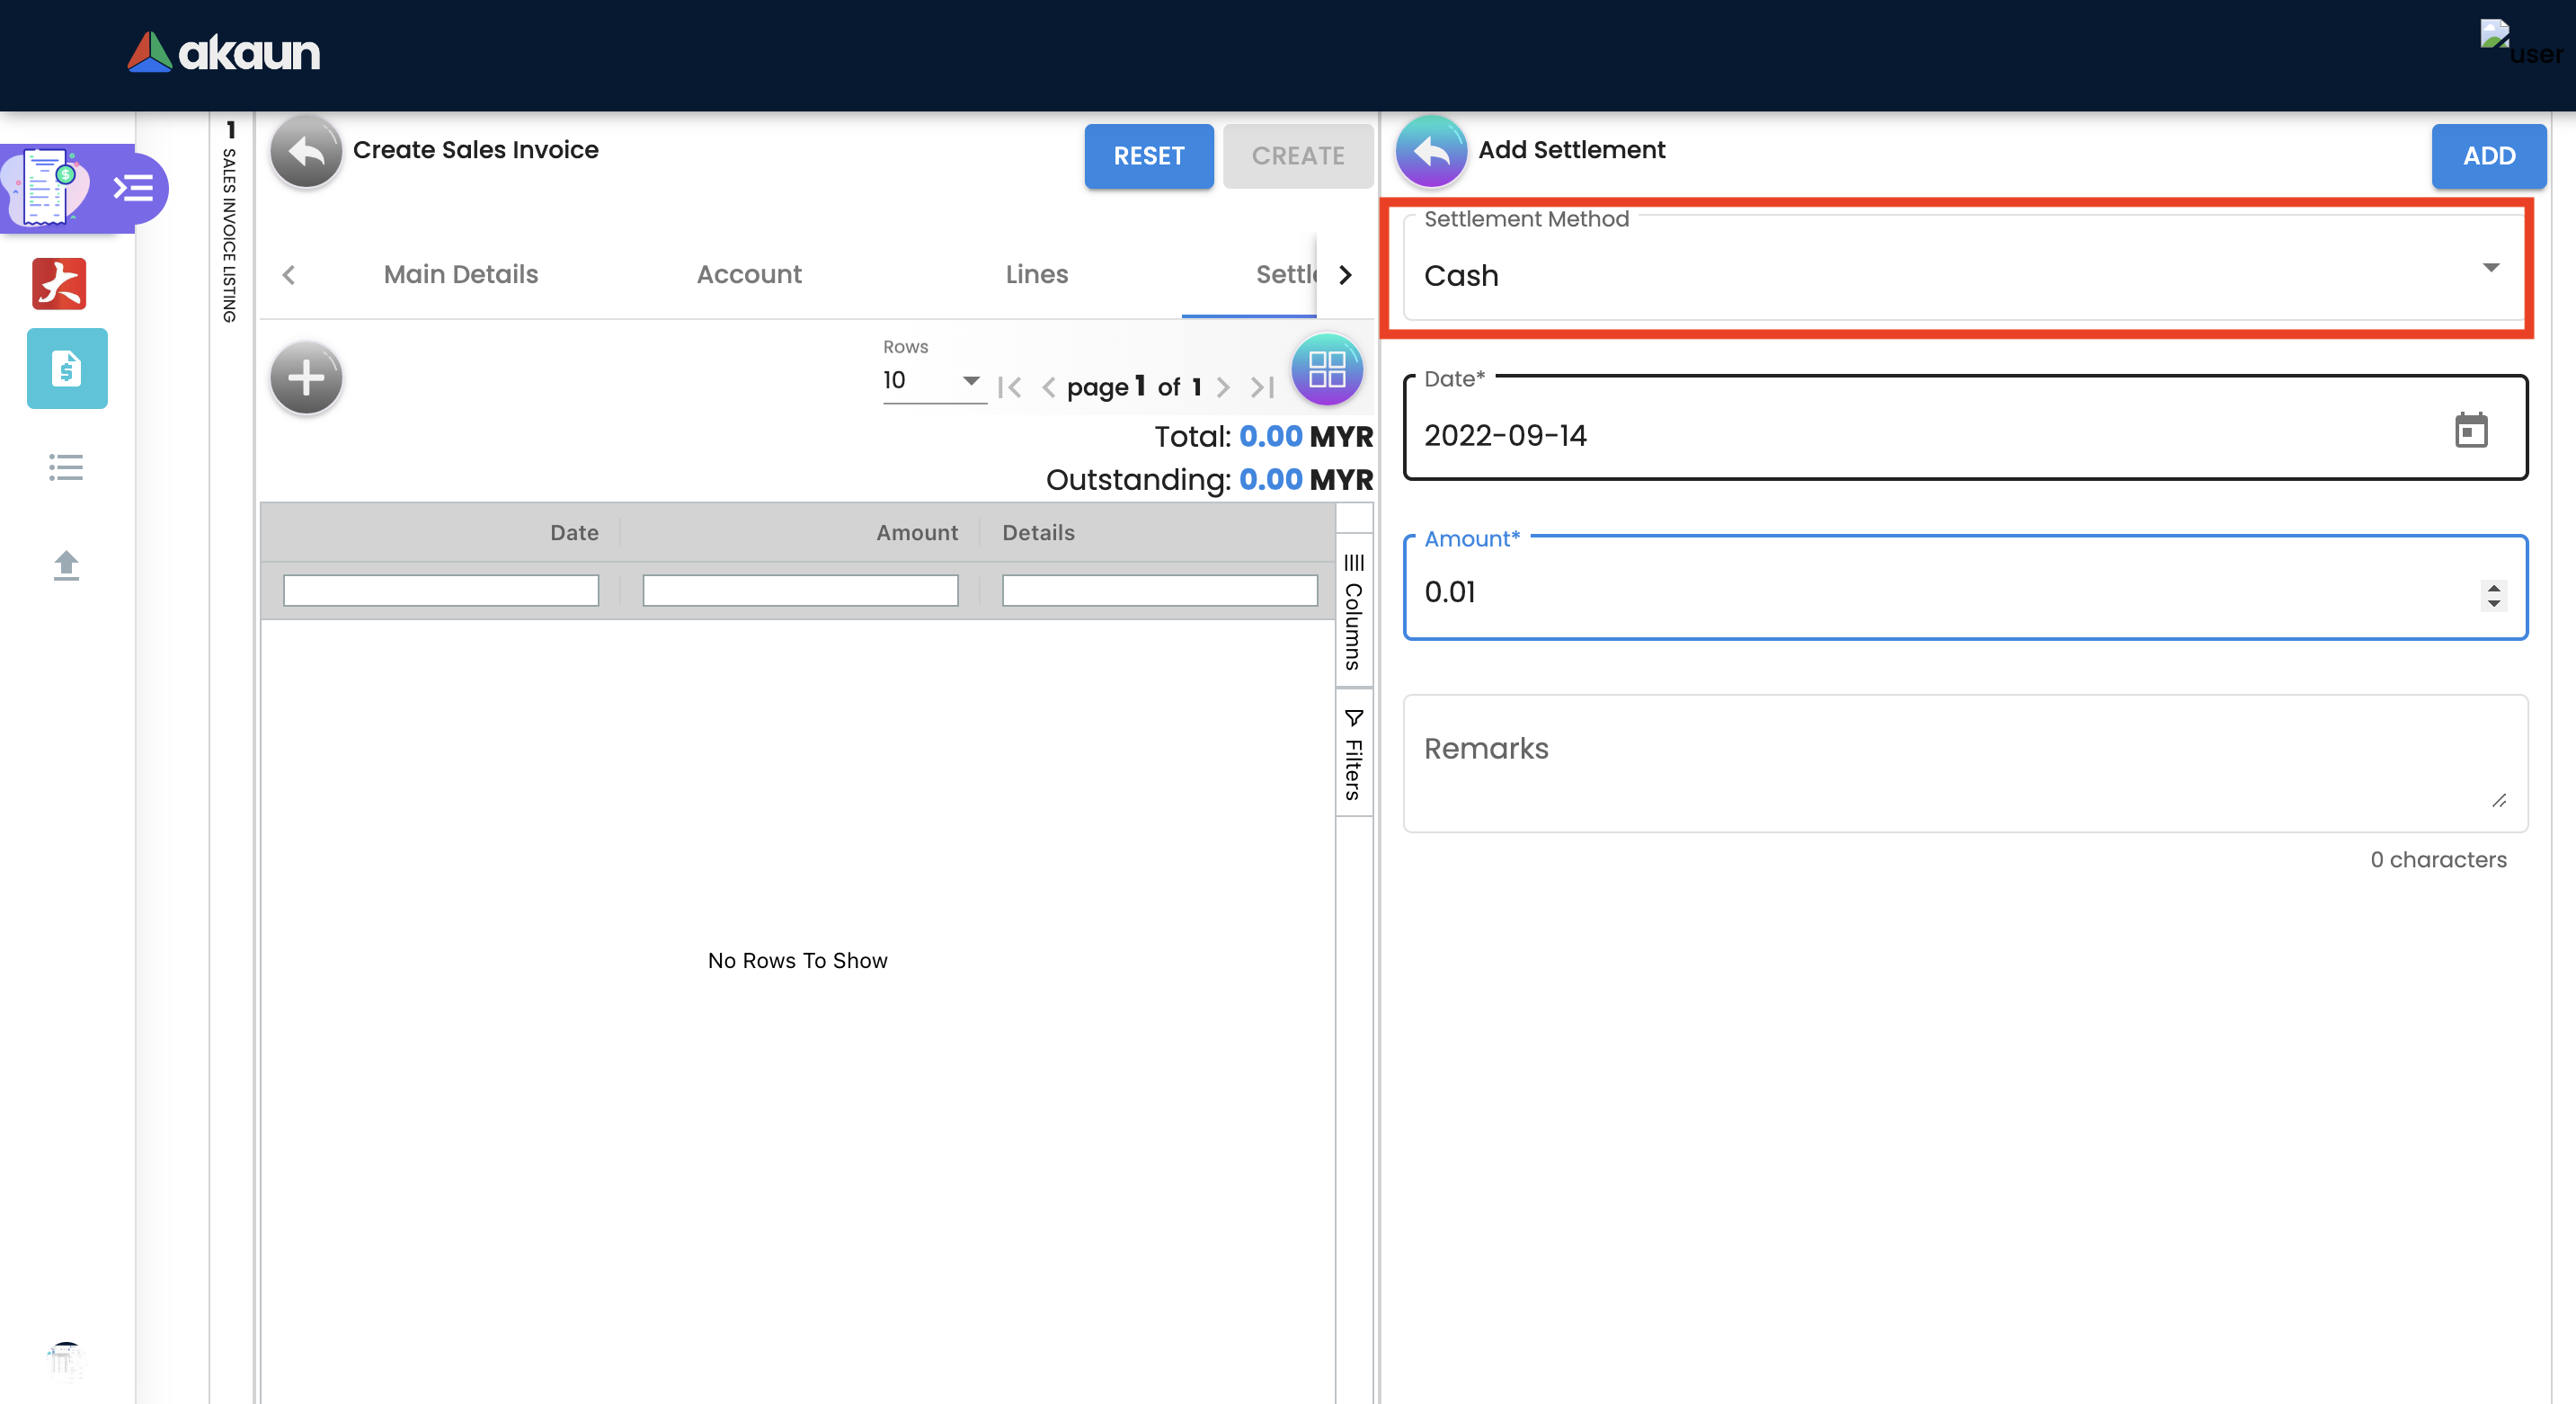
Based on the settlement type, the user needs to key in the required fields.
Click the 'Add' button to record the settlement against the sales order:
Once added, a new row will be created under the Settlement tab and the Total and Outstanding amounts will be updated accordingly. User may click on the Save button to record the changes.
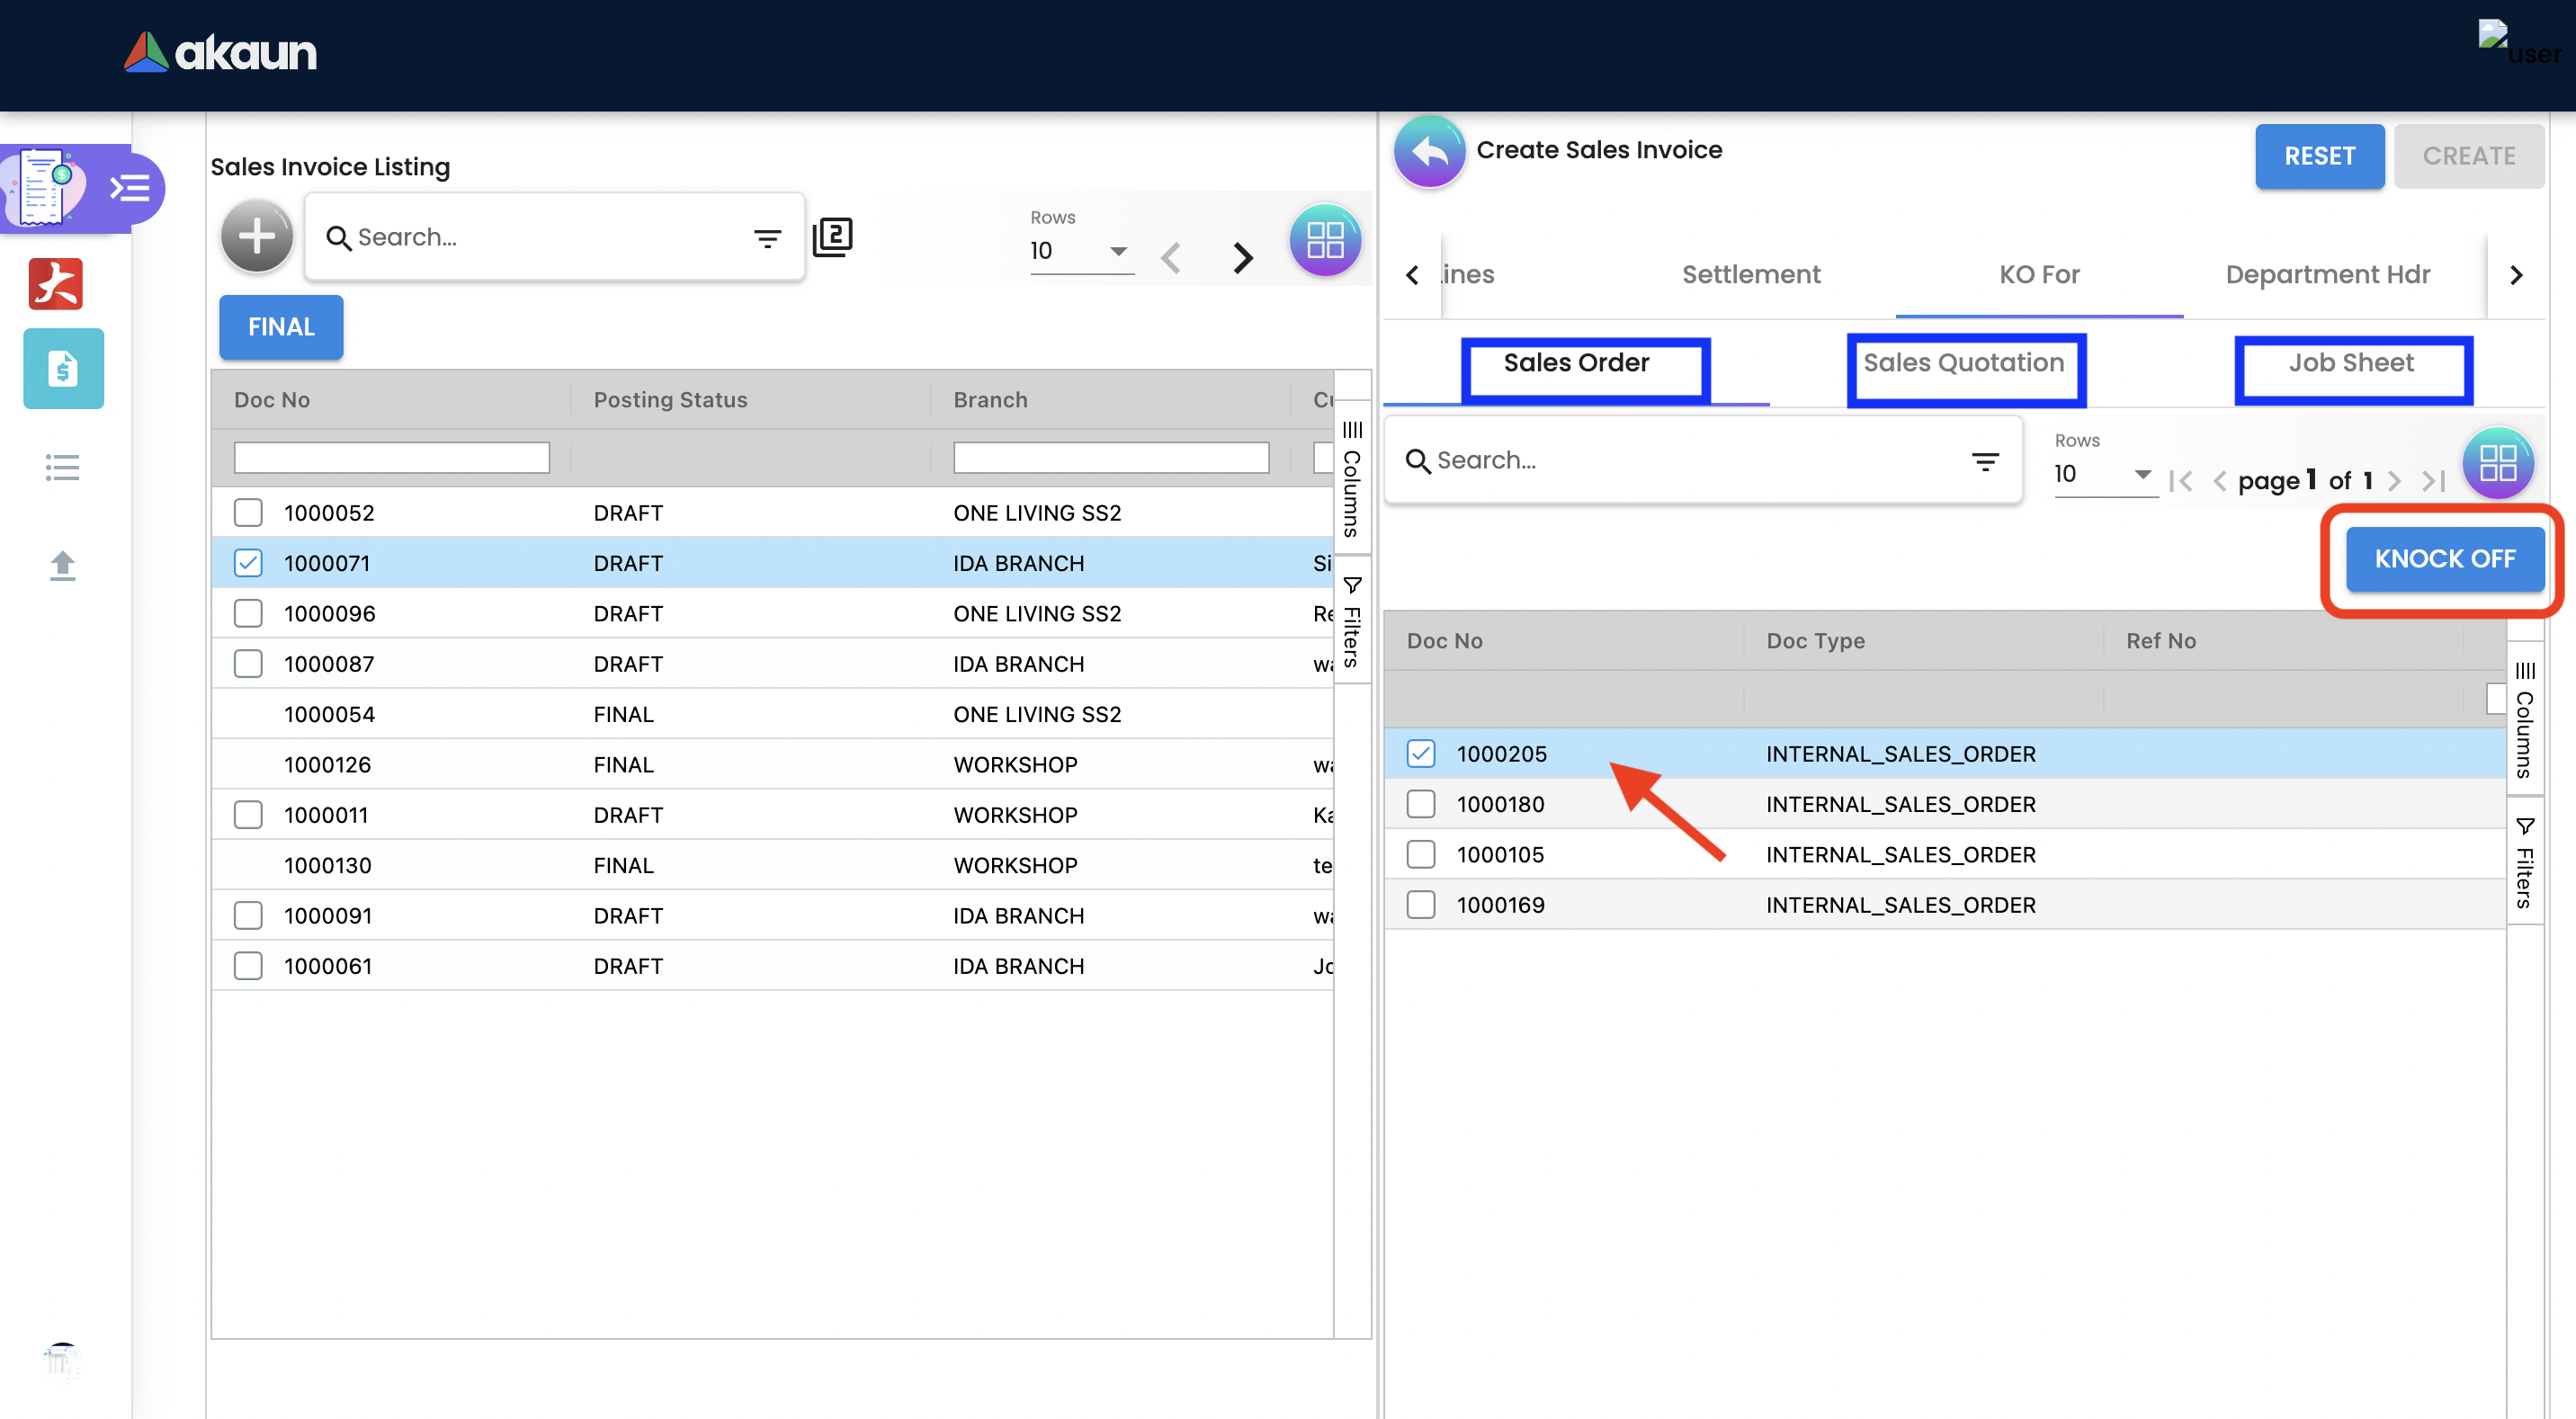
2.3.5 KO For Tab
On Knocking off at the header level, we copy most of the gen doc details and line items and create a sales invoice.
Knocking for tab is used to convert the documents taken from Sales order applet, Sales Quatation Applet and Job Sheet applet to Sales Invoice.
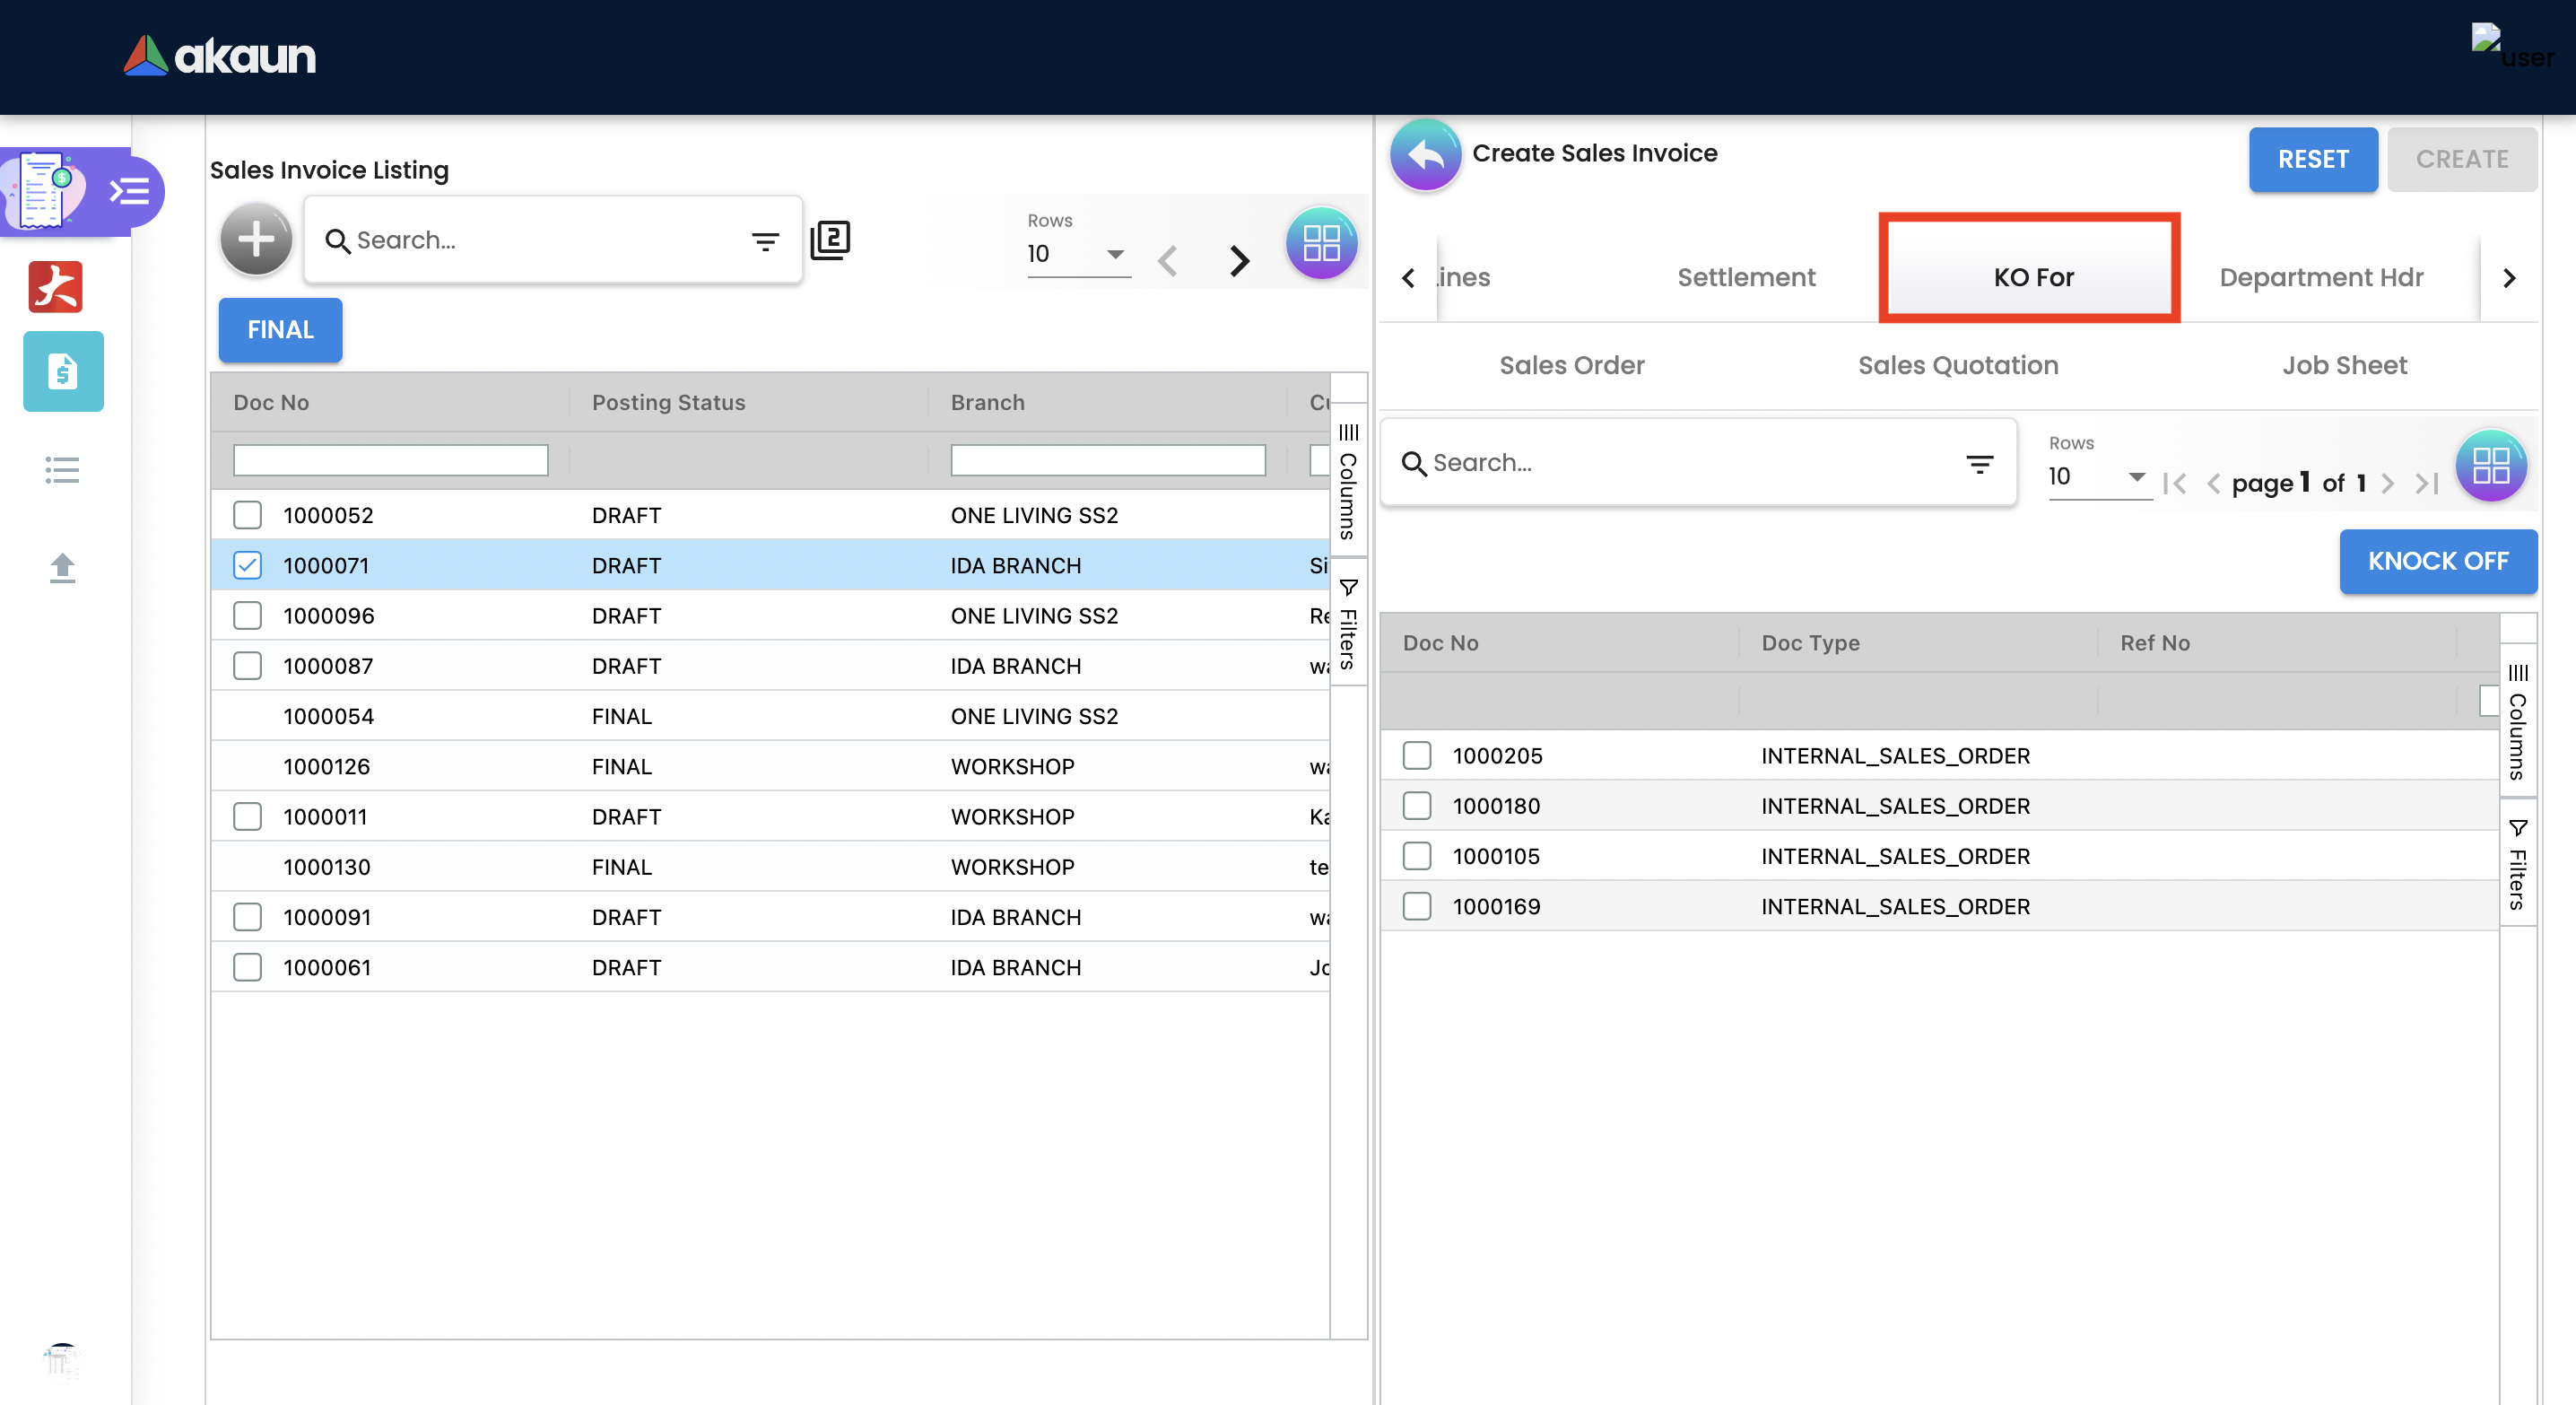
Once user select the applet, they will choose the document and click Knock off button.
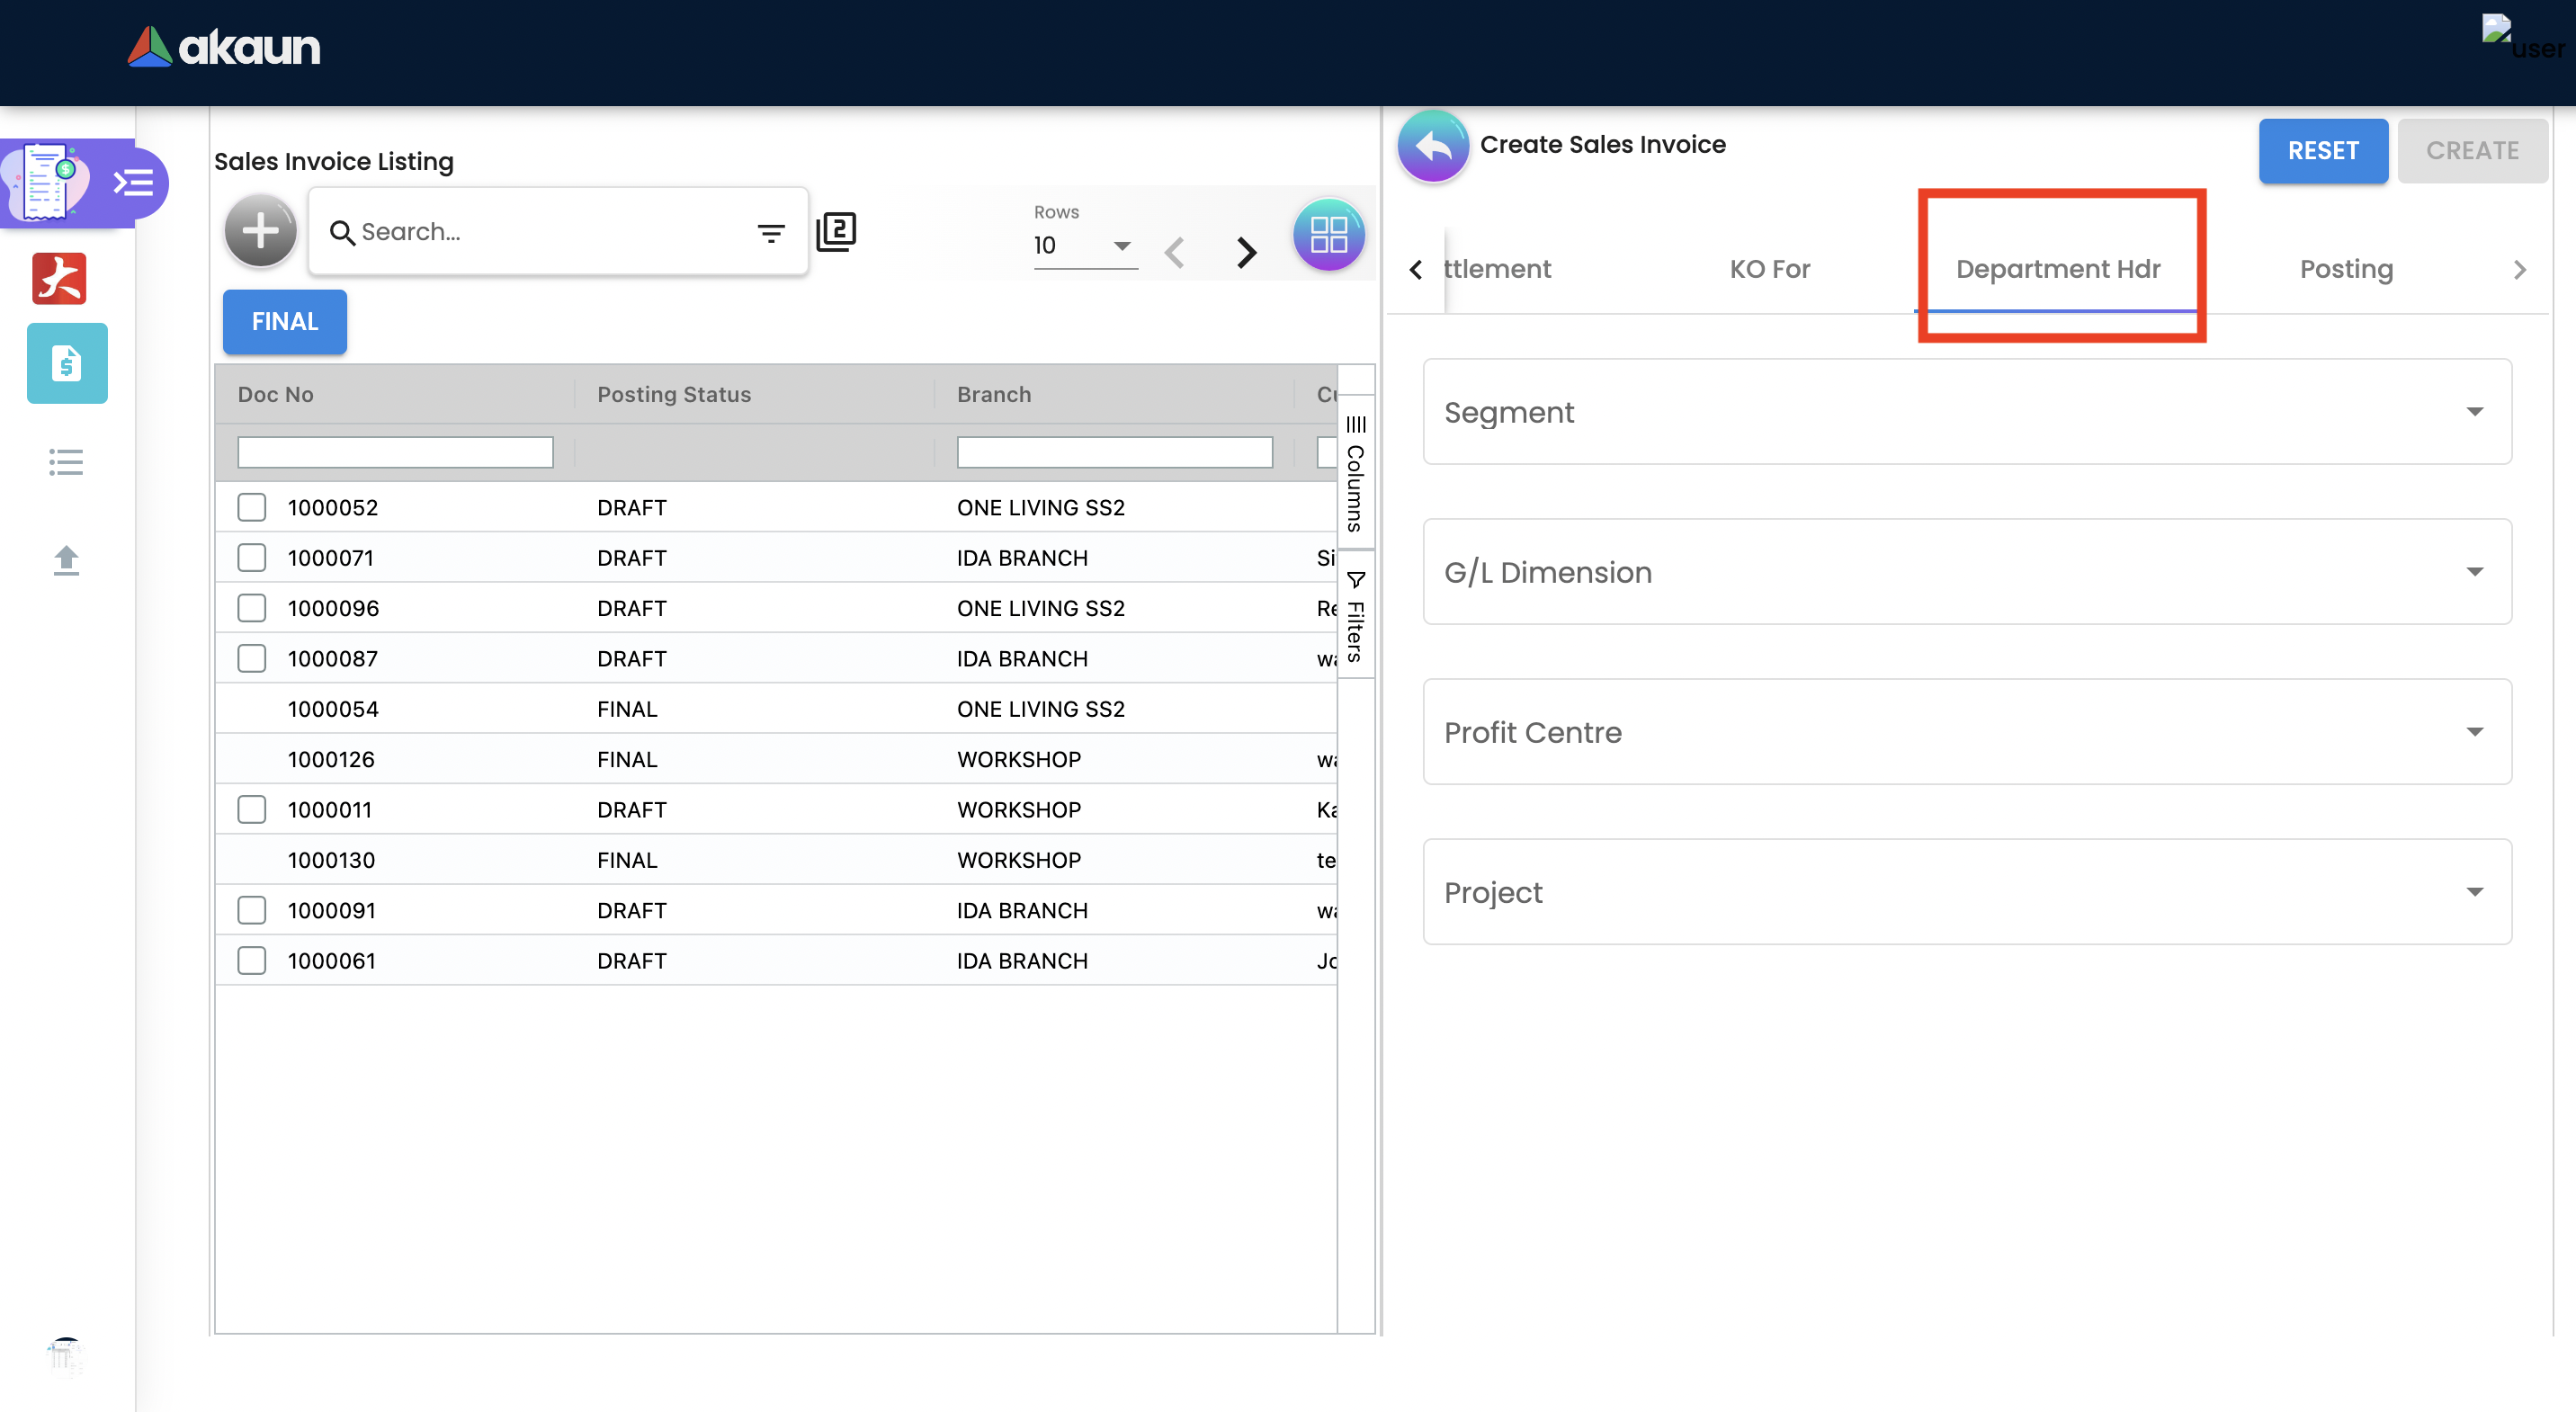
2.3.6 Department Hdr Tab
Linking the sales invoice to the following departments is optional and helps in reports:
Segment: Segmentation at the item or hdr level.
Dimension: Selecting dimension at the item or hdr level.
Profit center: Selecting profit center at the item or hdr level.
Project: Selecting project at the item or hdr level.
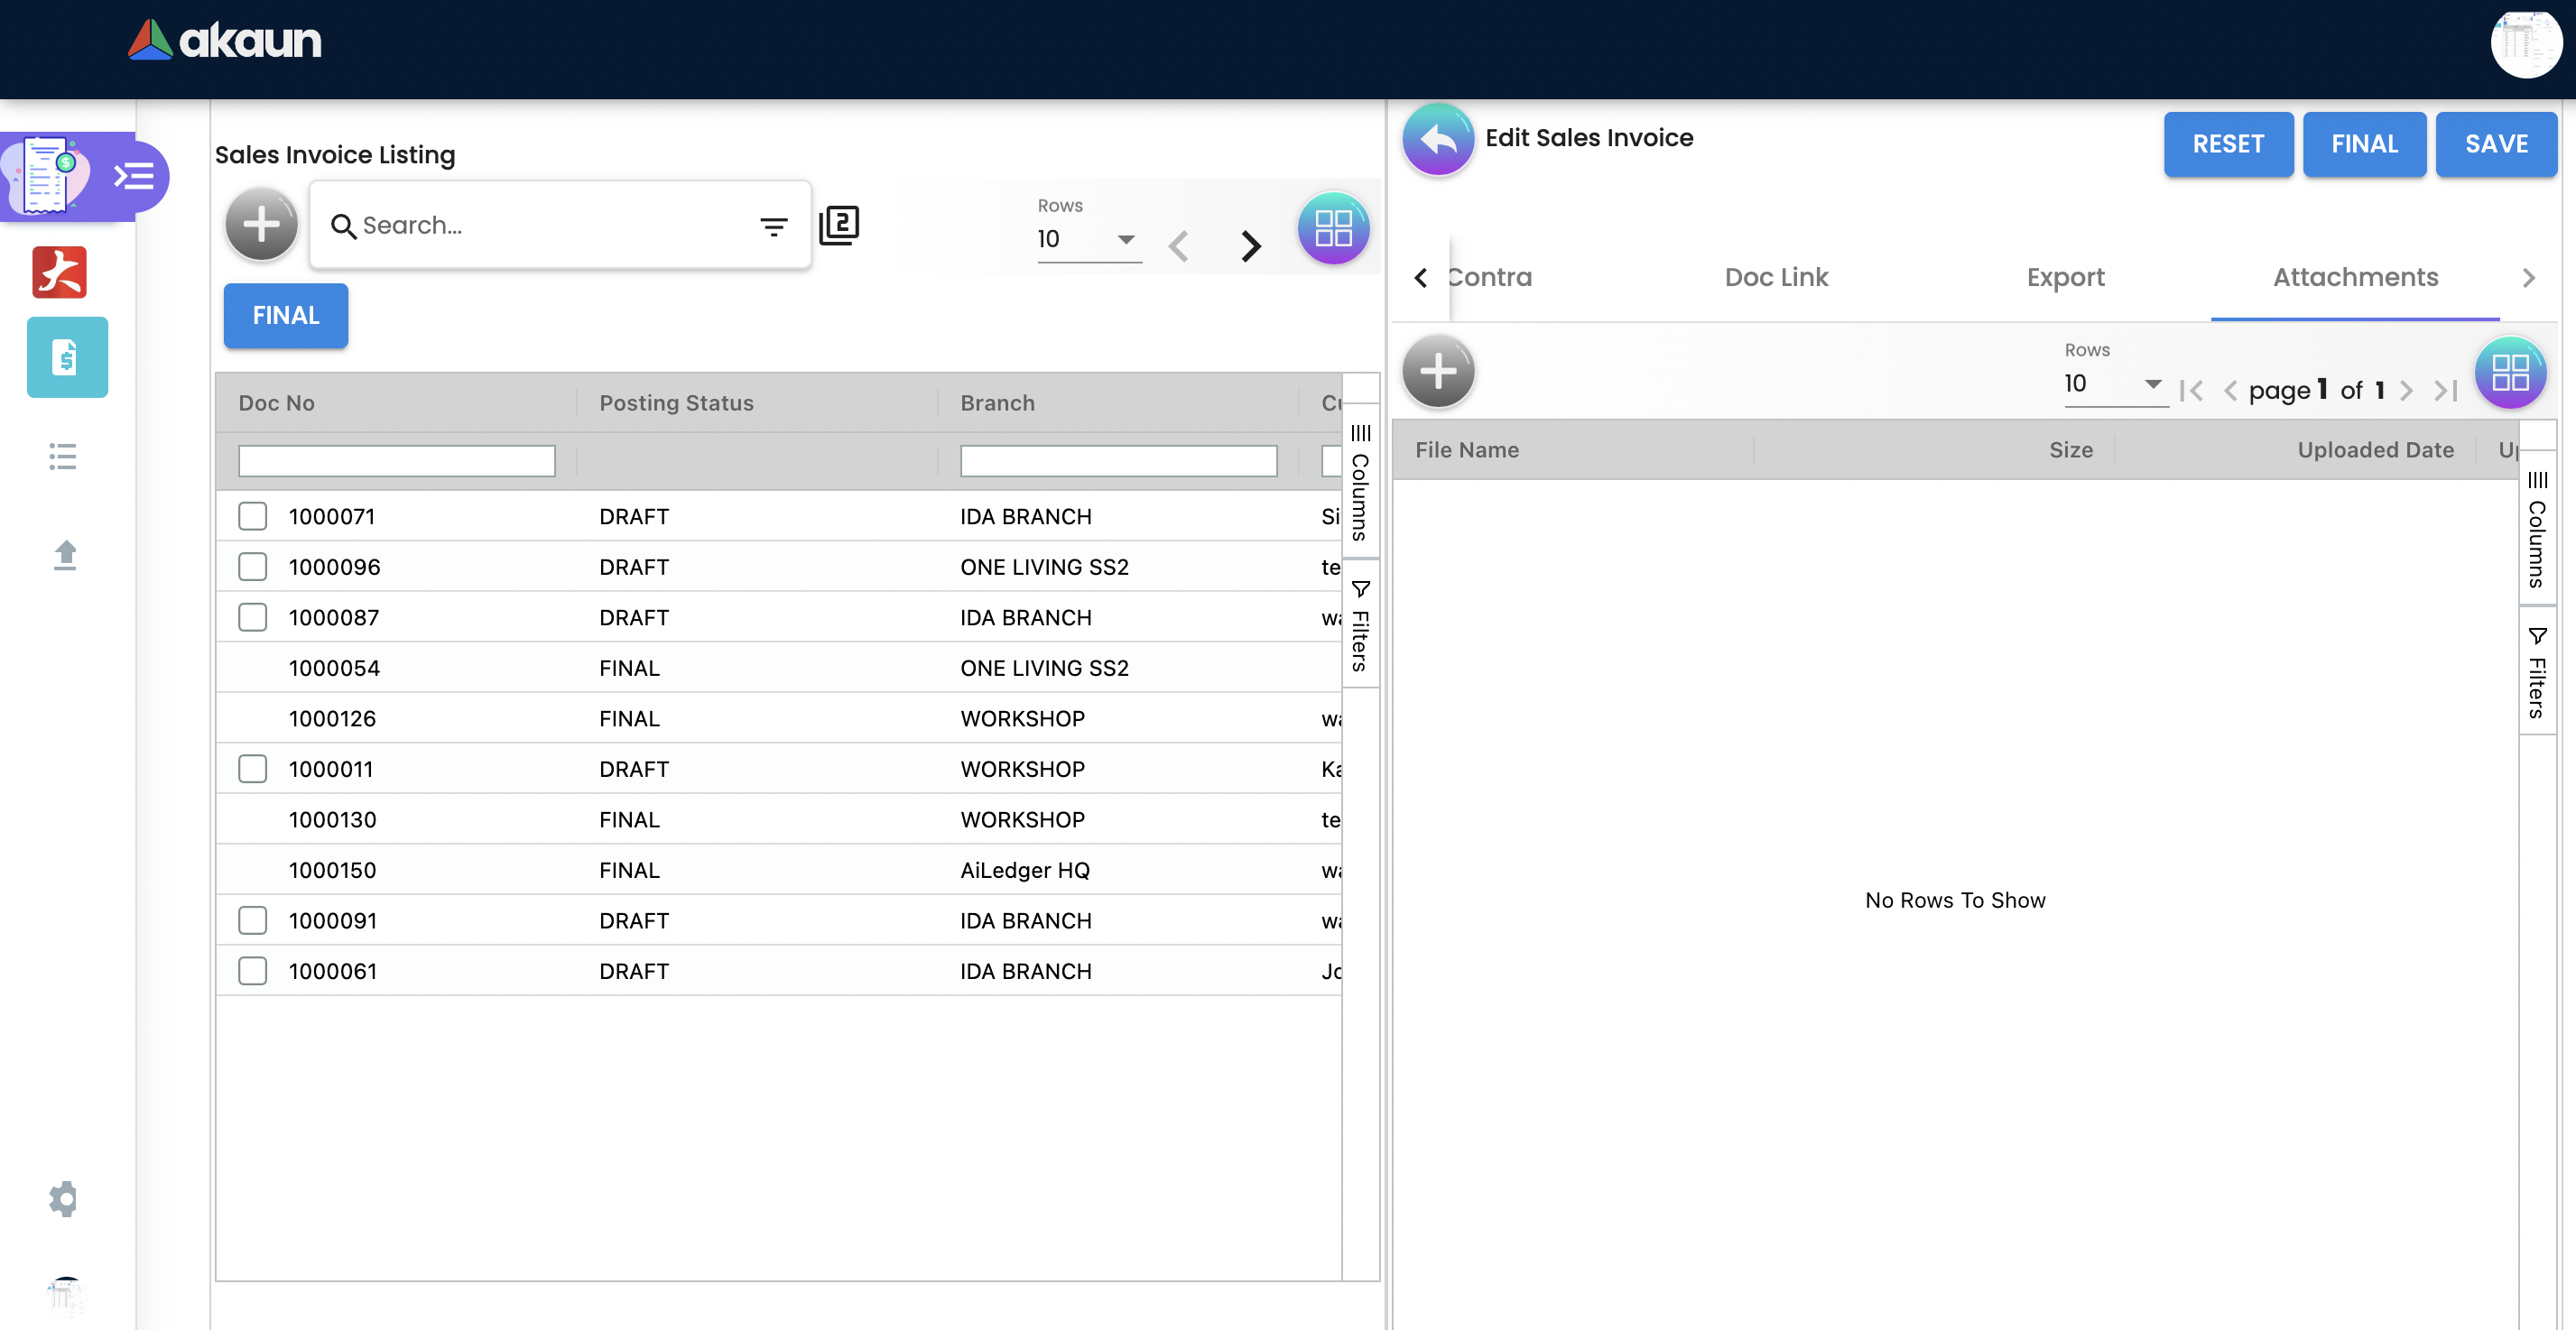
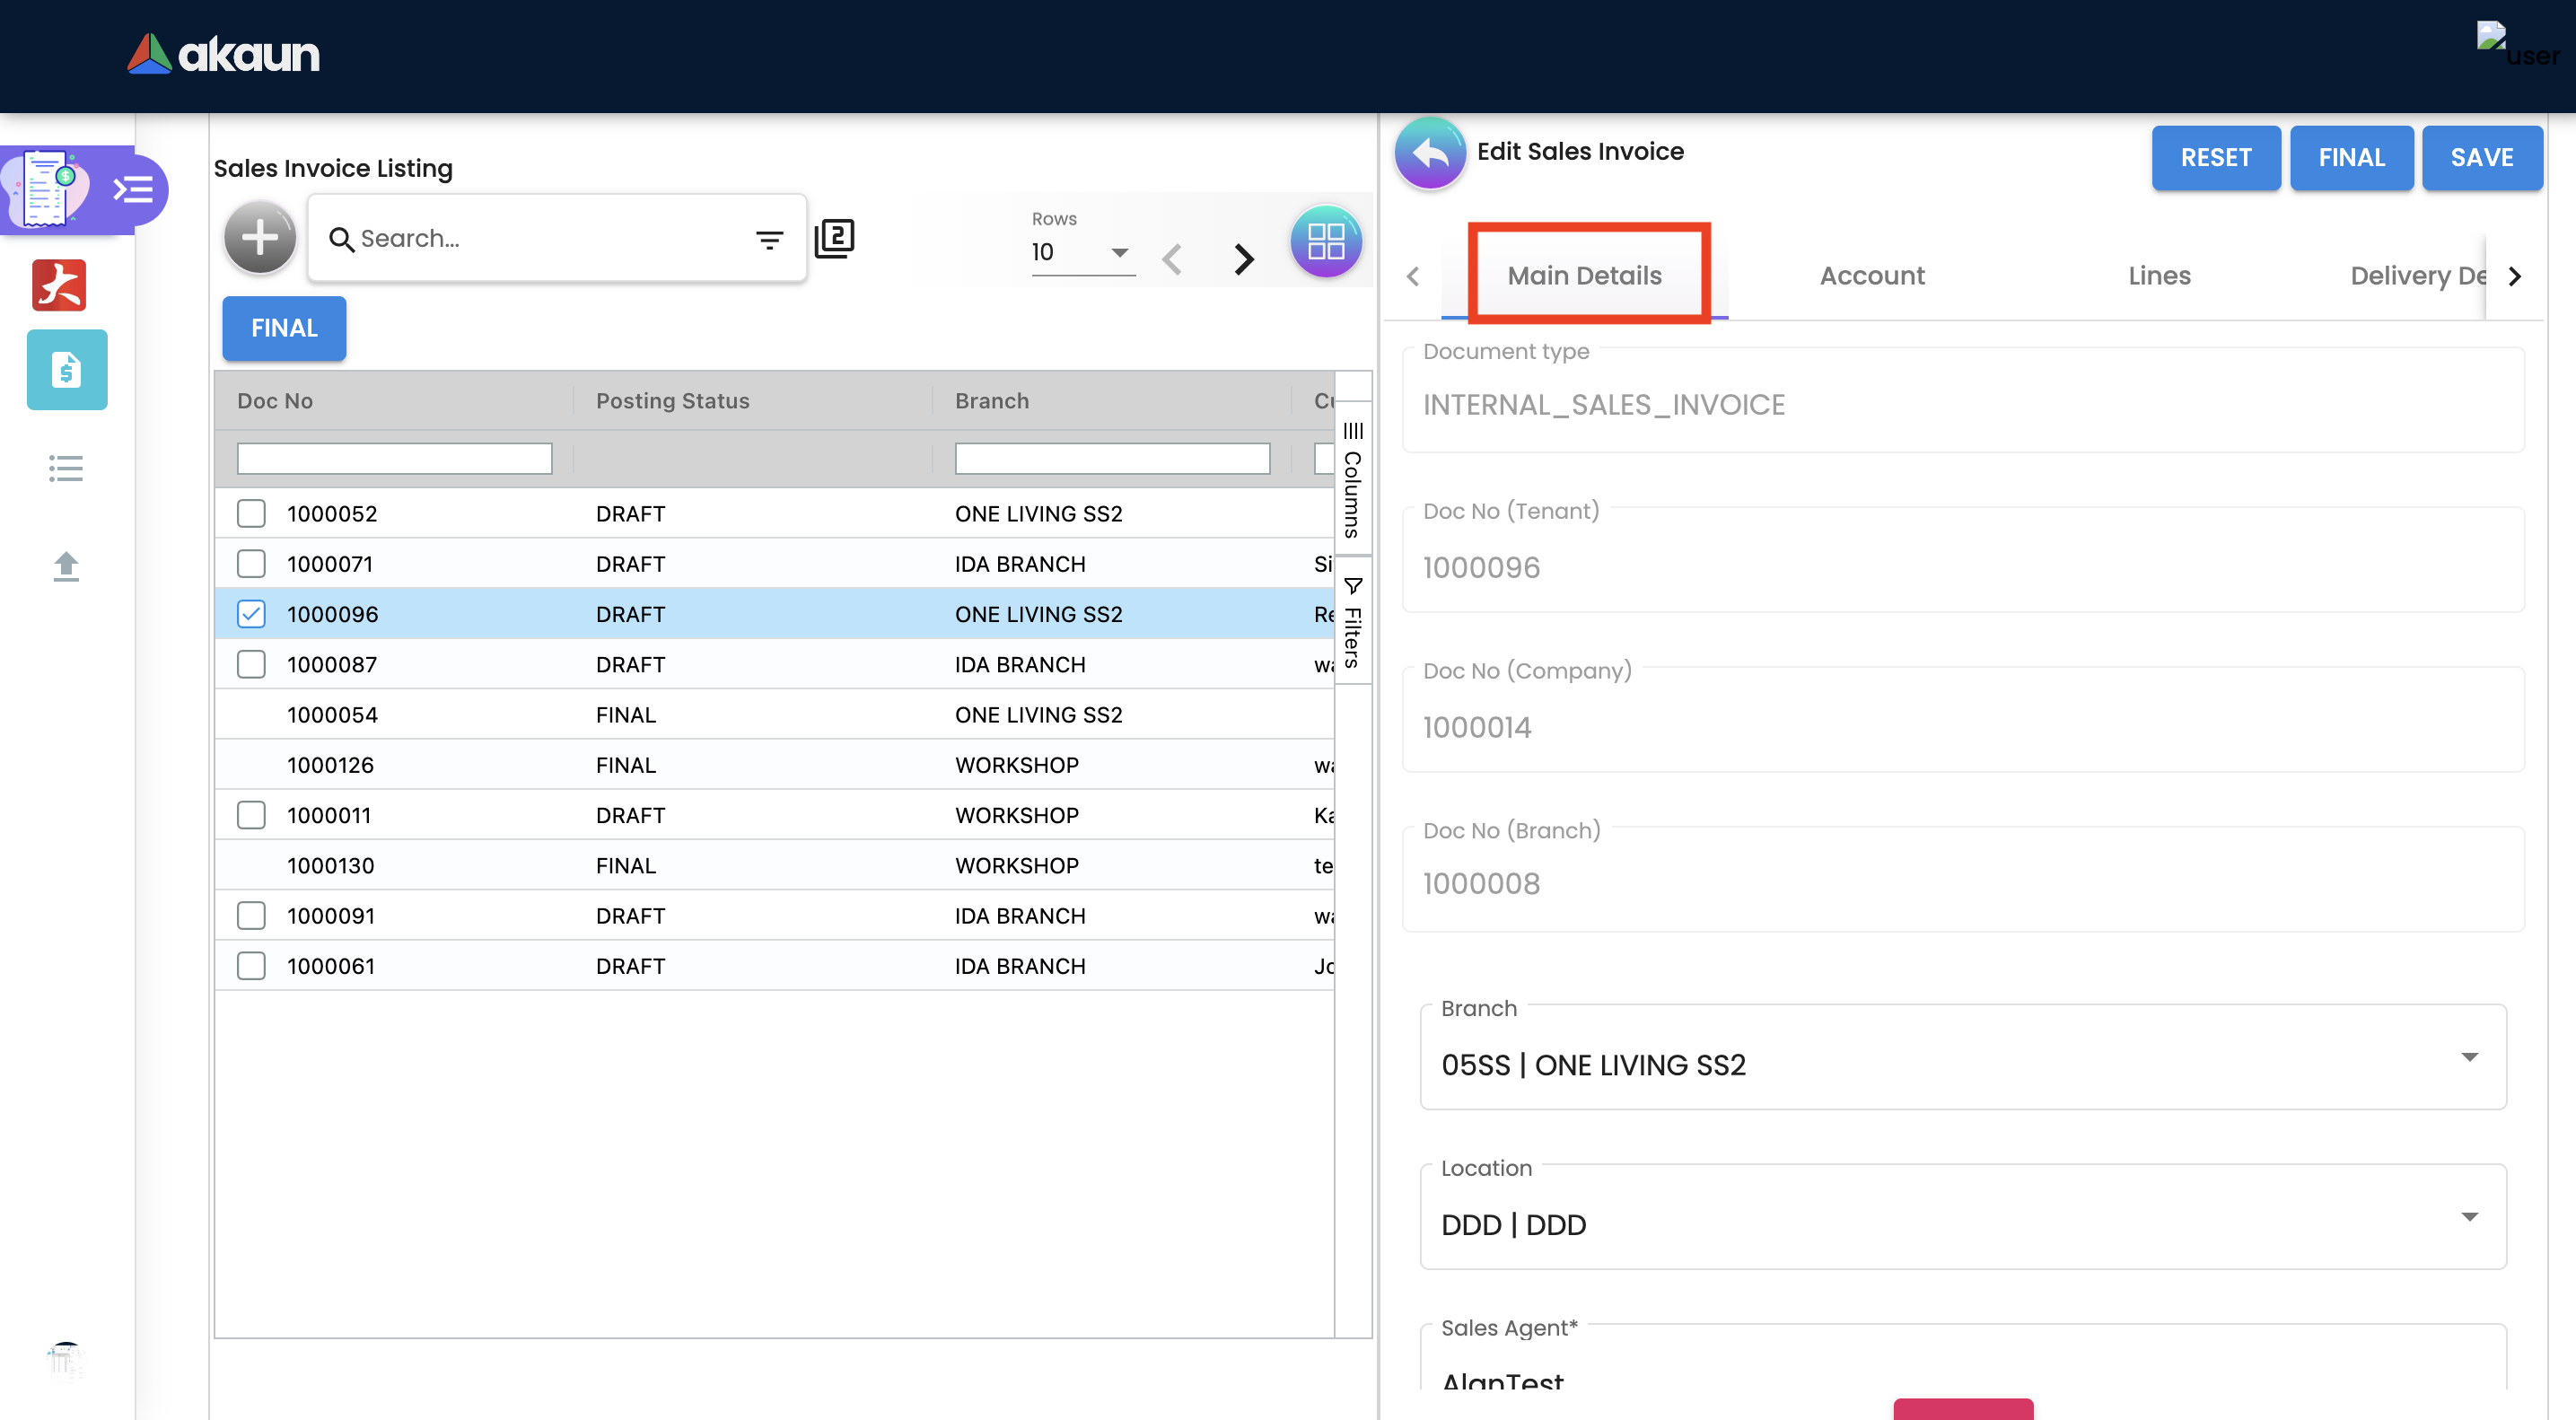
2.4 Edit Sales Invoice
In order to edit existing sales invoice, user need to click selected document.
When user select the document, it automatically go to the second page where configurations is being done.
2.4.1 Main Details Tab
Main details tab is used to edit:
-
Branch
-
Location
-
Sales Agent
-
Date
-
Credit Terms
-
Reference
-
Remarks
-
Permit No
-
CRM Contact
-
Member card
-
Currency
-
Sales Lead
-
Tracking ID
2.4.2 Account Tab
As the user is creating a contract between organization and a Customer for the supply of specified goods and/or services, a link is configured here between the sales order and the customer.
In order to proceed and start on Sales Order Applet, kindly make sure that you have created Customer details in the Customer Maintenance Applet.
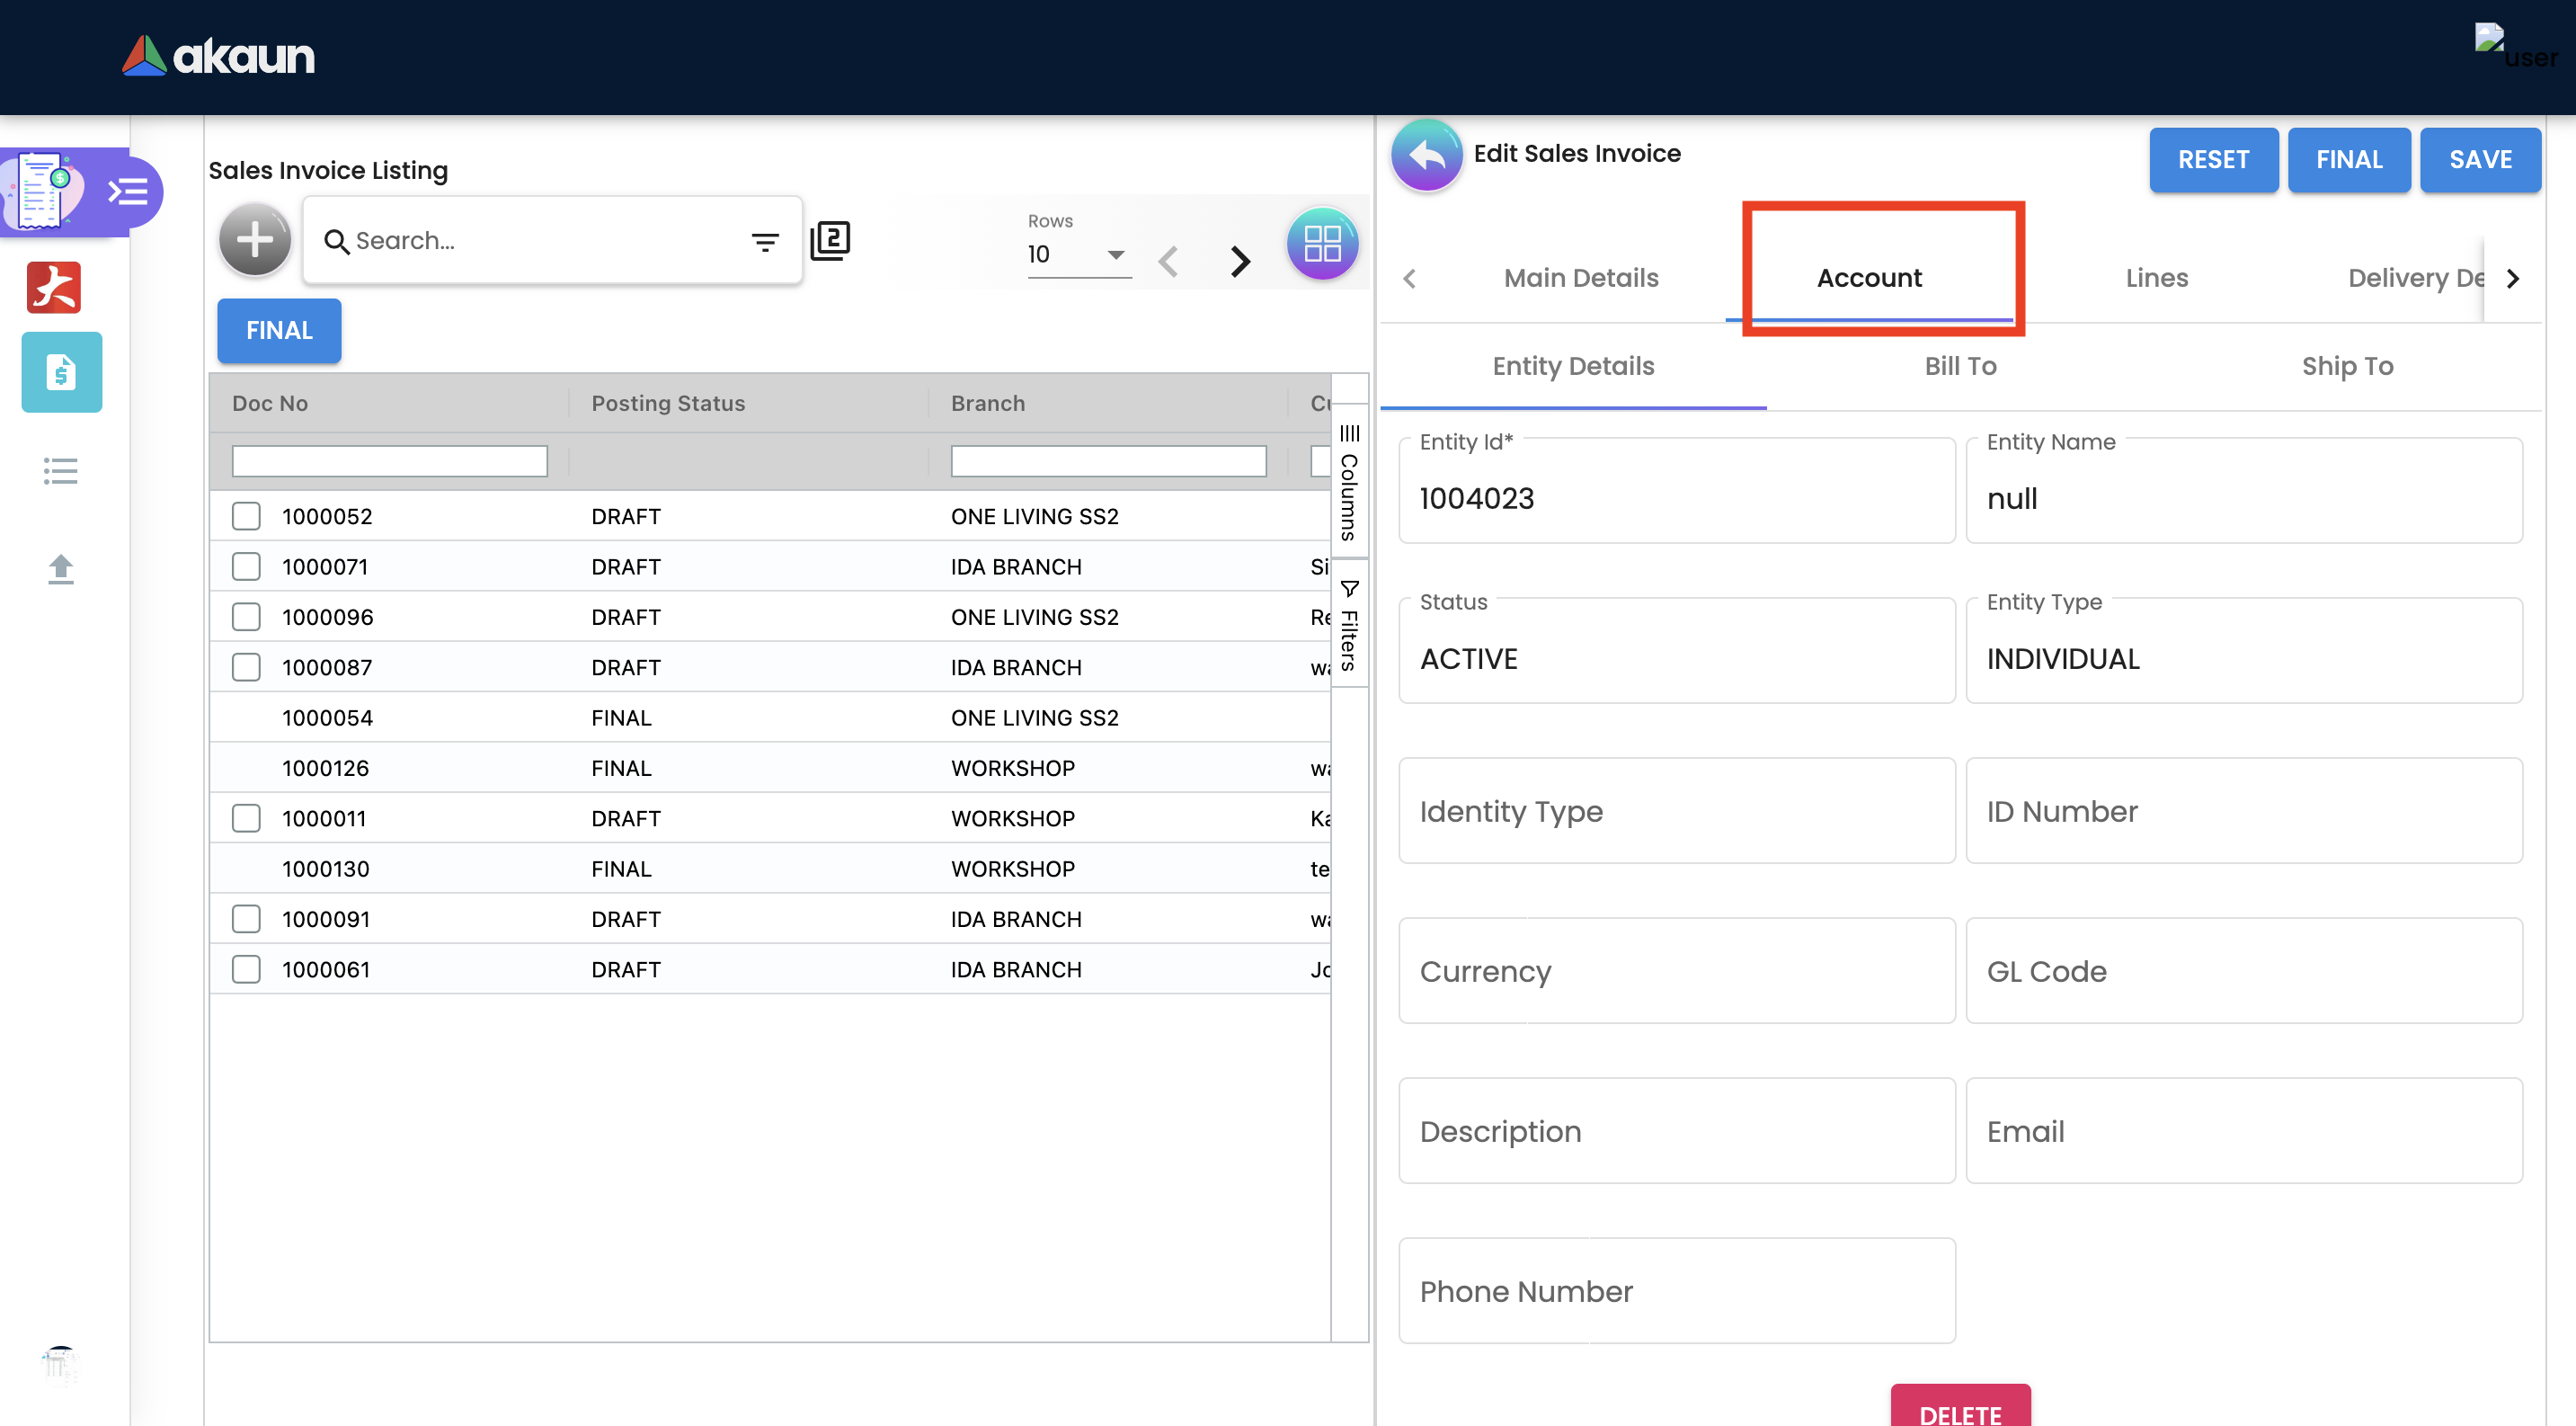
Entity ID: Customer Code, auto-filled when customer entity is selected.
2.4.2.1 Entity Details
All relevant information from the Customer master record will be copied from here to the sales order.
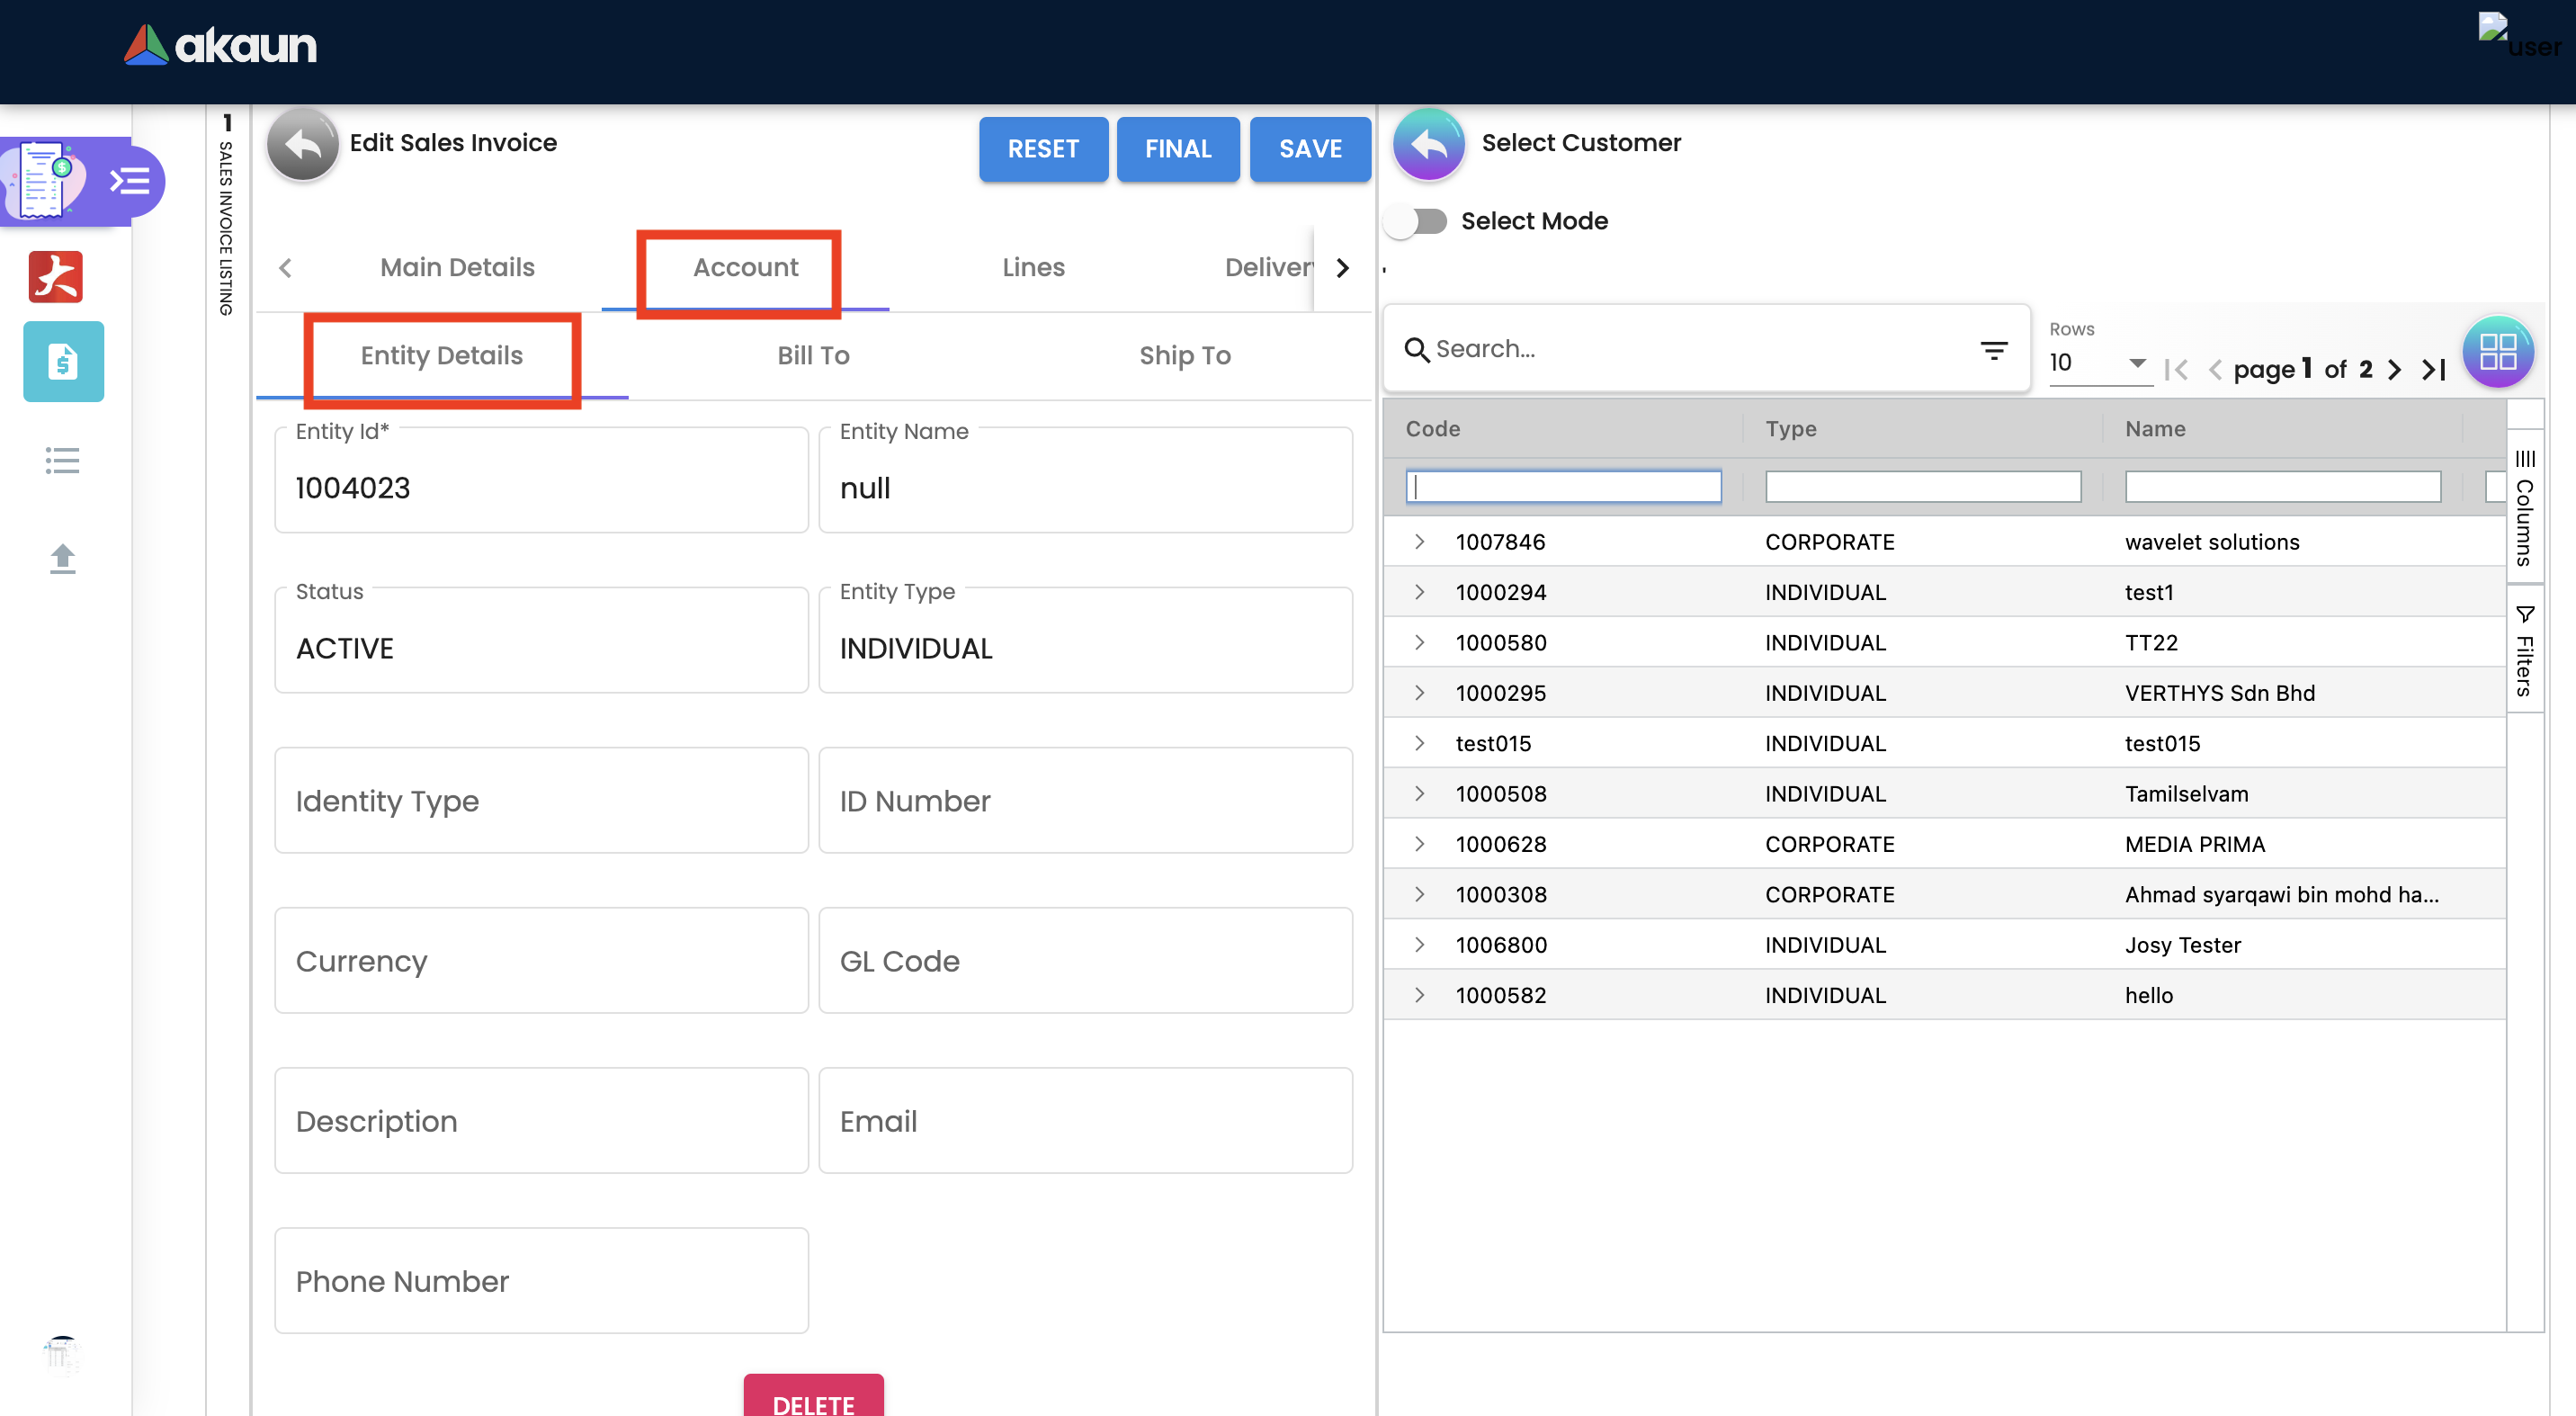
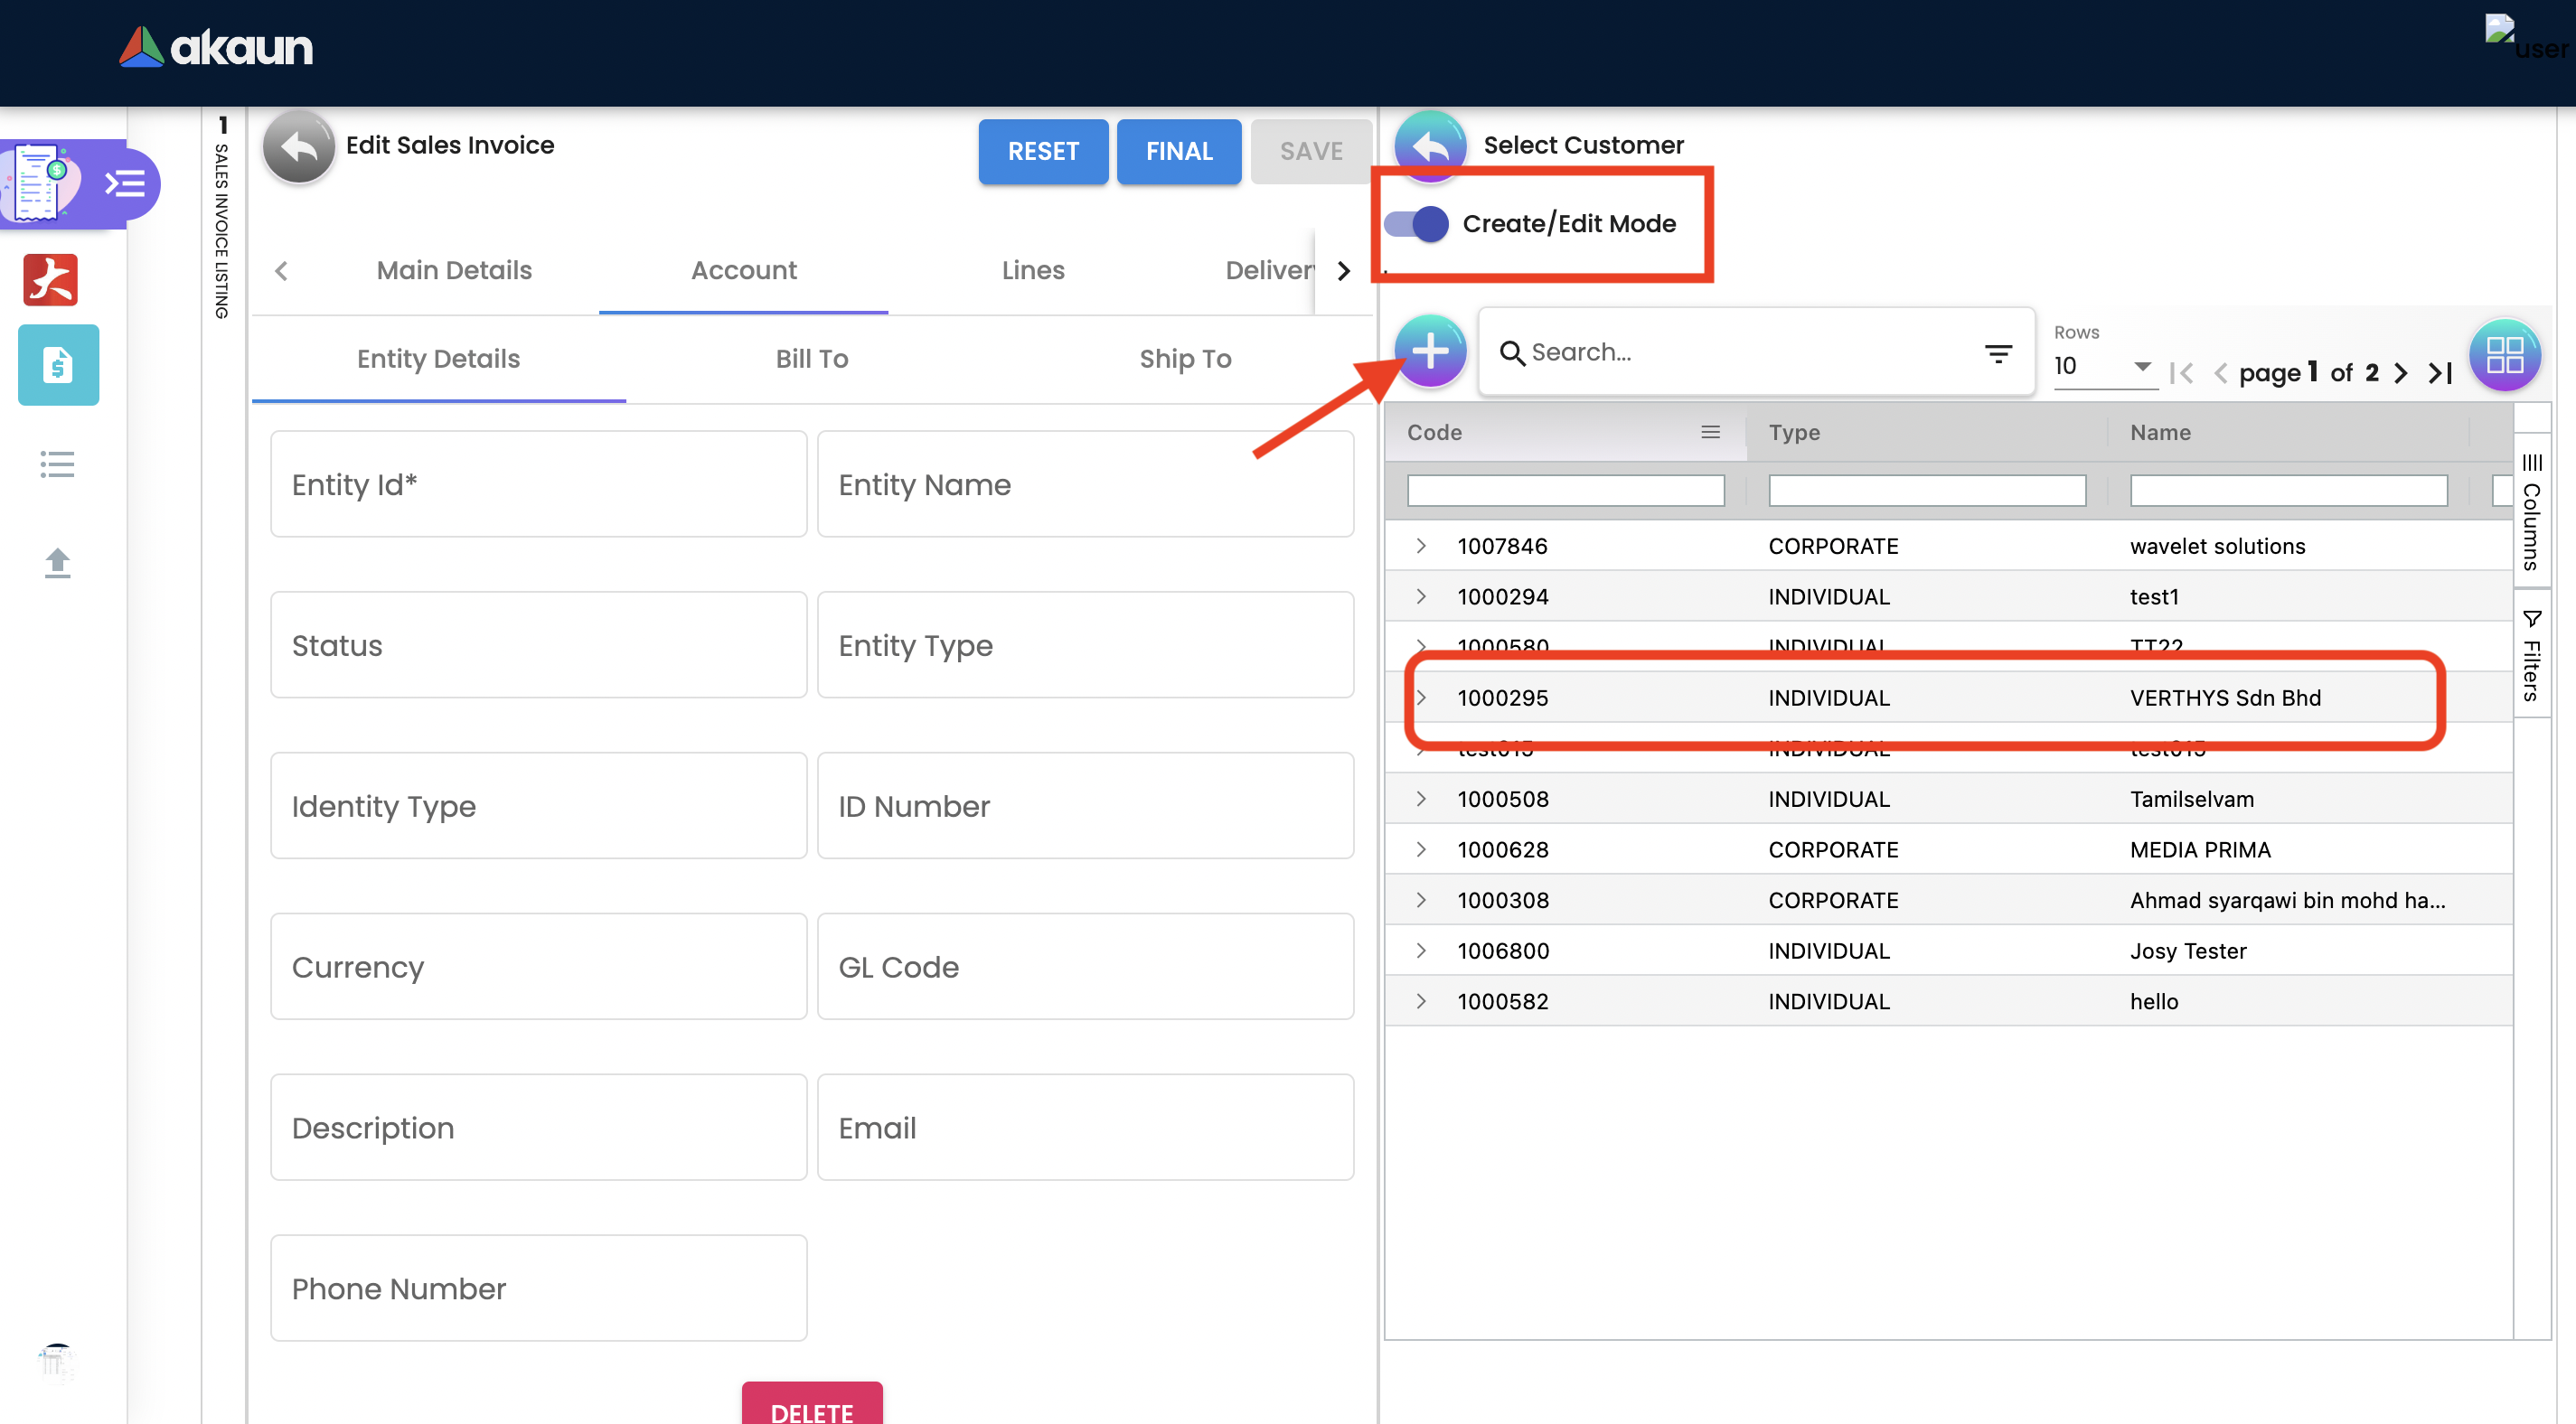
Click on the Entity ID and Search Customers from the list.
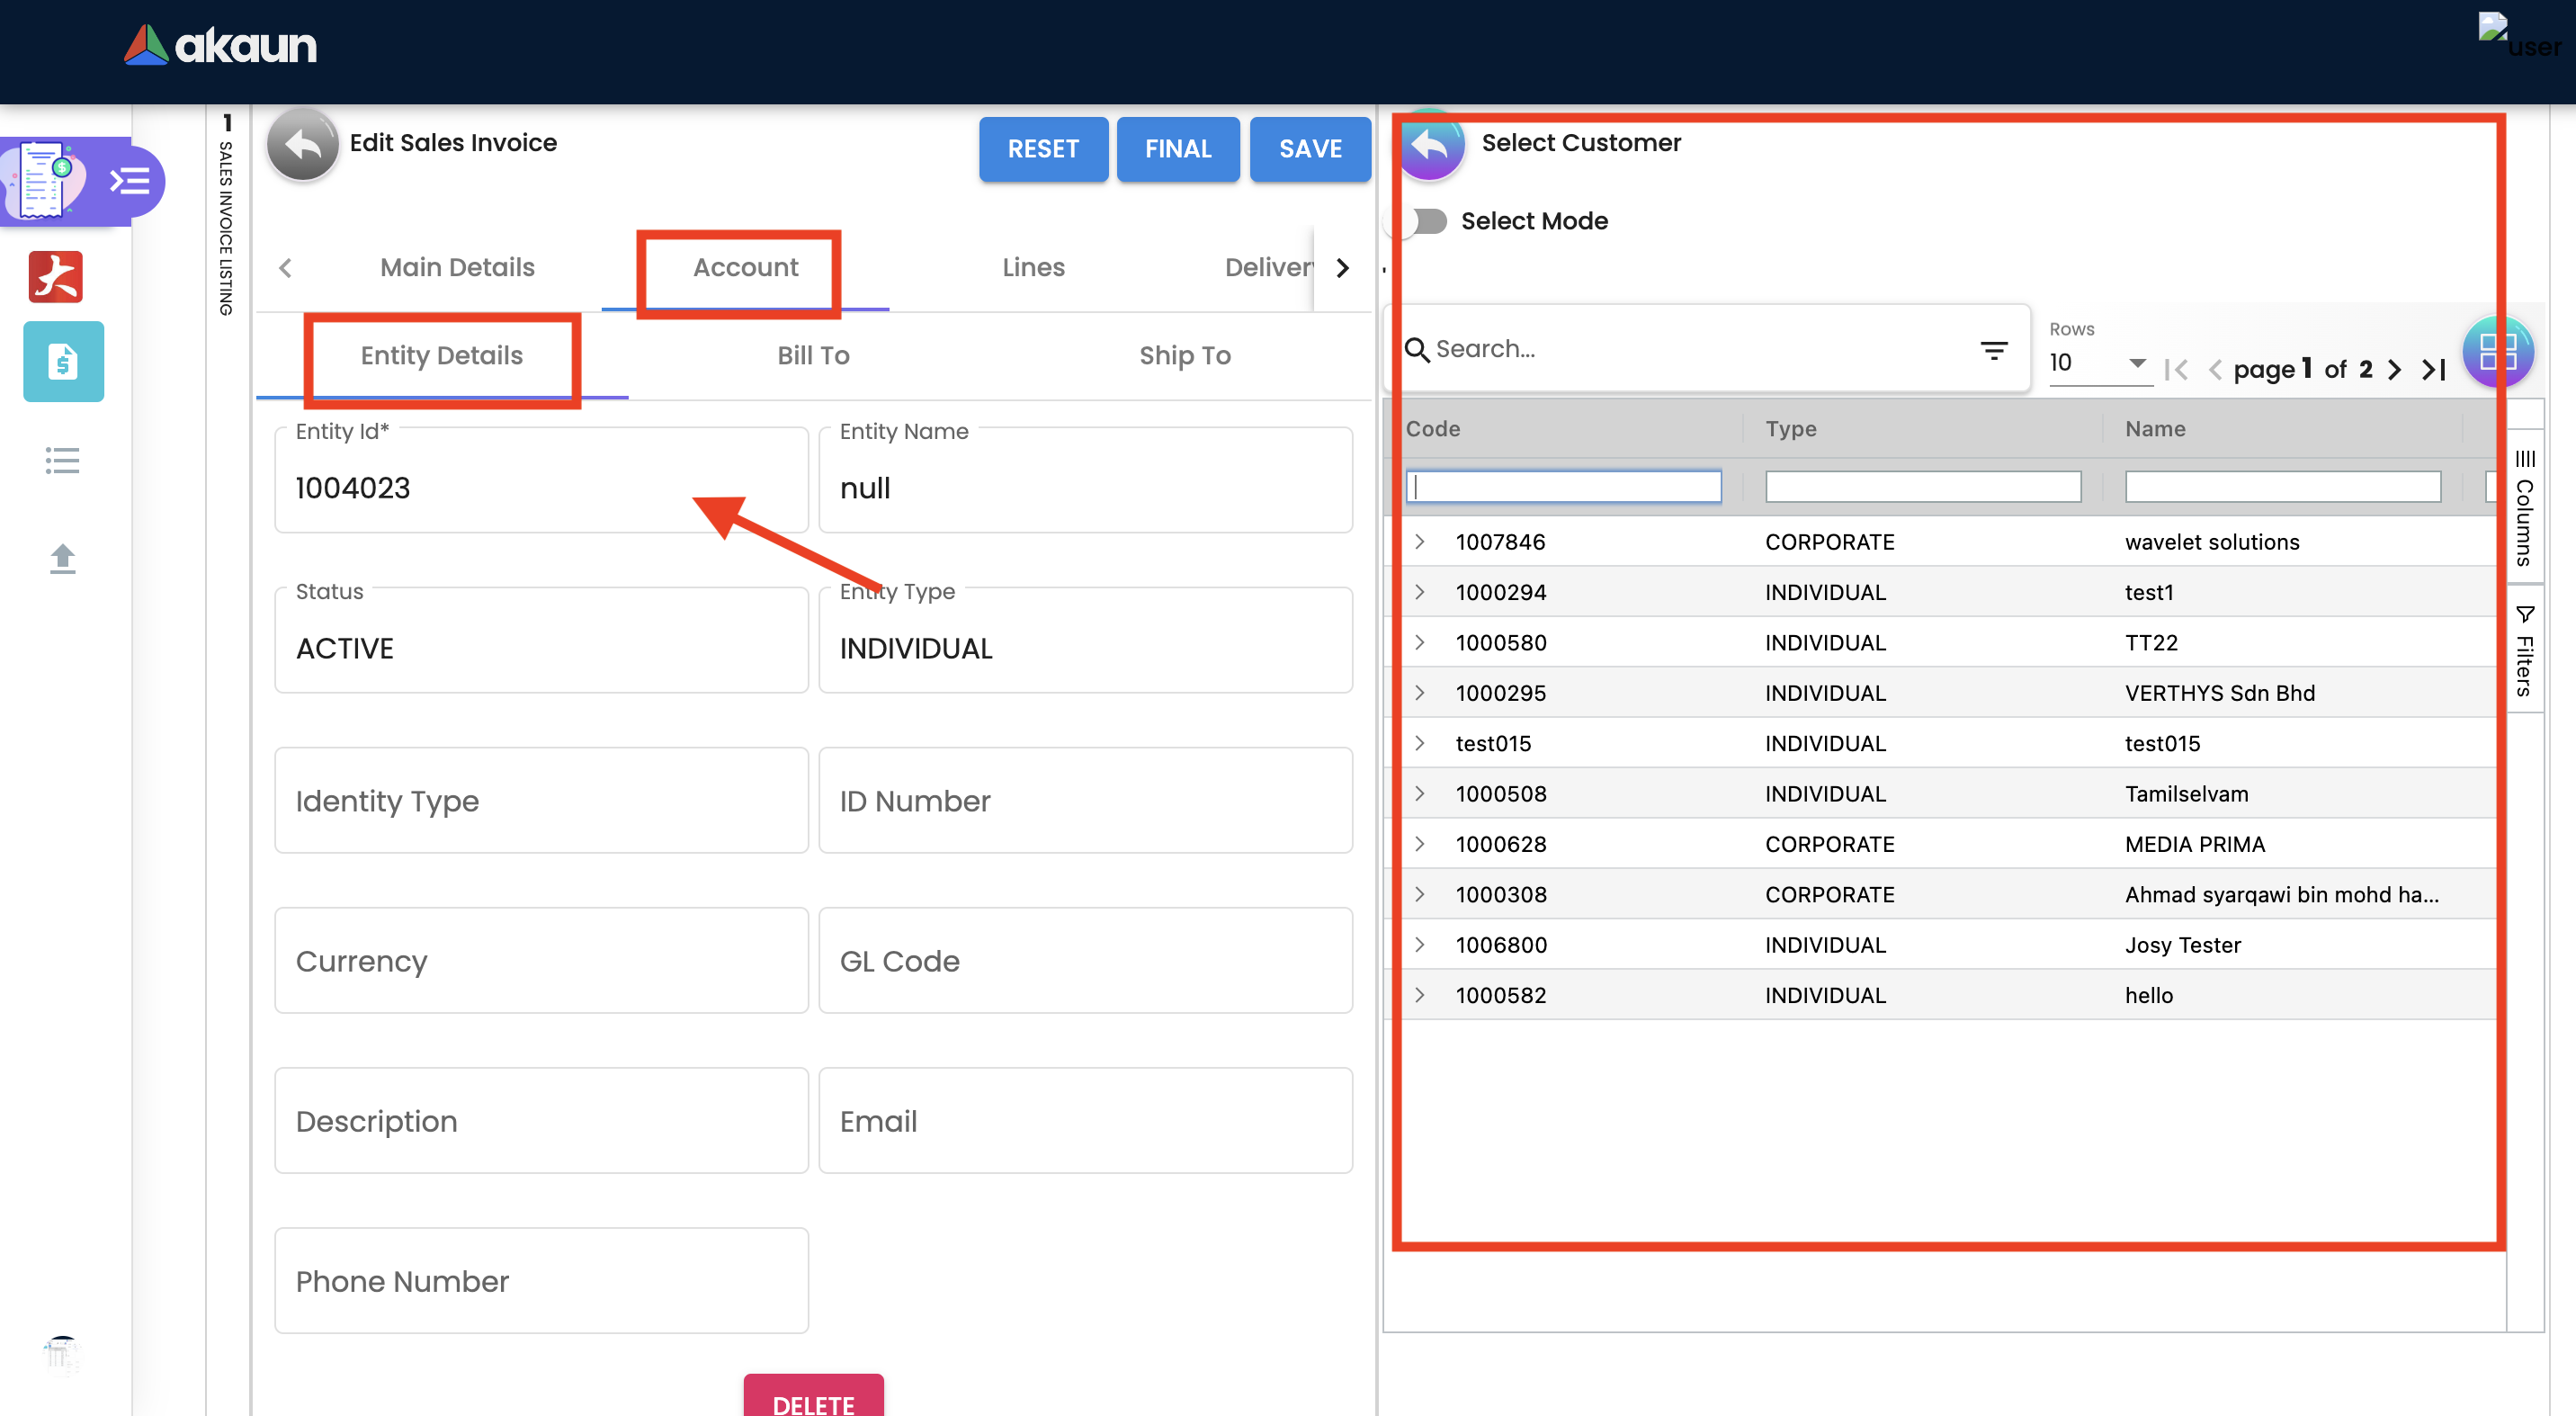
Upon selecting the customer, master record details will be auto-filled. As shown in the screen below.
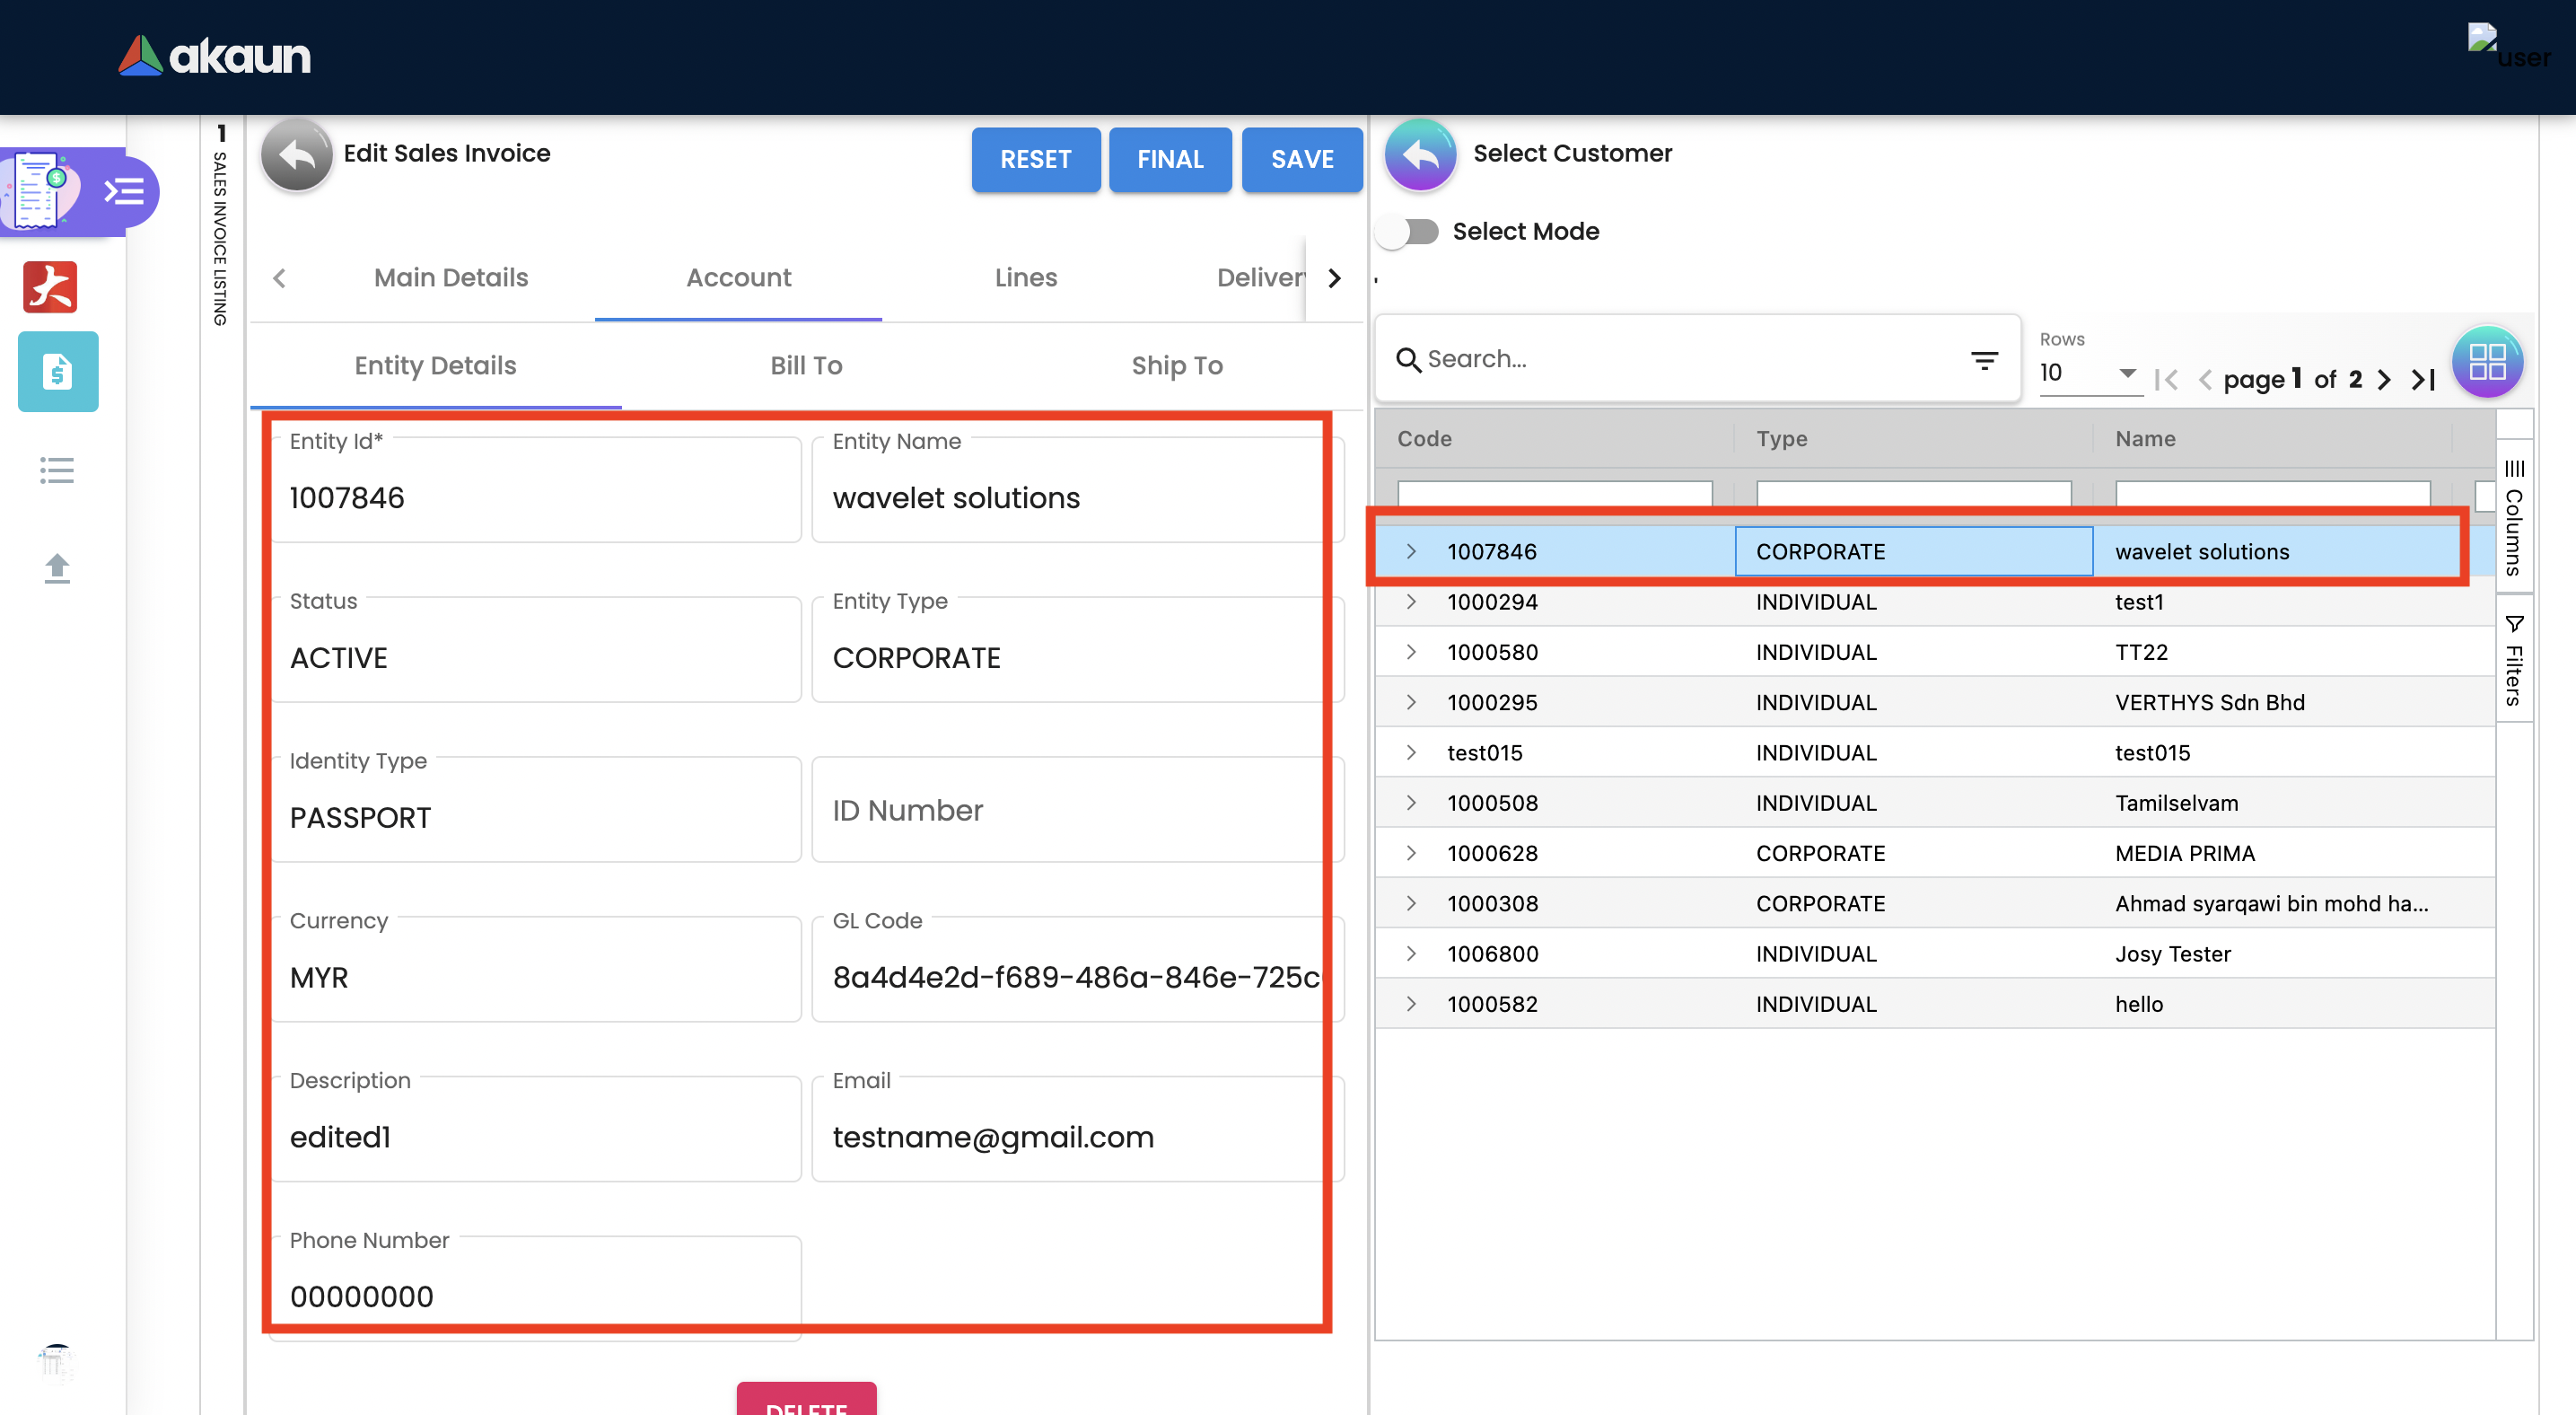
User can create and edit the Customer.
-
Entity Name: Customer Name, auto-filled when customer entity is selected.
-
Status: Active or Inactive. Auto-filled when customer entity is selected.
-
Entity Type: Corporate or Individual. Auto-filled when customer entity is selected.
-
Identity Type: IC or Passport, auto-filled when customer entity is selected. ** ID Number: IC or Passport number, auto-filled when customer entity is selected.
-
Currency: To determined based on the pricing condition what you are maintaining. Auto-filled when customer entity is selected.
-
GL Code: A number used to record business transactions in the general ledger. Auto-filled when customer entity is selected.
-
Description: Additional notes. Auto-filled when customer entity is selected.
-
Email: A central email through which customers want to communicate. Auto-filled when customer entity is selected.
-
Phone Number: A central phone number through which customers want to communicate. Auto-filled when customer entity is selected.
2.4.2.2 Bill To
A bill to is the customer who pays for the sales order. It can be different than the sold-to customer.
In order to proceed, kindly make sure the addresses are defined in the customer maintenance applet.
Based on the entity selected, the bill to details gets auto-filled and are editable.
Click on the billing address.
Upon selecting the address, the billing address details get auto-filled and are editable.
2.4.2.3 Ship To
A ship to is the customer who receives the specified goods and/or services in the sales order. It can be different than the sold-to customer.
In order to proceed, kindly make sure the addresses are defined in the customer maintenance applet.
Based on the entity selected, the bill to details gets auto-filled and are editable.
Click on the shipping address.
Upon selecting the address, the shipping address details get auto-filled and are editable.
2.4.3 Lines Tab
Lines tab is used to select the line to be knocked off. This is for knocking off at the line level.
Before using Line tab, user need to go to Organization applet to enable the settings.
The documents are only visible if configured in the organisation applet and on finalising a document.
After enabling settings, go to the Sales Invoice Applet to add the Lines. There user will see two tabs:
-
Search Item
-
Delivery Order Item
The requested delivery information for the Products specified in the document, including multiple delivery dates (if applicable), location, and responsible person details.
-
Require Delivery : choose from dropdown list: yes or no.
-
Delivery status
-
Delivery Region Code: In order to apply different shipping rules and costs to different geographic locations.
-
Delivery Logic: The mechanism of physical settlement, penalties for delivery default, and timelines for submitting delivery intents are all defined by delivery logic.
-
Delivery ID: A unique identifier for delivery.
-
Planned Delivery Date: It’s the date when you are supposed to deliver things based on the order.
-
Estimate Delivery Date: It’s the date when you are expected to delivery things based on the order.
-
Actual Delivery Date: It’s the date when you are actually deiverying things based on the order.
-
Delivery PIC Name: It’s name of the delivery person in charge.
-
Delivery PIC Contact: It’s contact of the delivery person in charge.
-
Delivery Remarks: Additional notes/remarks for delivery.
2.4.4 Delivery Trips Tab
Delivery trips report for the particular sales invoice is displayed here.
-
Trip No: A unique number generated and assigned to a scheduled trip.
-
Driver Name: ”Coach man” or "vehicle operator."
-
Vehicle No: A series of letters and numbers assigned to a vehicle, at the time of registration.
-
Job Start Date: The official date on which a person begins their delivery job.
-
Job End Date: The official date on which a person finishes their delivery job.
-
Delivery Status: If the delivery item was successfully delivered to the addressee.
-
Recipient Name: The person’s name that receives.
2.4.5 Settlement Tab
Transaction in which the sales order is fully or partially settled.
Click on the '+' button to Add a New Settlement
Select the Settlement method
Based on the settlement type, the user needs to key in the required fields.
Click the 'Add' button to record the settlement against the sales order:
Once added, a new row will be created under the Settlement tab and the Total and Outstanding amounts will be updated accordingly. User may click on the Save button to record the changes.
2.4.6 Department Hdr Tab
Linking the sales invoice to the following departments is optional and helps in reports:
Segment: Segmentation at the item or hdr level
Dimension: Selecting dimension at the item or hdr level
Profit center: Selecting profit center at the item or hdr level
Project: Selecting project at the item or hdr level
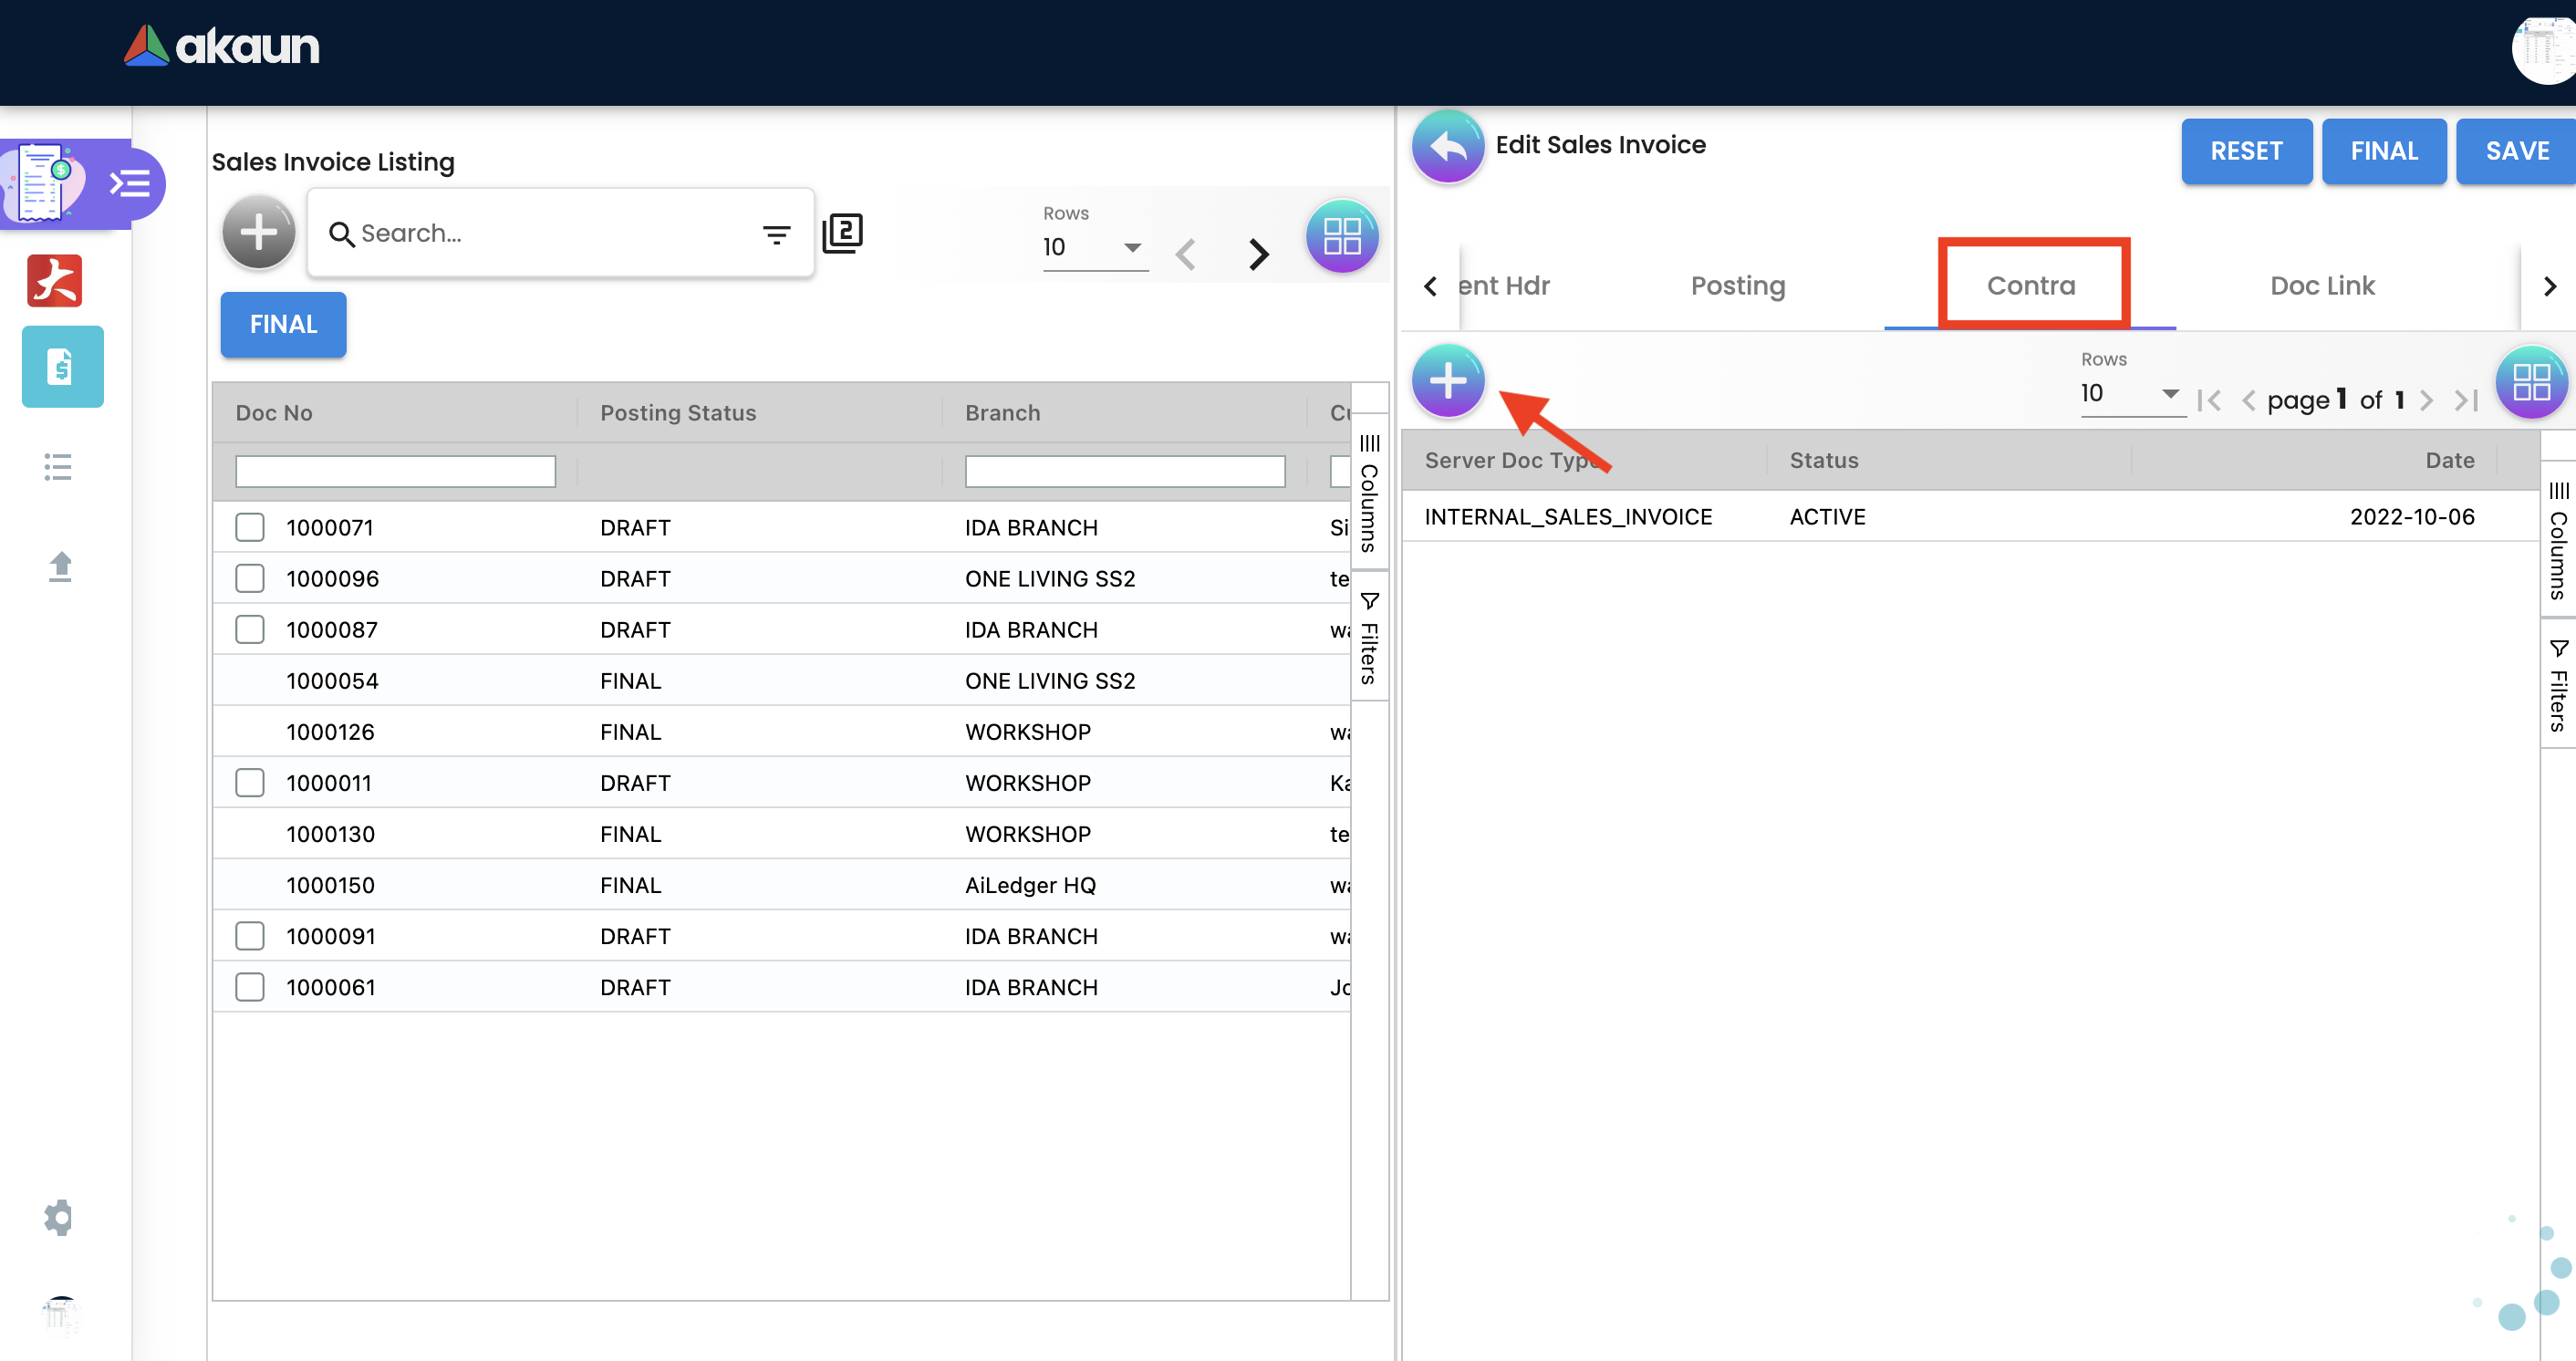
2.4.8 Contra Tab
In order to create Contra, users need to click "+" button, it will open the second page where you select the document to add Contra amount.
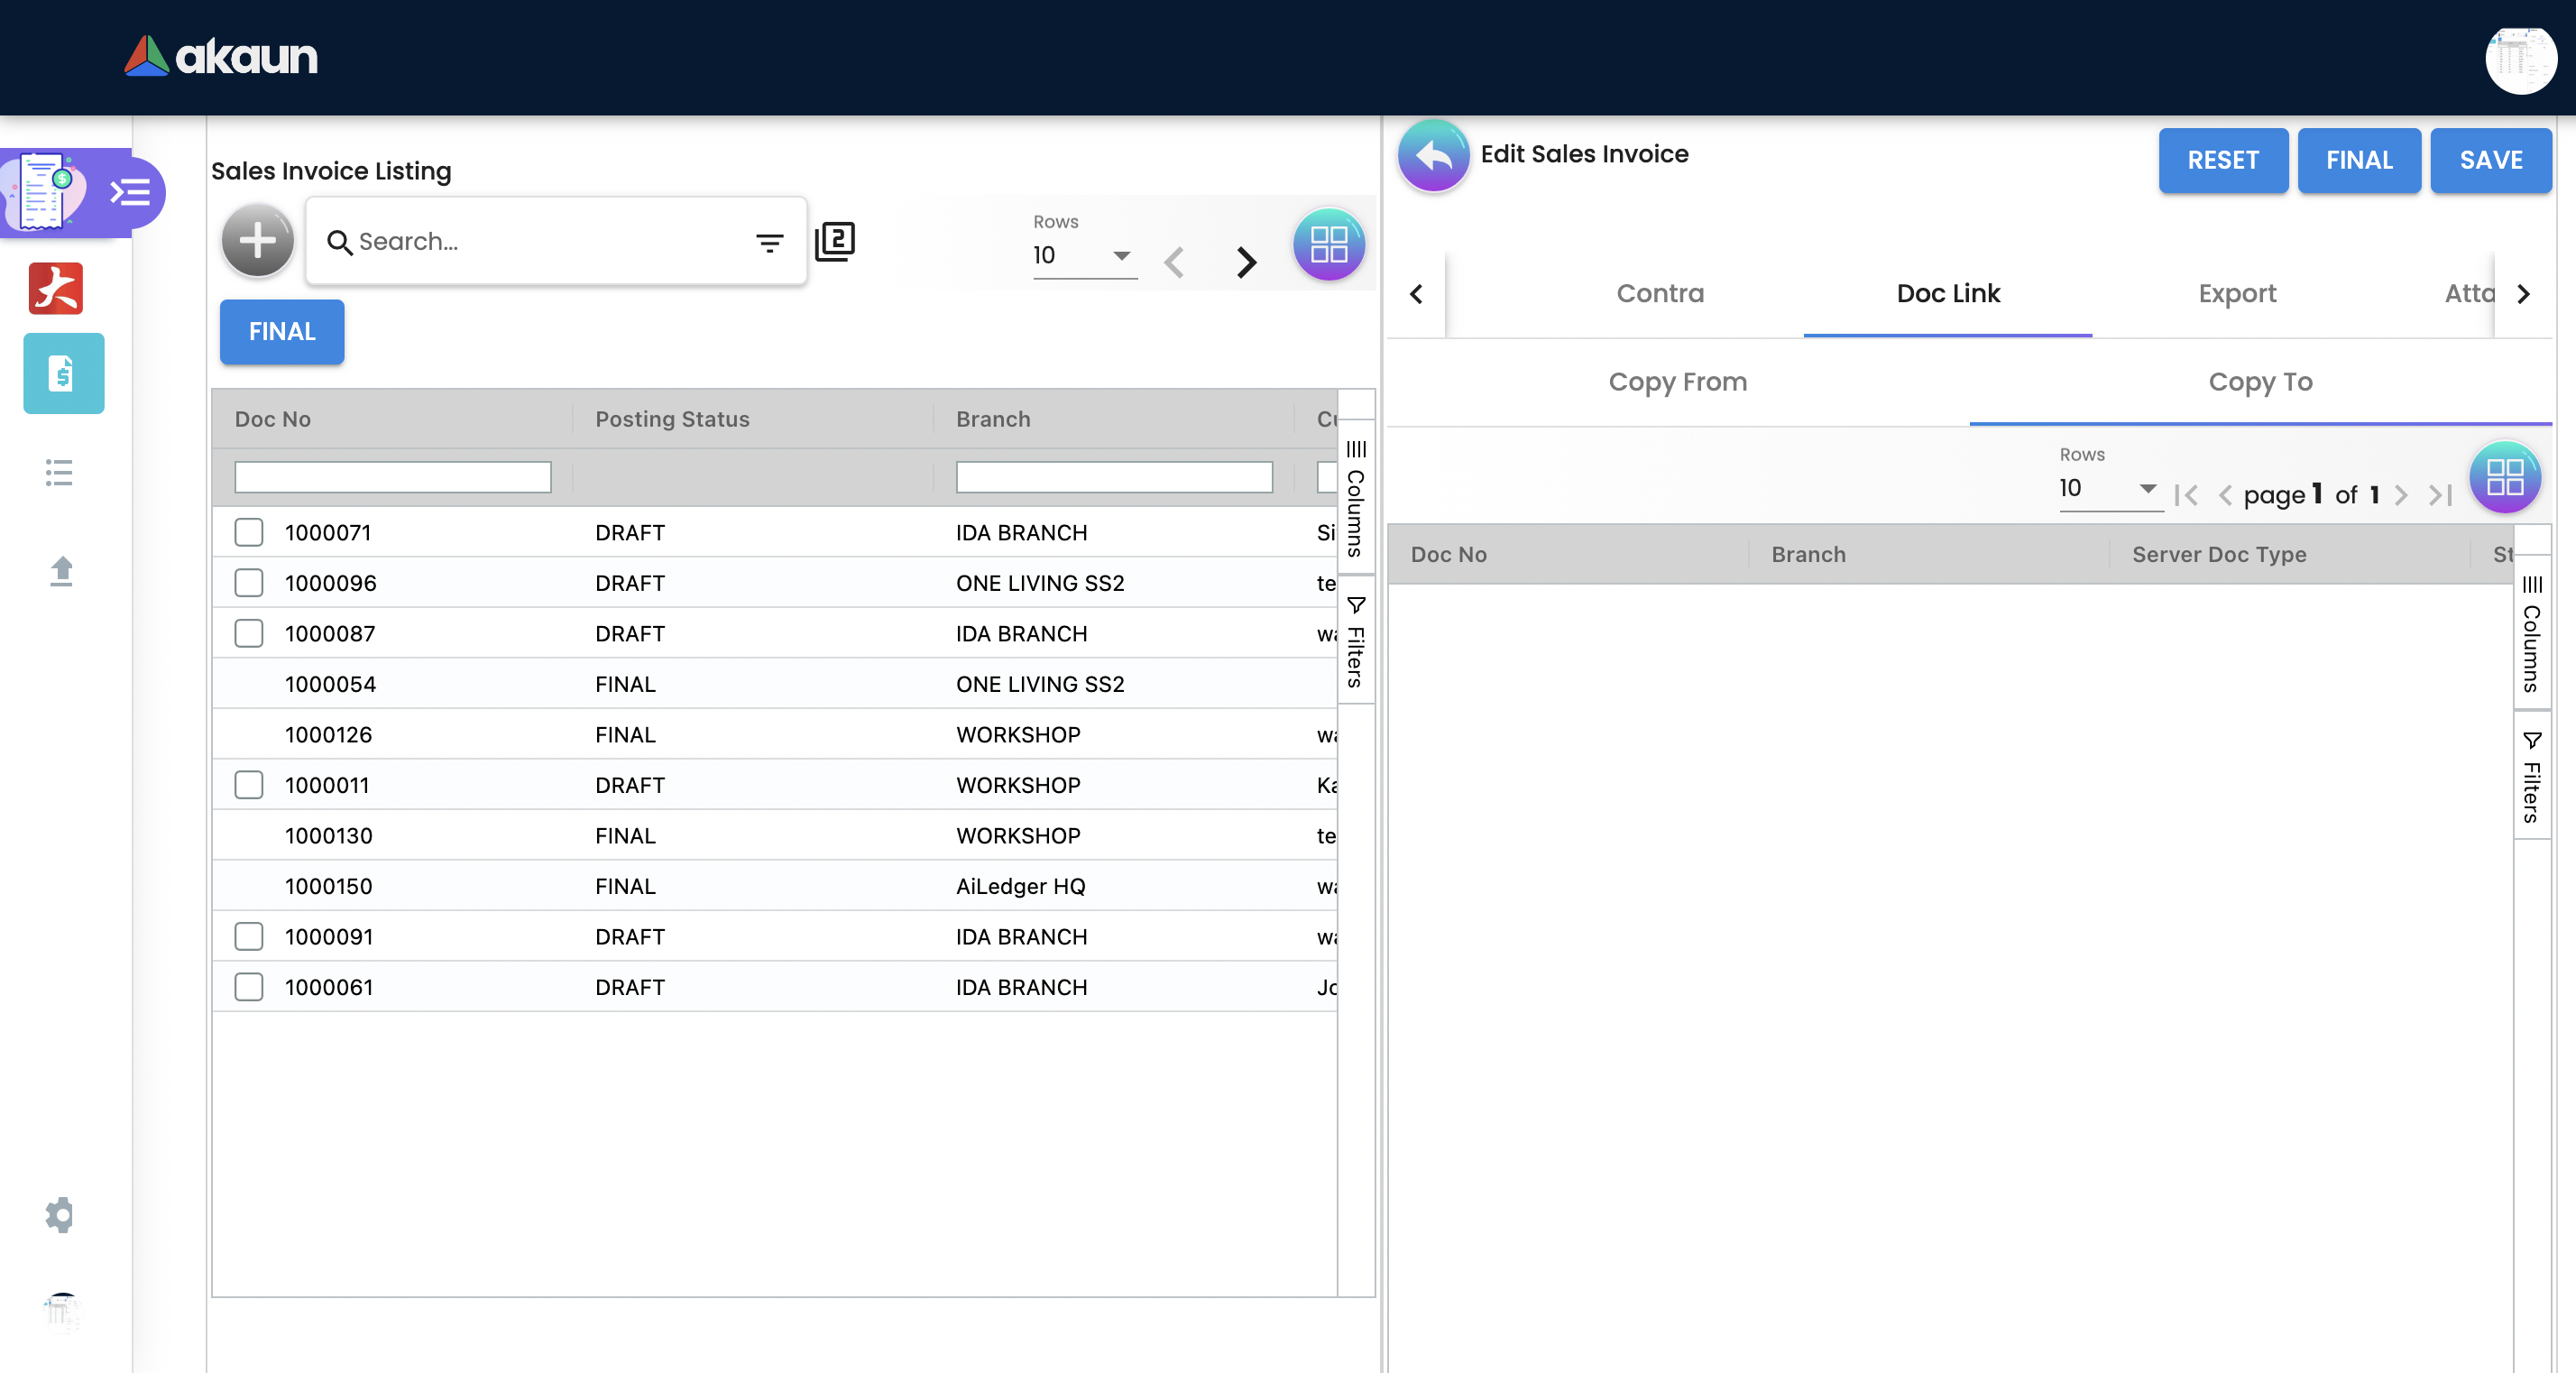
2.4.9 Doc Link Tab
Doc Link is used to show either the selected line item have link with other Gen doc Line Item
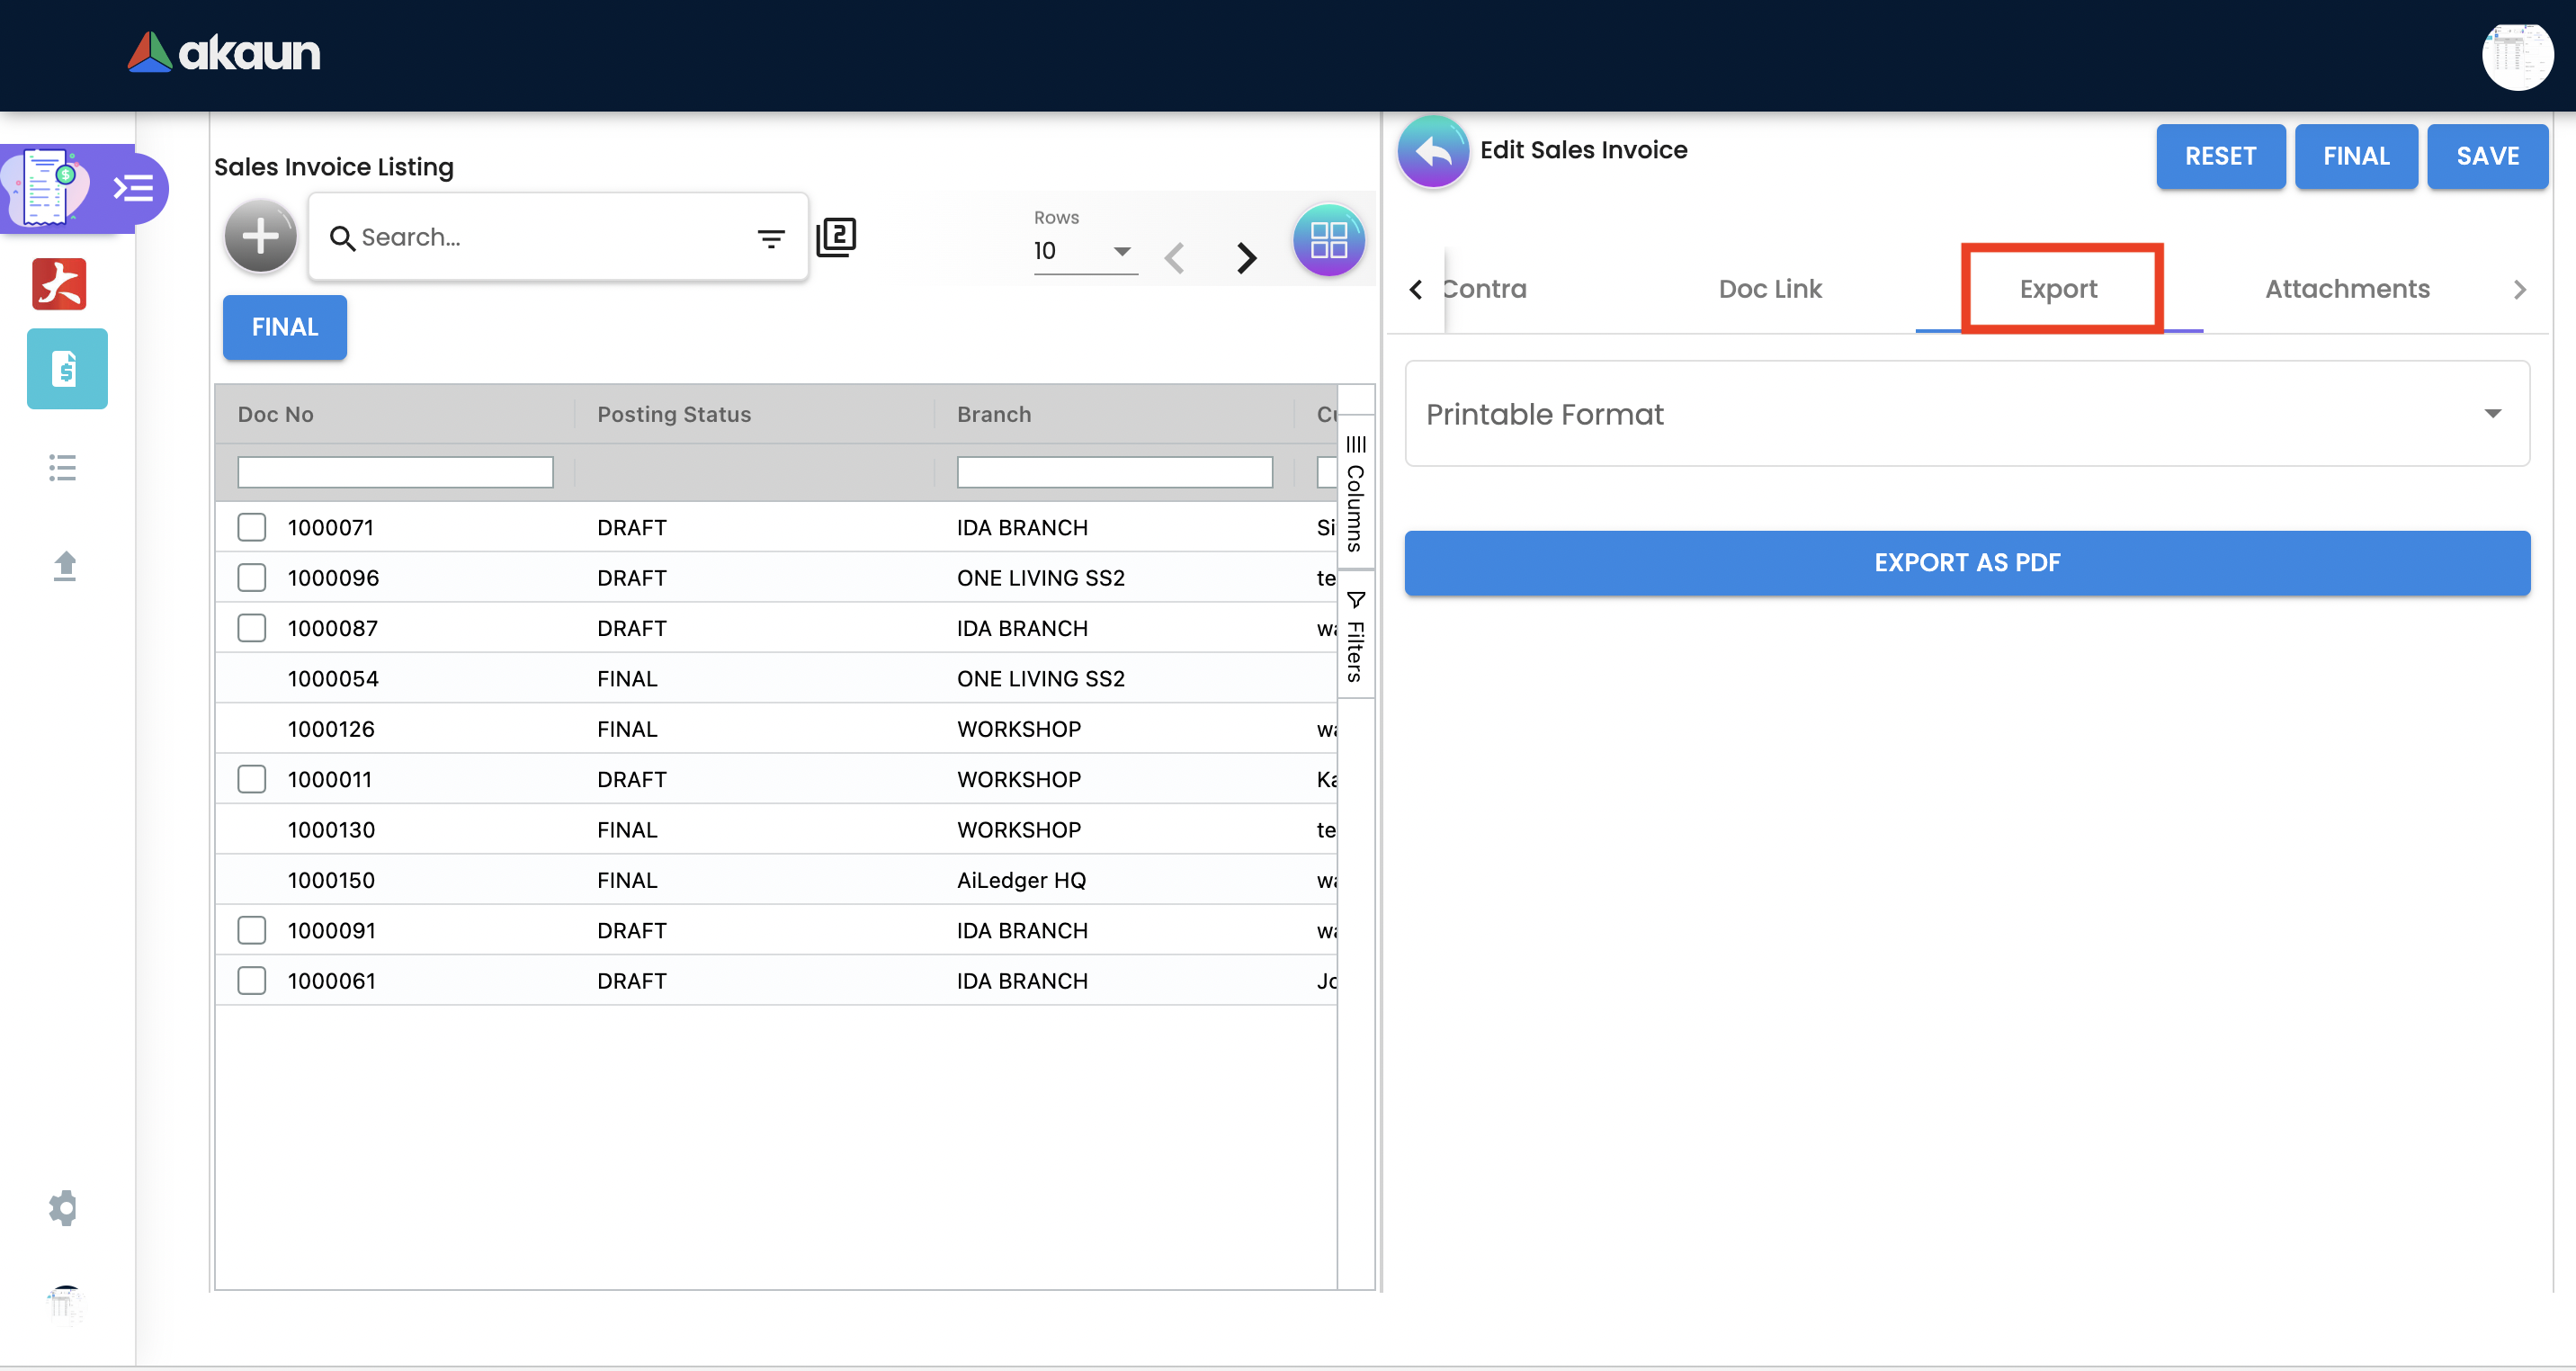
2.4.10 Export Tab

The Document can be exported to PDF files.
Go to the export tab. Choose the Printable format from dropdownn lis and click on the Export PDF button.
Upon exporting the documents, the system will show a success message, and users will be able to view the file that has been downloaded to their device.